Tutorial: Database Connection in SnapDevelop
Introduction
SnapDevelop supports the following database types: SQL Anywhere, HANA, Informix, MySQL, Oracle, PostgreSQL, Adaptive Server Enterprice, SQL Server, and SQLite. Please refer to Database server requirements for detailed information about the supported database versions.
This tutorial shows how to connect to different types of database in SnapDevelop.
Here are some information that you shall be noticed before reading this tutorial:
The database servers to be connected should be configured properly
SnapDeveop is installed in a Windows 10 x64 machine in this tutorial
ODBC Data Source (64-bit) is used whenever ODBC is needed in this tutorial
IP address in this tutorial should be replaced with your actual IP address
The Database Connection dialog box can be opened by selecting the SnapDevelop menu: View > DB Server Explorer, then clicking the Connect to the database icon in DB Server Explorer, and then clicking the New button.
The same Database Connection dialog box will also pop up when you create a DataContext, perform a SQL query, or use the DW Converter.
Connecting to the SQL Anywhere database
Configuring ODBC for SQL Anywhere
To configure ODBC for SQL Anywhere (using SQL Anywhere 17 as an example):
- Install the ODBC driver of SQL Anywhere 17.
- Open the ODBC Data Source Administrator (64-bit) tool (in the Windows search bar (or press Win + Q), type "ODBC" and then select ODBC Data Source (64-bit)).
- On the System DSN tab, click Add. In the Create New Data Source dialog, select SQL Anywhere 17 driver which was just installed, and then click Finish.

- Configure the ODBC settings by following the numerical order in the figures shown below. Remember to replace the database info with your own ones.
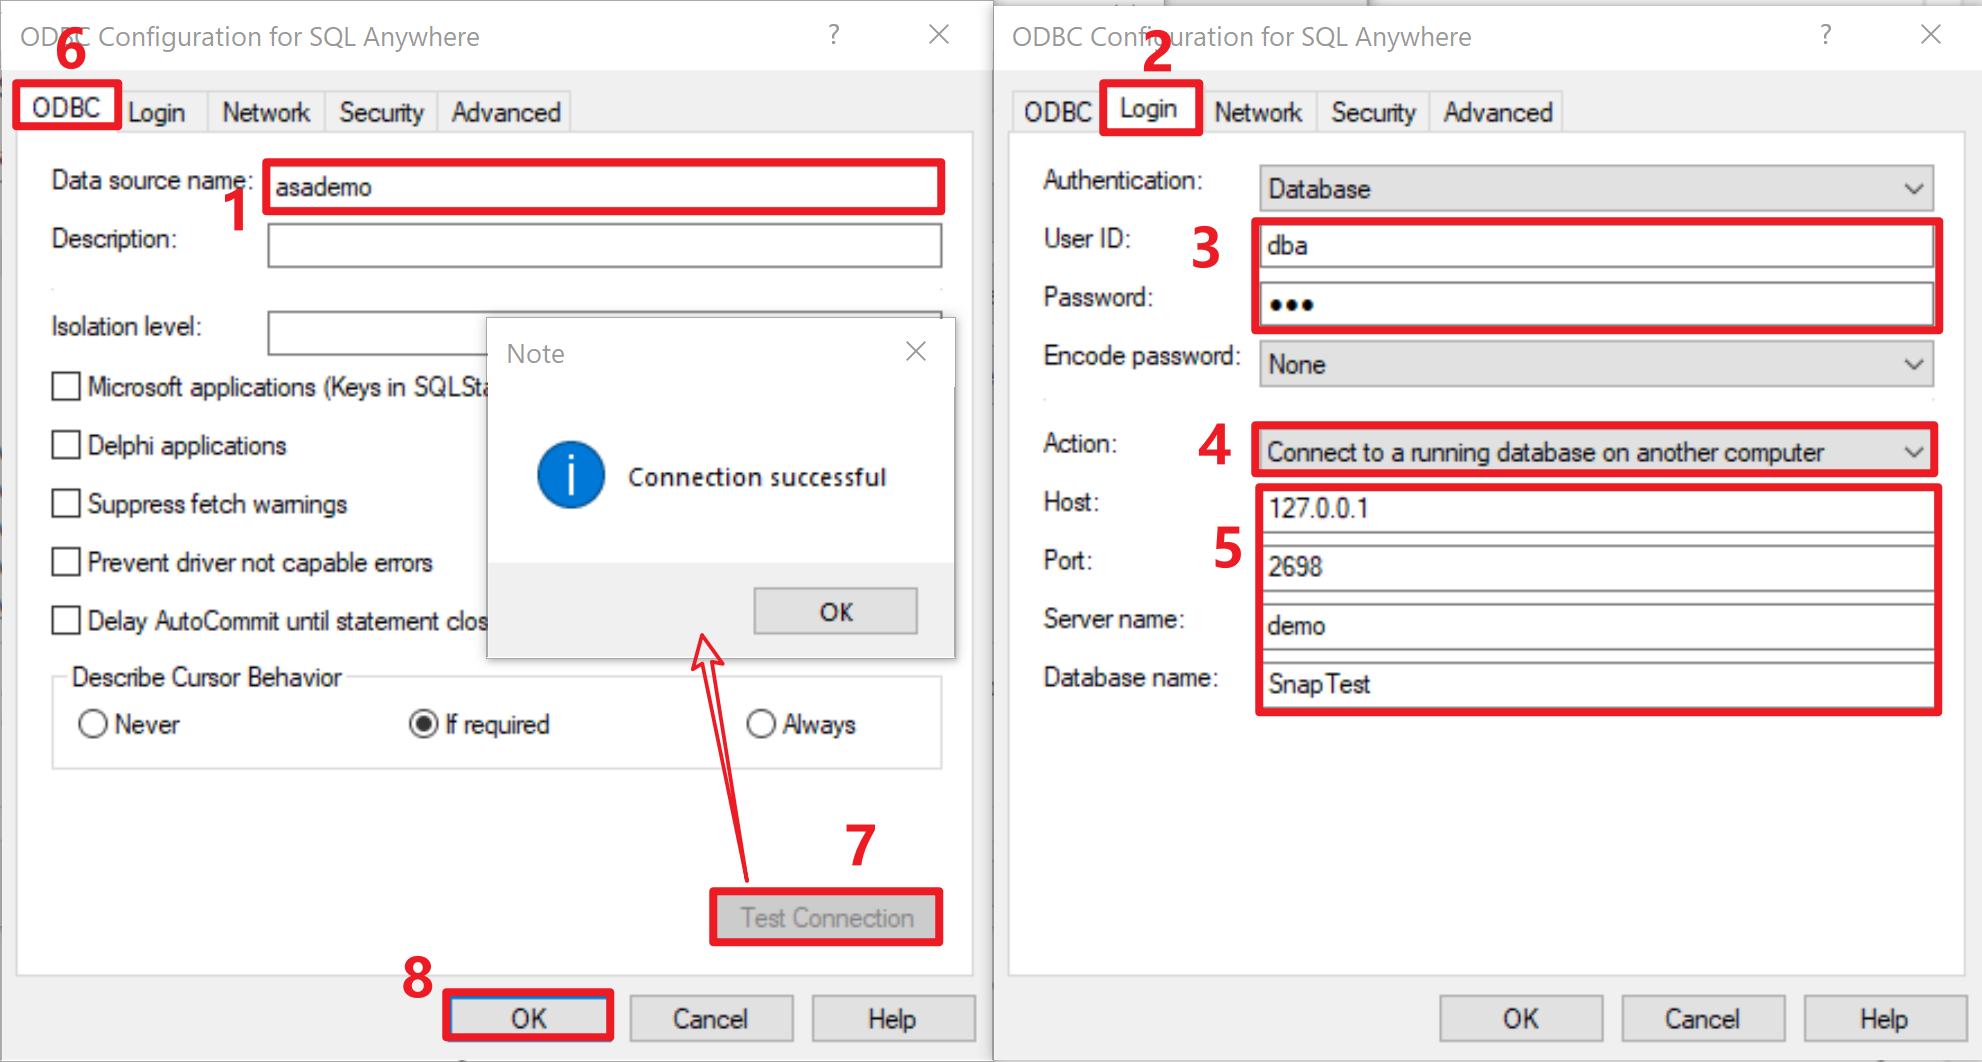
Connecting to SQL Anywhere database in SnapDevelop
After the ODBC data source is created successfully, you should be able to select it in the Database Connection dialog box. Proceed with the following steps:
- In the Database Connection dialog box, select SQL Anywhere (ODBC) from the Database provider list and then select the data source created just now from the Use user or system data source name list.
- Enter the Username and Password for the database connection.
- Click Test Connection to make sure the connection is successful.

Connecting to the HANA database
Configuring ODBC for HANA
To configure ODBC for HANA (using the HDBODBC driver as an example):
- Install the latest HDBODBC driver for HANA (using HDBODBC 2.0 as an example, HDBODBC 1.0 is no longer supported).
- Open the ODBC Data Source Administrator (64-bit) tool (in the Windows search bar (or press Win + Q), type "ODBC" and then select ODBC Data Source (64-bit)).
- On the System DSN tab, click Add. In the Create New Data Source dialog, select HDBODBC driver which was just installed, and then click Finish.
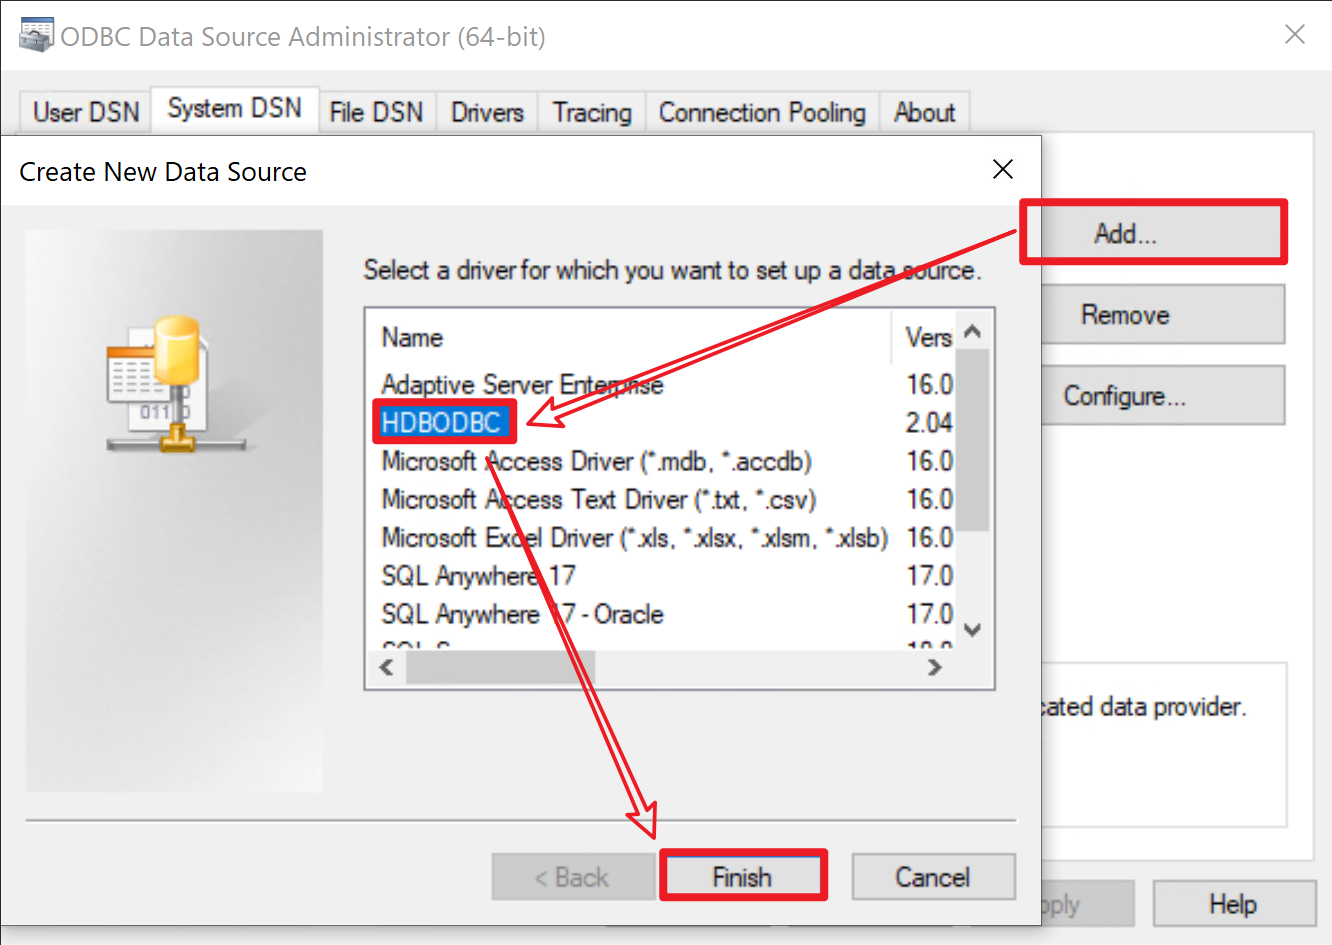
- Configure the settings according to the figure shown below. Remember to replace the database info with your own ones.
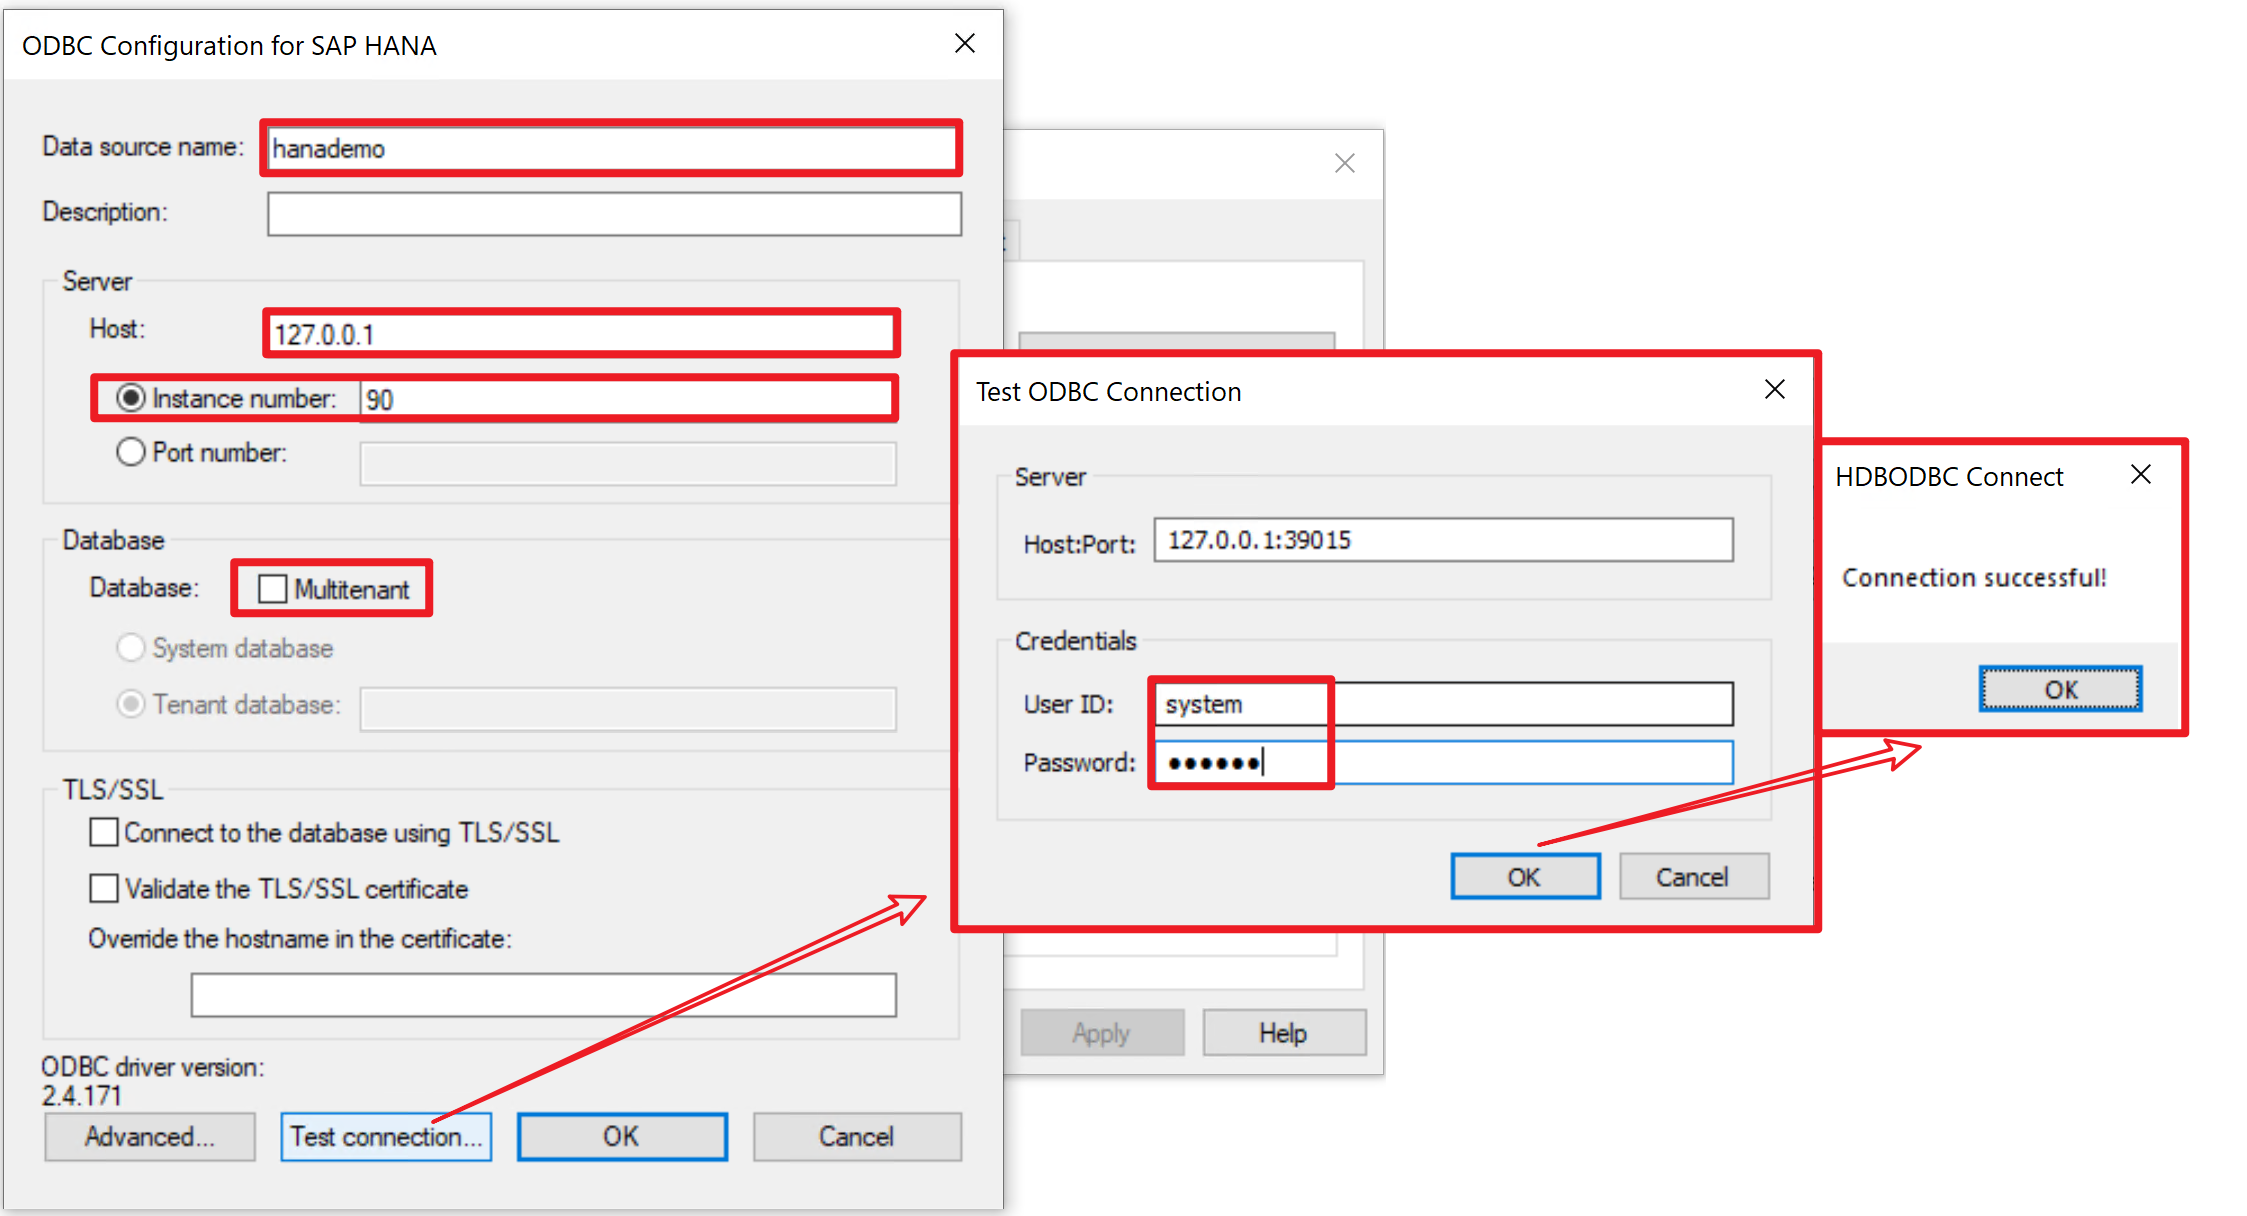
Connecting to the HANA database in SnapDevelop
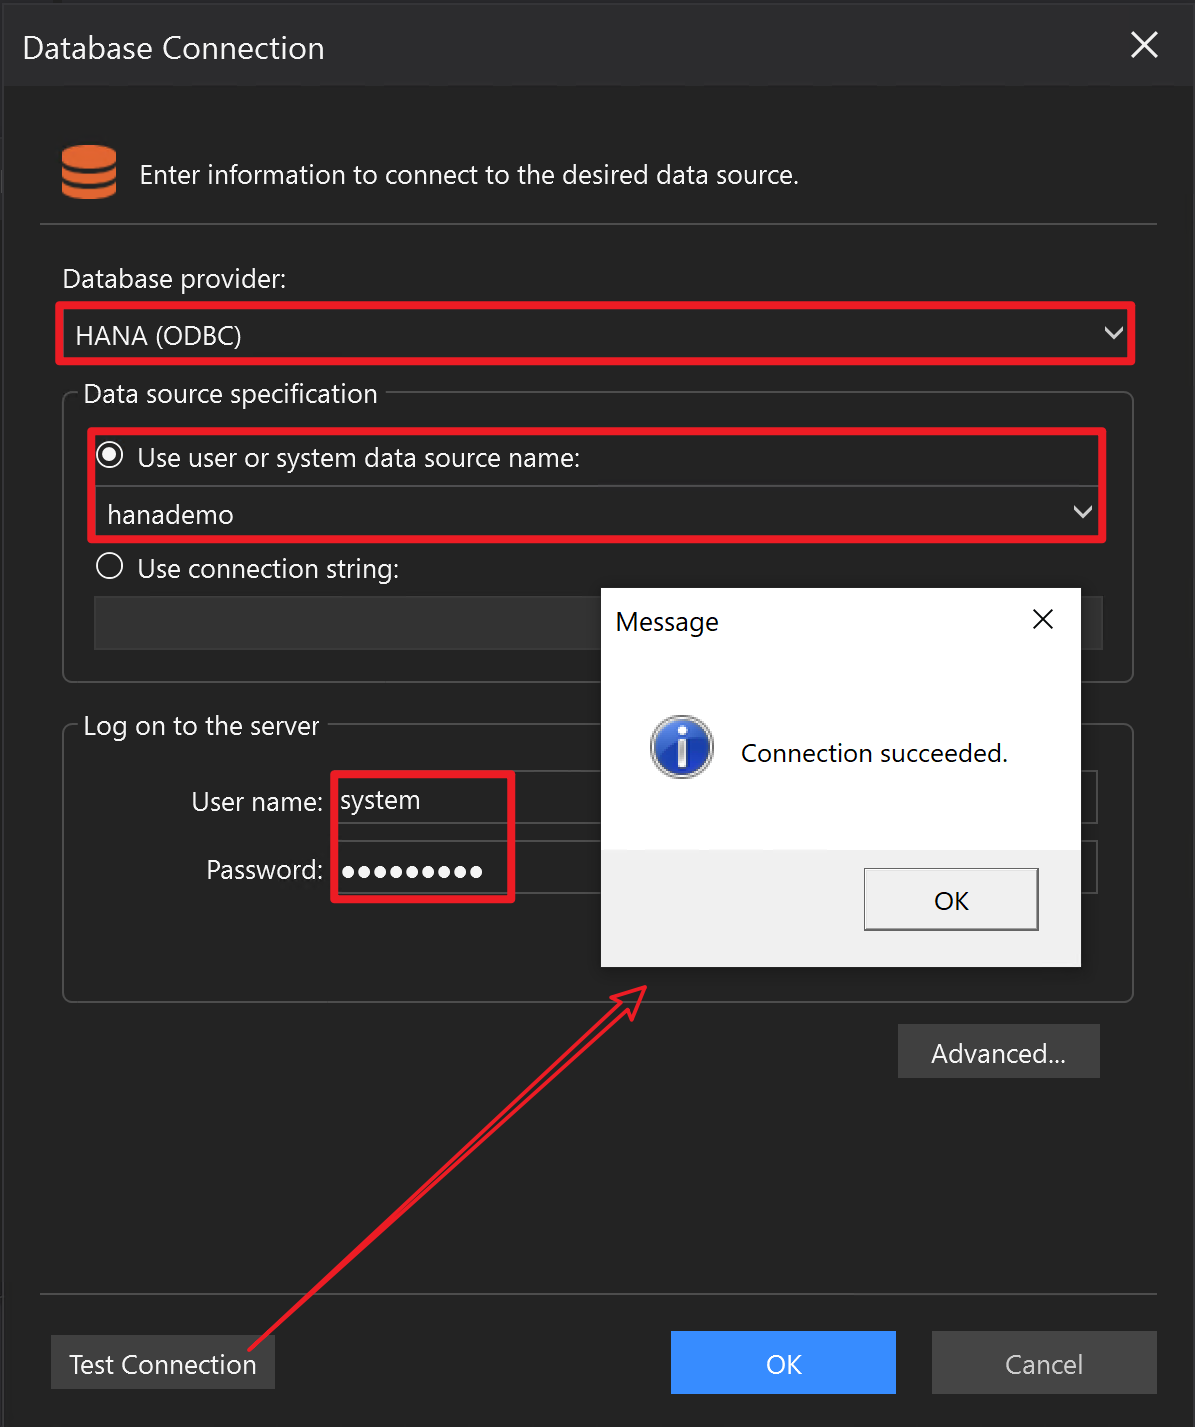
After the ODBC data source is created successfully, you should be able to select it in the Database Connection dialog box. Proceed with the following steps:
- In the Database Connection dialog box, select HANA (ODBC) from the Database provider list and then select the data source created just now from the Use user or system data source name list.
- Enter the Username and Password for the database connection.
- Click Test Connection to make sure the connection is successful.
Connecting to the MySQL database
Installing the driver
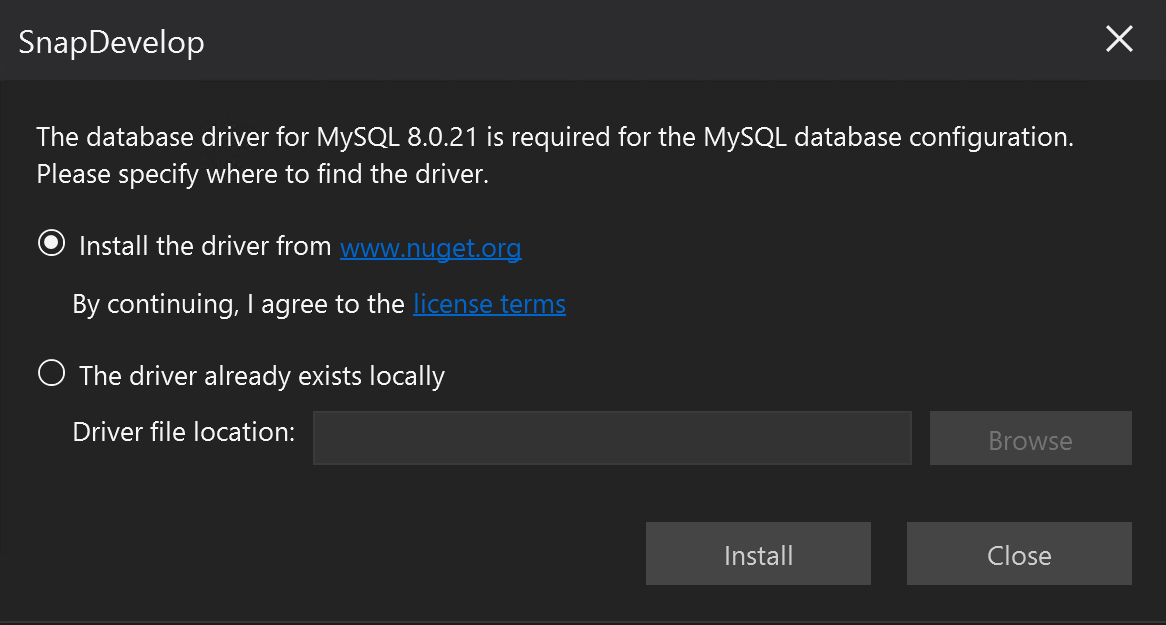
For the first time to connect to the MySQL database in SnapDevelop, you will need to install the corresponding database driver. When you select MySQL from the Database provider list in the Database Connection dialog box, you will be prompted to install the driver from www.nuget.org or specify the location of driver on your local computer.
- If you select to install the driver from www.nuget.org, it indicates that you agree with the license agreement. The MySQL packages will be downloaded from www.nuget.org to your local path (%userprofile%\.sd\19.0\dbDrivers).
- If MySql.Data.dll has already been downloaded from www.nuget.org to your computer, you can select The driver already exists locally and specify the location of the driver (the .dll file must be downloaded from www.nuget.org, otherwise installation will fail).
Connecting to the MySQL database in SnapDevelop
There are two connection methods for the MySQL database: General connection and SSL connection. We will show you how to use these methods.
General connection
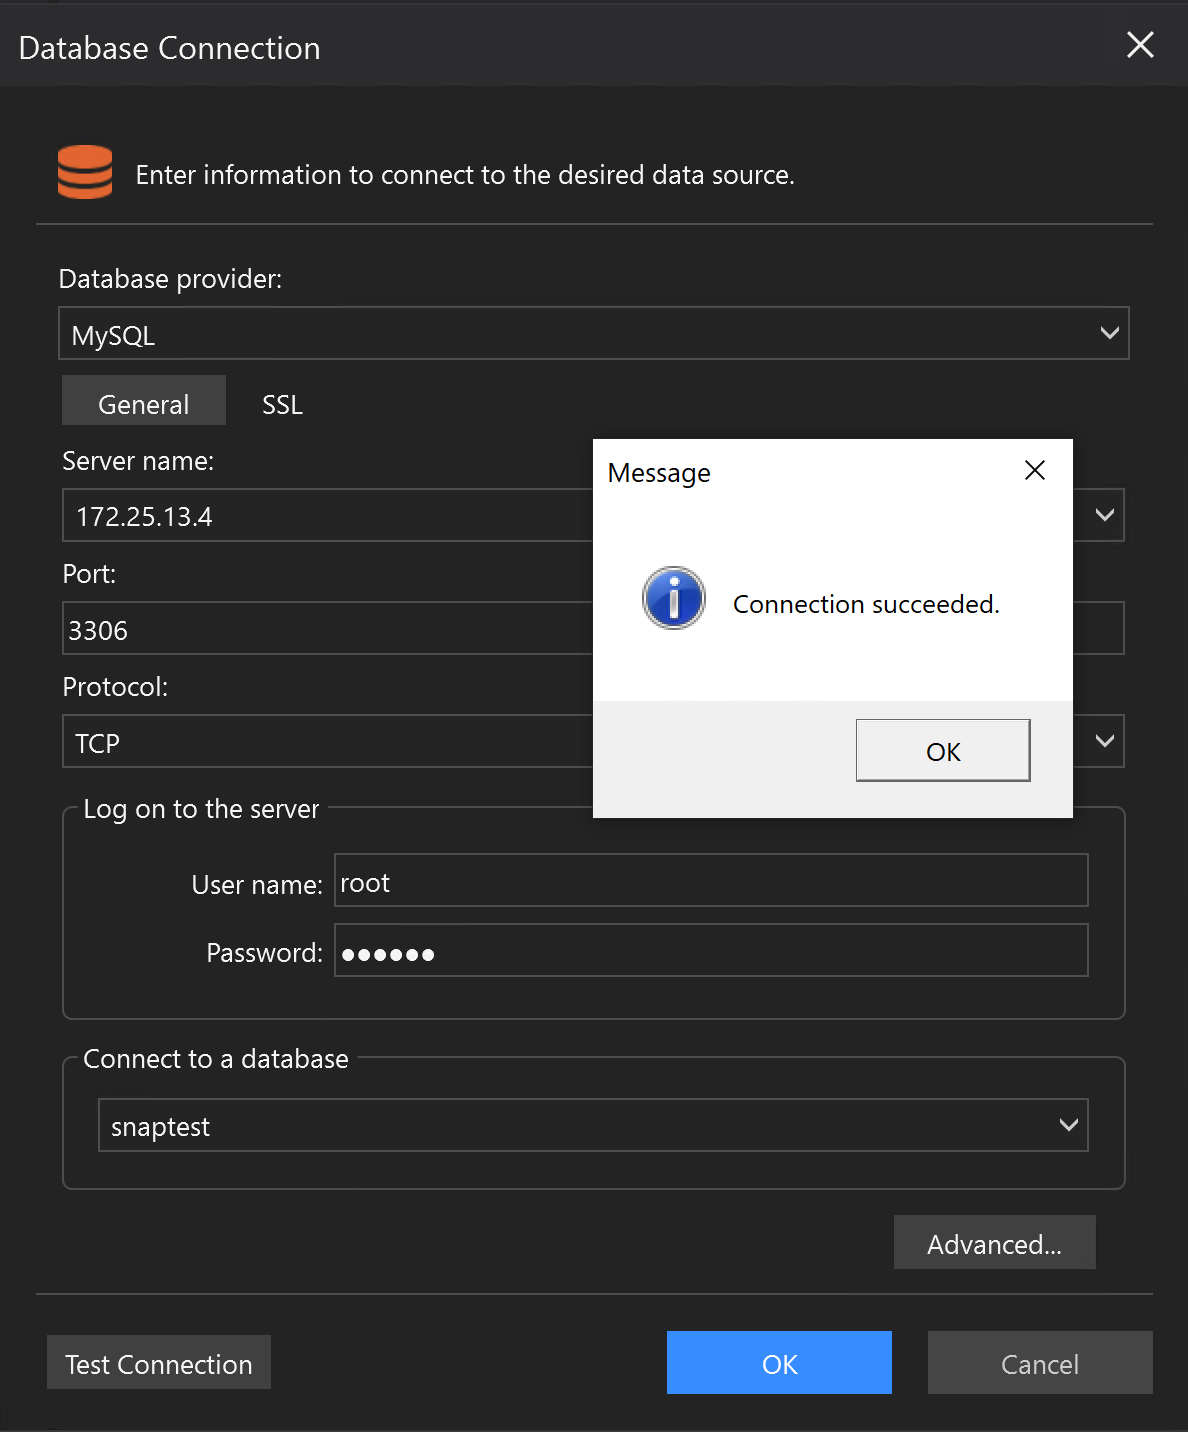
To configure the MySQL database connection using the General method:
- In the Database Connection dialog box, select MySQL from the Database Provider list, and then select General.
- Input your IP address or your machine name to Server name.
- Use the default port number 3306.
- Use the default TCP protocol (To use TCPS, see the next section MySQL SSL connection).
- Enter your Username and Password.
- Select your database name from the Connect to a database list, or enter your database name directly.
- Click Test Connection to make sure the connection is successful.
SSL connection
To configure the MySQL database connection using the SSL method:
In the Database Connection dialog box, select MySQL from the Database Provider list.
Select General, and then input your IP address or your machine name to Server name.
Select SSL, and then select the SSL mode.
SnapDevelop currently supports Preferred and Required mode only.
None -- Client is using an unencrypted connection.
Preferred -- Client attempts to connect using encryption, falling back to an unencrypted connection if an encrypted connection cannot be established.
Required -- Client requires an encrypted connection and fail if one cannot be established.
VerifyCA -- Client requires an encrypted connection and the CA certificate needs to be verified.
VerifyFull -- Client requires an encrypted connection. Both CA certificate and client certificate need to be verified.
For more, refer to Using encrypted connections.
Specify the SSL private key.
Specify the SSL CA certification.
Specify the SSL certification.
Click Test Connection to make sure the connection is successful.
Connecting to the Informix database
Installing the driver
For the first time to connect to the Informix database in SnapDevelop, you will need to install the corresponding database driver. When you select Informix from the Database provider list in the Database Connection dialog box, you will be prompted to install the driver from www.nuget.org or specify the location of driver on your local computer.
- If you select to install the driver from www.nuget.org, it indicates that you agree with the license agreement. The Informix packages will be downloaded from www.nuget.org to your local path (%userprofile%.sd\19.0\dbDrivers).
- If the driver has already been downloaded from www.nuget.org to your computer, you can select The driver already exists locally and specify the location of the driver (the .dll file must be downloaded from www.nuget.org, otherwise installation will fail).
Connecting to the Informix database in SnapDevelop
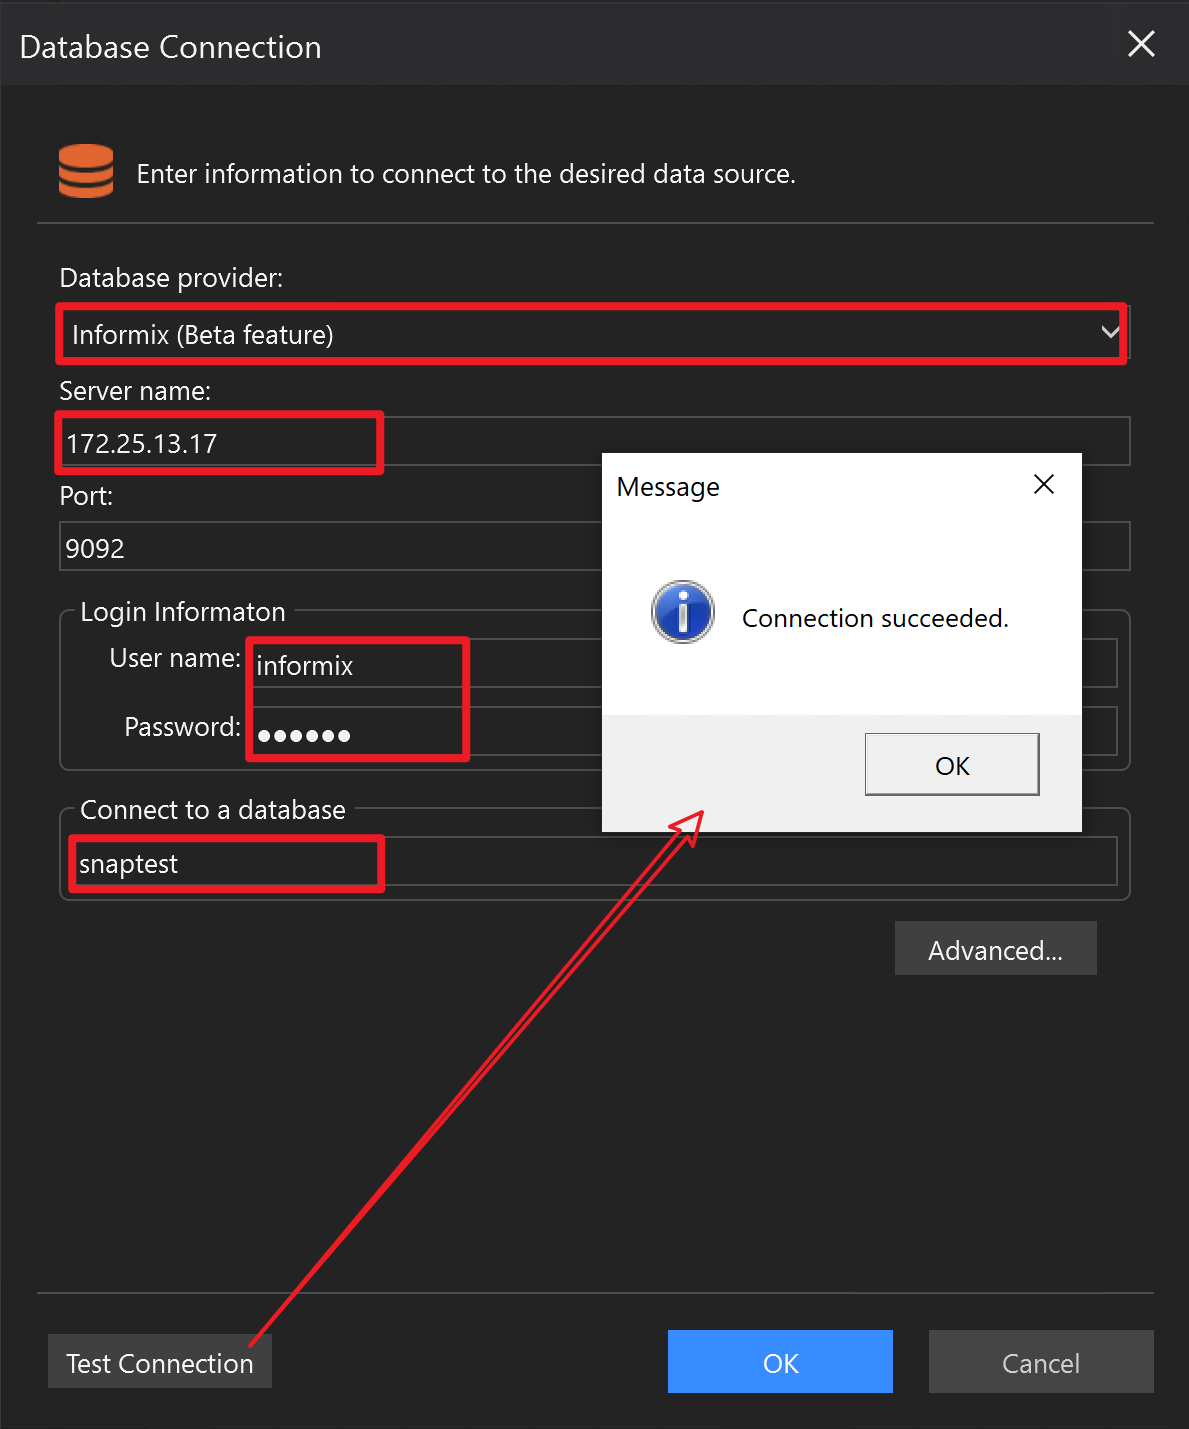
To configure the Informix database connection:
- Select Informix as Database provider in the Database Connection dialog box.
- Input your IP address or your machine name to Server name .
- Use the default port number 1526.
- Enter your Username and Password.
- Enter or select your database name in the Connect to a database field.
- Click Test Connection to make sure the connection is successful.
Connecting to the Oracle database
Installing the driver
For the first time to connect to the Oracle database in SnapDevelop, you will need to install the corresponding database driver. When you select Oracle from the Database provider list in the Database Connection dialog box, you will be prompted to install the driver from www.nuget.org or specify the location of driver on your local computer.
- If you select to install the driver from www.nuget.org, it indicates that you agree with the license agreement. The Oracle packages will be downloaded from www.nuget.org to your local path (%userprofile%.sd\19.0\dbDrivers).
- If the driver has already been downloaded from www.nuget.org to your computer, you can select The driver already exists locally and specify the location of the driver (the .dll file must be downloaded from www.nuget.org, otherwise installation will fail).
Connecting to the Oracle database in SnapDevelop
To configure the Oracle database connection:
- Select Oracle as Database provider in the Database Connection dialog box.
- Input your IP address or your machine name to Host.
- Use the default port number 1521.
- Use the default TCP protocol. If you select the TCPS protocol, you will need to input or select the Wallet location.
- Enter the Service name.
- Enter your Username and Password for logging into the server.
- Click Test Connection to make sure the connection is successful.

Connection types in Oracle
Currently SnapDevelop only supports connecting with the Oracle database via the Service Name. Other connection types such as SID and TNS Name will be supported in the later release.
Connecting to the PostgreSQL database
There are two connection methods for the PostgreSQL database: General connection and SSL connection. We will show you how to use these methods.
PostgreSQL General connection
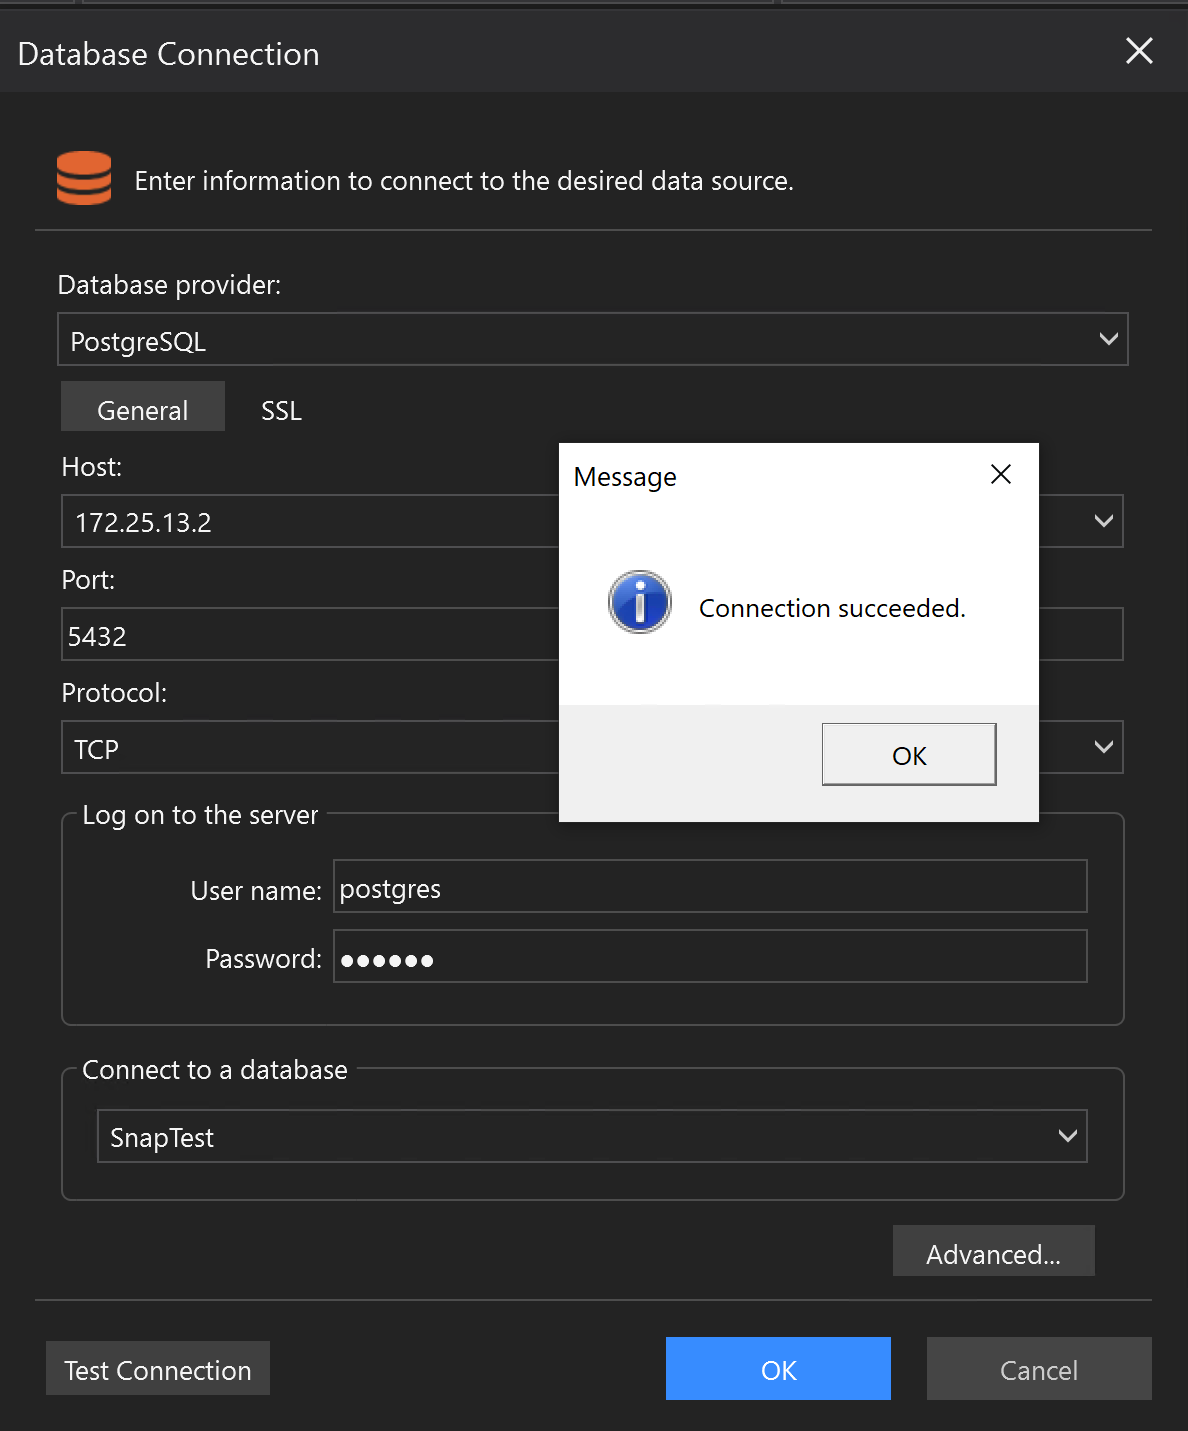
To configure the PostgreSQL database connection using the General method:
- In the Database Connection dialog box, select PostgreSQL from the Database Provider list, and then select General.
- Input the IP address (for connecting with the remote database) or machine name (for connecting with the local database) in Host.
- Use the default port number 5432.
- Use the default TCP protocol. (To use TCPS, see the next section "PostgreSQL SSL connection").
- Enter your Username and Password for logging into the server.
- Enter or select your database name from the Connect to a database list.
- Click Test Connection to make sure the connection is successful.
PostgreSQL SSL connection
To configure the PostgreSQL database connection using the SSL method:
- After configuring the settings in the General tab, select the SSL tab.
- Select the SSL mode.
- Disable -- Client is using an unencrypted connection.
- Prefer -- Client attempts to connect using encryption, falling back to an unencrypted connection if an encrypted connection cannot be established.
- Require -- Client requires an encrypted connection and fail if one cannot be established.
- Enter or select your client certificate.
- Click Test Connection to make sure the connection is successful.

Connecting to the Adaptive Server Enterprise database
Configuring ODBC for ASE
To configure ODBC for Adaptive Server Enterprise (using ASE 16 as an example):
- Install the ODBC driver for ASE 16.
- Open the ODBC Data Source Administrator (64-bit) tool (in the Windows search bar (or press Win + Q), type "ODBC" and then select ODBC Data Source (64-bit)).
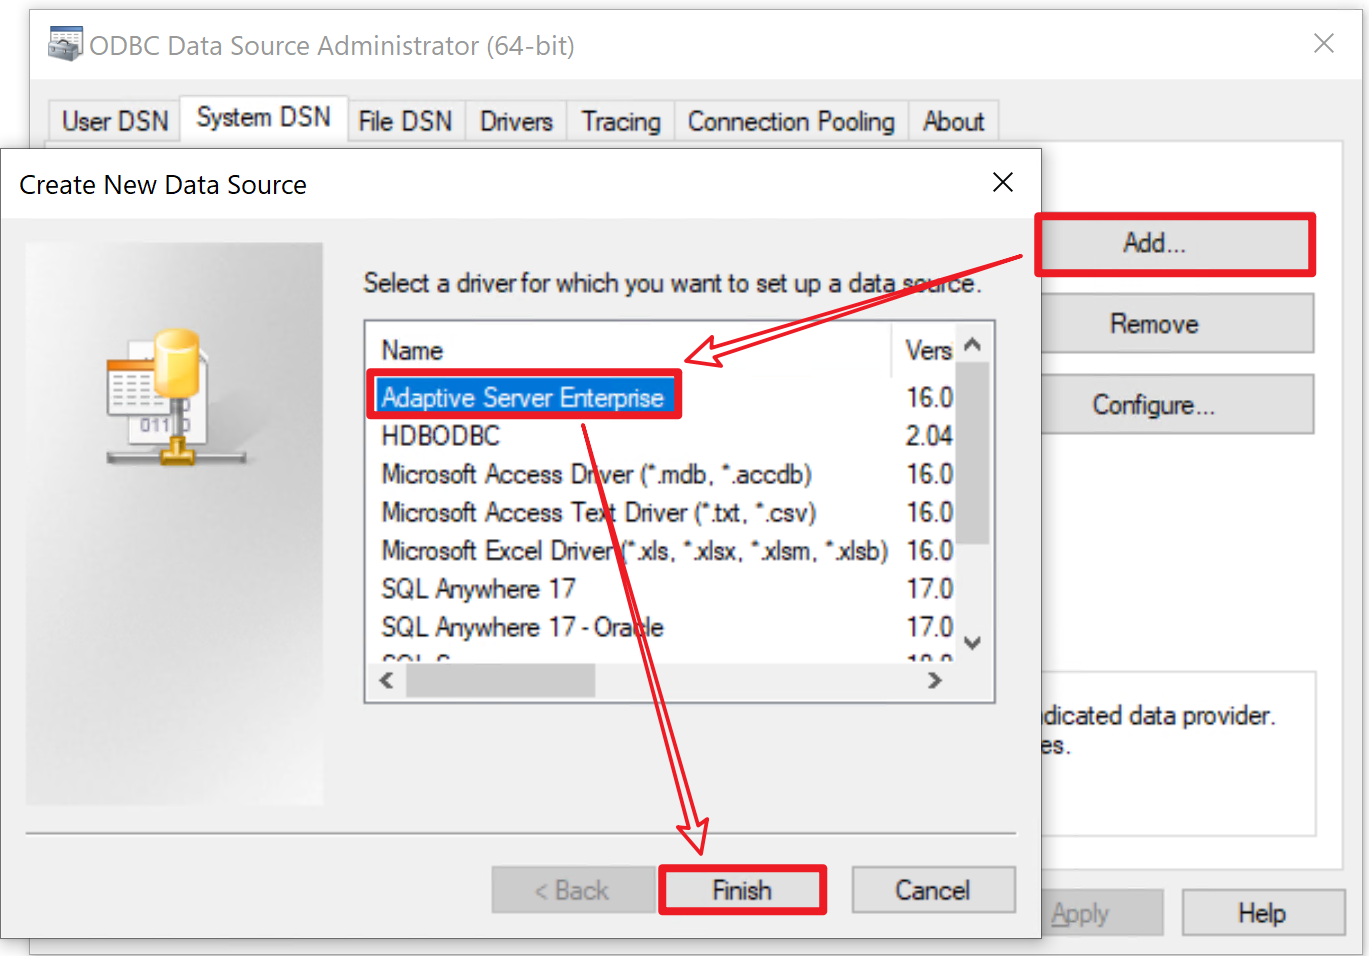
- On the System DSN tab, click Add. In the Create New Data Source dialog, select Adaptive Server Enterprise driver which was just installed, and then click Finish.
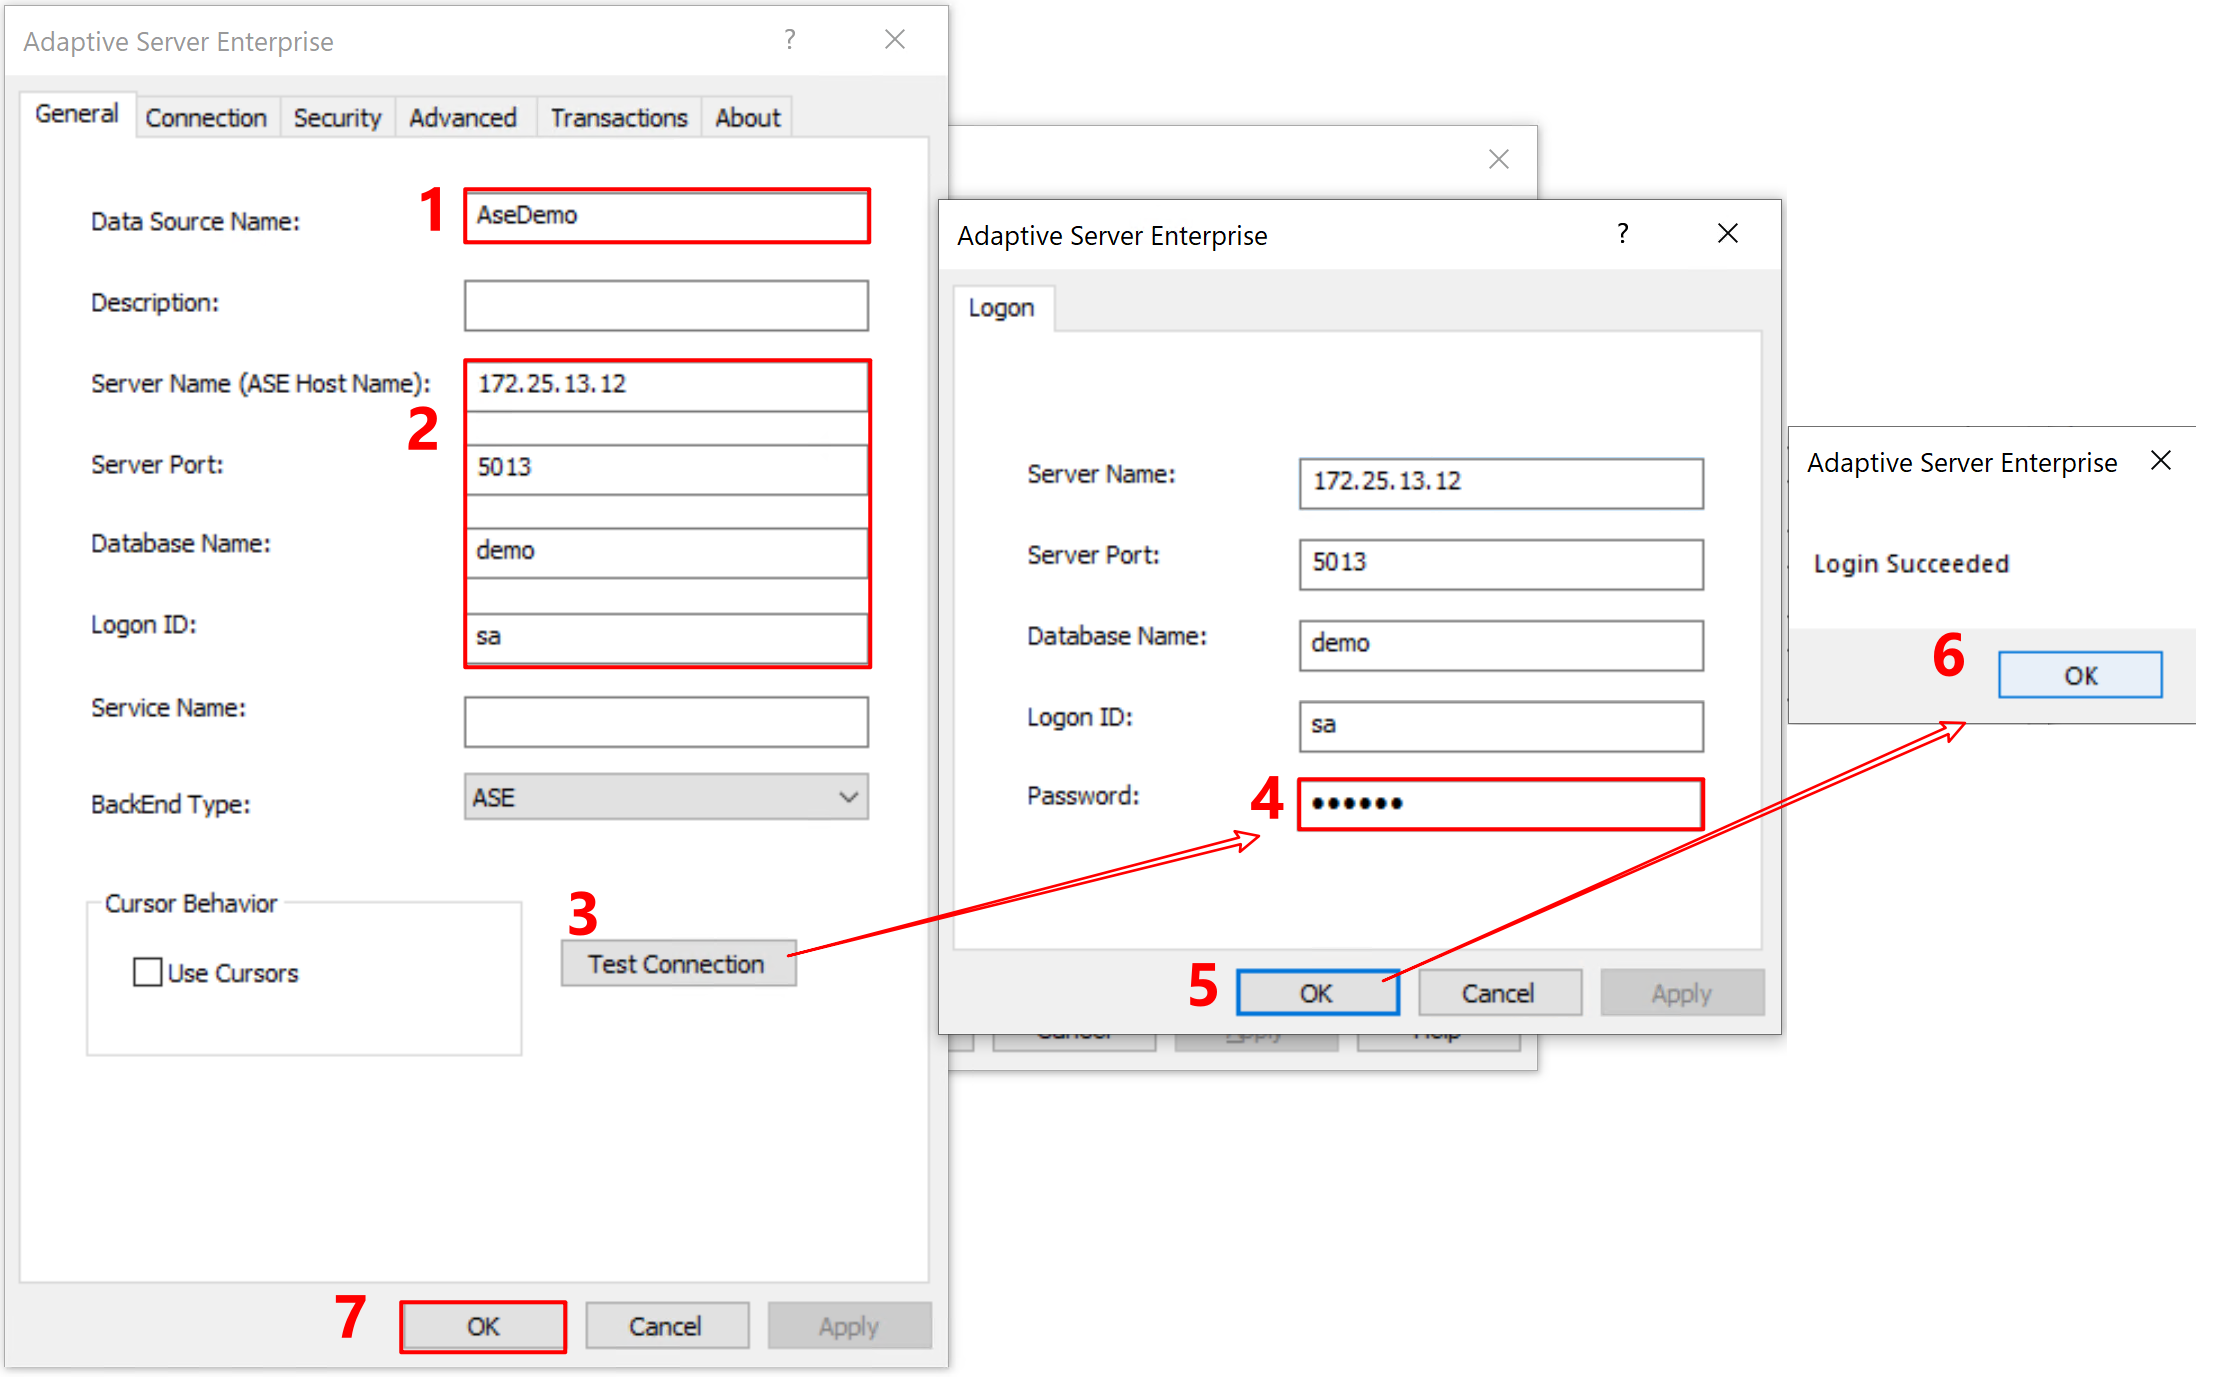
- Configure the ODBC settings by following the numerical order in the figures shown below. Remember to replace the database info with your own ones.
Connecting to the ASE database in SnapDevelop
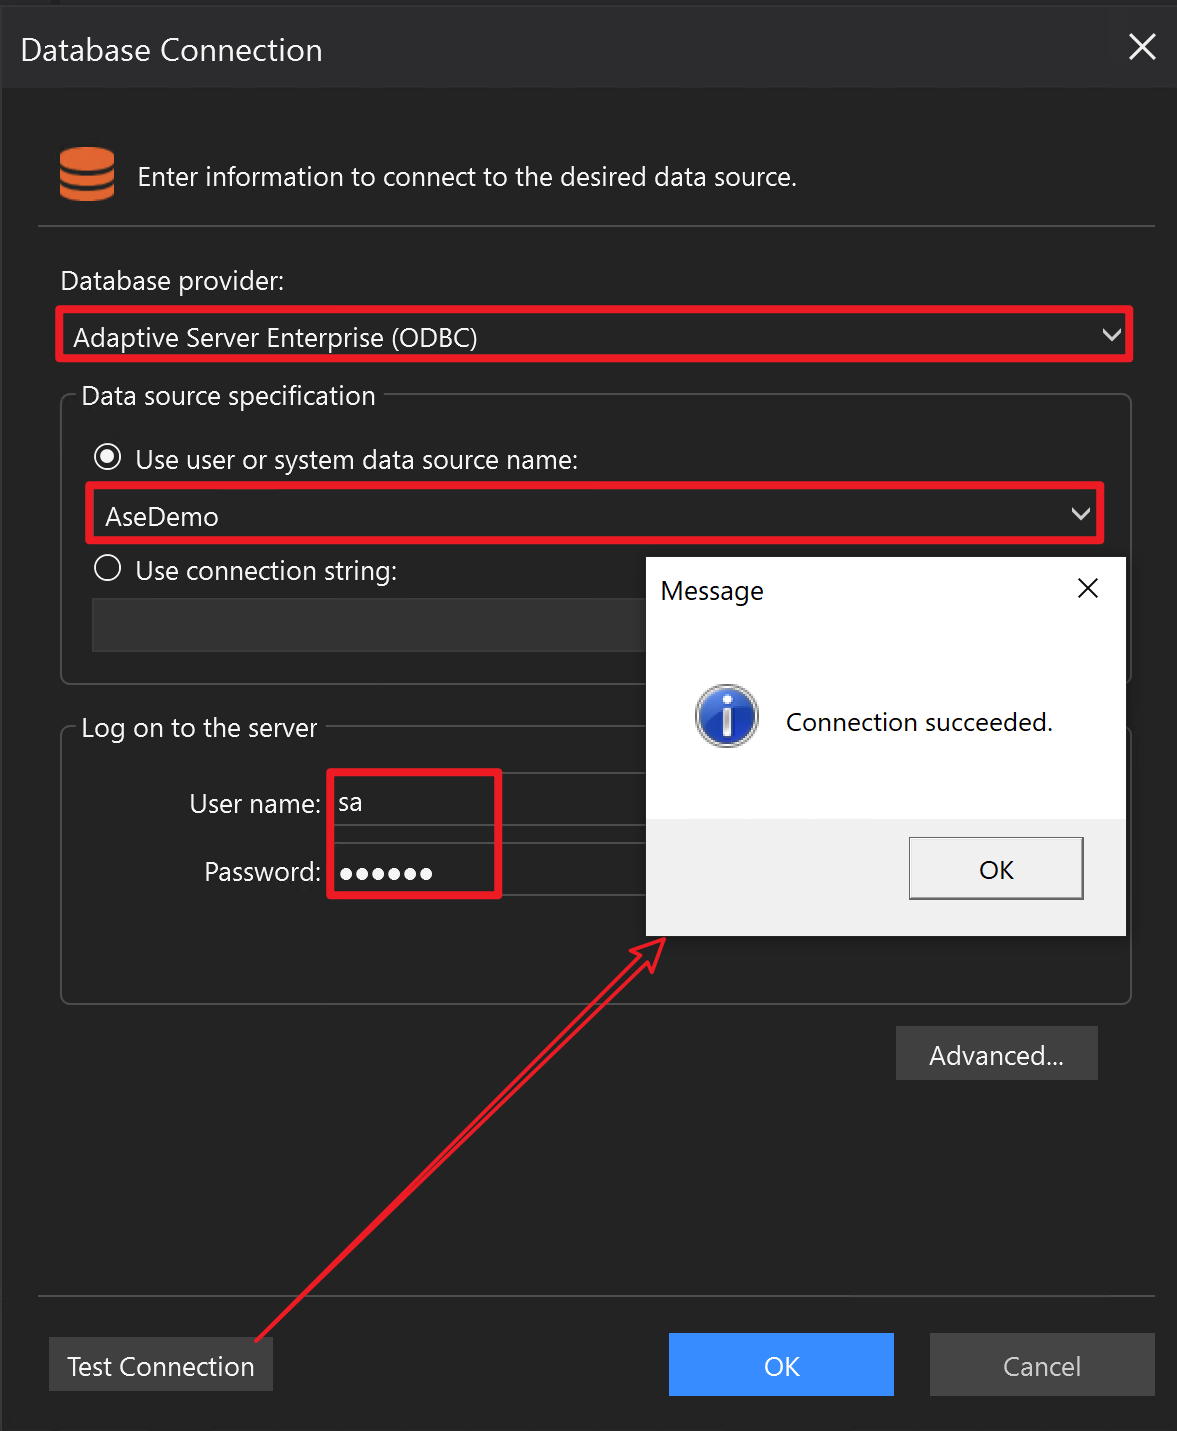
After the ODBC data source is created successfully, you should be able to select it in the Database Connection dialog box. Proceed with the following steps:
- In the Database Connection dialog box, select Adaptive Server Enterprise (ODBC) from the Database provider list and then select the data source created just now from the Use user or system data source name list.
- Enter the Username and Password for the database connection.
- Click Test Connection to make sure the connection is successful.
Connecting to the SQL Server database
SnapDevelop can connect with the SQL Server database through the TCP/IP, Shared Memory and Named Pipes protocols. To connect via any of these protocols, make sure the protocol has been enabled at the database server.
Configuring the SQL Server database server
To enable the protocol on the SQL Server database server (using SQL Server 2019 on Windows Server 2019 64-bit as an example):
- Open SQL Server 2019 Configuration Manager from the Windows Start menu > SQL Server 2019 > SQL Server 2019 Configuration Manager.
- Select the instance to be connected under SQL Server Network Configuration (such as Protocols for MSSQLSERVER), and then enable the protocols on the right-hand side.

For more bout these protocols, refer to Choosing a Network Protocol.
Connecting over TCP/IP protocol
To configure the SQL Server database connection over the TCP/IP protocol:
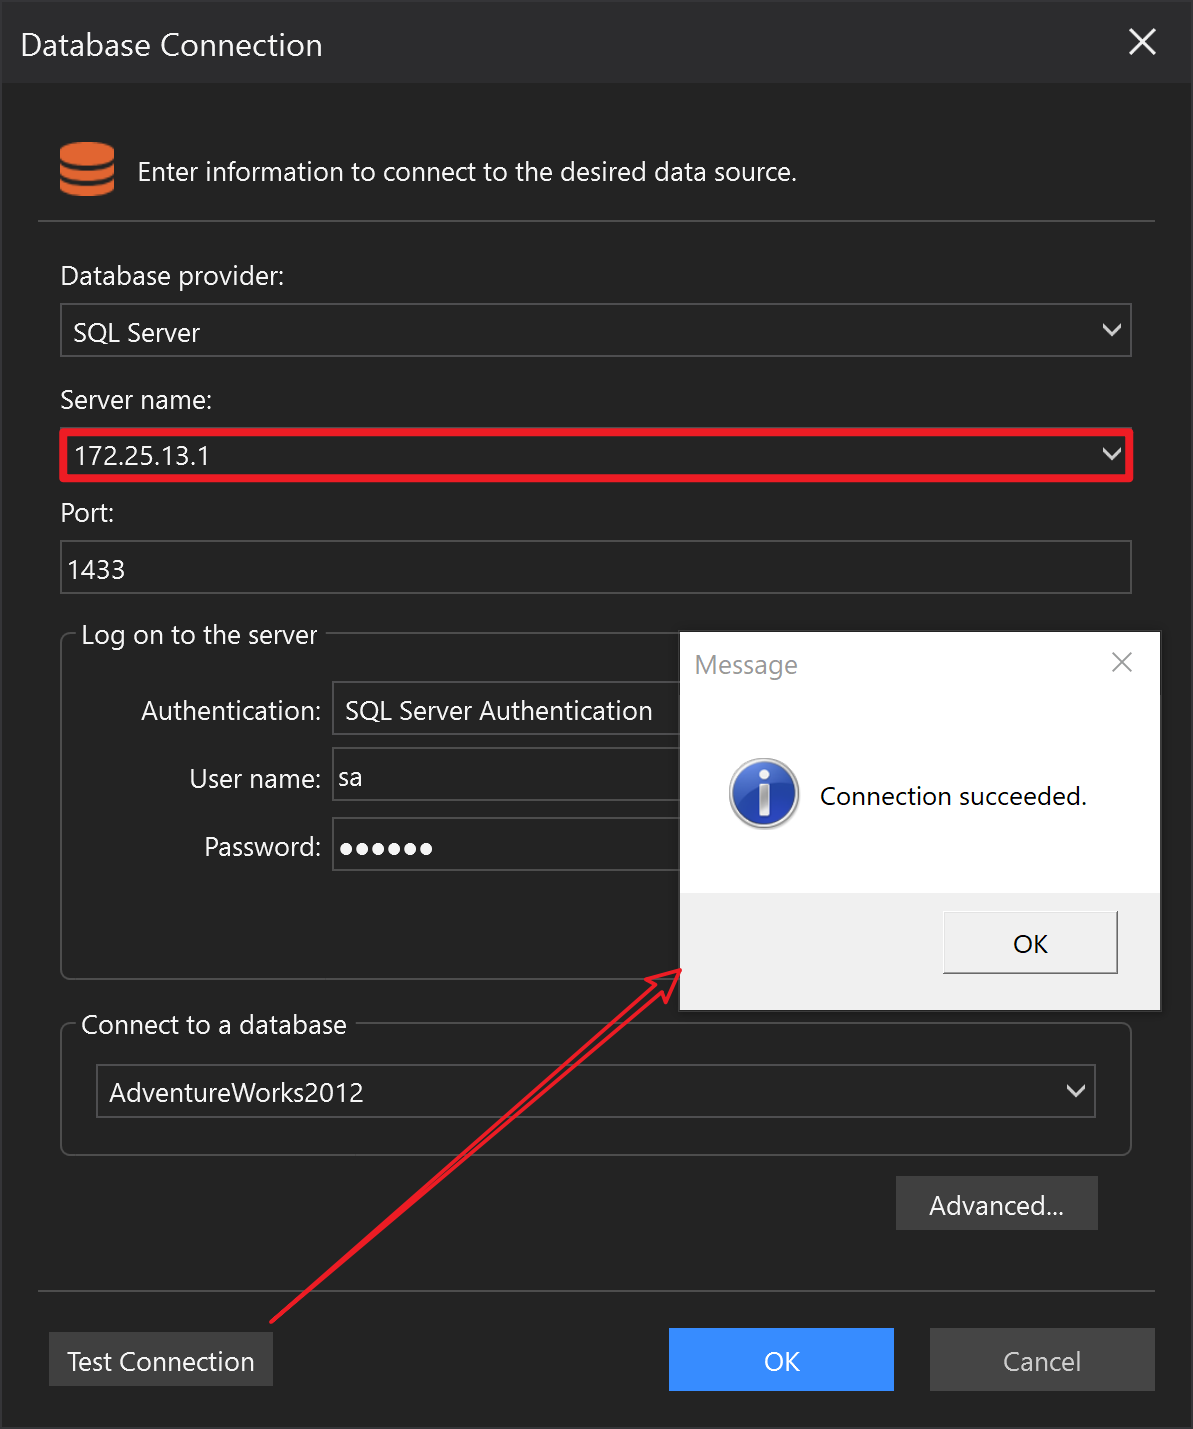
Specify the Server name field according to the following table. The TCP/IP protocol will be used by default.
| Server name | Connection String | Description |
|---|---|---|
| 172.25.13.1 | Data Source=172.25.13.1;Initial Catalog=SnapTest;User ID=sa;Password=appeon; |
Connect by IP |
| 127.0.0.1\sql2016 | Data Source=172.25.13.1\sql2016;Initial Catalog=SnapTest;User ID=sa;Password=appeon; |
Connect to the specific instance by IP |
| RemoteDBMachineName | Data Source=RemoteDBMachineName;Initial Catalog=SnapTest;User ID=sa;Password=appeon; |
Connect to the remote database by its machine name |
| RemoteDBMachineName\instancename | Data Source=RemoteDBMachineName\instancename;Initial Catalog=SnapTest;User ID=sa;Password=appeon; |
Connect to the specific instance by its machine name |
| tcp:(local)\MSSQLSERVER01 | Data Source=tcp:(local)\MSSQLSERVER01;Initial Catalog=SnapTest;User ID=sa;Password=appeon;" |
Force to use TCP/IP protocol to connect to the specified local instance |
Connecting over Shared Memory protocol
The Shared Memory protocol can only be used locally, therefore, this protocol is used only when connecting with a local database.
To configure the SQL Server database connection over the Shared Memory protocol:
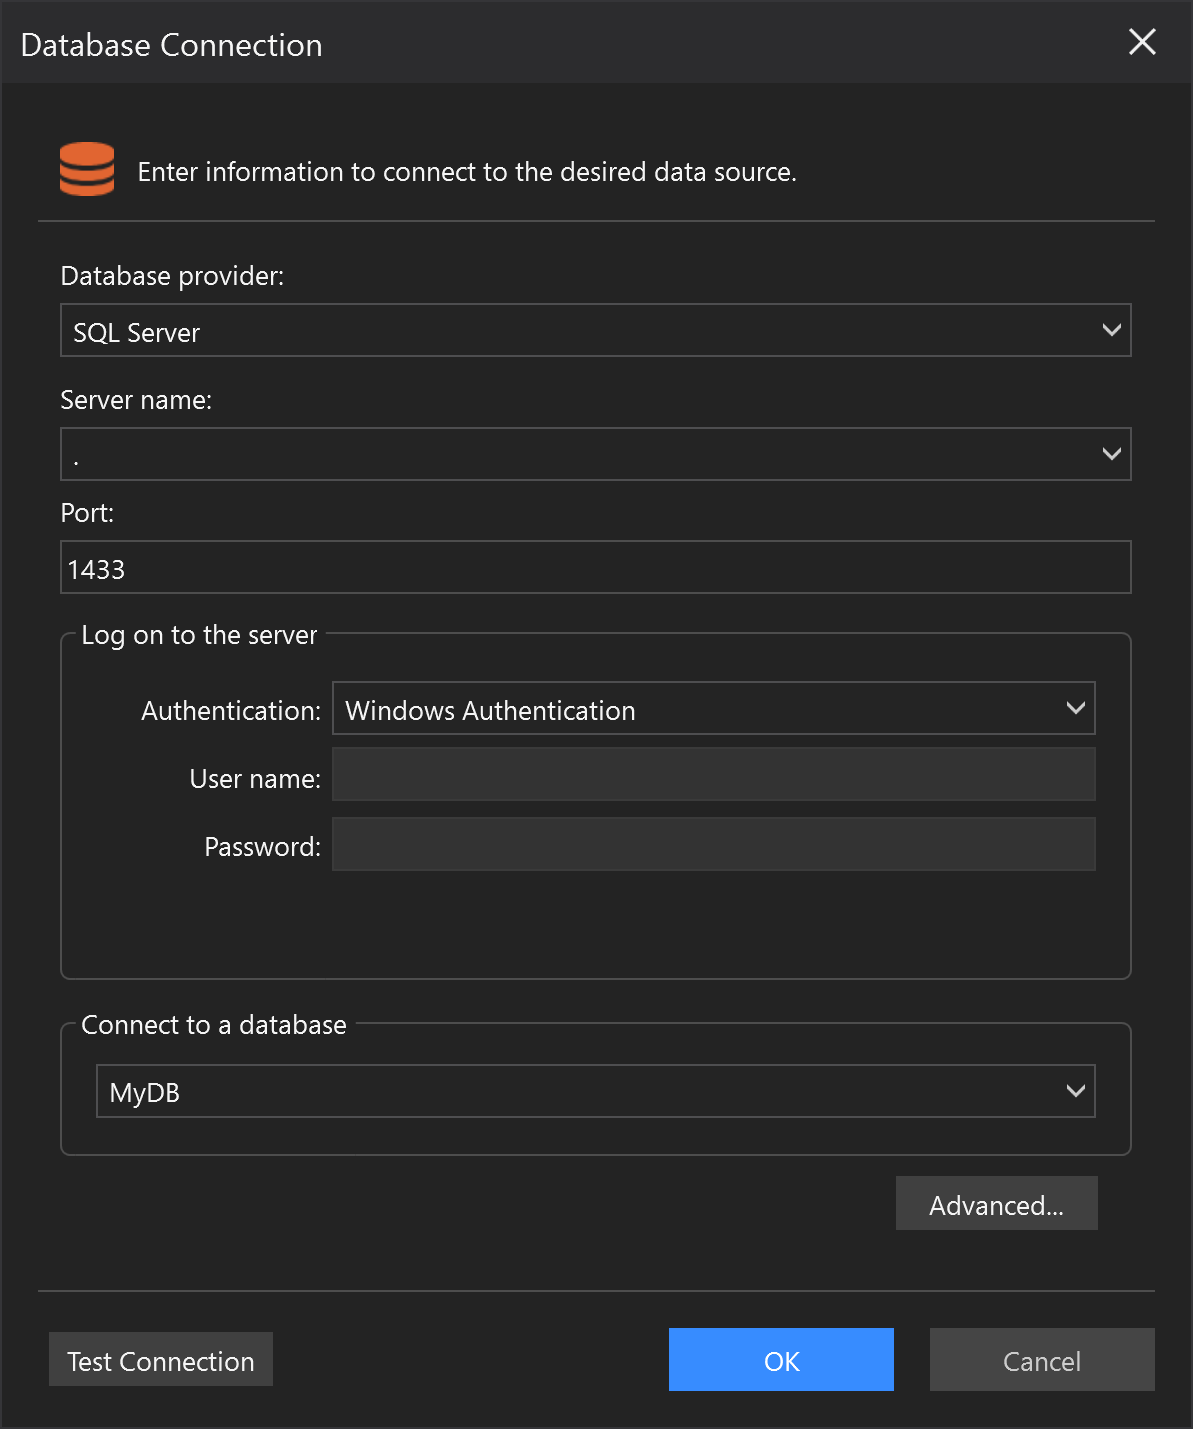
Input the local machine name, or a dot (.), or localhost (or local) in the Server name field. This indicates that a local database will be connected and the Shared Memory protocol will be used by default. (If the server name is set with the local IP address, TCP/IP will be used.)
Connecting over Named Pipes protocol
Configuring named pipes
To configure the Named Pipes protocol on the SQL Server database server (using SQL Server 2019 on Windows Server 2019 64-bit as an example):
Open SQL Server Configuration Manager from the Windows Start menu > SQL Server 2019 > SQL Server 2019 Configuration Manager.
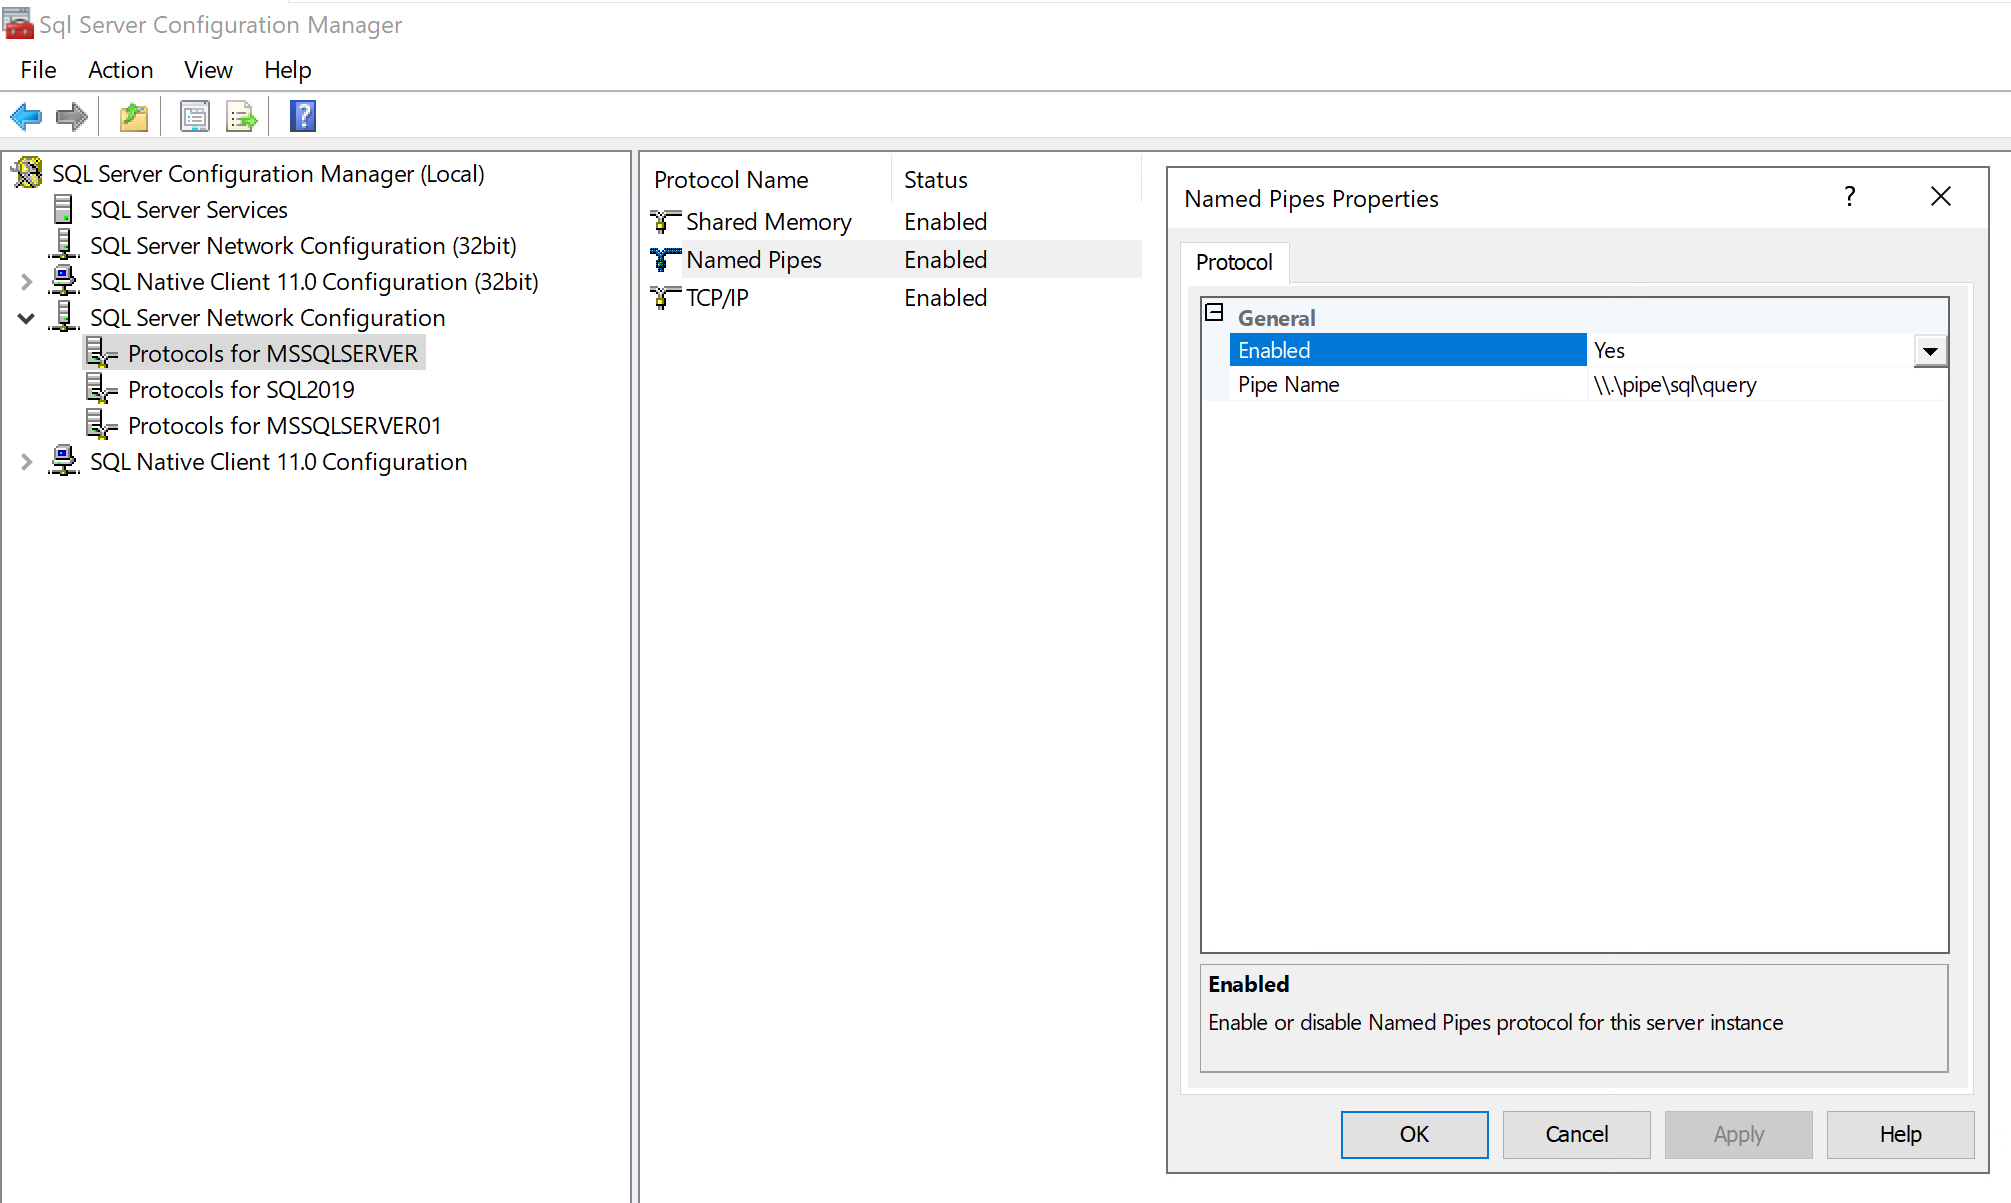
Select the instance to be connected under SQL Server Network Configuration (such as Protocols for MSSQLSERVER), and then double click on Named Pipes on the right-hand side. In the dialog box that pops up, write down the Pipe Name which is by default '\\.\pipe\sql\query', or double click on Pipe Name to modify the pipe name and then write down the new pipe name. The pipe name will be used for connection later.
Make sure the status of Named Pipes is set to "Enabled".
For more about Named Pipes configuration, refer to Named Pipes Properties.
Connecting over Named Pipes in SnapDevelop
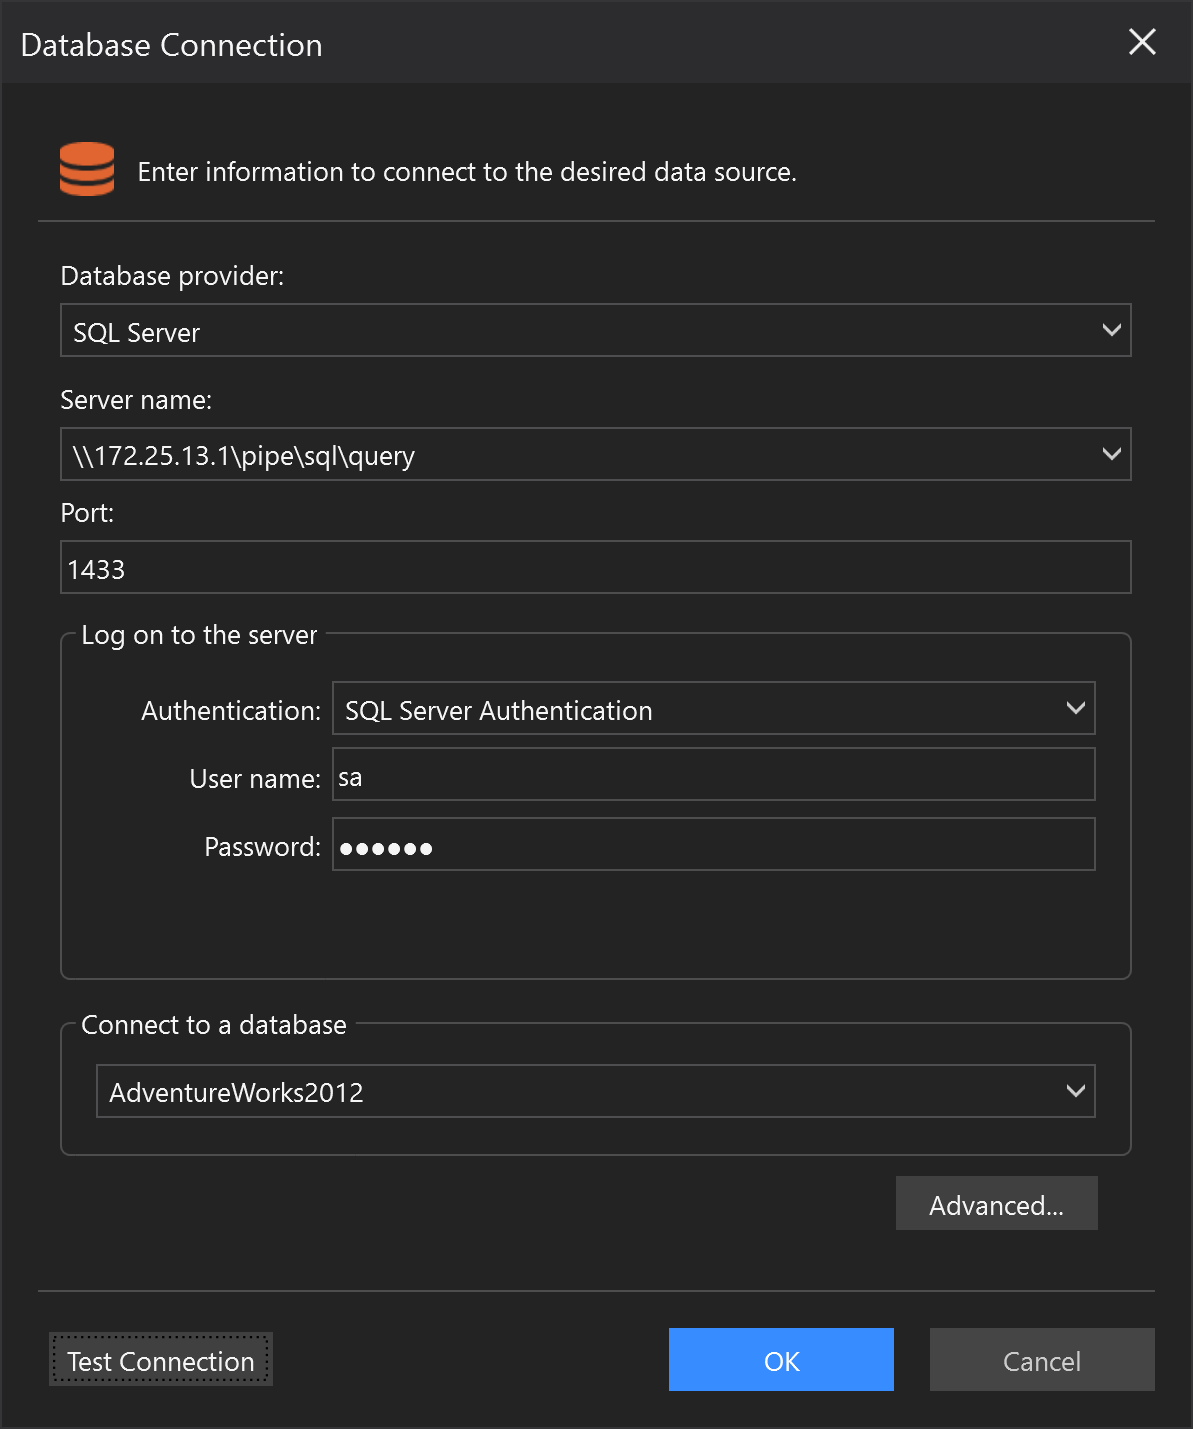
To configure the SQL Server database connection over the Named Pipes protocol:
Specify the Server name field according to the following connection strings:
Data Source=\\.\pipe\sql\query;Initial Catalog=MyDB;User ID=sa;Password=mypwd;
Data Source=\\.\pipe\MSSQL$MSSQLSERVER01\sql\query;Initial Catalog=SnapTest;User ID=sa;Password=mypwd;
Data Source=np:\\172.0.0.1\pipe\sql\query;Initial Catalog=SnapTest;User ID=sa;Password=mypwd;
Data Source=np:MyMachineName;Initial Catalog=MyDB;User ID=sa;Password=mypwd;
Tips:
SQL statement to query the connection protocol:
SELECT net_transport FROM sys.dm_exec_connections WHERE session_id =@@SPID;
If you want to specify a protocol connection, prefix the server name with np:, tcp:, or lcp:
Execution of SQL query is shown in the example below:
You can see from the figure blow that the output of SQLQuery1.sql is TCP because the 'tcp:' prefix is input in the Server name although it connects with a local database.
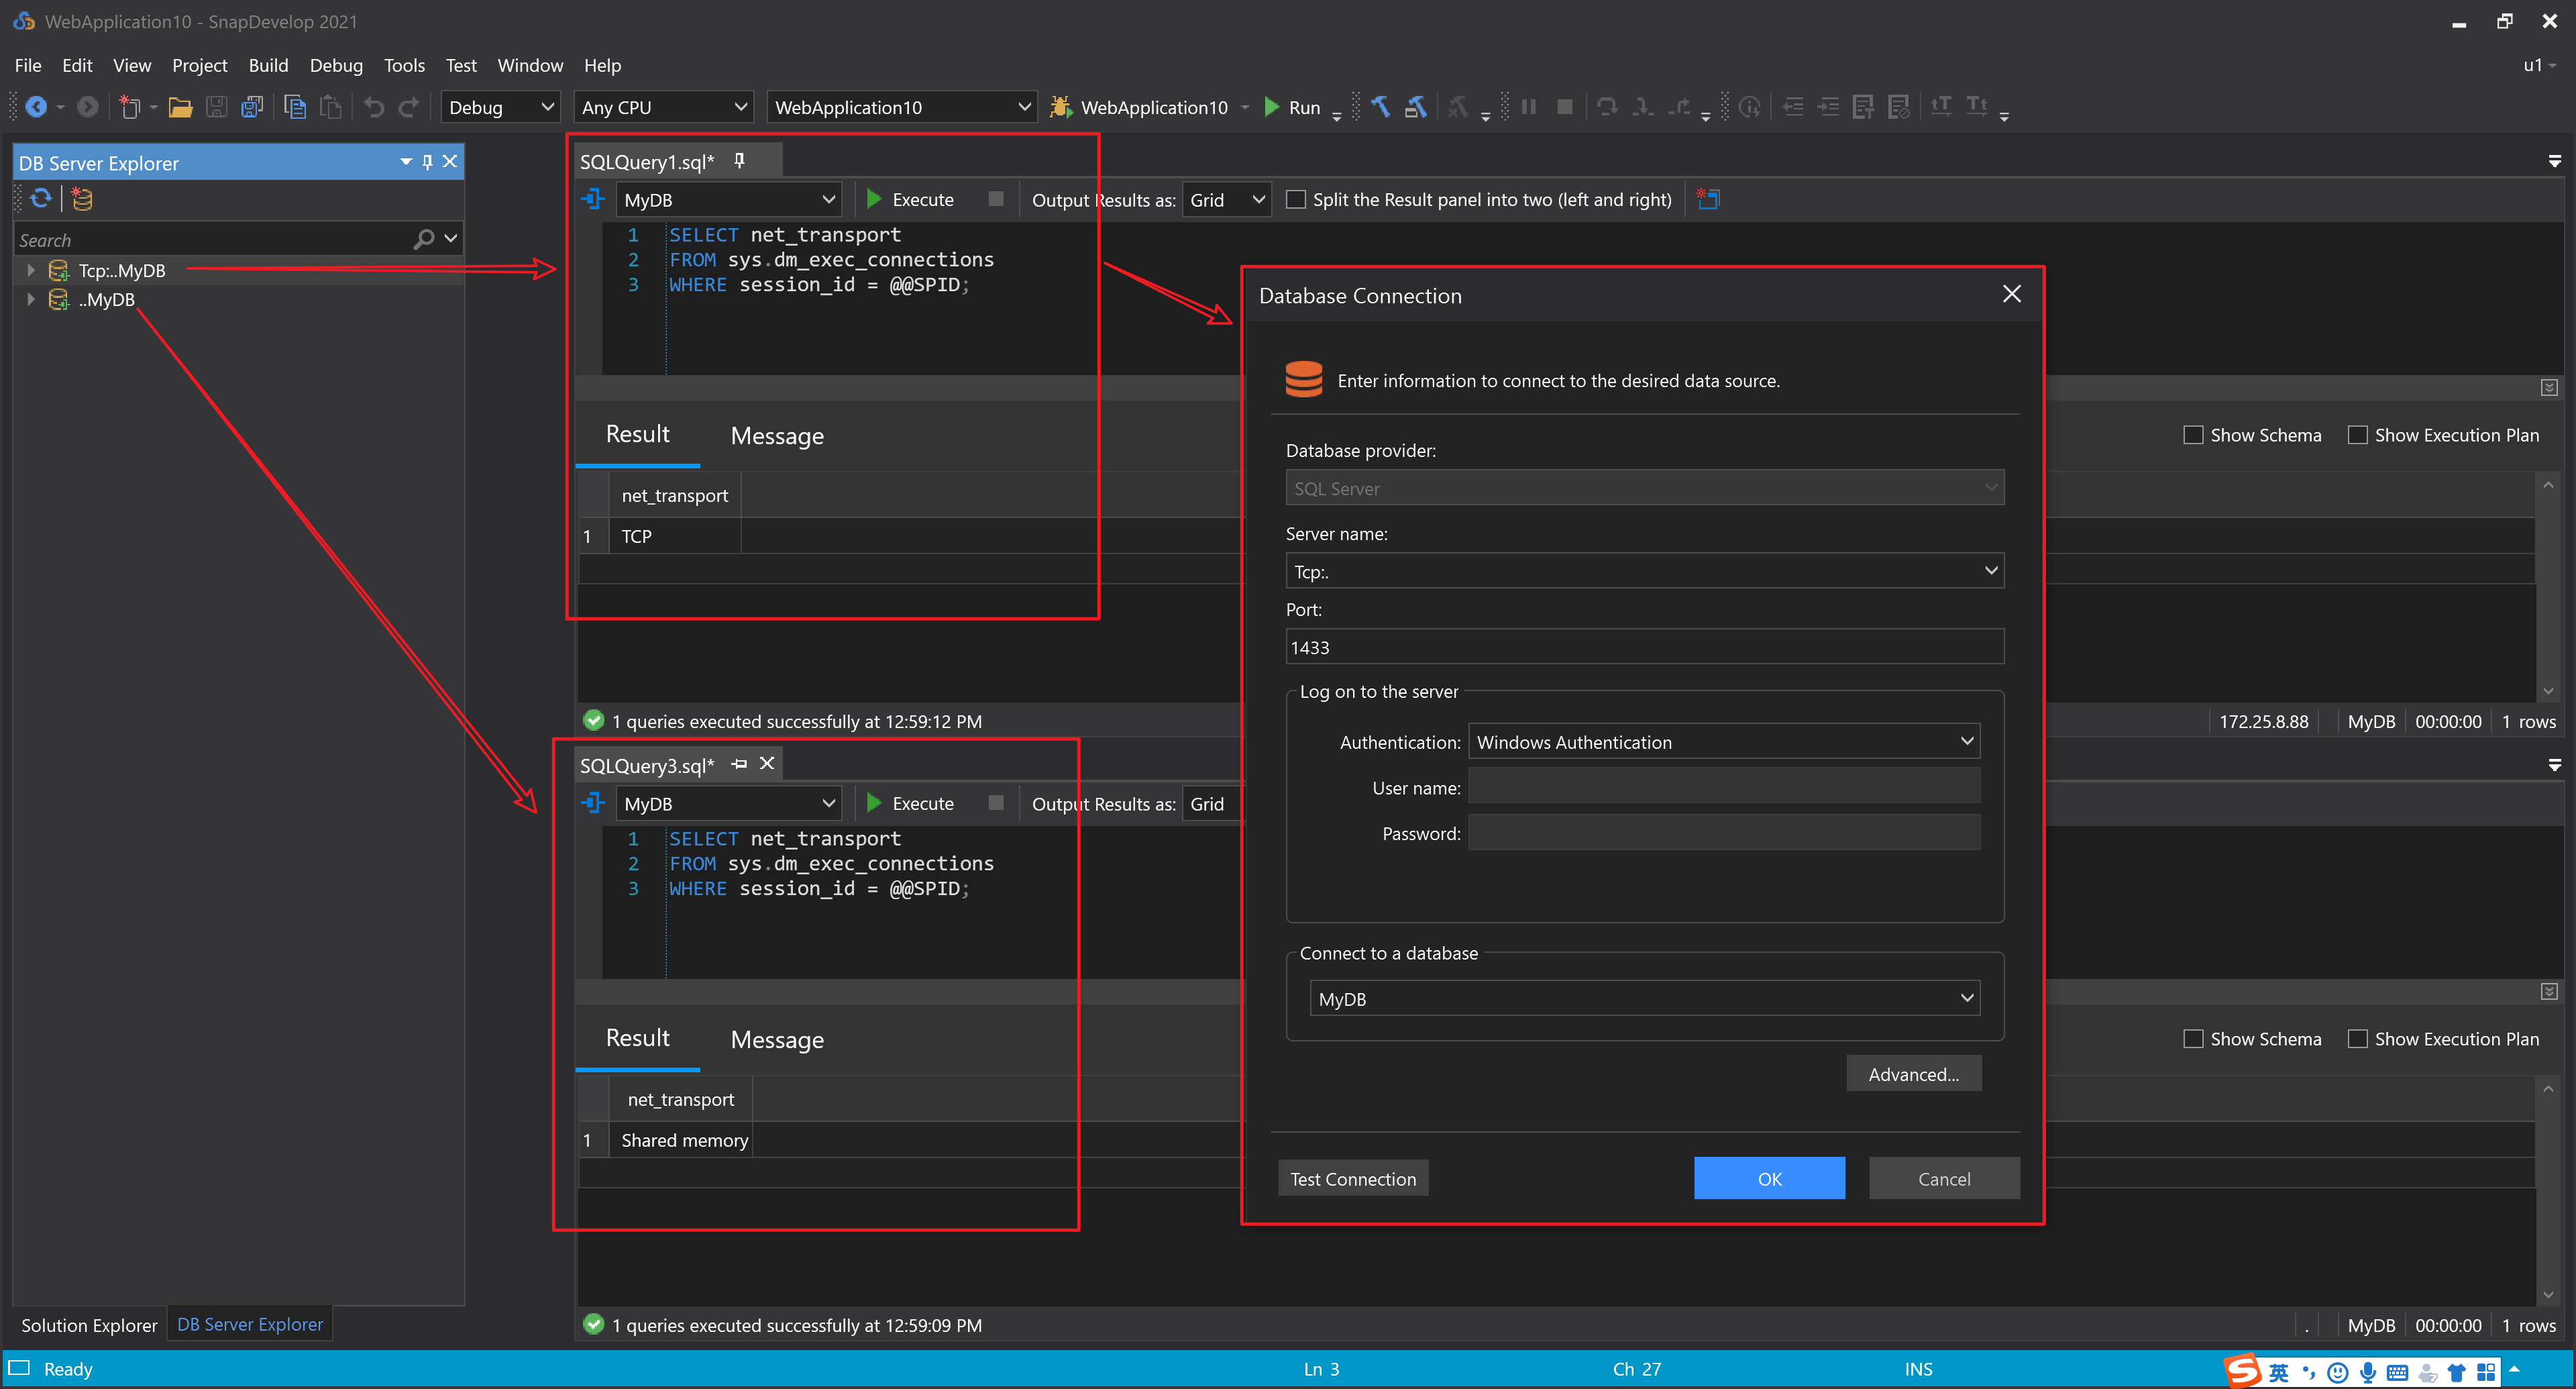
Note that if the Server name is entered with an IP address, even if 'lcp:' prefix is added, it will still connect to the database over TCP/IP.
If you want to connect to the specified instance, you can add "\"+"instance name" to the server name.

Connecting to the SQLite database
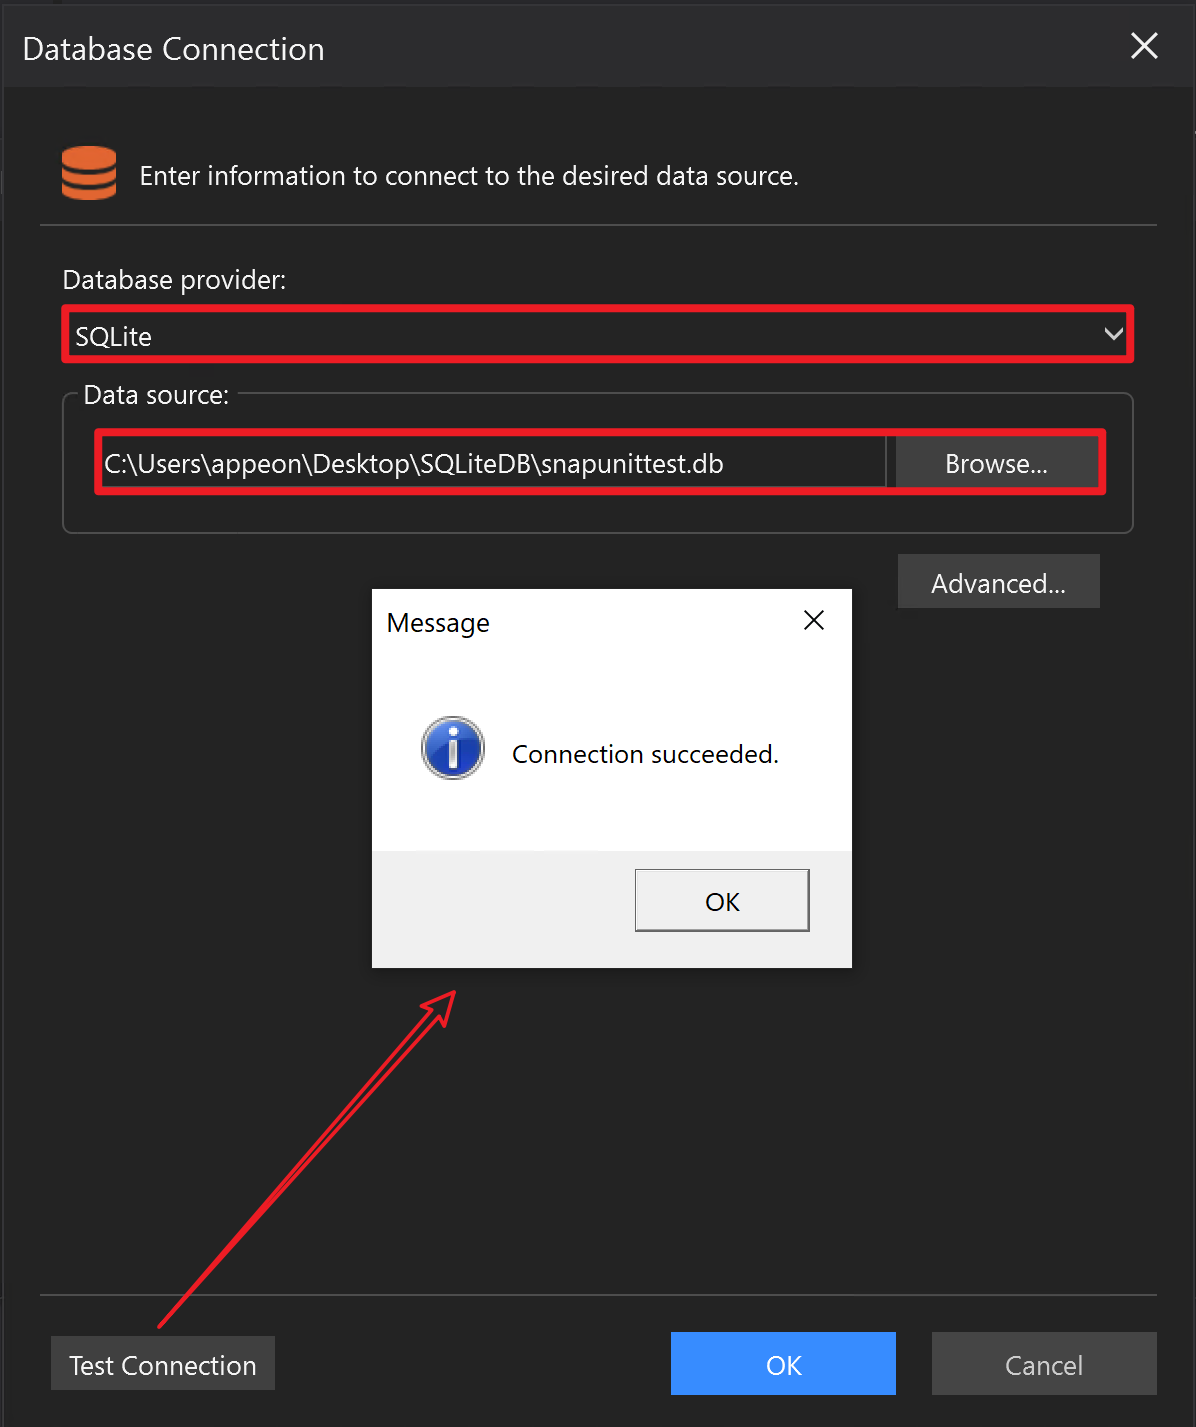
To configure the SQLite database connection:
- Select SQLite as Database provider in the Database Connection dialog box.
- Input the location of the SQLite database file or click the Browse button to select the SQLite database file on your local computer.
- Click Test Connection to make sure the connection is successful.
Troubleshooting
Unable to connect to remote SQL Server database over Named Pipes even though local database can be connected
If you are using Named Pipes to connect to a remote database, you may need to add Windows Credentials. Refer to the following steps:
- Open the Windows search bar (or press Win + Q), enter "Windows Credentials" and then select Manage Windows Credentials.
- Click Add a Windows credential.
- Enter IP address, username and password of the remote database.

Using the PostgreSQL CA certificate for SSL connection, the verification fails
If the PostgreSQL CA certificate is a self-signed certificate, you will need to install the certificate on the client machine to make Windows trust the certificate.
Reference Material
SQL Anywhere Official Driver Docs
PostgreSQL Official Driver Docs
Adaptive Server Enterprise Official Driver Docs