CRUD Operations with Non-Generic .NET DataStore
Last Updated: December 2023
Introduction
This tutorial teaches how to create an ASP.NET Core Web API that uses non-generic .NET DataStores to perform CRUD operations. For differences between non-generic and generic .NET DataStores, see https://docs.appeon.com/net_datastore/api_reference/#non-generic-net-datastore-vs-generic-net-datastore.
In this tutorial, you learn how to:
- Create a Web API Project
- Add and Register a Database Context
- Add a .NET DataStore Model
- Add and Register a Service
- Implement CRUD Operations in the Web API
- Call the Web API from PowerBuilder
If you are new to ASP.NET Core Web APIs, you are strongly recommended to read Create a Web API first to get familiar with the basic concepts of C# programming and RESTful services (also known as Web APIs).
Prerequisites
SnapDevelop 2022 R3
PowerBuilder 2022 R3
Sample database setup
Install SQL Server Express or SQL Server 2012 or later.
Download the database backup file (AdventureWorks_for_sqlserver.zip) from https://github.com/Appeon/.NET-Project-Example-Database.
Restore database using the downloaded database backup file.
For how to restore the database, you can refer to the readme file: https://github.com/Appeon/.NET-Project-Example-Database/blob/master/README.md.
Create a Web API Project
Start SnapDevelop and select Create New Project from the Start page. Or, from the File menu, select New and then Project...
In the New Project dialog box, select ASP.NET Core Web API and click Next. Name the project "WebAPI2", and then click Next to go to the next screen.
Select Basic for Type and click Create to generate the project. The project is then opened by SnapDevelop so that you can start to develop.
Test the Sample API
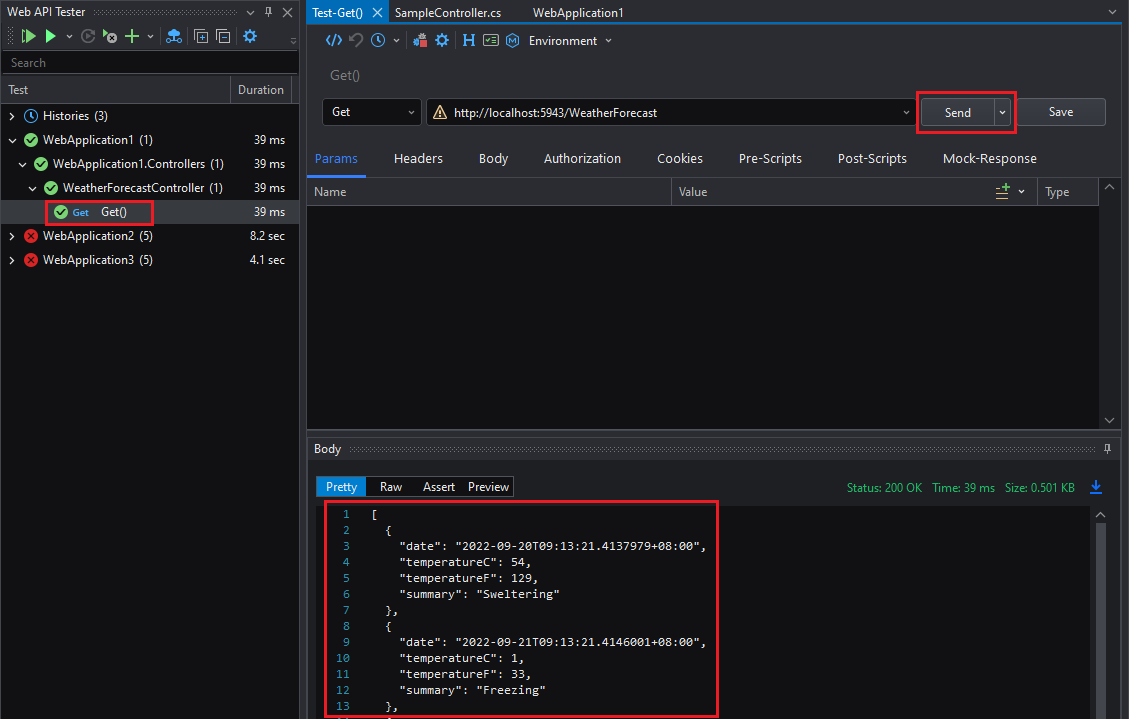
A sample API is created from the project template. Click Test > Web API Tester in the menu, double-click the Get() method, and then click Send. In the Start Project painter that pops up, select the project and click OK.
The following information is returned:
Add a Database Context
The database context is the class that manages database connections and transactions. This class is created by deriving from the SnapObjects.Data.DataContext class.
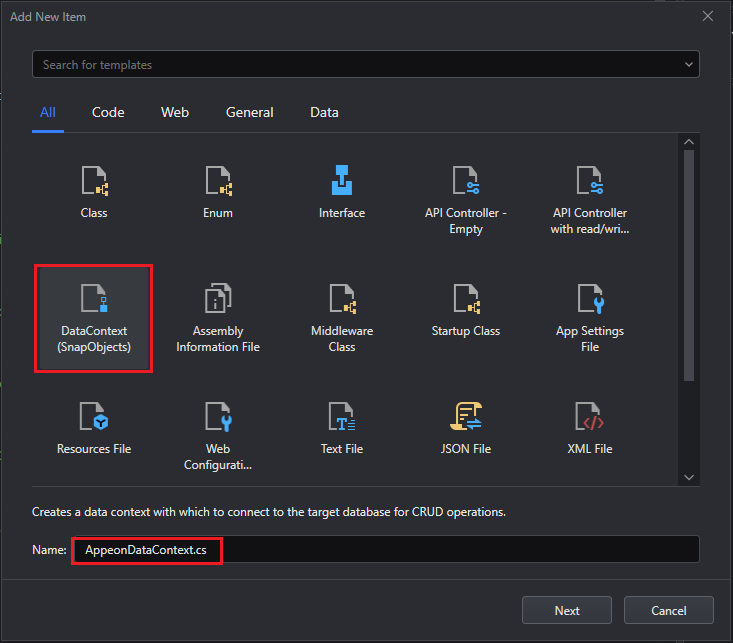
Right-click the Web API project and select Add > New Item... In the item template list select DataContext and name the class AppeonDataContext and click Next.
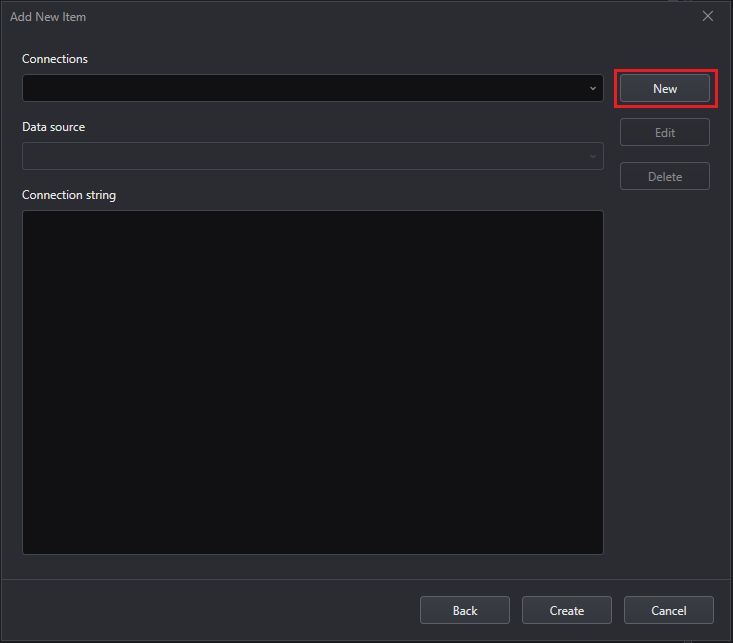
In the Add New Item dialog box, click New to create a database connection if no database connection exists.
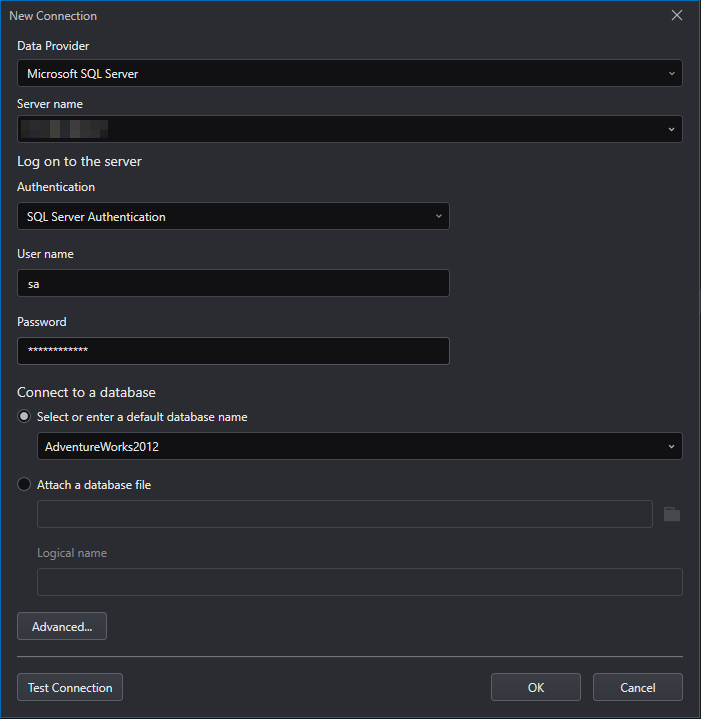
Fill in the information to connect to the database AdventureWorks2012 as shown in the image below and click OK.
Then back to the Add New Item dialog box, a connection string is automatically generated, click Create.
The connection string is saved in appsettings.json and the AppeonDataContext class is created.
Register the Database Context
In ASP.NET Core, services such as the DataContext must be registered with the dependency injection (DI) container. The container provides the service to the controllers.
In file Program.cs, right-click after the line builder.Services.AddSwaggerGen(); and select Inject DataContext.
In the Inject DataContext(s) dialog box, make sure WebAPI2 and AppeonDataContext are selected and click OK.
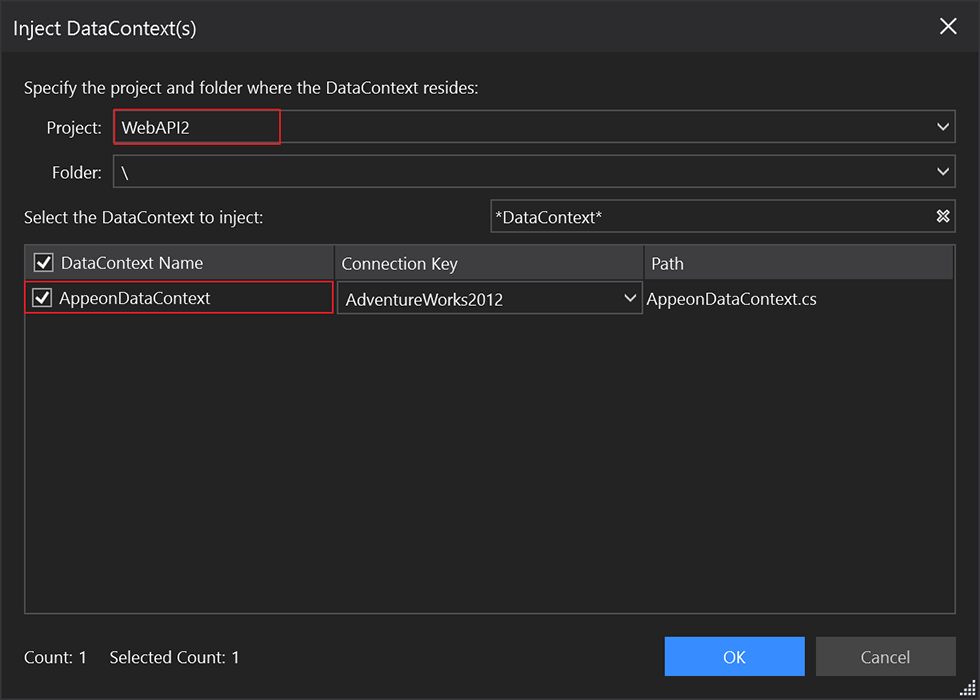
The following line is added automatically to the ConfigureServices() method:
builder.Services.AddDataContext<AppeonDataContext>(m => m.UseSqlServer(builder.Configuration, "localhost,1433.AdventureWorks2012"));
Add a .NET DataStore Model
.NET DataStore is the .NET version of the native PowerBuilder DataStore. It provides almost the same set of APIs as the native PowerBuilder DataStore. A native PowerBuilder DataStore is created using PowerBuilder's DataWindow Designer.
Create a DataObject in PowerBuilder
Start PowerBuilder and create a template application with no database connection. Then add a Grid DataWindow that maps to the table HumanResources.Department in the AdventureWorks2012 database. Save the DataWindow object with the name d_department.
Convert DataWindow to C# Model
In SnapDevelop IDE, right-click on the solution name, and select Open PB Workspace to open the application that you have just created in PowerBuilder.
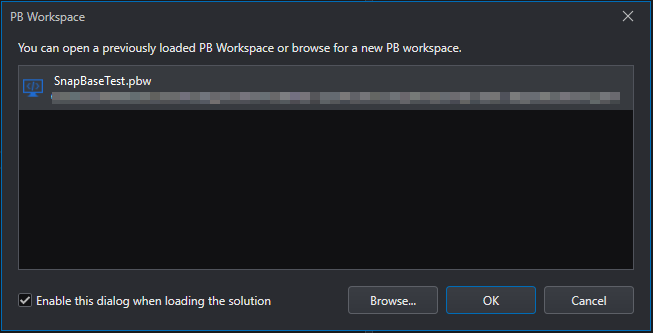
After the PB workspace is loaded in the Solution Explorer, expand the workspace and right-click the DataWindow d_department and select Convert DataWindow to C# Model.

The DataWindow Converter opens and loads the DataWindow d_department for converting to .NET DataStore.

Click Parse to parse the DataWindow and then click Export to generate the C# model (.NET DataStore), or directly click Export to perform the parsing and exporting together in one step. Before the export, you are required to connect to the AdventureWorks2012 database.
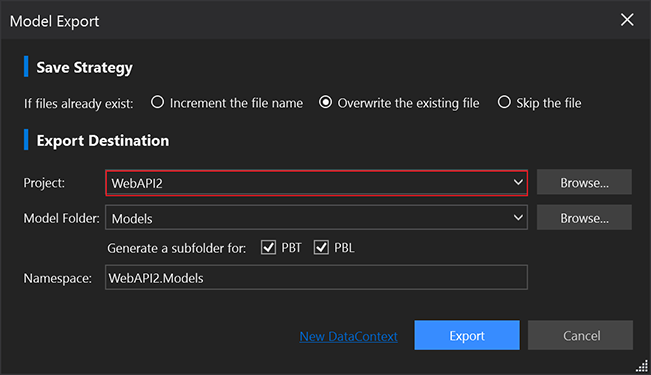
In the Model Export dialog, make sure the WebAPI2 project is selected and click Export.
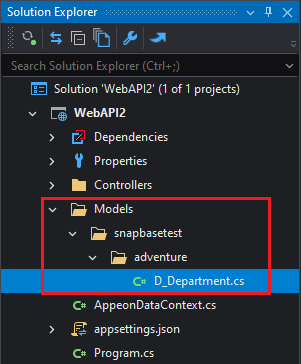
A Models folder is created and the .NET DataStore model D_Department.cs is generated and added in this folder. The D_Department.cs model maps to the table HumanResources.Department in the AdventureWorks2012 database.
Add a Service
A service is a component that is intended for common consumption in an app and commonly implements an interface. This is where you develop the business logic of your Web API.
The interface contains only the declaration of the methods, properties, and events, but not the implementation.
Right-click the Web API project and select Add > New Folder. Name the folder Services. Then add a sub-folder to it and name it Impl. Next, right-click the Services folder and select Add > New Item...
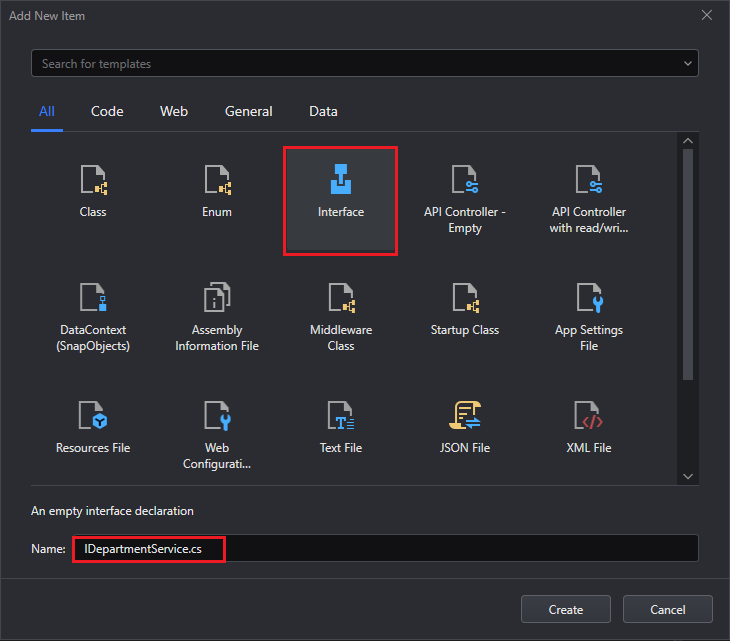
In the Add New Item dialog, select Interface . Name it as IDepartmentService.cs and click Create.
In IDepartmentService.cs, add the declaration of the methods: Retrieve, Create, Update and Delete which we will implement on the service.
// IDepartmentService.cs
using DWNet.Data;
using WebAPI2.Models;

namespace WebAPI2.Services
{
    public interface IDepartmentService
    {
        IDataStore Retrieve();

        int Create(D_Department department);

        int Update(IDataStore departments);

        int Delete(IDataStore department);
    }
}
To add the service, right-click the Impl sub-folder and select Add > Class... Name it DepartmentService.cs and click Create. (Notice the difference between the name of the interface "IDepartmentService.cs" and the name of the service "DepartmentService.cs")
Update DepartmentService.cs to implement the IDepartmentService interface, and add a constructor to receive the data context. The Create, Delete, Retrieve, and Delete methods will be added with the implementation scripts later.
using System;
using System.Collections.Generic;
using System.Linq;
using System.Threading.Tasks;
using SnapObjects.Data;
using DWNet.Data;
using WebAPI2;
using WebAPI2.Models;

namespace WebAPI2.Services.Impl
{
    /// <summary>
    /// The service needs to be injected into the ConfigureServices method of the Startup
    /// class. Sample code as follows:
    /// services.AddScoped<ISampleService, SampleService>();
    /// </summary>
    public class DepartmentService : IDepartmentService
    {
        private readonly AppeonDataContext _context;

        public DepartmentService(AppeonDataContext Context)
        {
            _context = Context;
        }

        public int Create(D_Department department)
        {
            throw new NotImplementedException();
        }

        public int Delete(IDataStore department)
        {
            throw new NotImplementedException();
        }

        public IDataStore Retrieve()
        {
            throw new NotImplementedException();
        }

        public int Update(IDataStore departments)
        {
            throw new NotImplementedException();
        }
    }
}
In ASP.NET Core, services such as the DepartmentService must be registered with the dependency injection (DI) container. The container provides the service to the controllers.
Install the following NuGet packages to your project:
- Microsoft.AspNetCore.Mvc.NewtonsoftJson 6.0.14 or lower
- DWNet.Data.AspNetCore 4.0.1
And add the following using statements to Program.cs:
using WebAPI2.Services;
using WebAPI2.Services.Impl;
using DWNet.Data.AspNetCore;
Replace the line builder.Services.AddControllers(); with:
builder.Services.AddControllers(m =>
{
    m.UsePowerBuilderIntegrated();
});
builder.Services.AddControllers().AddNewtonsoftJson();
Note: The System.Text.Json library is a built-in part of the shared framework for .NET Core 3.0 or higher versions. The library parses and writes DateTime and DateTimeOffset values according to the ISO 8601:-2019 extended profile. The JsonSerializer, Utf8JsonReader, Utf8JsonWriter, and JsonElement types parse and write DateTime and DateTimeOffset text representations according to the extended profile of the ISO 8601-1:2019 format; for example, 2019-07-26T16:59:57-05:00. For more information, refer to DateTime and DateTimeOffset support in System.Text.Json | Microsoft Learn. However, PowerBuilder uses a different DateTime format (yyyy-mm-dd hh:mm:ss:ffffff, for example, 2019-07-26 16:04:57.242000) from the ISO 8601-1:2019 format. This might cause errors when you send JSON data containing PowerBuilder DateTime values to a .NET Core 3.0 or higher Web API. Therefore, the code builder.services.AddControllers().AddNewtonsoftJson() is added above to switch ASP.NET Core 3.0 back to use JSON.NET. If your Web API project is created with .NET Core 2.1, you do NOT need to install the NuGet package Microsoft.AspNetCore.Mvc.NewtonsoftJson or add the code to handle the PowerBuilder DateTime values.
Add app.UseDataWindow(); before the line app.MapControllers();
// ...
// more code

var app = builder.Build();

// Configure the HTTP request pipeline.
if (app.Environment.IsDevelopment())
{
    app.UseSwagger();
    app.UseSwaggerUI();
}

app.UseHttpsRedirection();

app.UseAuthorization();

app.UseDataWindow();

app.MapControllers();

app.Run();
Implement CRUD Operations in the Web API
Since the .NET DataStore and PowerBuilder's DataStore are very similar, you perform Create, Retrieve/Read, Update and Delete (CRUD) operations in a similar way as you do in the Web API.
The Web API uses controllers to handle requests. A controller is responsible for the initial processing of the user request and returning the result of the processing. The controller does not directly include data access or business logic. Instead, the controller delegates to services performing user actions and/or retrieving data.
A default SampleController is created when you create the Web API project. You can also create a new one by right-clicking the Controllers folder, then selecting Add -> New Item -> API Controller Class.
Retrieve data
To retrieve data from the database for the .NET DataStore we will need to implement the Retrieve() method (which is declared in the IDepartmentService.cs class, but implemented in the DepartmentService.cs class).
Retrieve() method in the Service
In the DepartmentService.cs class, replace the Retrieve method with the following code.
The following code creates an instance of .NET DataStore using the d_department DataObject and DataContext, and then calls the instance's Retrieve method to retrieve data.
public IDataStore Retrieve()
{
    var ds_Department = new DataStore("d_department", _context);

    ds_Department.Retrieve();

    return ds_Department;
}
Retrieve() action method in the Controller
In the SampleController.cs controller, add the following using statements and define a Retrieve() action method.
using System;
using System.Collections.Generic;
using Microsoft.AspNetCore.Http;
using Microsoft.AspNetCore.Mvc;
using DWNet.Data;
using WebAPI2.Services;
using System.Linq;

namespace WebAPI2.Controllers
{
    [Route("api/[controller]/[action]")]
    [ApiController]
    public class SampleController : ControllerBase
    {
        private readonly IDepartmentService _service;

        public SampleController(IDepartmentService Service)
        {
            _service = Service;
        }

        // GET api/Sample/Retrieve
        [HttpGet]
        [ProducesResponseType(StatusCodes.Status200OK)]
        [ProducesResponseType(StatusCodes.Status404NotFound)]
        [ProducesResponseType(StatusCodes.Status500InternalServerError)]
        public ActionResult<IDataStore> Retrieve()
        {
            IDataStore ds_Department = new DataStore("d_department");

            try
            {
                ds_Department = _service.Retrieve();
            }
            catch (Exception ex)
            {
                return StatusCode(StatusCodes.Status500InternalServerError, ex.Message);
            }

            if (ds_Department.RowCount <= 0)
            {
                return NotFound("No rows retrieved.");
            }
            else
            {
                return Ok(ds_Department);
            }
        }

        // GET api/sample/load
        [HttpGet]
        public ActionResult<IEnumerable<string>> Load()
        {
            return new string[] { "value1", "value2" };
        }
    }

}
The Retrieve() action method will be called by the client using the HTTP GET method. It returns a response type 200 and the data rows in JSON format if rows are retrieved successfully, a response type 404 if no row is retrieved; and a response type 500 with the exception message if there is an internal server error.
Right-click in the Retrieve() method in the SampleController class and then select Run Test(s). In the Web API Tester, click Send. The following JSON is returned:
[{"Departmentid":1,"Name":"Engineering","Groupname":"Research and Development","Modifieddate":"2019-02-26T15:38:26.677"},{"Departmentid":2,"Name":"Tool Design","Groupname":"Research and Development","Modifieddate":"2008-04-30T00:00:00"},{"Departmentid":3,"Name":"Sales","Groupname":"Sales and Marketing","Modifieddate":"2008-04-30T00:00:00"},{"Departmentid":4,"Name":"Marketing","Groupname":"Sales and Marketing","Modifieddate":"2008-04-30T00:00:00"},{"Departmentid":5,"Name":"Purchasing","Groupname":"Inventory Management","Modifieddate":"2008-04-30T00:00:00"},{"Departmentid":6,"Name":"Research and Development","Groupname":"Research and Development","Modifieddate":"2008-04-30T00:00:00"},{"Departmentid":7,"Name":"Production","Groupname":"Manufacturing","Modifieddate":"2008-04-30T00:00:00"},{"Departmentid":8,"Name":"Production Control","Groupname":"Manufacturing","Modifieddate":"2008-04-30T00:00:00"},{"Departmentid":9,"Name":"Human Resources","Groupname":"Executive General and Administration","Modifieddate":"2008-04-30T00:00:00"},{"Departmentid":10,"Name":"Finance","Groupname":"Executive General and Administration","Modifieddate":"2008-04-30T00:00:00"},{"Departmentid":11,"Name":"Information Services","Groupname":"Executive General and Administration","Modifieddate":"2008-04-30T00:00:00"},{"Departmentid":12,"Name":"Document Control","Groupname":"Quality Assurance","Modifieddate":"2008-04-30T00:00:00"},{"Departmentid":13,"Name":"Quality Assurance","Groupname":"Quality Assurance","Modifieddate":"2008-04-30T00:00:00"},{"Departmentid":14,"Name":"Facilities and Maintenance","Groupname":"Executive General and Administration","Modifieddate":"2008-04-30T00:00:00"},{"Departmentid":15,"Name":"Shipping and Receiving","Groupname":"Inventory Management","Modifieddate":"2008-04-30T00:00:00"},{"Departmentid":16,"Name":"Executive","Groupname":"Executive General and Administration","Modifieddate":"2008-04-30T00:00:00"}]
Create/Insert data
To insert data into the database we will need to implement the Create() method.
Create() method in the Service
In the DepartmentService.cs class, replace the Create method with the following code.
The following code creates a .NET DataStore instance ds_Department using the specified DataObject d_department and DataContext _context, then calls this instance's AddRow() method to append the department object as a new row, and finally calls this instance's Update() method to update the data into the database.
public int Create(D_Department department)
{
    var ds_Department = new DataStore("d_department", _context);

    ds_Department.AddRow(department);

    return ds_Department.Update();
}
Create() action method in the Controller
In the SampleController.cs controller, add the following using statement:
using WebAPI2.Models;
And define a Create() action method with the following code:
// POST api/Sample/Create
[HttpPost]
[ProducesResponseType(StatusCodes.Status200OK)]
[ProducesResponseType(StatusCodes.Status409Conflict)]
[ProducesResponseType(StatusCodes.Status500InternalServerError)]
public ActionResult<int> Create([FromBody]IList<D_Department> department)
{
	int insertedRow;

  try
  {
  	insertedRow = _service.Create(department.FirstOrDefault());
	}
  catch (Exception ex)
  {
  	return StatusCode(StatusCodes.Status500InternalServerError, ex.Message);
	}

  if (insertedRow <= 0)
  {
  	return Conflict();
	}
  else
  {
  	return Ok(insertedRow);
	}
}
The Create() action method will be called by the client using the HTTP POST methods. It converts the JSON string in the request body to the department model and then calls the Create method in the service to add the model as a new row. It returns a response type 200 and the number of rows if rows are inserted successfully, a response type 500 if an internal server error occurs, or a response type 409 if a conflict occurs.
The JSON string which contains the data values to be inserted into the database will be sent from a PowerBuilder client app. This app will be created later in the section: Call the Web API from PowerBuilder.
Update/modify data
To modify the data values in the database, we will need to implement the Update() method (which is declared in the IDepartmentService.cs class, but implemented in the DepartmentService.cs class).
Update() method in the Service
In the DepartmentService.cs class, replace the Update method with the following code.
The following code sets the .NET DataStore instance to use the specified DataContext, then calls the instance's Update() method to update the changes to the database.
public int Update(IDataStore departments)
{
    departments.DataContext = _context;

    return departments.Update();
}
Update() action method in the Controller
In the SampleController.cs controller, define an Update() action method with the following code.
// POST api/Sample/Update
[HttpPost]
[ProducesResponseType(StatusCodes.Status200OK)]
[ProducesResponseType(StatusCodes.Status404NotFound)]
[ProducesResponseType(StatusCodes.Status500InternalServerError)]
public ActionResult<int> Update([FromBody] IDataStore department)
{
	int modifiedRows;

  try
  {
  	modifiedRows = _service.Update(department);
	}
  catch (Exception ex)
  {
  	return StatusCode(StatusCodes.Status500InternalServerError, ex.Message);
	}

  if (modifiedRows <= 0)
  {
  	return NotFound("No rows updated.");
	}
  else
  {
  	return Ok(modifiedRows);
	}
}
The Update() action method will be called by the client using the HTTP POST method. It receives a DataStore object which contains the changed data values and calls the Update method in the service to update the changed data values to the database. It returns a response type 200 if the update is successful, a response type 404 if ID is not found or is invalid, or a response type 500 if an internal server error occurred.
The DataStore object which contains the changed data values will be sent from a PowerBuilder client app. This app will be created later in the section: Call the Web API from PowerBuilder.
Delete data
To delete data from the database we will need to implement the Delete() method.
Delete() method in the Service
In the DepartmentService.cs class, replace the Delete method with the following code.
The following code sets the .NET DataStore instance to use the specified DataContext, then calls the instance's Update() method to update the data changes to the database. The Update() method will delete the row according to its update flag.
public int Delete(IDataStore department)
{
	department.DataContext = _context;

  	return department.Update();
}
Delete() action method in the Controller
In the SampleController.cs controller, define a Delete() action method with the following code:
// DELETE api/Sample/Delete
[HttpDelete]
[ProducesResponseType(StatusCodes.Status200OK)]
[ProducesResponseType(StatusCodes.Status404NotFound)]
[ProducesResponseType(StatusCodes.Status500InternalServerError)]
public ActionResult<int> Delete([FromBody]IDataStore department)
{
	int deletedRows;

  try
  {
  	deletedRows = _service.Delete(department);
	}
  catch (Exception ex)
  {
  	return StatusCode(StatusCodes.Status500InternalServerError, ex.Message);
	}

  if (deletedRows <= 0)
  {
  	return NotFound("No rows deleted.");
	}
  else
  {
  	return Ok(deletedRows);
	}
}
The Delete() action method will be called by the client using the HTTP DELETE method. It receives a .NET DataStore with the row(s) to delete in the Delete buffer and calls the delete method in the service to delete the row and update the database. It returns a response type 200 if the deletion is successful, a response type 404 if ID is invalid or is not found, or a response type 500 if an internal server error occurs.
The DataStore object which contains the row to delete will be sent from a PowerBuilder client app. This app will be created later in the section: Call the Web API from PowerBuilder.
Call the Web API from PowerBuilder
Add the JSON DataWindow
A JSON DataWindow is a traditional DataWindow that has a Web API as its data source. You use the same functionalities on the client-side, but the data manipulation is done on the Web API server-side.
In the Create a DataObject in PowerBuilder section, we have created a template PowerBuilder application and a d_department DataObject. Now add a DataWindow control to the sheet window, set its Name to dw_department and DataObject to d_department, and then add four buttons: Retrieve, Insert, Update, and Delete to the window.
Retrieve data for the JSON DataWindow
The PowerBuilder RESTClient object provides the ability to access the RESTful Web APIs. It can load the JSON-formatted string returned from the RESTful Web Service APIs into the DataWindow object.
To retrieve data for the JSON DataWindow, you first need to instantiate the RESTClient object.
Add an instance variable of the RESTClient object in the window.
RESTClient inv_RestClient
On the Open event of the window, create the object variable and set the request headers.
// Create the RESTClient object variable
inv_RestClient	= CREATE RESTClient

// Set the Request Headers to tell the Web API you will send JSON data
inv_RestClient.SetRequestHeader ("Content-Type", "application/json;charset=UTF-8")

// Set the Request Headers to accept GZIP compression
inv_RestClient.SetRequestHeader("Accept-Encoding", "gzip")
On the Clicked event of the Retrieve button, add the RESTClient.Retrieve() function to call the Web API and load the data directly into the DataWindow.
// Retrieve the DW using the RESTClient
inv_RestClient.Retrieve(dw_department, "http://localhost:5000/api/Sample/Retrieve")
Insert, Update, and Delete data using the Web API
On the Clicked event of the Insert button, add the DataWindow.ExportJson() function to export the new data as plain-format JSON string, and add the RESTClient.SendPostRequest() function to call the Web API using the HTTP POST method to send the string to the Web API.
// Variable Declaration
Long	ll_row
Long	ll_rtn
String	ls_json
String	ls_response

// Insert a new row into the DW
ll_row	= dw_department.InsertRow(0)

// Add data to the new row
dw_department.object.departmentid[ll_row]	= 0
dw_department.object.name[ll_row]			= "ProductManagement"
dw_department.object.groupname[ll_row]		= "TechnicalWriting"
dw_department.object.modifieddate[ll_row]	= Today()

// Accept the text of the DW
dw_department.AcceptText()

// Export the DW JSON
// The exported JSON string will be a plain-format string.
ls_json	= dw_department.ExportJson(TRUE, FALSE)

// Call the Create method of the Web API by passing the JSON and catching the response
ll_rtn	= inv_RestClient.SendPostRequest("http://localhost:5000/api/Sample/Create", ls_json, ls_response)

// Add your business logic to validate if the Creation of the department was successful
// ...
Alternatively, you can directly pass the JSON DataWindow using the RESTClient.Submit() function if the Web API can receive an IDataStore type argument.
inv_RestClient.Submit("http://localhost:5000/api/Sample/Update", ls_response, dw_department)
On the Clicked event of the Update button, add the RESTClient.Submit() function to call the Web API using the HTTP POST method. The RESTClient.Submit() function automatically exports the DataWindow JSON, as well as all of its buffers, and sends all rows to the Web API.
// Variable Declaration
Long	ll_rtn
String	ls_response
String	ls_json

// Retrieve the DW from the Web API
inv_RestClient.Retrieve(dw_department, "http://localhost:5000/api/Sample/Retrieve")

// Changes the data values
dw_department.SetItem(1, "name", "Training")

// Call the Web API to submit the changes
ll_rtn = inv_RestClient.Submit("http://localhost:5000/api/Sample/Update", ls_response, dw_department)

// Add your business logic to validate if the Creation of the department was successful
// ...
On the Clicked event of the Delete button, add the RESTClient.SendDeleteRequest() function to call the Web API using the HTTP DELETE method. You can also send your JSON data in the body of the request or you can send individual arguments on the URL.
// Variable Declaration
Int	li_rtn
Int li_dep_id
String	ls_response
String	ls_json

// Note: for the Delete method to actually delete a row, delete a newly inserted row
// since the existing rows have dependent data on other tables.
dw_department.DeleteRow(dw_department.GetRow())

// Accept the text of the DW
dw_department.AcceptText()

// Export the DW JSON
// The exported JSON string will be a DW JSON-format string.
ls_json	= dw_department.ExportJson(TRUE, TRUE)

// Delete data from the JSON DataWindow with the RESTClient
li_rtn = inv_RestClient.SendDeleteRequest("http://localhost:5000/api/Sample/Delete", ls_json, ls_response)

// Check if the delete was successful by looking into the Return code of the RESTClient
IF li_rtn <> 1 THEN
	  // Rest of your code....
End If
Alternatively, you can delete data from the JSON DataWindow with the RESTClient.Submit() function if Web API can receive an IDataStore type argument.
inv_RestClient.Submit("http://localhost:5000/api/Sample/Update", ls_response, dw_department)
Now you can run the PowerBuilder application, and click on each button to test each operation. (Note: Your Web API needs to be running)