Scaffolding Guide
Last updated: December 2023
Prerequisites
Installing the sample database
To use the scaffolding (DB First) feature, you must have an existing database. To install the sample database used in this tutorial, follow these steps:
Install SQL Server Express or SQL Server 2012 or later.
Download the database backup file AdventureWorks for sqlserver.zip from https://github.com/Appeon/.NET-Project-Example-Database.
Restore the database using the downloaded database backup file.
For how to restore the database, please refer to the README.
Configuring the network environment
Using the scaffolding feature will require downloading the required dependencies from the NuGet website, so make sure the current machine has an internet connection.
If connecting to the Internet through a proxy, first make sure that the proxy is working and that the NuGet site is not excluded from the exception list. If the network connection is normal, but SnapDevelop still prompts a network connection error, please restart the SnapDevelop IDE and try again.
Configuring Scaffolding Settings
You can personalize general settings on Tools > Options > Scaffolding.
Selecting Namespace Style
Under Scaffolding > General, you can specify the namespace style for classes in the generated services/controllers. The following namespace styles are available:
Root namespace only
If you select this option, the generated services/controllers use the root namespace you specify in the Namespace setting for the target service(s)/controller(s).
For example, if you set the Namespace field to demo_scaffold1.Services or demo_scaffold1.Controllers when specifying Scaffolding options, the namespace declaration in the generated service/controller will be similar to the following:
namespace demo_scaffold1Full namespace
If you select this option, the namespace in the generated services/controllers will contain both the root namespace and the namespace path, which means that with the above example, the namespace declaration in the generated service will be similar to the following:
namespace demo_scaffold1.ServicesAnd the namespace declaration in the generated controller will be similar to the following:
namespace demo_scaffold1.Controllers
Parsing Rules Settings
Under Scaffolding > Parsing Rules, you can specify how the scaffolding function parses and gets the classes from the source items. Note that you can only define parsing rules for user-defined scaffolding templates.
When Scaffolding Based on a User-Defined Template
At the first step, you need to select a user-defined scaffolding template first. The configured parsing rule will only work for the currently selected template. You can specify different parsing rules for different templates. NOTE: You cannot edit parsing rules for system templates.
Specify Classes and Class Attributes to be Parsed
Get classes by keyword means that the scaffolding function will identify classes from the source items by the keyword Interface, or Class, or both.
Class(es)/Class attribute(s) means that the scaffolding function will identify classes from the source items by the class name or class attributes.
- If you want to parse all classes and/or class attributes in your program, you can select the Class(es) check box and then the Class attribute(s) check box, and leave the input box empty.
- If you want to parse some of the classes and/or class attributes in your program, you can select the Class check box and then the Class attribute(s) check box, and specify the class(es)/class attribute(s) in the input box.
- If you select neither the Class(es) nor the Class attribute(s) check box, no class or class attribute will be parsed.
Scaffolding overview
Scaffolding is a technology to create the model and the database context (DbContext) based on the existing database schema, and then generate the service and the controller based on the model. Specifically, scaffolding reads information about tables, columns, constraints, and indexes from the database, and then uses that information to create the model. Tables are used to create entity types, columns are used to create properties, and foreign keys are used to create relationships. Finally, the service (including the implementation class) and the controller are generated according to the model, and simple CRUD methods are implemented. After the scaffolding process, a completely functioning project is created and can be used directly.
At present, the scaffolding feature reads the schema of the database. For information that does not exist in the schema, such as inheritance hierarchy, own entity, table split, etc., they will not be supported by scaffolding.
The database types that support scaffolding are: Informix, SQL Server, MySQL, Oracle, PostgreSQL, and SQLite.
After making changes to database information, if it is a simple change (for example, renaming a table or column, dropping a column, or updating the type of a column), you can manually change the model. In case of some important or complex changes, it is recommended that you re-run the scaffolding feature to regenerate the model from the database. But be aware that this will cause your changes to the model to be lost.
Currently, SnapDevelop's Scaffolding technology can generate SqlModelMapper models. SqlModelMapper is a data access technology implemented by the ORM framework (SnapObjects) independently developed by the SnapDevelop team.
In SnapDevelop, you can use the scaffolding technologies to quickly:
- Generate model and DbContext
- Generate service and controller (according to model)
- Generate only controller (according to service)
- Generate only DbContext
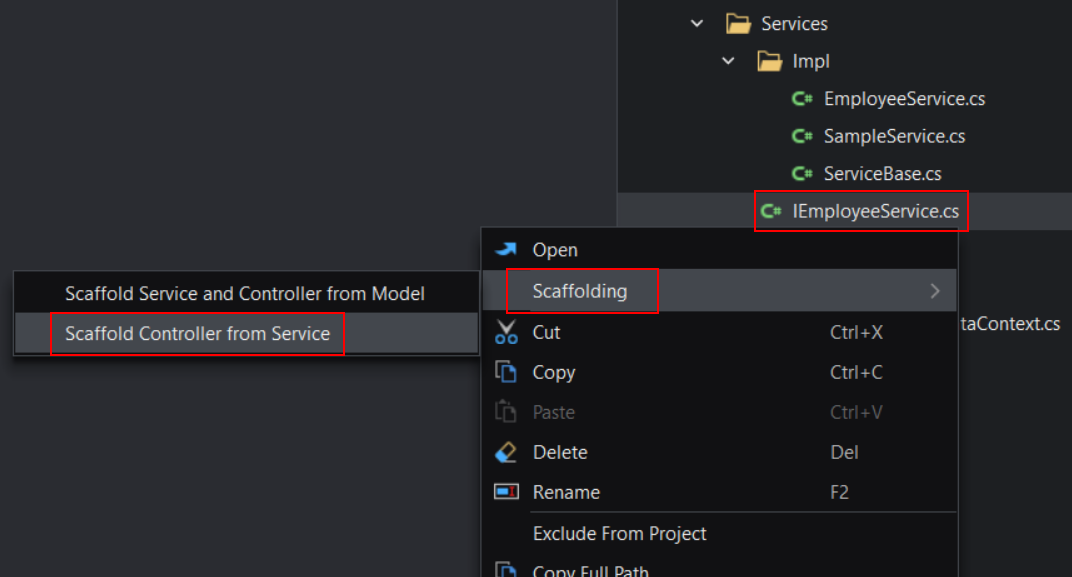
You may see options related to scaffolding in the right-click menu of any .cs file or the folder containing the .cs file (eg. Scaffolding > Scaffold Service and Controller from Model or Scaffolding > Scaffold Controller from Service ), but not all .cs files are suitable for scaffolding feature. Make sure to choose the appropriate cs. file to use the scaffolding feature, for example, you can only scaffold service and controller from a model file, and scaffold a Controller from the Services directory or the Service's Implementation file.
Scaffolding for SqlModelMapper
If you want to use SnapDevelop's scaffolding technology to generate the SqlModelMapper model, you must first create a Web API project of type SqlModelMapper, and then use scaffolding to add the SqlModelMapper model to this project.
Creating a Web API project (SqlModelMapper type)
Below we will show how to create a Web API project of type SqlModelMapper (the project will contain samples of SqlModelMapper model, DataContext, controller, service, etc.).
Select New from the welcome page of the SnapDevelop IDE, or select File > New > New Project from the menu.
In the New Project dialog box, select ASP.NET Core Web API from the template list, and then click Next.

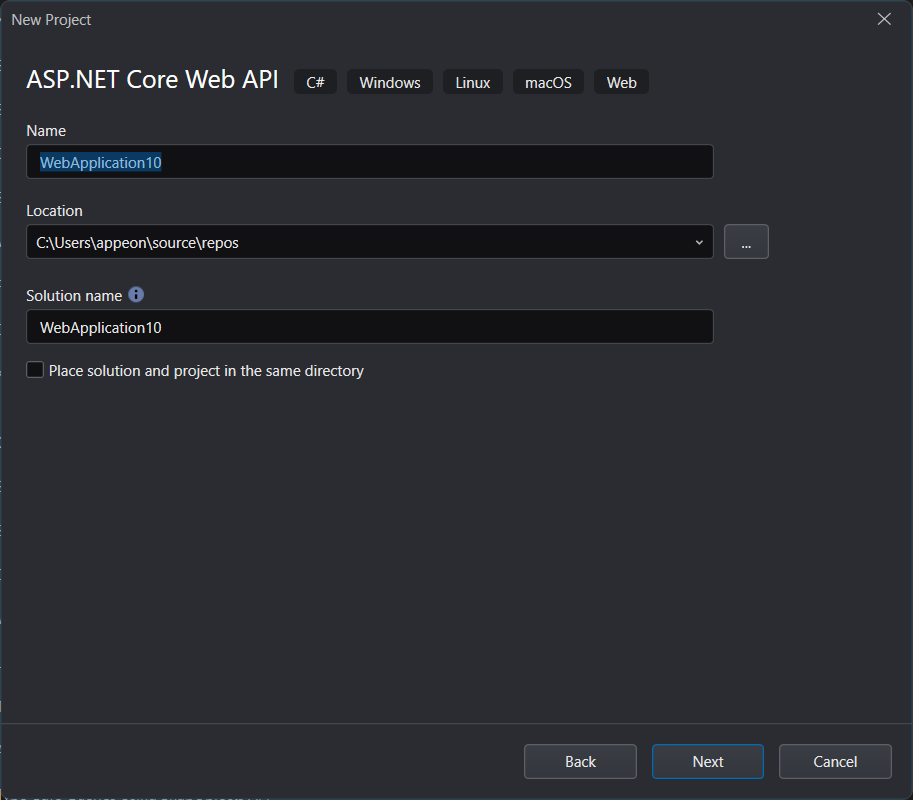
Specify the project name and location, and select whether to create a new solution or add to an existing one. Click Next.
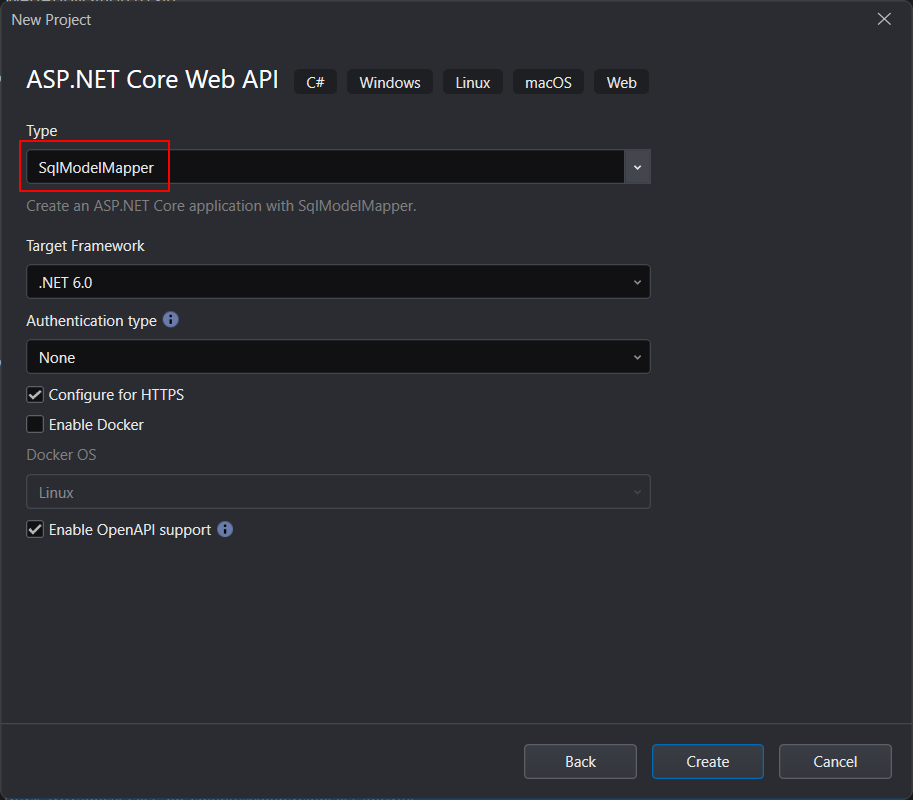
Select SqlModelMapper from the Type drop-down list and click Create.
If you have changed the settings on this page, they will be used as default settings for the next project.
You can choose from the following types:
Basic -- Creates a standard ASP.NET Core application. The application includes a sample controller for building a RESTful HTTP service.
DataStore -- Creates a standard ASP.NET Core application. The application includes samples of using the .NET DataStore, controller, and service for building RESTful HTTP services.
SqlModelMapper -- Creates a standard ASP.NET Core application. The application includes samples of using the SqlModelMapper model, controller, and service for building RESTful HTTP services.
If SqlModelMapper is selected, you can further set the following options:
Target Framework -- The .NET version the project is targeting. Although only the latest three frameworks are listed here (because it is recommended to use the latest framework when creating a project), SnapDevelop is compatible with projects of different frameworks (including Framework). Multiple projects in the same solution can target different .NET versions. After the project is created, the target framework can be modified in the project properties page.
Authentication Type -- The authentication method to use in the application.
Configure for HTTPS -- When this option is enabled, an HTTPS URL and port will be automatically assigned to the Web API service. You can change the HTTPS URL and port in your project's launchSettings.json file.
Enable Docker -- When this option is enabled, the files and configurations required for Docker support will be automatically added to the project.
Docker OS -- The operating system of the Docker runtime environment: Windows or Linux.
Enable OpenAPI Support -- When this option is enabled, the Swagger UI generator will be automatically added to the Program.cs file in the project, and the middleware will be downloaded and enabled so that you can access the Swagger UI page to try out the API directly during the development phase.
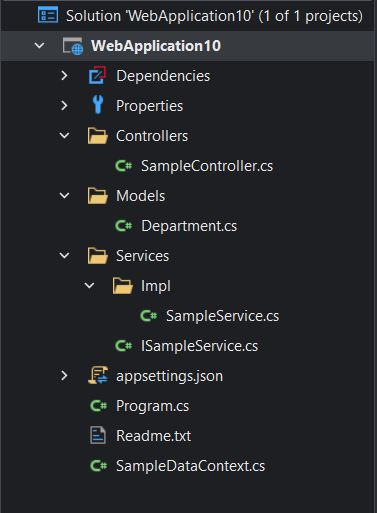
SnapDevelop will create a Web API project that contains the sample files for SqlModelMapper model, DataContext, controller, service (including implementation and interface), and implements simple CRUD methods.
Scaffolding Model and DataContext
In the previous section we created a Web API project (including sample files of SqlModelMapper model, DataContext, controller, and service). In this section we will use the scaffolding feature to generate model and DataContext in this project.
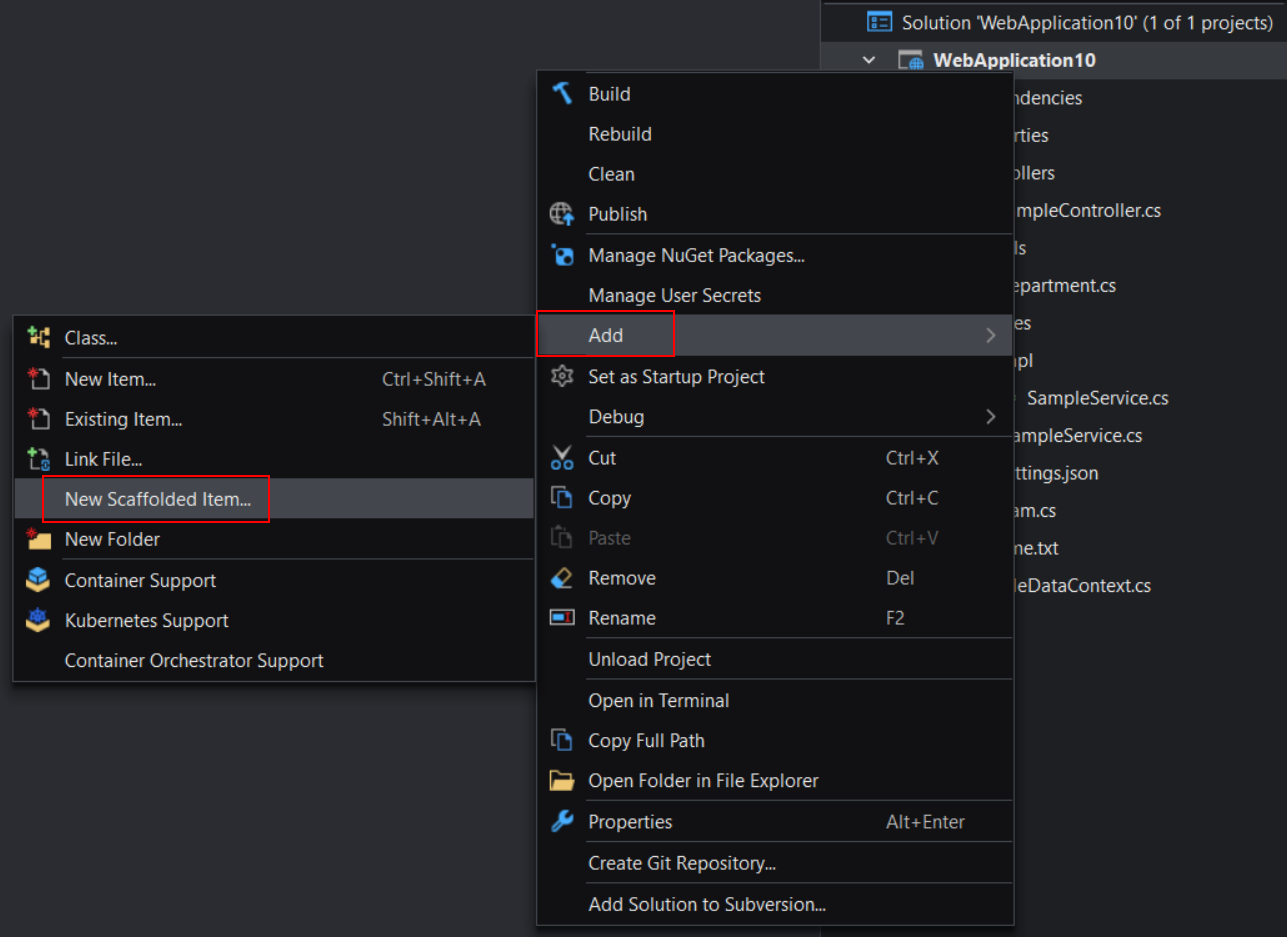
Right-click the project node and select Add > New Scaffolded Item.
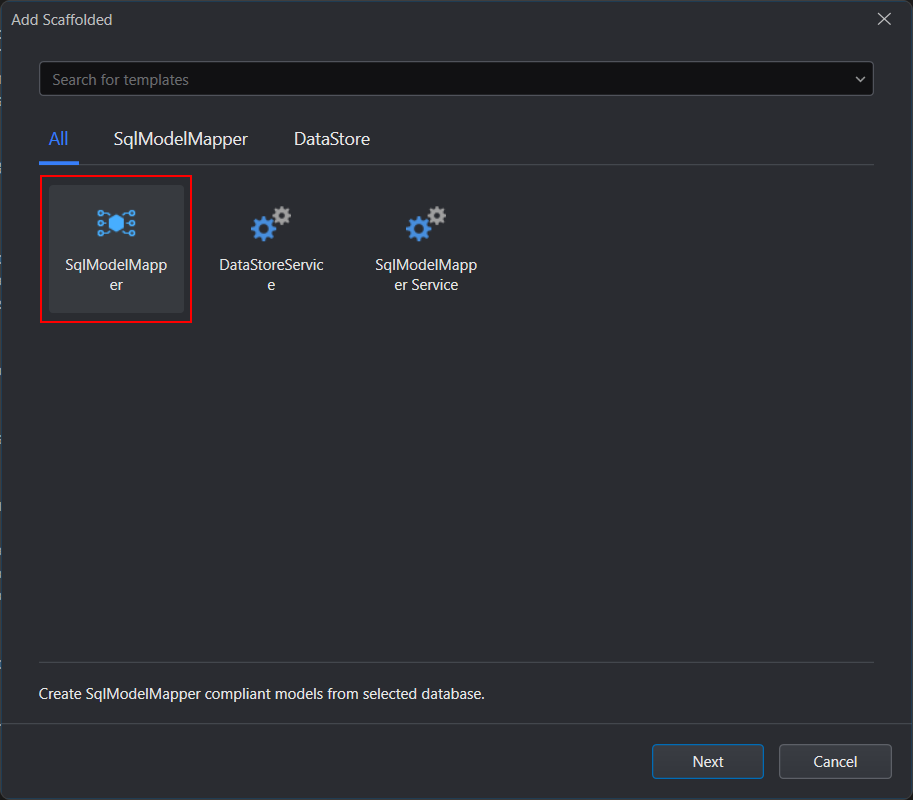
Select SqlModelMapper and click Next.
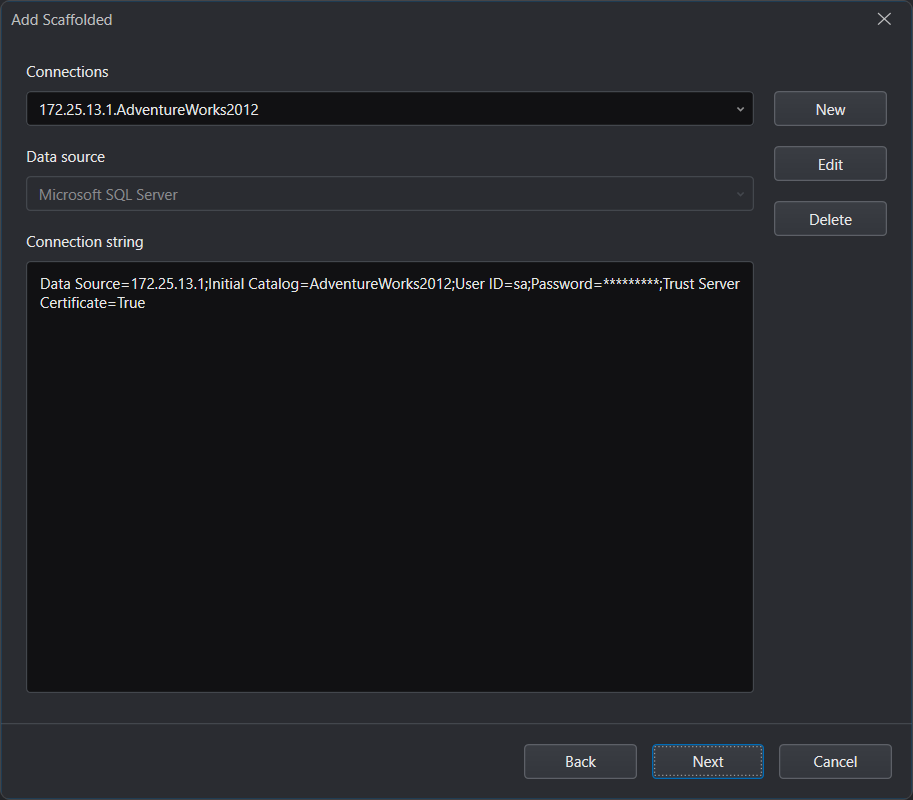
Select an existing database connection from the Connections drop-down list (or click New to create a new database connection). Click Next.
If you have created a database connection before (for example in DB Server Explorer), the created database connection will be displayed here, you can select an existing connection from the Connections drop-down list, or click New to create a new connection. Successfully created connections will automatically appear in the DB Server Explorer. You can manage these connections in DB Server Explorer. See Database Connections for details.
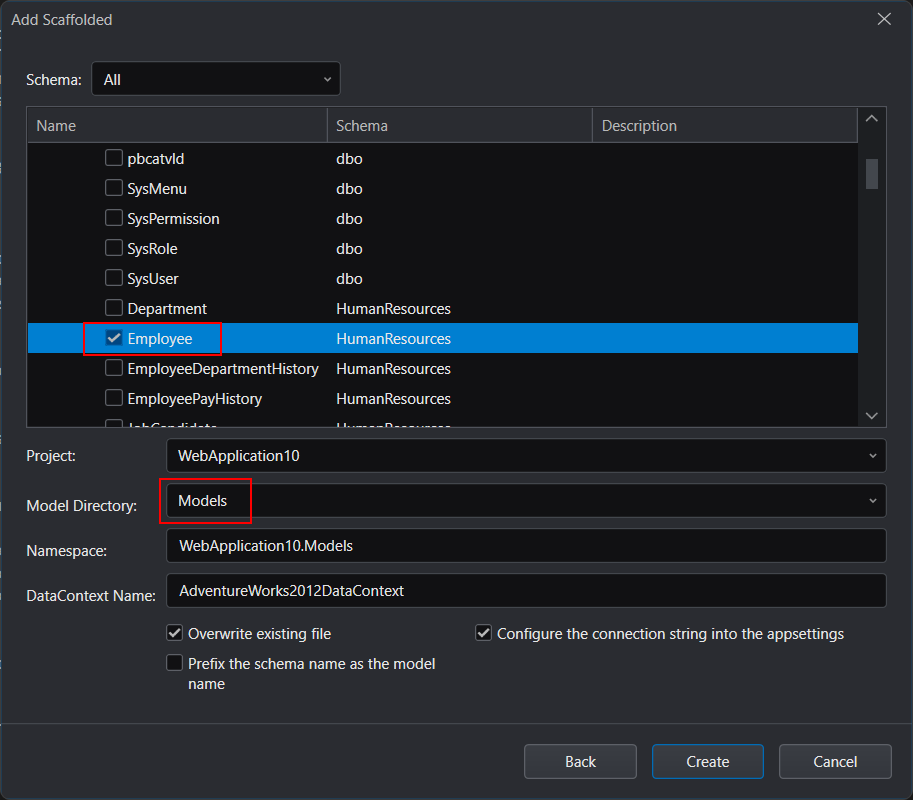
Select tables and/or views. For clarity, we select only the Employee table in the Tables list.
The Model Directory is set to Models by default. Remember the directory (as the model will be generated in that directory). Double check the other settings. Then click Create.
- Schema -- The schema of the database, which can be used to filter the list of tables and views.
- Project -- The project name.
- Model Directory -- The folder for saving the models.
- Namespace -- The namespace used by the project when creating the model, DbContext, controller, and service.
- DataContext Name -- The name of the database context that will be generated.
- Overwrite existing file -- If the file to be created already exists with the same name, you can choose to replace the existing file with the newly generated file. If this setting is not checked, no new file will be generated.
- Configure the connection string into the appsettings -- If checked, the database connection string will be saved in the configuration file (appsettings.json), if not checked, the database connection string (including password) will be stored in plain text in code (the project's DbContext class file). Saving connection strings in code is generally not recommended.
- Prefix the schema name as the model name -- Whether the schema name will be added as the prefix of the model name.
Model and DataContext files are generated in the project.
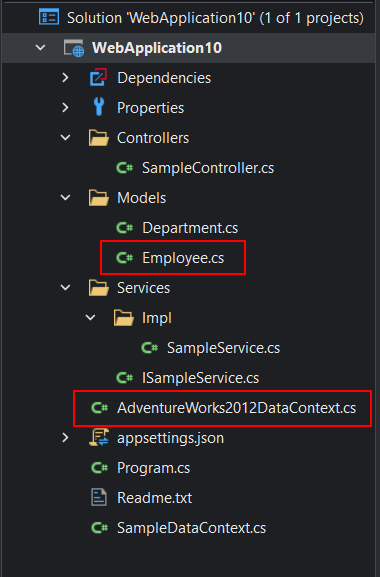
Scaffolding Service and Controller
In the previous section, we used scaffolding to generate model and DbContext in the project. In this section, we will scaffold to generate the service and controller based on the model.
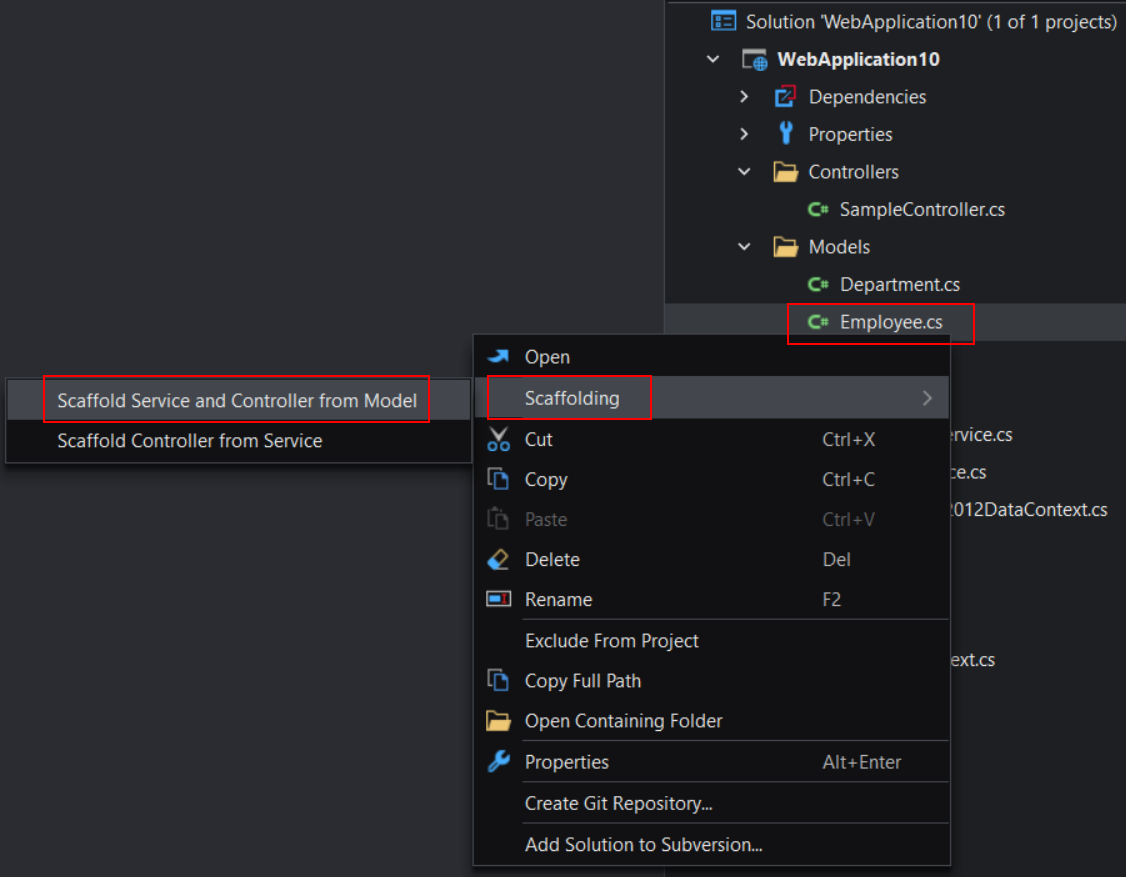
Right-click the model file (or Models node) and select Scaffolding > Scaffold Service and Controller from Model.
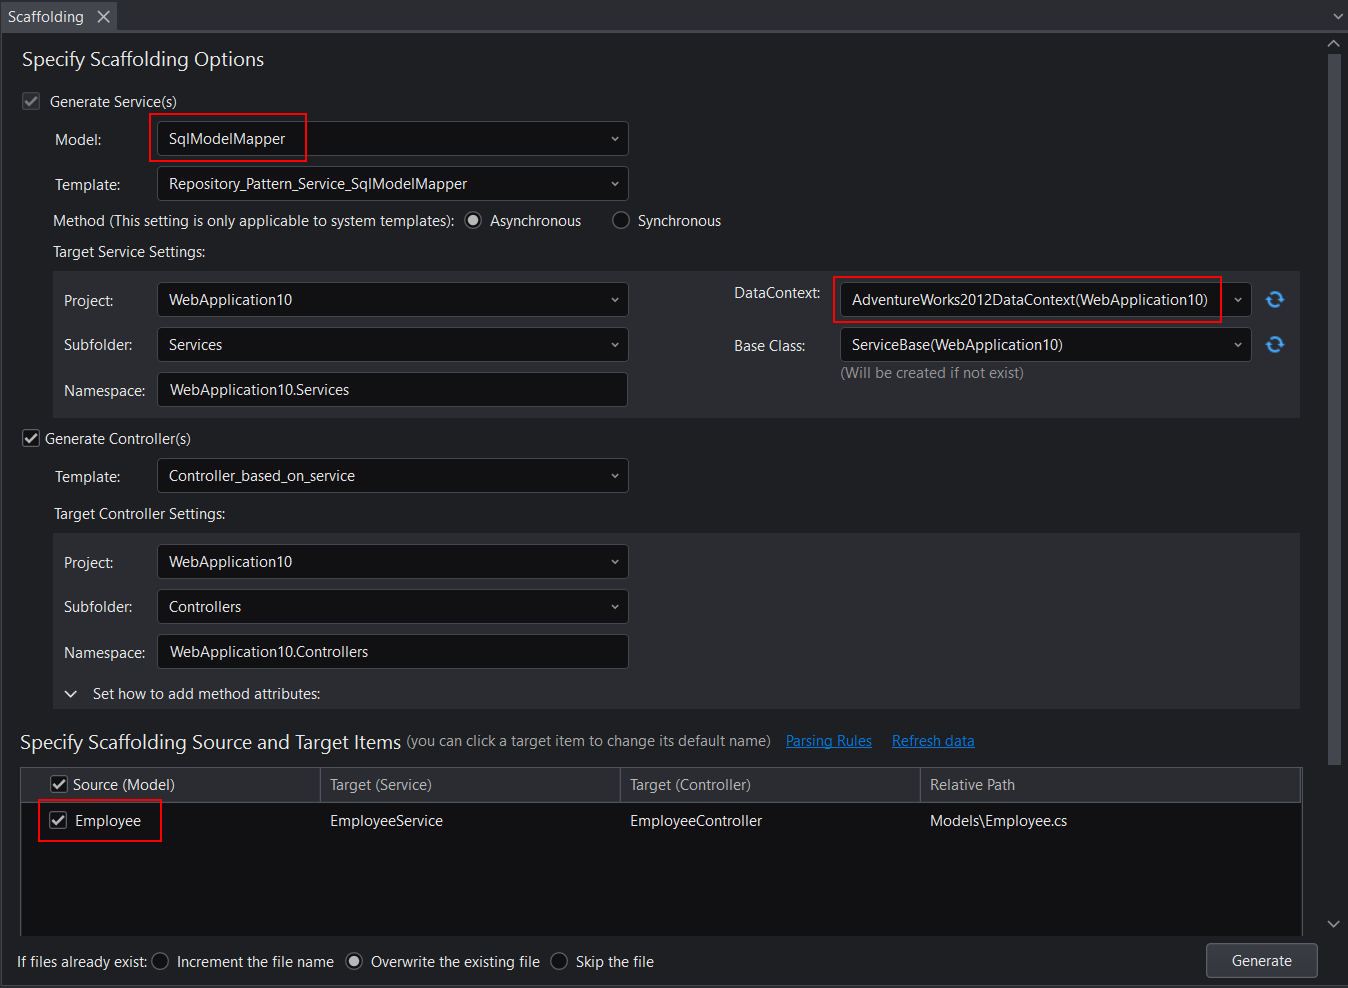
Set Model to SqlModelMapper. Select the DbContext file from the DataContext drop-down list. Verify that the appropriate model file is selected in the list. Click Generate.
The Generate Service(s) options are available only when you select Scaffold Service and Controller for an item in the Solution Explorer.
- Model: Select the type of model that you are scaffolding service(s) from in the list.
- Template: Select a template from the list.
- Method: Select to generate asynchronous or synchronous methods.
When you scaffold controllers from services, the scaffolding function will check whether a method in the service is asynchronous or synchronous, and directly generate asynchronous controllers from synchronous methods, and synchronous controllers from synchronous methods.
- Project: Select from the list the project in which you want to generate the target services.
- Subfolder: Specify the folder where you want to generate the target services. You can select a folder from the list, or choose New Folder to create a new one.
- Namespace: Designate the namespace in the target services.
- DataContext: Specify the data source that the target service will use. You can select one from the list or choose New DataContext to create a new one. If the newly created DataContext doesn't appear in the list, click Refresh to update the list.
- Base Class: Specify whether to generate a base class for the target service. You can select None to skip generating a base class, or specify the base class to use, or select New Base Class to create a new base class. As indicated in the field name, if you specify a base class that already exists in the current project, the base class can be directly used for the target services; if you specify a base class that does not exist yet, the base class will first be created, and then will be used for the target services.
- Set how to add method attributes: These settings allow you to define a set of attributes for the methods in the controllers. For each listed method attribute, specify the method name to which you want to add the method attribute.
Note that if a method is not covered in the setting, scaffolding will decide which method attribute to add for it by checking the parameter of the method:
- If the method has no parameter, the [HttpGet] method attribute will be added to it by default;
- If the method contains one or more parameters with a non-basic C# type, the [HttpPost] method attribute will be added to it by default.
- Specifying Scaffolding Source and Target Items: The system templates use the default parsing rules. If you have selected a user-defined template, you can configure the parsing rules before you specify the scaffolding source. The parsing rules filter out what source items you can select from. For more information about the parsing rules, see Parsing Rules Settings.
- If Files Already Exist: This setting determines what to do if the files to add for the scaffolded items already exist in the target folder. You can select Overwrite to replace the existing files with the newly generated files, Increment the file name to increment the file names when saving the files, or Skip the file to retain the existing files.
If you are prompted to install NuGet packages, click Yes to confirm the install.
After installing the required packages, the control and service (including interface and implementation) will be added to the project.
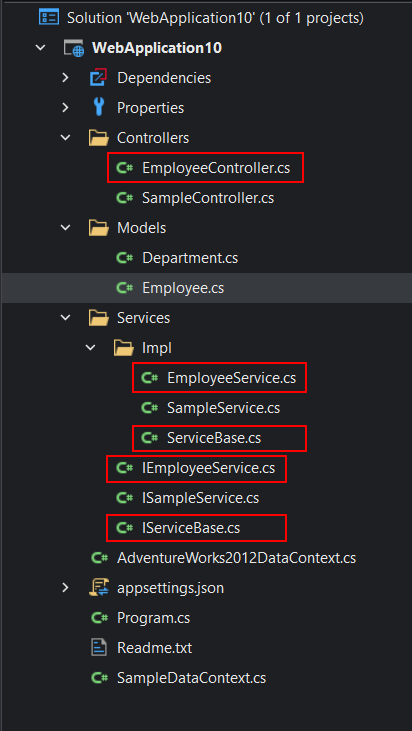
Following is an introduction to the model, DbContext, controller, and service (including implementation and interface) files.
AdventureWorks2012DbContext.cs: This is the database context; the class that manages database connections and transactions.
Models\Employee.cs: This is the entity class model converted from the database table. It maps to the
Employeetable in the AdventureWorks2012 database.Services folder: This folder contains services that perform data operations on the model. A service typically separates its interface from the implementation of that interface. The interface only contains declarations of methods, properties, and events.
\IEmployeeService.cs: This service defines the
IEmployeeServiceinterface, which contains the declarations of the methods. All of the methods are declared with only parameters and return types, but the body is empty.\Impl\EmployeeService.cs: This service provides an implementation of the
IEmployeeServiceinterface. It contains the actual definitions of the methods declared in the interface.
Controllers\EmployeeController.cs: The controller is based on the existing service interface. For example,
EmployeeControlleris based on theEmployeeServiceservice. It defines the routing format, HTTP method and action method corresponding to the service.[Route("api/[controller]/[action]")][controller]will be automatically replaced with the name of the controller, by convention the controller class name minus the "Controller" suffix is the controller name. If the controller class name is EmployeeController, then the controller name isEmployee. This project uses RESTful routing, for example, appendingapi/Employee/RetrieveOne/{businessentityid}to the base URL will cause theRetrieveOneAsync(int businessentityid)action method in theEmployeeControllerclass to be executed.The [HttpGet] attribute represents a method for responding to HTTP GET requests.
"{businessentityid}"is a variable placeholder for the unique identifier of the employee. WhenRetrieveOneAsync(int businessentityid)is called, the value of"{businessentityid}"in the URL will be passed to the method as the value of thebusinessentityidparameter.
Scaffolding only Controller
In addition to scaffolding to generate service and controller, you can also scaffold to generate only controller (based on the service).
Right-click the interface file (or the Services node) and select Scaffolding > Scaffold Controller from Service.
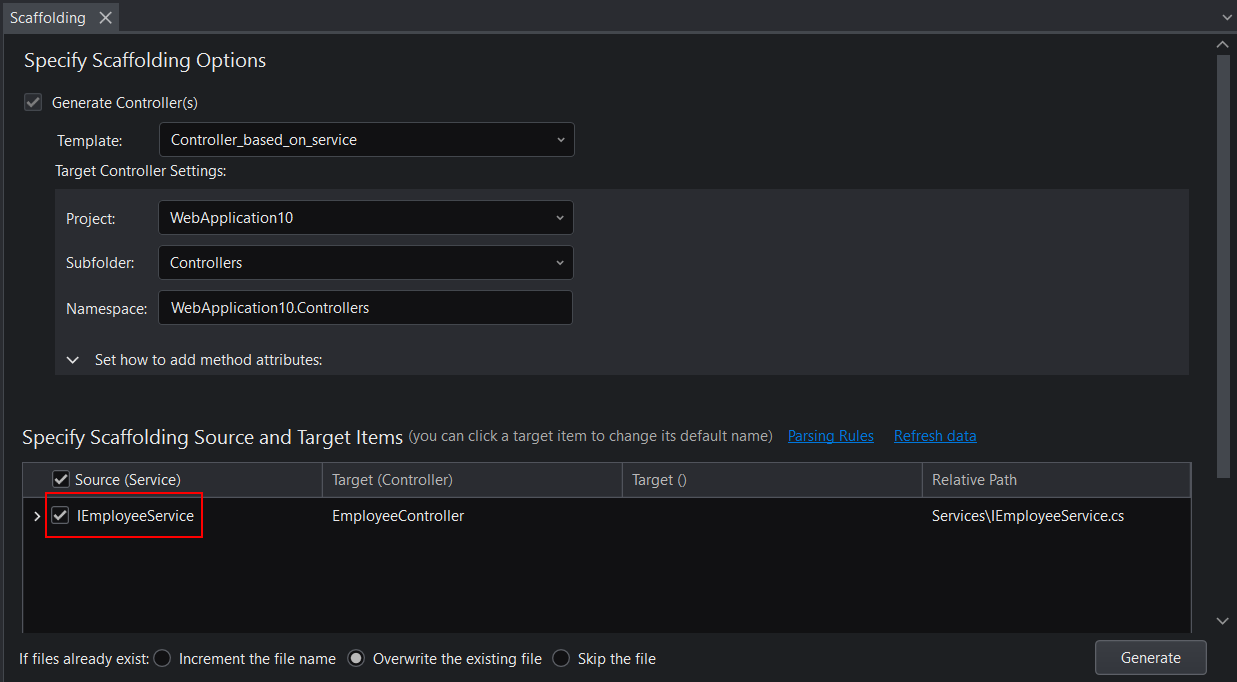
Verify that the appropriate interface file is selected in the list. Click Generate.
- Template: Select a template from the list.
- Project: Select from the list the project in which you want to generate the target controllers.
- Subfolder: Specify the folder where you want to generate the target controllers. You can select a folder from the list, or choose New Folder to create a new one.
- Namespace: Designate the namespace in the target controllers.
- Set how to add method attributes: These settings allow you to define a set of attributes for the methods in the controllers. For each listed method attribute, specify the method name to which you want to add the method attribute.
Note that if a method is not covered in the setting, scaffolding will decide which method attribute to add for it by checking the parameter of the method:
- If the method has no parameter, the [HttpGet] method attribute will be added to it by default;
- If the method contains one or more parameters with a non-basic C# type, the [HttpPost] method attribute will be added to it by default.
- Specifying Scaffolding Source and Target Items: The system templates use the default parsing rules. If you have selected a user-defined template, you can configure the parsing rules before you specify the scaffolding source. The parsing rules filter out what source items you can select from. For more information about the parsing rules, see Parsing Rules Settings.
- If Files Already Exist: This setting determines what to do if the files to add for the scaffolded items already exist in the target folder. You can select Overwrite to replace the existing files with the newly generated files, Increment the file name to increment the file names when saving the files, or Skip the file to retain the existing files.
Scaffolding only DataContext
In addition to scaffolding to generate model and DataContext, you can also scaffold to generate only DataContext.
Right-click the project node and select Add > New Item.

Select DataContext (SnapObjects). Specify the DataContext file name. Click Next.
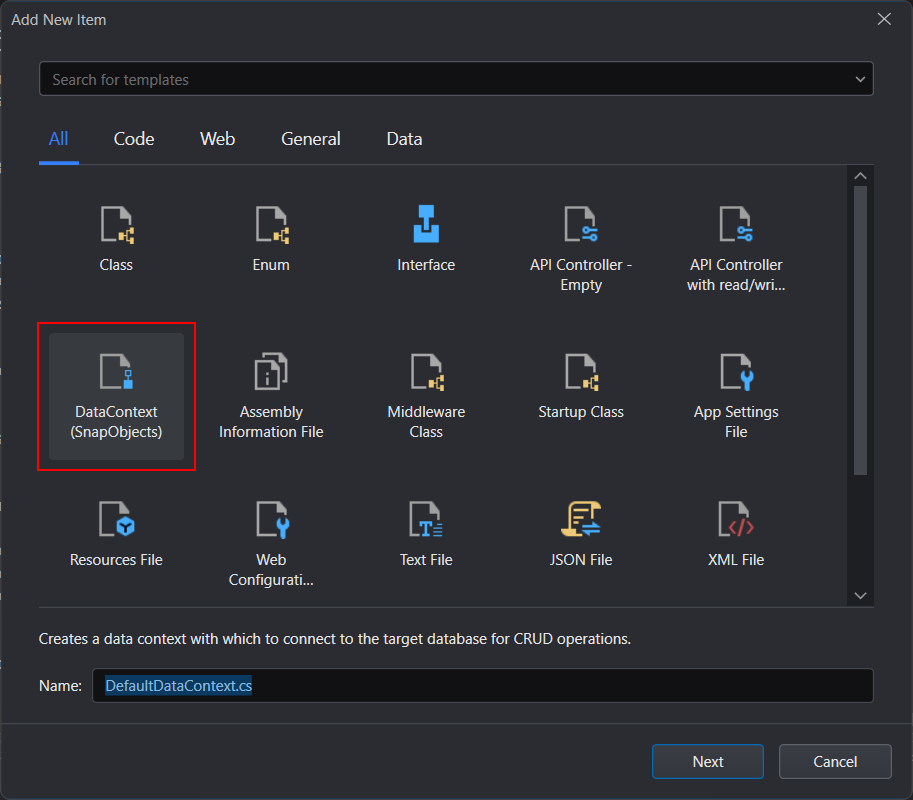
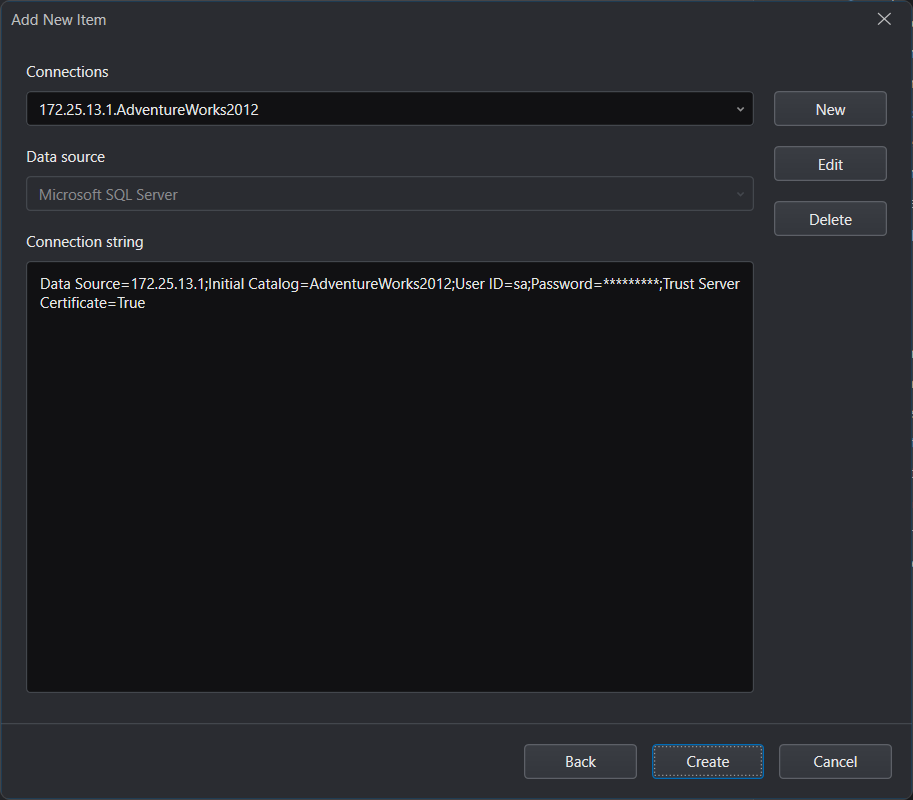
Use an existing database connection (or click New to create a new database connection). Click Create.
