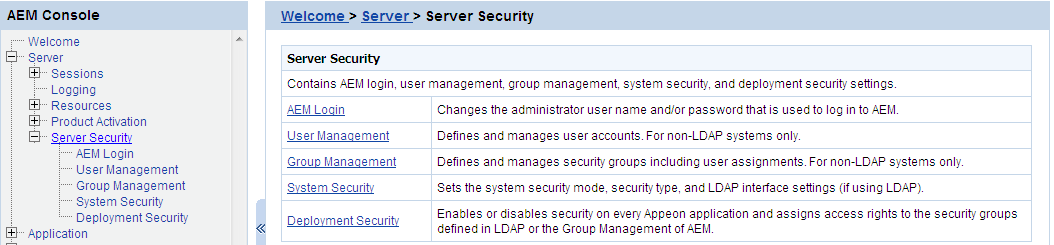
Server Security is a set of tools for viewing and modifying all the security on the server side and prevents unauthorized access to the PowerServer Web application or the PowerServer mobile application using an existing LDAP installation or Appeon's built-in application security. There are five tools: AEM Login, User Management, Group Management, System Security, and Deployment Security.
The user can change the default or current username and password to log in to AEM.

1) Change AEM Password
The new password will overwrite the user's existing password, but the existing username will be used to login. In order to successfully change the password, the user must enter information in the following fields:
-
Old password - Correctly enter the current password (case sensitive).
-
New password - Enter a new password to replace the old password (case sensitive).
-
Confirm password - Retype the new password. The value entered in this field must match the 'New password' field (case sensitive).
2) Change AEM Username
The new username will overwrite the user's existing username, but the existing password will be used to login. In order to successfully change the username, the user must enter information in the following fields:
-
Old username - Correctly enter the current username (case sensitive).
-
New username - Enter a new username to replace the old username (case sensitive).
-
Confirm username - Retype the new username. The value entered in this field must match the New username field (case sensitive)
Note that if this is the first time you are using this AEM Login tool, the old username and password are those you specified when installing the PowerServer. If you did not specify the username and password during the installation, the old user name and password are both "admin" by default. For security purposes, it is recommended that you change the username and password after the initial login.
The User Management tool in AEM can be used to manage two types of users:
-
user accounts for all PowerServer applications including Web apps and mobile apps
-
Appeon Workspace clients for the PowerServer mobile application running in Appeon Workspace
You can create, edit and remove users in this tool. After you create the user, you can assign the users to groups in the Group Management tool.

If the security type is Appeon security, you can use the User Management tool of AEM to set up user accounts. This feature is not applicable to LDAP systems. For LDAP systems, use LDAP to add or remove security groups.
On the User Management page, you can view which users are currently in the system and whether their accounts are enabled or disabled. By default, all existing users are displayed.
User names and associated user information can be viewed in the following two ways:
-
Click the Show All button to display all users.
-
Specify filter criteria to view users:
Step 1: Select User name, Full Name, Account Status, or Description in the dropdown list as the type of filter criteria.
Step 2: Enter the contents that are expected to be included in the item specified in the dropdown list.
Step 3: Enable or disable the "Exact search".
Step 4: Click the Filter button. Users that meet the criteria will be displayed.
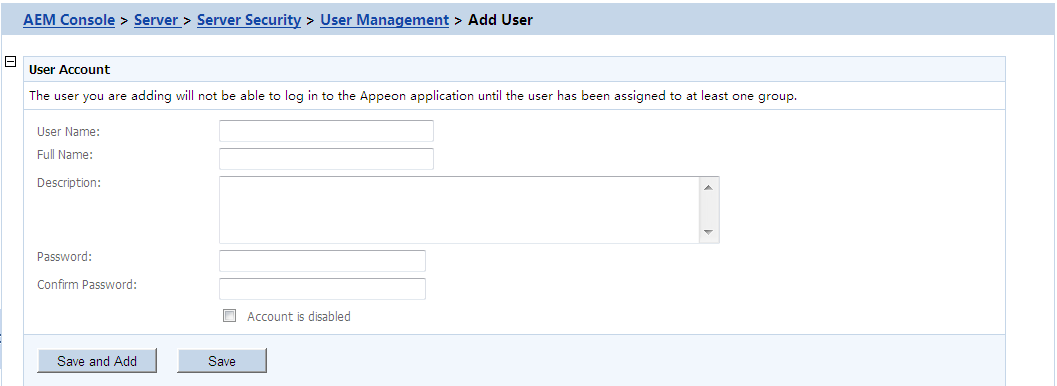
If you want to add one or more users, click the Add User button on the User Management page and the Add User page will be displayed.
-
Username -- The user identifier. This field is required. Chinese characters are unsupported.
-
Full name -- The full name of the user. This field is optional. Chinese characters are unsupported.
-
Description -- Any appropriate user information. This field is optional.
-
Password -- The password of the new user. This field is required.
-
Confirm password -- The user must enter the new password again to confirm the password. This field is required.
-
Account is disabled -- If this checkbox is checked, the user account is disabled.
When the account status is disabled, the user cannot load any application with the username and password if the application requires user authentication.
When the account status is enabled, the user can load an application with the username and password if the account is assigned to a group that is in turn assigned to the application (with application access status enabled).
By clicking the Edit button on the User Management page, you can enter the Edit User page to edit an existing User.

The Edit User is similar to the Add User page except that the user name is not editable. You can modify the full name, the description, or change the password or account status in the same way as you were instructed in Adding a new user.
After making any changes, click the Save button. The changes are updated in PowerServer.
Appeon Workspace Client is intended for security configurations for mobile applications. It works along with Appeon Workspace Group to add extra security to your Appeon Workspace applications.
In the Appeon Workspace Client table on the User Management page, you can view all the existing clients and associated client information in the system. And you can view them in the following two ways. By default, all the existing clients are displayed.
-
Click the Show All button to display all the clients.
-
Specify a filter criteria to view certain clients:
Step 1: Select Client ID, Client Name, Client Status, or Description from the Search Field dropdown list box.
Step 2: Type your relevant keywords in the keyword text box.
Step 3: Enable or disable the Exact Search check box.
Step 4: Click Search. Clients that meet the criteria will be displayed.
To add an new Appeon Workspace client:
Step 1: Click Add Client in the Appeon Workspace Client table.
Step 2: On the Appeon Workspace Client ID page that displays, type a client ID in the Client ID text box; enter a client name in the Client Name text box; and then enter some descriptions for the client in the Description text box.
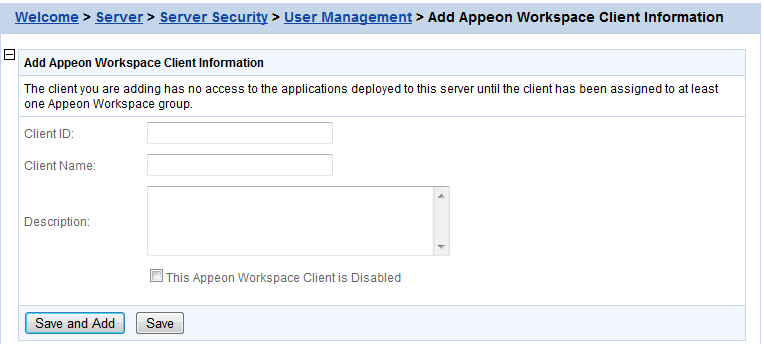
Step 3: (Optional) If you want to disable the Appeon Workspace client so that it cannot access any PowerServer mobile application on this PowerServer, select the This Appeon Workspace Client is Disabled checkbox.
Detailed configuration descriptions are shown in the following table.
Table 35. Add Appeon Workspace Client Items
|
Items |
Descriptions |
|---|---|
|
Client ID |
The unique identifier to identify the mobile device. It must be the same value as the Appeon Workspace ID which can be obtained from the About window of Appeon Workspace. See the Appeon Workspace User Guide for details. |
|
Client Name |
The display name of the mobile client. It can be any text you like. |
|
Description |
Any other information for this mobile client. This field is optional. |
|
This Appeon Workspace Client is Disabled |
The client's accessbility to the PowerServer mobile application on this PowerServer. You can select this checkbox to disable the client account, instead of deleting it. The disabled client cannot access any mobile application on this PowerServer. |
Step 4: Click the Save button to add the client, or click Save and Add to save the client and begin to add another one.
To edit an Appeon Workspace client:
Step 1: In the Appeon Workspace Client table, click the Edit button associated with an Appeon Workspace client ID, and then make the changes you intend to.
You can only change the Appeon Workspace client name and description, and/or you can also enable or disable a client by selecting or deselecting the This Appeon Workspace Client is Disabled checkbox.

Step 2: Click Save to save the changes.
To delete an Appeon Workspace client, click the Delete button associated with an Appeon Workspace client ID in the Appeon Workspace Client table, and click OK to confirm the deletion in the popup dialog box.
You can only delete the Appeon Workspace client one by one.
The Group Management tool in AEM is used to manage user groups and Appeon Workspace groups.
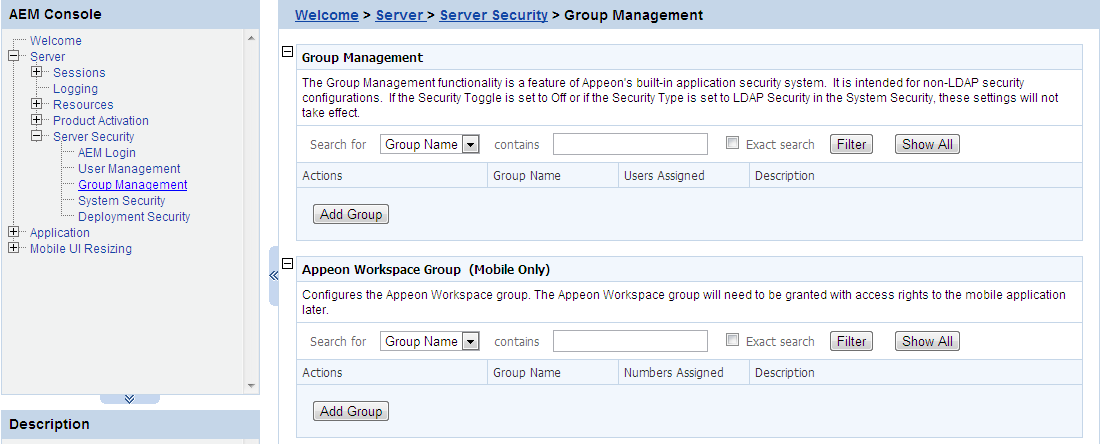
If the security type is Appeon security, you can use the Group Management tool of AEM to set up various security groups and assign user accounts to the groups. This feature is not applicable to LDAP systems. For LDAP systems, use LDAP to add or remove security groups.
The group information and associated user information can be viewed in the following two ways:
-
Click the Show All button to display all the groups.
-
Specify filter criteria to view groups:
Step 1: Select Group or Description in the dropdown list as the type of the filter criteria.
Step 2: Enter the contents that are expected to be included in the item specified in the dropdown list. Based on the criteria, groups that contain the specified information will be displayed.
Step 3: Enable or disable the Exact search.
Step 4: Click the Filter button and the groups that meet the criteria will be displayed.
To add one or more groups, click the Add Group button in the Group Management table and the Add Group page will be displayed.

-
Group name - The group identifier. This field is required. Chinese characters are unsupported.
-
Group description - Some explanation about the group. This field is optional.
-
Assign or unassign users to the group.
-
To assign a user to the group
Select a user from the Unassigned Users list. Click the forward button to shift the user to the Assigned Users list.
By default, all the users are listed in the Unassigned Users list. The users are configured in the User Management tool.
-
To unassign a user from the group
Select a user from the Assigned Users list by clicking it. Click the back button to shift the user to the Unassigned Users list.
-
To edit a specific group, click the Edit button in the Group Management page and enter the Edit Group page.
The Edit Group page is similar to the Add Group page except that the group name is not editable. You can modify the group description, or assign (unassign) users to the group in the same way as instructed in Adding a new group.
Appeon Workspace Group is intended for security configurations for mobile applications.
In the Appeon Workspace Group table, you can view all the groups and associated group information in the system. And you can view them in the following two ways. By default, all the existing groups are displayed.
-
Click the Show All button to display all the groups.
-
Specify a filter criteria to view certain groups:
Step 1: Select Group Name or Description from the Search Field dropdown list box.
Step 2: Type your relevant keywords in the keyword text box.
Step 3: Enable or disable the Exact Search check box.
Step 4: Click Search. Groups that meet the criteria will be displayed.
To add a new Appeon Workspace group:
Step 1: In the Appeon Workspace Group table, click Add Group.
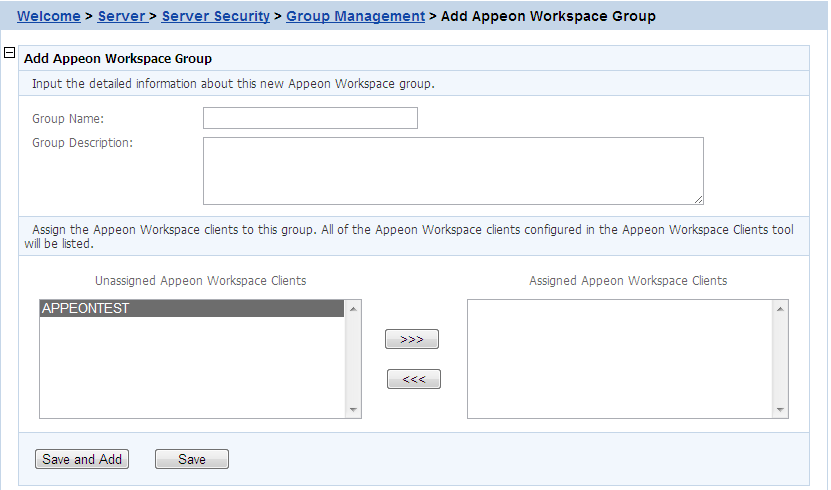
Step 2: On the Add Appeon Workspace Group page that displays, type a group name in the Group Name text box, and then enter a description in the Group Description text box.
Step 3: Assign users into the Assigned Appeon Workspace Clients group
by selecting a client name from the Unassigned Appeon Workspace Clients list
box and then clicking the forward  icon. You can create clients in the Appeon Workspace Client tool.
Step 4: Click the Save button to save the group, or click Save and Add to save the group and begin to add another one.
To edit an Appeon Workspace Group:
Step 1: In the Appeon Workspace Group table, click the Edit button associated with an Appeon Workspace group, and then make the changes you intend to.

You can only change the descriptions and assign new users into the group or delete assigned users from the group, as showing in the following figure.

Step 2: Click Save to save the changes.
To delete an Appeon Workspace Group, click the Delete button associated with an Appeon Workspace group in the Appeon Workspace Group table, and then click OK to confirm the deletion in the popup dialog box.
You can only delete the Appeon Workspace Group one by one.
Managing users and groups "at the LDAP server side" means that the administrator adds/removes/modifies users and groups in the LDAP/LDAPS server rather than in the user management and group management of AEM. The following are the steps to perform LDAP/LDAPS user and group management:
-
Set up the LDAP/LDAPS server in the system
Refer to the documentation supplied by the LDAP/LDAPS server vendor for installation and setup instructions for your LDAP/LDAPS server.
-
Create an organization unit in the LDAP server.
Only a single organization unit can be used to host all the groups and users for the PowerServer Web application or the PowerServer mobile application.
-
Create/manage users and groups in the organization unit in accordance with the LDAP/LDAPS server documentation.
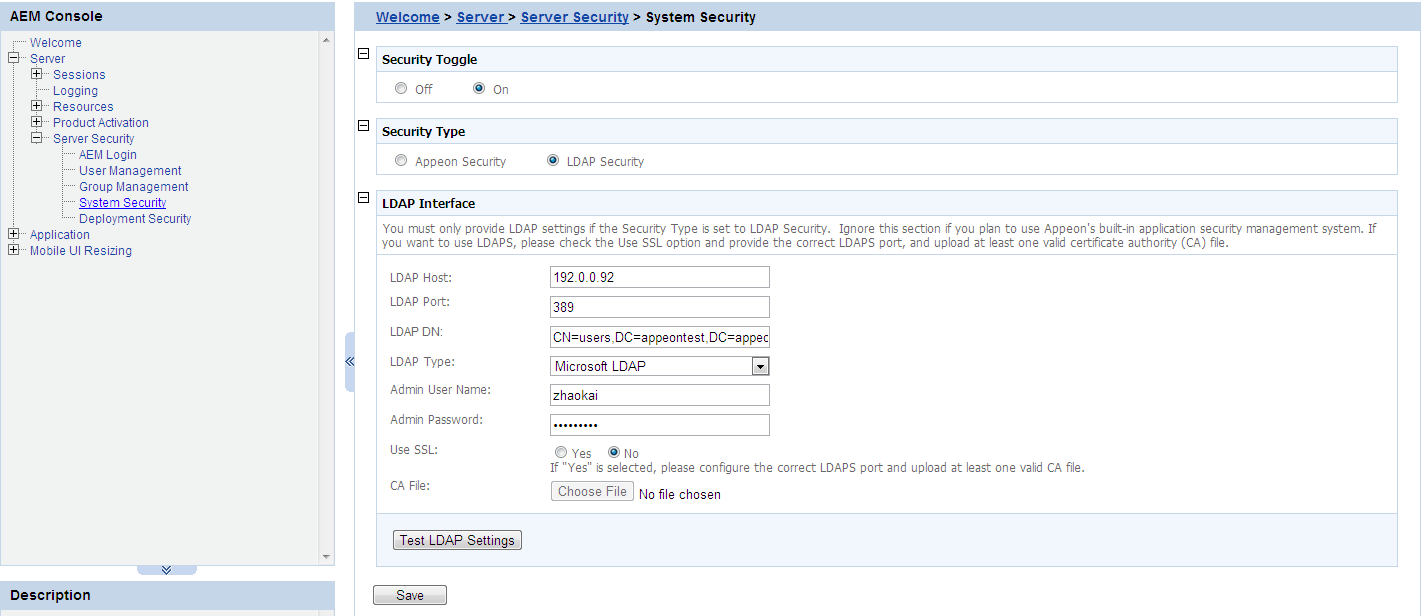
As the above figure illustrates, the System Security covers three important settings:
-
Security Toggle -- Turns application security on and off at the system level. All application security and settings in Client Security are ignored when set to off, but the settings will not be lost.
-
Security Type -- Determines which system, Appeon built-in system or LDAP server, is applied to implement the security feature. Note that the Group Management and User Management tools only work with the PowerServer built-in system.
-
LDAP Interface Settings -- If you are using LDAP server, the user must configure LDAP interface settings to connect the LDAP server with PowerServer.
The following table shows how the Security Toggle and Security Type settings determine which security tools are applied and what security features are performed.
Table 36. Security toggle, Security type and Security Settings
|
Security Toggle |
Security Type |
Settings in Security |
Security Feature |
|---|---|---|---|
|
Off |
Not Available |
Not Available |
Disabled. Unauthorized users have access to load or deploy applications. |
|
On |
Appeon Security |
User Management Group Management Client Security Deployment Security |
The Appeon built-in security is enabled. Only authorized groups and users of a deployed application are allowed to load or deploy the application. Three consecutive invalid logins will result in an exceptional exit of the login dialog from the application. In this case, the user can click the Refresh button to obtain the login dialog again and re-log in with the correct username and password. |
|
LDAP Security |
LDAP Interface Settings Client Security Deployment Security |
Enabled. Any authorized LDAP groups and users of an application are allowed to load or deploy the application. Three consecutive invalid logins will result in an exceptional exit of the login dialog from the application. In this case, the user can click the Refresh button to obtain the login dialog again and re-log in with the correct username and password. |
-
Appeon security and LDAP security provides the user with options of using PowerServer or LDAP to assign groups to the application. The security groups will be read from either LDAP (if it is LDAP security) or PowerServer (if it is Appeon security).
-
When the user attempts to change the security type, a message box will prompt the user to confirm the change.
If you are using the LDAP security, you must perform additional steps to access and manage the user/group information.
There are several limitations about using LDAP with PowerServer:
-
One PowerServer can be configured with only one LDAP domain, which means, all the users and groups must be in a single domain.
-
Only the "Security" type of LDAP Group is supported, not the "Distribution" type.
-
Only "User logon name" (not the "Display name") can be used in the LDAP Logon Dialog when running the application.
For detailed information, please refer to the Appeon LDAP Security Configuration Guide at http://support.appeon.com/index.php?/Knowledgebase/Article/View/22/0/appeon-ldap-security-configuration-guide/.
To access the user and group information on your LDAP server, it is necessary to provide the LDAP interface settings in AEM. AEM interfaces with the LDAP server every time it opens the page that displays the users and groups information stored in the server.
All the fields in the LDAP Interface Settings group box are required:
-
LDAP host -- The IP address or domain name of the LDAP Server.
-
LDAP port -- Port of the LDAP Server.
-
LDAP DN -- The distinguished name uniquely identifies the LDAP directory.
If using Netscape LDAP or Sun LDAP, the LDAP DN should be "ou=AAA, o=BBB", where AAA stands for the organization unit in which all the groups are created, and BBB stands for the domain name.
For Microsoft LDAP, the LDAP DN should be "DC=AAA, DC=BBB, (DC=CCC)", where AAA stands for the domain component (DC) that contains all the groups, and BBB stands for the domain component that contains the AAA component.
If using IBM LDAP, the LDAP DN should be "o=AAA, c=BBB", where AAA stands for the organization suffix, and BBB stands for the country.
-
LDAP type -- Type of the LDAP server.
There are four options (the LDAP servers that PowerServer supports): Netscape LDAP, Sun LDAP, Microsoft LDAP, and IBM LDAP.
Table 37. Supported LDAP types
LDAP types
Requirements
Netscape LDAP
Netscape LDAP 4.2 or above
Sun LDAP
Sun LDAP 5.1 (Sun LDAP is very similar to Netscape LDAP)
Microsoft LDAP
Windows 2000, 2003, & 2008 Active Directory
IBM LDAP
Directory Services (LDAP) 5.1
-
Admin username -- The administrator username.
If using Microsoft LDAP, the username should be the username for the domain of the LDAP (The username has access rights to the specified LDAP domain component).
-
Admin password -- The administrator password.
-
Use SSL -- If Yes is selected, the communication between PowerServer and LDAP Server will use LDAPS protocol. You need to provide the Certificate Authenticated file of LDAPS. If No is selected, the communication between PowerServer and LDAP server will use LDAP protocol.
-
Certificate File -- The Certificate authenticated file of LDAPS.
You can use the Deployment Security tool to manage PowerServer deployment security, which controls what PowerBuilder developers are allowed to deploy applications to PowerServer.
Corresponding to the Deployment Security in AEM, PowerServer Toolkit requires PowerBuilder developers to specify deployment user name and password in the PowerServer profile configuration. If the user name and password of the PowerServer profile does not match the setting in Deployment Security, the PowerServer profile will not take any application deployments.

The Deployment Security tool enables you to do the following:
-
Disable deployment security for PowerServer
Select the Security Off radio button in the "Application Deployment Security Settings" group box. When the deployment security is off, the user name and password in the PowerServer profile will be ignored, and the PowerServer profile will always work for application deployments.
-
Enable deployment security for PowerServer
Step 1: Select the Security On radio button.
Step 2: Select a group from the Unassigned Groups list and click the forward button (">>>") to shift the group to the Assigned Groups list. By doing this, that group obtains the permission to deploy applications to PowerServer. If a user name and password that belongs to the group is specified in the PowerServer profile configuration in PowerServer Toolkit, the profile will work for application deployments. Otherwise, application deployments to the PowerServer profile give an error message "Failed to call methods in PowerServer; cannot find the user..."
By default, all groups are listed in the Unassigned Groups list. The groups are read from the PowerServer (if the security type is Appeon security) or the LDAP server (if the security type is LDAP security) in use. You can use back button ("<<<") to shift the group to the Unassigned Groups list.
