- Add a library to the search path
- Create a new ancestor sheet window
- Create a new sheet window inheritance hierarchy
- Add a DataWindow control for the master DataWindow
- Add a DataWindow control for the detail DataWindow
- View the scripts inherited from the user object
- Add user events and event scripts
- Add scripts to retrieve data for the DataWindow controls
- Adjust a runtime setting for sheet window size
In this lesson you create a window that inherits from the basesheet window that you generated with the Application Template wizard. You add predefined user objects containing DataWindow controls to the inherited window. You then create new w_customers and w_products windows that inherit from this extension layer window instead of from the original basesheet. Finally you make sure that the sheet windows open at runtime with the size you set at design time.
But first you add a library to the library list that contains the predefined user objects with DataWindow controls. In this lesson you:
How long does it take?
About 30 minutes.
Where you are
> Add a library to the search path
Create a new ancestor sheet window
Add user events and event scripts
Add scripts to retrieve data for the DataWindow controls
Adjust a runtime setting for sheet window size
Next you add a library to the tutorial application search path. You must add all libraries on which an application depends.
The library you add to the current application contains some precoded objects, including the user object (u_dwstandard) that you will later add to the base sheet window.
-
Right-click the pbtutor target (not the pbtutor application object) in the System Tree.
The pbtutor target contains the pbtutor.pbl and the pbtutor application.
-
Select Library List from the pop-up menu.
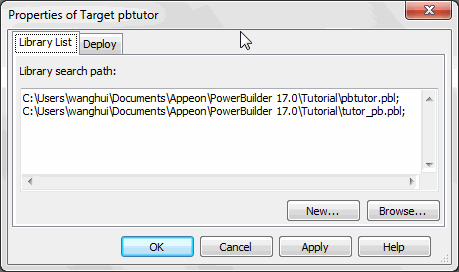
The pbtutor target Properties dialog box displays the Library List page.
-
Click Browse.
The Select Library dialog box displays.
-
Navigate to the Tutorial folder.
Select tutor_pb.pbl and click Open.
You return to the Library List page. The tutor_pb.pbl file is now included in the search path for the tutorial application.
-
Click OK.
Where you are
Add a library to the search path
> Create a new ancestor sheet window
Add user events and event scripts
Add scripts to retrieve data for the DataWindow controls
Adjust a runtime setting for sheet window size
Now you create a window that inherits from the basesheet window you generated with the Template Application wizard and add DataWindow controls to it. In the Source editor, you change the inheritance of the generated sheet windows (w_customers and w_products) to use the new window.
The DataWindow controls you add to the new ancestor window inherit their definitions from a user object that was created for the tutorial application. The user object is provided in the PBL file that you just added to the target library list. The user object is a customized DataWindow control that includes scripts to perform standard database error checking.
Why use a user object
You can build a user object in PowerBuilder to perform processing that you use frequently in applications. Once you have defined a user object, you can reuse it as many times as you need without any additional work.
In this exercise you:
The new window you create now is an extension layer between the basesheet window and application sheet windows. Later in this lesson you make changes to the extension layer window. The changes you make are automatically extended to any new sheet windows that you inherit from the extension layer window.
In the current tutorial application, the w_customers and w_products windows already inherit from the w_pbtutor_basesheet window. Because you have not yet added any non-generic property values or functions to these sheet windows (other than their names and display text), you can write over these wizard-generated windows without having to transfer any code to the replacement windows. In this lesson you overwrite these windows with new windows that inherit from the extension layer window.
-
Select File>Inherit from the PowerBuilder menu.
The Inherit from Object dialog box displays.
-
Make sure that pbtutor.pbl is selected in the Libraries list box and that Windows is selected in the Objects Of Type drop-down list.
If you cannot see the full library list, you can change the size of the dialog box by clicking on one of its edges and holding down the mouse button while you drag the edge toward a corner of the screen. The pbtutor.pbl should be the first of two libraries listed in the Libraries list box.
-
Select w_pbtutor_basesheet in the Object column of the main list box and click OK.
-
Select File>Save As, and in the Save Window dialog box, select w_master_detail_ancestor in the Windows field for the new window name.
-
(Optional) Type the following text in the Comments box:
New ancestor basesheet for the w_customers and w_products sheet windows.
-
Make sure that pbtutor.pbl is selected in the Application Libraries list box and click OK.
Select File>Close to close the new ancestor basesheet.
You cannot create descendant windows if an ancestor window is open in the Window painter.
-
Select File>Inherit from the PowerBuilder menu.
-
Make sure that pbtutor.pbl is selected in the Libraries list box and that Windows is selected in the Objects Of Type drop-down list box.
Select w_master_detail_ancestor and click OK.
-
Type Maintain Customers in the Tag text box on the General page of the Properties view.
Select File>Save As from the PowerBuilder menu and select w_customers in the Windows list box.
-
Change the Comments text to:
Customer sheet window inheriting from w_master_detail_ancestor.
-
Click OK, then click Yes in the Save Window message box that asks if you want to replace the existing w_customers window.
The new sheet window inherits from w_master_detail_ancestor instead of from w_pbtutor_basesheet.
-
Repeat steps 7-11, with the following modifications:
Step
Modified instruction
9
Type Maintain Products in the Tag text box on the General page of the Properties view. Select File>Save As from the PowerBuilder menu and select w_products in the Windows list box.
10
Change the Comments text to: Product sheet window inheriting from w_master_detail_ancestor.
11
The message box prompts you to replace the existing w_products window.
-
Close the new w_customers and w_products windows.
You cannot open an ancestor window in the Window painter if any of its descendants are already displayed in the painter.
-
From the PowerBuilder menu, select Run>Full Build Workspace.
You should rebuild the workspace after changing the inheritance hierarchy and before making modifications to the new ancestor window. You can see the status of the build in the Output window, which displays below the System Tree at the bottom of the PowerBuilder main window. The build is finished when the Output window displays Finished Full build of workspace MyWorkspace.
-
Close the Output window.
Now you add a DataWindow control (saved as the user object, u_dwstandard) to the w_master_detail_ancestor window. It serves as the master DataWindow for the ancestor window and its descendants.
How to create a user object like u_dwstandard
You can create a user object based on a DataWindow control by clicking the New button and selecting Standard Visual from the PB Object page of the New dialog box. This opens the Select Standard Visual Type dialog box. You can then select DataWindow in the Types text box and add user events as needed. You see how to add user events later in this tutorial.
-
Double-click w_master_detail_ancestor in the System Tree.
The w_master_detail_ancestor window opens in the Window painter. You generated this window with the Template Application wizard. The wizard also created and attached a menu to this window, m_pbtutor_sheet. The menu is indicated in the Properties view for the window. You change this property later.
-
Make sure the Layout view is visible in the Window painter.
-
Expand tutor_pb.pbl by double-clicking it in the System Tree.
-
Drag u_dwstandard from the System Tree to the w_master_detail_ancestor window in the Layout view.
-
Widen the window so that the control is completely visible inside the window.
PowerBuilder creates a DataWindow control that inherits its definition from the user object.

-
Make sure the new control is selected in the Layout view.
Small black squares at the corners indicate that the control is selected. The Properties view displays the properties of the selected control.
-
Select the text dw_1 in the Name text box in the Properties view.
-
Type dw_master in the Name text box.
Select the VScrollBar check box.

PowerBuilder adds a vertical scroll bar to the control. It also changes its name to dw_master. The prefix dw_ is standard for DataWindow controls.
Now you add a second DataWindow control that is the detail DataWindow in the application.
-
Resize the window so that there is room for a second DataWindow control below the first.
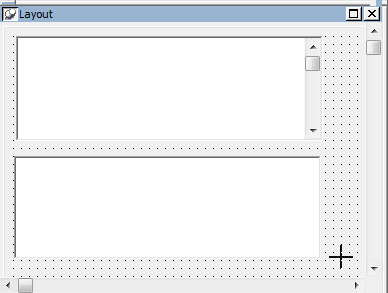
Drag u_dwstandard from the System Tree to below the dw_master control in the Layout view.
PowerBuilder creates another DataWindow control that inherits its definition from the user object u_dwstandard.
-
Move the DataWindow control so that it is completely visible inside the window.
If you need to, you can maximize the Layout view and enlarge the window object inside it to make more room for the DataWindow controls.
-
Make sure that the new control is selected in the Layout view.
The Properties view displays the properties of the selected control.
-
Replace the text dw_1 in the Name text box in the Properties view with
dw_detail
PowerBuilder changes the name of the control to dw_detail.
Now you view the scripts the DataWindow controls inherited from u_dwstandard.
-
Double-click the dw_detail DataWindow in the Layout view
or
Select dw_detail from the first drop-down list box in the Script view if it is not already selected.
The Script view opens to the empty script for the dw_detail control's ItemChanged event.
Unscripted events are alphabetized separately from scripted events. Scripted events are listed at the top of the drop-down list box. You will next look at the dberror event, which contains an ancestor script, so you need to scroll up in the event drop-down list box to find it.
-
Select dberror from the second drop-down list box in the Script view.
This script is also empty, but a purple script icon displays next to the event name. This indicates that the ancestor control (u_dwstandard) has an associated script.
-
Select Edit>Go To>Ancestor Script from the menu bar
or
Select u_dwstandard in the third drop-down list box.
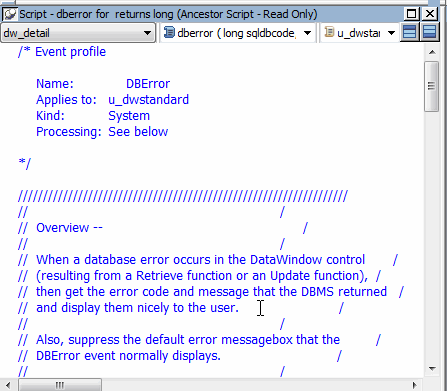
PowerBuilder displays the script for the DBError event in the Script view. The ancestor script is read-only when it is accessed from the Script view for one of its descendants.
-
Scroll through the window to view the database error-handling logic defined for the DBError event.
The script suppresses the default error message that the DBError event normally displays. Instead, it causes an appropriate message to be displayed for each database error that might occur. The script makes calls to user events that were declared for the user object.
Because you used the u_dwstandard object to define both DataWindow controls in the window, this logic is automatically reused in both controls.
-
Select Edit>Go To>Descendant Script from the menu bar
or
Right-click inside the script area of the Script view.
Select Go To>Descendant Script from the pop-up menu.
The third drop-down list box again displays w_master_detail_ancestor, the identifier of the object that contains the current control. The script for the DBError event of this control (dw_detail) is still blank.
Where you are
Add a library to the search path
Create a new ancestor sheet window
> Add user events and event scripts
Add scripts to retrieve data for the DataWindow controls
Adjust a runtime setting for sheet window size
Windows, user objects, and controls have predefined events associated with them. Most of the time, the predefined events are all you need, but there are times when you want to declare your own events. Events that you define are called user events.
Purpose of user events
One reason to define a user event is to reduce coding in situations where an application provides several ways to perform a particular task. For example, a task like updating the database can be performed by clicking a button, selecting a menu item, or closing a window. Instead of writing the code to update the database in each of these places, you can define a user event, then trigger that user event in each place in which you update the database.
Now you define some user events to handle retrieval, insert, update, and delete operations against the tutorial database. You make these changes in the Script view of the Window painter. Later in the tutorial, you add code in the Menu painter to trigger these events.
-
Select w_master_detail_ancestor in the first drop-down list box of the Script view.
-
Select Insert>Event from the menu bar
or
Select New Event in the second drop-down list box of the Script view.
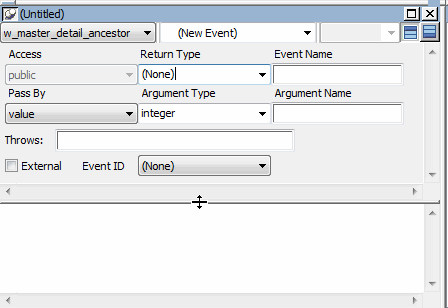
The Script view displays the Prototype window for defining a new event.
The first button to the right of the third drop-down list box is a toggle switch that displays or hides the Prototype window.
-
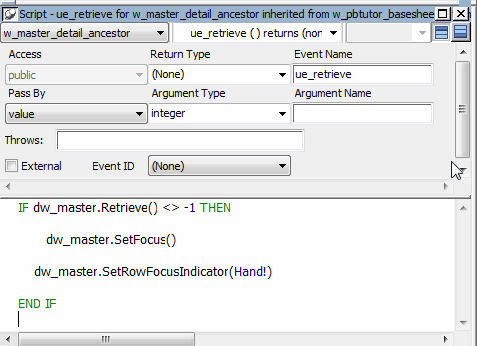
Type ue_retrieve in the Event Name text box in the Prototype window.
Click inside the Script view below the Prototype window.
Type these lines (or use AutoScript as described below):
IF dw_master.Retrieve() <> -1 THEN
    dw_master.SetFocus()
    dw_master.SetRowFocusIndicator(Hand!)
END IF
Using AutoScript instead of typing
You can use AutoScript to paste in the IF THEN template as well as the variables and function names:
Type IF, then press Ctrl+space.
Press Tab to paste an IF THEN statement.
Type dw_m, then press Ctrl+space.
Place the cursor after dw_master, type a dot, then type Ctrl+space.
Scroll and select retrieve( ), press Tab, and type the rest of the line.
Press Ctrl+M to jump to the next comment.
Enter the other function calls by typing them or using AutoScript.
As soon as you clicked in the script area, the text in the second drop-down list box of the Script view changed from New Event to ue_retrieve. It has no arguments, does not return a value, and does not throw user-defined exceptions. For information on throwing user-defined exceptions, see Exception Handling
The script lines you entered execute the Retrieve function and place the retrieved rows in the dw_master DataWindow control. If the retrieval operation succeeds, the script sets the focus to the first row in the DataWindow control and establishes the hand pointer as the current row indicator.
If the retrieve fails
If the retrieval operation does not succeed, PowerBuilder triggers the DBError event. The logic for the DBError event is handled in the user object u_dwstandard. You looked at this script in the previous exercise.
-
Select File>Save from the menu bar.
Right-click the Prototype window and select New Event from the pop-up menu.
PowerBuilder compiles the script you entered for the ue_retrieve event. The Script view displays the Prototype window for another new user event.
If you get an error message
Mistyped or incomplete script entries generate compiler errors. If you select No when prompted to ignore compilation errors, a compiler error area displays at the bottom of the Script view, identifying your error. If this happens, retype the script for the ue_retrieve event.
You can display or hide the compiler error area by clicking the second toggle switch at the top right of the Script view.
-
Repeat steps 3 and 4 for the following entries:
Event name
Script
ue_insert
dw_detail.Reset()
dw_detail.InsertRow(0)
dw_detail.SetFocus()
ue_update
IF dw_detail.Update() = 1 THEN
 COMMIT using SQLCA;
 MessageBox("Save","Save succeeded")
ELSE
 ROLLBACK using SQLCA;
END IF
ue_delete
dw_detail.DeleteRow(0)
What the scripts do
The first line of the script for the ue_insert event clears the dw_detail DataWindow control. The second line inserts a new row after the last row in the DataWindow (the argument zero specifies the last row). The third line positions the cursor in the dw_detail control.
The ue_insert and ue_delete events operate on the DataWindow buffer, not on the database. When these events are triggered, a row is not inserted or deleted from the database unless the Update function is also called (the ue_update event calls this function). If the Update function returns the integer 1, changes made to the buffer are committed to the database. If it returns a different integer, changes to the buffer are rolled back.
In the script for the ue_delete event, the argument zero in the DeleteRow function specifies that the current row in the dw_detail control be deleted.
-
Make sure your work is saved.
If you repeated step 4 for each new event and script that you added, you have already saved your work.
Where you are
Add a library to the search path
Create a new ancestor sheet window
Add user events and event scripts
> Add scripts to retrieve data for the DataWindow controls
Adjust a runtime setting for sheet window size
The scripts you just typed have no effect on the dw_master DataWindow control, but now that you have a script for the ue_retrieve event, you need only trigger this event to retrieve data into the dw_master DataWindow.
You trigger the ue_retrieve event from the sheet window Open event. This retrieves data into the dw_master DataWindow as soon as the window (or one of its descendant windows) opens. Then you add a script for the RowFocusChanged event of dw_master to retrieve data into the dw_detail DataWindow. The RowFocusChanged event is triggered each time the focus is changed inside the dw_master DataWindow.
RowFocusChanged occurs upon DataWindow display
The RowFocusChanged event also occurs when the w_master DataWindow is first displayed. This allows the application to retrieve and display detail information for the first row retrieved in the master DataWindow.
Here is how the script works for the w_master_detail_ancestor window and its descendants when you are done:
-
When a sheet window first opens, a list (of all customers or products) displays in the top DataWindow control. Detail information for the first item in the list displays in the bottom DataWindow control.
-
When a user moves through the list in the top DataWindow control using the up arrow and down arrow keys or by clicking in a row, the details for the current row display in the bottom DataWindow control.
-
Select open from the second drop-down list box in the Script view for w_master_detail_ancestor.
The Open event has a purple script icon indicating it has an ancestor script. If you check the ancestor script, you see that it calls the ue_postopen event and posts it to the end of the window's message queue.
-
Type these new lines in the script area for the w_master_detail_ancestor Open event:
dw_master.settransobject ( sqlca )
dw_detail.settransobject ( sqlca )
this.EVENT ue_retrieve()
The first two lines tell the dw_master and dw_detail DataWindows to look in the SQLCA Transaction object for the values of the database variables. The third line triggers the ue_retrieve event. The pronoun This refers to the current object. In this example, the w_master_detail_ancestor window is the current object.
-
Select dw_master in the first drop-down list box of the Script view.
-
Select rowfocuschanged in the second drop-down list box.
Read the event name carefully
Make sure you select the RowFocusChanged event, and not the RowFocusChanging event.
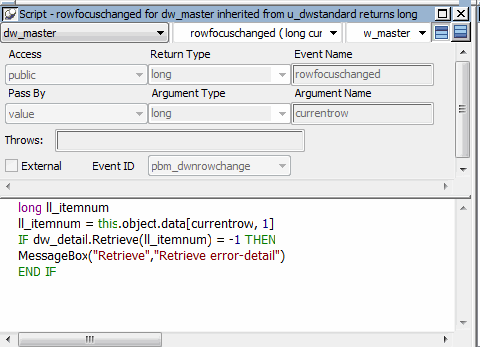
You now add a script for the RowFocusChanged event of the dw_master DataWindow control. This script sends a retrieval request and the ID number of the selected row to the dw_detail DataWindow control.
-
Type this line in the script area for the RowFocusChanged event:
long ll_itemnum
This line declares the local variable ll_itemnum (l is a letter, not a number), which has the long data type.
-
Type this line below the variable declaration line you just typed:
ll_itemnum = this.object.data[currentrow, 1]
Use square brackets
The expression shown above requires square brackets, not parentheses.
This line uses a DataWindow data expression to obtain the item number in column 1 of the currently selected row of dw_master. It stores the number in the variable ll_itemnum.
CurrentRow is an argument passed to the RowFocusChanged event that specifies the current row in the DataWindow control. The current row is the row the user has selected by clicking or by scrolling with the arrow or tab keys.
-
Type these lines below the data expression line you just typed:
IF dw_detail.Retrieve(ll_itemnum) = -1 THEN
 MessageBox("Retrieve","Retrieve error-detail")
END IF
This group of lines sends a retrieval request to the dw_detail DataWindow along with the argument the DataWindow expects (an ID number stored in the ll_itemnum variable). The IF statement that encloses the Retrieve function checks for successful completion. If the retrieval operation fails, it displays an error message box.
-
Click the Save button in PainterBar1.
-
Click the Close button in PainterBar1.
PowerBuilder compiles the script you typed and saves it.
-
Click the Full Build Workspace button in the PowerBar.
It is a good idea to rebuild all your objects after modifying an ancestor object.
-
Close the Output window.
Where you are
Add a library to the search path
Create a new ancestor sheet window
Add user events and event scripts
Add scripts to retrieve data for the DataWindow controls
> Adjust a runtime setting for sheet window size
The Template Application wizard creates a sheet manager that makes the OpenSheet function call to open a sheet window. The OpenSheet function has an argument that can affect the sheet window size at runtime. By default the wizard sets this argument to the Cascaded! value that overrides the sheet window size you set at design time. Now you change this value to allow the runtime window size to be the same as the design time size.
-
Double-click n_pbtutor_sheetmanager in the System Tree
or
Right-click n_pbtutor_sheetmanager in the System Tree and select Edit from the pop-up menu.
-
In the Script view, select (Functions) in the first drop-down list box.
Select of_opensheet in the second drop-down list box.
-
Go to the following line in the script:
li_rc = OpenSheet ( lw_sheet, as_sheetname, w_pbtutor_frame, 0, Cascaded! )
-
Change the Cascaded! argument to Original!:
li_rc = OpenSheet ( lw_sheet, as_sheetname, w_pbtutor_frame, 0, Original! )
-
Click the Save button in PainterBar1.
Click the Close button in PainterBar1.
The next time you run the tutorial application, the sheet windows will open in the size you set at design time. They will still be cascaded relative to other open sheets.


