About this chapter
This chapter describes what you will do in the PowerBuilder tutorial and how to get set up for it.
The PowerBuilder tutorial is divided into parts. The first part of the tutorial is a set of eleven exercises in which you build a Multiple Document Interface (MDI) database application for a fictional company called SportsWear, Inc. The application allows you to retrieve customer and product information from the database and perform insert, update, and delete functions against the customer and product data.
Customer and Product windows
The MDI application includes two windows that provide access to the Customer and Product tables in the Demo database.

These windows are master/detail windows: each allows you to display a master list of rows in a particular table and also see detailed information for each row in the table. For example, the top half of the Maintain Products window contains a list of products with a pointer to a single product; the bottom half of the window displays extra detail for the current product.
Login window
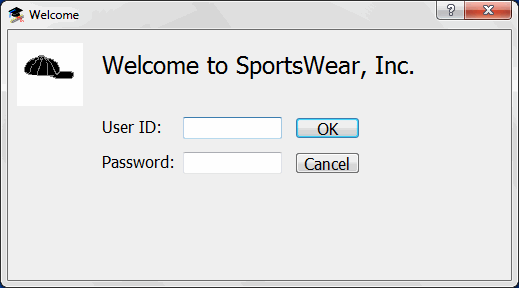
The MDI application also includes a login window that allows you to connect to the database at start-up time.

The following table describes what you will do in each of the tutorial lessons.
|
Lesson |
What you will do |
|---|---|
|
1 |
Start PowerBuilder; begin familiarizing yourself with the development environment; use the Workspace wizard and the Template Application wizard to create an Application object, windows, and menus in a PowerBuilder workspace and target. |
|
2 |
Explore the PowerBuilder environment and customize the workspace. |
|
3 |
Create a login window to allow the user to enter database connection parameters (user ID and password). |
|
4 |
Connect to the database using the Transaction object and user-entry parameters; see how database profiles are defined in the PowerBuilder environment. |
|
5 |
Change the base sheet window by adding master and detail DataWindow controls; add scripts to allow users to retrieve data and perform insert, update, and delete operations against the database. |
|
6 |
Modify the frame menu and create a new sheet menu for the application. |
|
7-8 |
Build the DataWindow objects that retrieve customer and product information, then add them to the Customer and Product windows. |
|
9 |
Run the tutorial application in debug mode; see how to set breakpoints in scripts, step through the code, and display the contents of variables. |
|
10 |
Create a new window to test exception handling in PowerBuilder. |
|
11 |
Create an executable file that you can use to run the application outside the PowerBuilder development environment. |
You can do all the tutorials in about six hours, or you can stop after any lesson and continue at another time.
If you are interrupted
You can save your work and exit PowerBuilder at any time. When you are ready to continue, you can open the tutorial workspace and continue where you left off.
This tutorial will not make you an expert in PowerBuilder. Only experience building real-world applications can do that. It will give you hands-on experience, though, and provide a foundation for continued growth.
Client/server applications
You will learn basic PowerBuilder techniques and concepts, including those listed in the following table:
|
How to use the |
To |
|---|---|
|
Application painter |
Define an Application object and application-level scripts |
|
Window painter |
Create SingleLineEdit controls, StaticText controls, CommandButton controls, DataWindow controls, window-level scripts, and control-level scripts |
|
DataWindow painter |
Define selection and display options |
|
Menu painter |
Define menus, menu items, accelerators, and shortcut keys |
|
Layout view |
Design how the windows, menus, and DataWindows will look when you run the application |
|
Script view |
Define scripts for applications, windows, window controls, and menus |
|
Debugger |
Identify logic errors that may cause problems when you run the application |
|
Project painter |
Create an executable version of an application |
Before you start the tutorial, you need to make sure that you can connect to a database and that you have the tutorial files.
Connecting to a database
The tutorial uses the PB Demo DB V2019R3 database that installs with PowerBuilder. This is an SQL Anywhere database and requires the SAP SQL Anywhere engine.
If you do not already have SQL Anywhere on your local machine or server, you must install it now. You can download and install it from the SAP website. If you installed PowerBuilder in a nondefault location, you must make sure that the odbc.ini registry entry defining the Demo Database as a data source points to the correct location of the SQL Anywhere engine.
The Tutorial directory
The PowerBuilder installation directory includes a Tutorial folder that contains all the files you need to work with the tutorial. The installation also creates a copy of that folder under your user profile directory. You will work with the copy of the Tutorial folder, not the original source. The Tutorial folder locates in %SystemDrive%\Users\[username]\Documents\Appeon\PowerBuilder [version]\Tutorial on Windows:
The Tutorial folder includes the following files:
|
File |
Contents |
|---|---|
|
tutor_pb.pbl |
PowerBuilder library that contains several objects that you use in the tutorial |
|
tutsport.bmp |
A bitmap |
|
tshirtw.jpg |
A graphic |
|
tutorial.ico |
An icon |
When you have finished the tutorial, you can delete the files.
The Tutorial\Solutions directory
The Tutorial\Solutions directory contains a PowerBuilder library called pbtutor.pbl that contains all the objects and scripts that you create in the first part of the tutorial, as well as workspace and target files. You can use this solutions library as a reference while you complete the first part of the tutorial.


