This lesson shows you how to make the application connect to the Enterprise Application Sample demonstration database (Demo Database) at execution time and how to use the Database painter to look at the table definitions and database profile for this database.
In this lesson you:
How long does it take?
About 30 minutes.
Where you are
Run the Connection Object wizard
Modify the connection information
Complete the login and logout scripts
In many organizations, database specialists maintain the database. If this is true in your organization, you might not need to create and maintain tables within the database. However, to take full advantage of PowerBuilder, you should know how to work with databases.
Defining a data source
Using the ODBC administrator or other database connection utilities, you can define a database as a data source for your application. You can access the ODBC Administrator from the DataBase Profiles dialog box. The definitions of ODBC data sources are stored in the odbc.ini registry key.
Using database profiles to connect
Once you define a data source, you can create a database profile for it. A database profile is a named set of parameters that specifies a connection to a particular data source or database. Database profiles provide an easy way for you to manage database connections that you use frequently. When you are developing an application, you can change database profiles to connect to a different data source.
When database connections occur
PowerBuilder can establish a connection to the database in either the design-time or runtime environment. PowerBuilder connects to a database when you open certain painters, when you compile or save a PowerBuilder script that contains embedded SQL statements, or when you run a PowerBuilder application that accesses the database.
To maintain database definitions with PowerBuilder, you do most of your work using the Database painter. The Database painter allows you to:
-
Create, alter, and drop tables
-
Create, alter, and drop primary and foreign keys
-
Create and drop indexes
-
Define and modify extended attributes for columns
-
Drop views
In this exercise you:
If you installed PowerBuilder with standard options, you already have a data source and a database profile defined for the Demo Database. You use the Demo Database in this tutorial.
Demo Database is an SQL Anywhere database that is accessed through ODBC. In this lesson you look at the database profile for the Demo Database. PowerBuilder stores database profile parameters in the registry.
-
Click the Database Profile button (
 ) in the PowerBar
or
Select Tools>Database Profile from the menu bar.
PowerBuilder displays the Database Profiles dialog box, which includes a tree view of the installed database interfaces and defined database profiles for each interface. You can click the + signs or double-click the icons next to items in the tree view to expand or contract tree view nodes.
-
Expand the ODB ODBC node by clicking on the plus sign, and select PB Demo DB V2019R3.
PowerBuilder created this profile during installation.
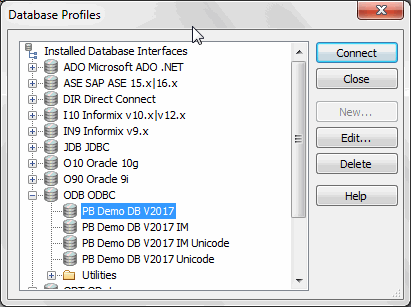
If you do not see the PB Demo DB V2019R3 database profile
If there is no profile for the PB Demo DB V2019R3 database, you may not have installed the database. You can install it now from the product installation package.
If you did install the database and it is defined as a data source in the ODBC Administrator, select ODBC in the tree view of the Database Profile painter and click New. In the Database Profile Setup dialog box, select the data source from the Data Source drop-down list and type PB Demo DB V2019R3 in the Profile Name text box. Type dba for the user ID and sql for the password, then click OK to return to the painter.
-
Click Edit.
PowerBuilder displays the Connection page of the Database Profile Setup dialog box.
-
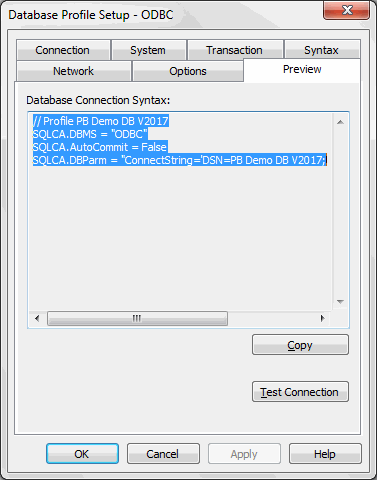
Select the Preview tab.
The PowerScript connection syntax for the selected profile is shown on the Preview tab. If you change the profile connection options, the syntax changes accordingly.
-
Click the Test Connection button.
A message box tells you that the connection is successful.
If the message box tells you the connection is not successful
Close the message box and verify that the information on the Connection page of the Database Profile Setup dialog box is correct. Then check the configuration of the data source in the ODBC Administrator. You can run the ODBC Administrator by expanding the Utilities folder under the ODB ODBC node of the Database Profile painter and double-clicking the ODBC Administrator item.
-
Click OK to close the message box.
Click Cancel to close the Database Profile Setup dialog box.
Click Close to close the Database Profiles dialog box.
Now you look at the definitions for the Customer and Product tables in the Demo Database. This helps you become familiar with the Database painter and the tables you will use in the tutorial.
What happens when you connect
To look at the table definitions, you have to connect to the database. When you connect to a database in the development environment, PowerBuilder writes the connection parameters to the Windows registry.
Each time you connect to a different database, PowerBuilder overwrites the existing parameters in the registry with those for the new database connection. When you open a PowerBuilder painter that accesses the database, you automatically connect to the last database used. PowerBuilder determines which database this is by reading the registry.
-
Click the Database button (
 ) in the PowerBar.
PowerBuilder connects to the database and the Database painter opens. The Database painter title bar identifies the active database connection.
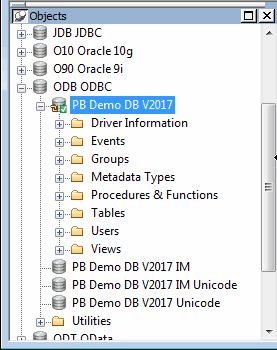
The Objects view of the Database painter displays all existing database profiles in a tree view under the Installed Database Interfaces heading. The PB Demo DB V2019R3 database is visible under the ODB ODBC node in the tree view.
If the Objects view is not open
The Objects view is part of the default view layout scheme. To reset to this scheme, select View>Layouts>Default. You can also open an Objects view by selecting View>Objects from the menu bar.
-
Expand the PB Demo DB V2019R3 database node in the Objects view.
Notice the folders under the PB Demo DB V2019R3 database node.
-
Expand the Tables folder.
You see the list of tables in the database.
Table names might have a prefix
The table names in the Select Tables dialog box might have a prefix such as dba or dbo. This depends on the login ID you are using. You can ignore the prefix.
-
Right-click the customer table and select Add To Layout from the pop-up menu
or
Drag the customer table from the Objects view to the Object Layout view.
Dragging an object from one view to another
When you start dragging an object from the Objects view to another view, the pointer changes to a barred circle. If you continue moving the cursor to a view that can accept the object, the barred circle changes back to a pointer with an additional arrow symbol in a small box. When you see this symbol, you can release the object.
-
Repeat step 4 for the product table.
Widening the Object Layout view
You can widen the Object Layout view by dragging its separator bars toward the painter frame. If the Object Layout view is part of a stack, you might find it easier to separate it from the stack before you change its size.
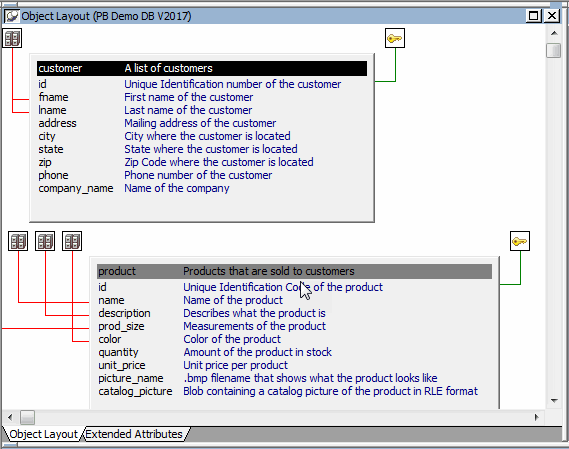
The Object Layout view shows the two tables you selected.
Viewing table data types, comments, keys, and indexes
In the Object Layout view, you can see a description for each column, as well as icons for keys and indexes. If you do not see this, right-click a blank area inside the view and select Show Comments, Show Referential Integrity, and then Show Index Keys from the pop-up menu. If you select Show Datatypes, you also see the data type for each column in the selected tables.
-
Right-click the title bar of the customer table in the Object Layout view and select Alter Table from the pop-up menu
or
Right-click the customer table in the Objects tree view and select Alter Table from the pop-up menu.
The Columns view displays the column definitions for the table.
-
Right-click a column in the customer table in the Object Layout view.
Select Properties from the pop-up menu.
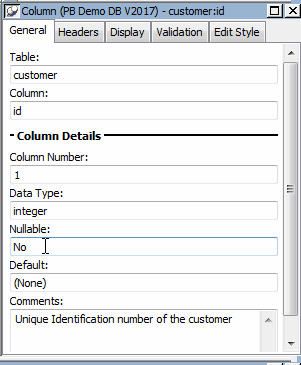
In the Database painter, the Properties view is also called the Object Details view.
The title bar and tab headings for the Object Details view change dynamically depending on the current object selection. The title bar gives the object type, the database connection, and the object identifier.
The Object Details view for a column has five tabs, one for general database properties, one for column header information, and the others for column extended attributes.
About extended attributes
PowerBuilder stores extended attribute information in system tables of the database. Extended attributes include headers and labels for columns, initial values for columns, validation rules, and display formats.
You can define new extended attributes or change the definitions of existing extended attributes from the pop-up menus of items in the Extended Attributes view of the Database painter.
-
Close the Database painter.
Where you are
> Run the Connection Object wizard
Modify the connection information
Complete the login and logout scripts
Now you run the Connection Object wizard to create a connection service manager, which you use to establish the runtime database connection.
The connection service manager is a nonvisual user object. It is nonvisual because it does not have a graphic representation in the runtime application; it is a user object because it is a customized object. You use it to perform database connection processing in a PowerBuilder application.
Why you run a second wizard
If you had specified connection information in the Template Application wizard, you would have created the connection service manager when you generated the application. You can use multiple wizards in building your application.
-
Click the To-Do List button (
 ) in the PowerBar.
The To-Do List was generated by the Template Application wizard.

-
Double-click the Run Connection Object Wizard item in the list
or
Right-click the Run Connection Object Wizard item.
Select Go To Link from the pop-up menu.
This is the next-to-last item in the list. The To-Do List lists what you need to do to complete the application. You can also use the list to make comments to yourself or other developers working on the application.
You can also run the Connection Object wizard from the PB Object page of the New dialog box. You used the New dialog box to run the Template Application wizard in Starting PowerBuilder
The first page of the wizard tells you what it can do.
-
Click Next until the Choose Database Profile page displays.
You accept the wizard's default selections for the destination library (pbtutor.pbl) and the database connectivity options (SQL). The Choose Database Connection Profile page lists all the database profiles stored in the registry.
-
Choose the PB Demo DB V2019R3 in the Database Profiles list box if it is not already selected.
-
Click Next until the Ready To Create Connection Object page displays.
You accept the default settings for the following items:
Wizard page
Option
Default selection
Specify Connectivity Source Info
Source of Connection Information
Application INI File
Connection Service Object
n_pbtutor_connectservice
Name Application INI File
Application INI File
pbtutor.ini
The wizard creates the n_pbtutor_connectservice user object to manage your database connections. If you change an instance variable in this connection service object, you can change the source of connection information to the registry or to a script file. Otherwise, the pbtutor.ini file -- created by the wizard -- is used for application connection information.
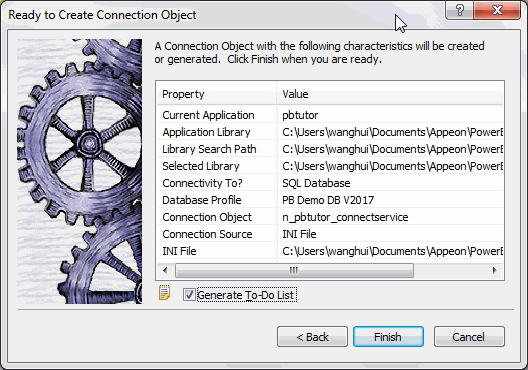
The last wizard page contains a summary of your choices, including the default selections.
-
Click Finish.
The wizard creates the connection service object and opens it in the User Object painter. You can see n_pbtutor_connectservice in the System Tree. The wizard also creates the application INI file. The To-Do List is still open.
-
Close the To-Do List.
Where you are
Run the Connection Object wizard
Modify the connection information
Complete the login and logout scripts
You will next examine the new connection service manager and create a global variable to reference it. A global variable is available to all objects in the application.
In more complex applications, you might prefer to reference the connection service manager with local variables. This would release more memory as soon as the local variable went out of scope. But in the tutorial, you should keep an instance of the connection service manager available as long as the database connection is open.
Establishing a connection
To make it possible for an application to connect to the database at execution time, the connection service manager calls a wizard-generated function to set properties for a Transaction object that serves as a communications area between the application and the database.
SQLCA Transaction object
The connection service manager uses a built-in nonvisual system object, the SQL Communications Area (SQLCA) object, as the default Transaction object. The SQLCA object has several default properties (including database name, login ID, and password) that are populated by the connection service manager.
If an application communicates with multiple databases, you can create additional Transaction objects as needed, one for each database connection.
What is required and what is not
You must have a Transaction object to connect to a database. The connection service manager is not required, but is used in the tutorial because it generates Transaction object properties you would otherwise have to type in an application script.
-
Make sure n_pbtutor_connectservice is open in the User Object painter.
Opening the connection service manager
If the n_pbtutor_connectservice object is not open in the User Object painter, double-click n_pbtutor_connectservice in the System Tree.
The default view layout scheme for the User Object painter includes a Script view and a Declare Instance Variables view as part of a stack of tabbed panes.
-
Make sure n_pbtutor_connectservice is selected in the first drop-down list box of the Script view.
Make sure the Constructor event is selected in the second drop-down list box.
The Script view displays the script created by the Connection Object wizard for the Constructor event.
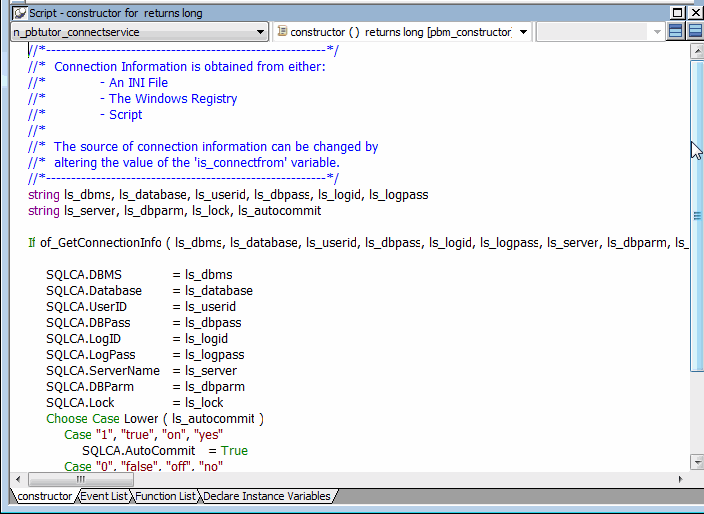
The script calls the function of_GetConnectionInfo to obtain connection information. You will next look at the script for this function.
-
Select Functions in the first drop-down list box in a Script view.
-
Select of_GetConnectionInfo in the second drop-down list box.
The script for this function passes database connection information to the Constructor event of the connection service manager. The information passed depends on an instance variable. In this case, the value of the is_connectfrom variable is 1. You will verify this in a moment. The instance variable is available to all functions and events of the n_pbtutor_connectservice object.
Because the is_connectfrom variable is 1, the connection service manager looks to the Database section of the named INI file to get database connection information using ProfileString function calls. In this case, the named INI file is pbtutor.ini. You created this file with the Connection Object wizard.
Later you modify the pbtutor.ini file and the of_GetConnectionInfo function to make sure that user ID and password information comes from the login window instead of the INI file.
-
Select of_ConnectDB in the second drop-down list box.
This is the connection service manager function that actually connects to the database using the SQLCA Transaction object. You call this function from the login window you created in Building a Login Window
Notice that the wizard-generated script for this function also opens a message box if the database connection fails.
-
Select of_DisconnectDB in the second drop-down list box.
This is the connection service manager function that disconnects from the database. You call this function from the application Close event.
-
Click the Declare Instance Variables tab.
Make sure Instance Variables is selected in the second drop-down list box.
Selecting Declare in Script views
The Declare Instance Variables view is a special instance of the Script view. It displays when you select Declare in the first drop-down list box of the Script view. However, you cannot select Declare if a second Script view already displays instance variables.
You can now verify that the value of the is_connectfrom variable is 1.

-
Select Global Variables in the second drop-down list box.
Drag n_pbtutor_connectservice from the System Tree to the Script view.
Dragging object and function names from the System Tree to the Script view saves time and helps avoid typing errors.
-
Complete the line by typing the variable name after the object name:
n_pbtutor_connectservice gnv_connect
Although you declare this object in the Script view for the n_pbtutor_connectservice user object, it is available everywhere in the application.
Naming conventions for variables
To make scripts easier to read, it is best to follow a standard naming convention. The recommended standard is to give each variable a 2-letter or 3-letter prefix followed by an underscore ( _ ). The first letter of the prefix identifies the scope of the variable (for example: g for global, l for local) and the next letter or letters identify the data type (for example: s for string, l for long, or nv for nonvisual object).
-
Click the Save button in the PainterBar
or
Select File>Save from the menu bar.
PowerBuilder compiles the script and saves it. If you had typed the global variable data type (instead of dragging it from the System Tree) and you made a typing error, an error message would display. You would then correct the error and select Save again.
Where you are
Run the Connection Object wizard
> Modify the connection information
Complete the login and logout scripts
You can now call the connection service manager to establish a database connection, but you should open a database connection only if the user enters a valid ID and password in the login window. You will therefore add the connection service call to the Clicked event of the OK button on this window, substituting user-entered information for information from the pbtutor.ini file.
However, before you add the call to the OK button, you remove or comment out the ProfileString calls that the connection service manager makes to get user ID and password information from the INI file. Then you modify the DBParm parameter in the pbtutor.ini file, because it includes hard-coded user ID and password values that were copied from the pb.ini file.
In this exercise you:
-
Modify the of_GetConnectionInfo function
-
Call the connection service manager
You looked at the of_GetConnectionInfo function in the last exercise. Now you comment out the information that the function returns for the user ID and password information.
If you closed the User Object painter, you must open it again for the n_pbtutor_connectservice user object. You can use the File>Recent Objects menu to redisplay it.
-
Select Functions in the first drop-down list box in the Script view.
-
Select of_GetConnectionInfo in the second drop-down list box.
-
Select the two ProfileString assignment lines that begin:
as_userid       = ProfileString (...)
as_dbpass       = ProfileString (...)
The four arguments of a ProfileString call are the INI file name or variable, the INI file section, the INI file key, and the default value to be used if the INI file name, section, or key is incorrect. These lines are part of the IS_USE_INIFILE case of the CHOOSE CASE statement for the of_GetConnectionInfo function.
-
Click the Comment button (
 ) in PainterBar2.
By commenting out these lines, you make sure that the user ID and password information do not come from the pbtutor.ini file.
-
Click anywhere in the line that begins:
as_dbparm = ProfileString ( ... )
-
Click the Comment button in PainterBar2.
The DBParm parameter in the pbtutor.ini file includes hard-coded values for the user ID and password as well as the database name. You do not use these values. Instead, you assign values to the DBParm parameter from user-entry information for user ID and password.
About the SQLCA DBParm parameter
Although the user ID and password are not required for the DBParm ConnectString, assigning them to the ConnectString overwrites SQLCA user ID and password values in the data source definition for an SQL Anywhere database. For this DBMS, the DBParm parameter also takes precedence over the SQLCA UserID and DBPass parameters.
-
Click the Save button in PainterBar1.
-
Click the Close button in PainterBar1.
You will next call the connection service manager to connect to the database. Because you eventually need to add user-entry information from the login window, you add the call to the Clicked event for the OK button on this window.
An object is considered to be the parent of the controls that are added to it. The login window is therefore the parent of the OK button.
When referring to a parent object in a script, it is usually better practice to use the qualifier parent than to name the object explicitly. This allows the code to be reused more easily for controls placed on a different object. In the script for the Clicked event, you refer to the login window as parent.
Using a single wizard to create the application and connection
If you had created the connection service user object with the Template Application wizard, the code you enter in this exercise to call the connection service manager would have been generated automatically, but it would have been added to the application Open event, not to a Clicked event in a login window. It would also have used a local variable, not a global variable.
-
Double-click w_welcome in the System Tree.
The Window painter opens.
-
Select cb_ok in the first drop-down list box of the Script view
or
Double-click the OK button in the Layout view.
The Clicked event should be the selected event in the second drop-down list box. If it is not, select it. The Clicked event script is empty.
-
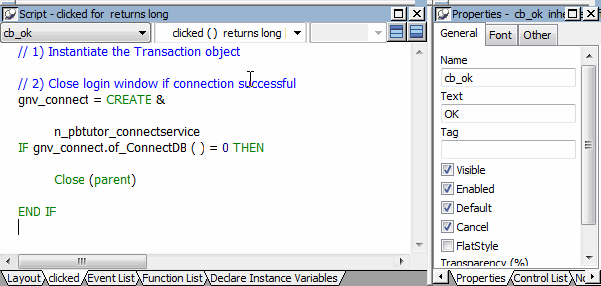
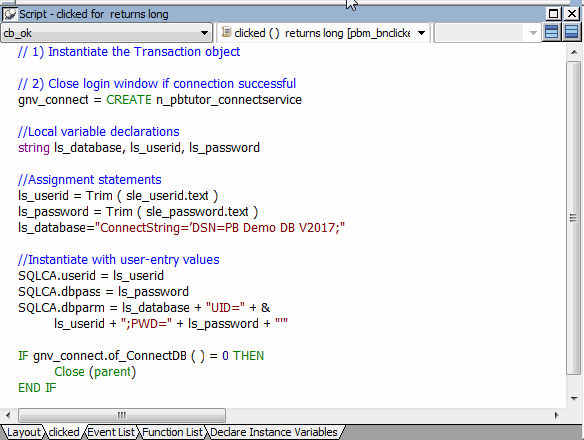
Type these lines:
// 1) Instantiate the Transaction object
// 2) Close login window if connection successful
These lines explain the code you add to the Clicked event. Adding double slash marks at the front of a line turns it into a comment.
-
Type the following assignment statement below the comments:
gnv_connect = CREATE &
         n_pbtutor_connectservice
Do not type the ampersand (&) if you combine the lines of the script into a single line. The ampersand character indicates that a line of script is continued on the next line.
The CREATE statement instantiates the SQLCA Transaction object with all the values retrieved by the of_GetConnectionInfo function from the pbtutor.ini file. Because you previously commented out the lines for the user ID and password, this information is not retrieved.
For ease of reading, you can add blank lines between the comments and the assignment statement for the global variable gnv_connect.
-
Type the following lines below the CREATE statement:
IF gnv_connect.of_ConnectDB ( ) = 0 THEN
         Close (parent)
END IF
The of_ConnectDB function connects the application to the database. As you saw earlier in this lesson, if the connection fails (the SQLCode is not 0), a message box opens and displays the SQL error text.
If of_ConnectDB returns a zero (the SQLCode for a successful connection), the lines that follow the IF-THEN statement line are parsed. In this case, the parent window for the cb_ok control (w_welcome) closes.
-
Click the Compile button in PainterBar2
or
Right-click inside the Script view and click Compile in the pop-up menu.
The script should compile without error. If you get an error message, make sure you have typed object and function names correctly and saved gnv_connect as a global variable.
Toggling the Error window of the Script view
You can show or hide the Error window by clicking the icon at the far right of the Script view just under the title bar.
You still need to code the Clicked event to instantiate the Transaction object with user-entered connection information.
Where you are
Run the Connection Object wizard
Modify the connection information
> Complete the login and logout scripts
Earlier in this lesson, you called the connection service manager from the Clicked event for the login window OK button. Next you add code to the same Clicked event to instantiate the Transaction object with information entered by the user.
You also add code to the login window Cancel button Clicked event and to the application Closed event.
Minimizing typing errors in the Script view
If you right-click inside the scripting area, you open a pop-up menu that includes Paste Special commands. You can use these commands to paste statements, objects, functions or even the contents of text files into the event script. This reduces the risk of typing errors. You can also use AutoScript to complete code, as you will see in this lesson.
In this exercise you:
When you are coding scripts, AutoScript provides help by completing the statement you are typing or displaying a list of language elements that are appropriate to insert in the script at the cursor location.
-
Select Design>Options from the menu bar and click the AutoScript tab.
-
Make sure all the check boxes in the first three group boxes are selected.
-
Make sure the Activate Only After A Dot and Automatic Popup check boxes in the fourth group box are cleared, and click OK.
With these settings, AutoScript provides Help wherever it has enough information to determine what code to insert, but it does not pop up automatically when you pause. By selecting the Statement Templates check box (not selected by default), you can use AutoScript to enter structures for a multiple line PowerScript statement.
-
Select Tools>Keyboard Shortcuts from the menu bar.
Expand the Edit node in the tree.
-
Scroll down and select Activate AutoScript.
With your cursor in the Press Keys For Shortcut box, press Ctrl+Space.
-
Expand the Edit>Go To node in the Current Menu list and select Next Marker.
With your cursor in the shortcut box, press Ctrl+M.
Now whenever you want help completing code, you can press Ctrl+space to see a list of possible completions. If you paste a statement or function with comments, you can press Ctrl+M to move to the next comment.
-
Click OK.
As is often the case when you are developing production applications, you get some of the connection properties from an initialization file and some from user input.
For the tutorial application, you should not get the user ID and password from the tutorial INI file. Get them directly from the user in the login window and then pass the database information in a script.
-
Make sure you are looking at the Clicked event script for the cb_ok control.
This is the script in which you added the call to the Connection Service object.
-
Click before the IF-THEN statement.
Type the following lines:
//Local variable declarations
string ls_database, ls_userid, ls_password

//Assignment statements
ls_userid = Trim ( sle_userid.text )
ls_password = Trim ( sle_password.text )
ls_database="ConnectString='DSN=PB Demo DB V2019R3;"
With these lines you declare local variables and assign them values. Do not use blank spaces around the = signs in the ConnectString text. Do not worry about the lone single quotation mark. You will add a single quotation mark in the next step to complete the connection script.
Using AutoScript to help code the assignment statements
When you type the assignment statements, if you type the letters before the underscore in a variable name and then press Ctrl+space, AutoScript pops up a list of possible completions. Use the arrow keys to move to the correct completion and the Tab key to paste it into your script. If you type the underscore and the first letter after the underscore and then press Ctrl+space, AutoScript pastes the completion directly into your script, as long as there is a unique completion.
The Trim function removes leading and trailing spaces from the user ID and password values passed as arguments to the function from the SingleLineEdit boxes on the login window.
-
Click after the lines you just added (which follow the CREATE statement) but before the IF-THEN statement.
Type the following lines:
//Instantiate with user-entry values
SQLCA.userid = ls_userid
SQLCA.dbpass = ls_password
SQLCA.dbparm = ls_database + "UID=" + &
         ls_userid + ";PWD=" + ls_password + "'"
These lines instantiate SQLCA parameters with values from the SingleLineEdit text boxes.
The lines must be added to the script after the CREATE statement to keep them from being overwritten with blank values from the Constructor event of the connection service manager. They must be added before the IF-THEN statement or their values are not used by the Transaction object when it is called by the of_ConnectDB function of the connection service manager.
-
Click the Compile button in PainterBar2
or
Right-click inside the Script view and click Compile in the pop-up menu.
The script should compile without error. If you get an error message, make sure you have typed object and function names correctly.
Now you add code to the Cancel button to stop the application when this button is clicked.
-
Double-click the Cancel button in the Layout view
or
Select cb_cancel in the first drop-down list box of the Script view.
The script area for the Cancel button is blank.
-
Type this one-line script for the Clicked event:
HALT
This statement terminates the application immediately when the user clicks Cancel on the login window.
-
Click the Save button in the PainterBar
or
Select File>Save from the menu bar.
PowerBuilder compiles the script.
-
Click the Close button in the PainterBar
or
Select File>Close from the menu bar.
The Window painter closes.
Because the connection service manager was called by a global variable, it is still available to the application and does not need to be instantiated again (as it would if you had used a local variable).
Now you call the connection service manager disconnect function to close the database connection.
-
Double-click the pbtutor application icon in the System Tree.
The Application painter displays different views of the tutorial application object. The Script view is part of a stack in the default layout, but you might find it easier to detach it from the stack or open a second Script view.
-
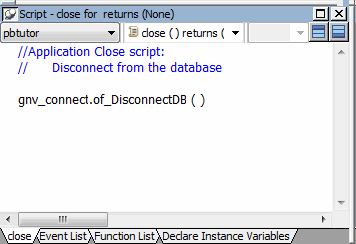
Select close ( ) returns (none) in the second drop-down list box of the Script view.
There is no code yet for the application Close event.
-
Type the following lines for the Close event comment:
Application Close script: Disconnect from the database -
Select all or part of the lines you just added.
Click the Comment button.
-
Type the following line below the comment you typed (you can use AutoScript to complete the variable name and the function name):
gnv_connect.of_DisconnectDB ( )
Releasing memory by setting global variables to null
If this were not the application Close event and you no longer needed an instance of the global connection variable, you could release the memory it occupies by calling the SetNull function.
PowerBuilder also provides a DESTROY statement to destroy object instances. Do not use the DESTROY statement for local or global variables for nonvisual objects. PowerBuilder garbage collection removes any local variables that go out of scope.
-
Right-click anywhere in the script area of the Script view.
Click Compile in the pop-up menu.
PowerBuilder compiles the Close script. If you get an error message, look carefully at the lines you typed to make sure there is no mistyped variable or object name.
-
Click the Close button in PainterBar1.
A message box asks if you want to save your changes to the Application object in the application library file.
-
Click Yes.
This saves your changes and closes the Application painter.
Where you are
Run the Connection Object wizard
Modify the connection information
Complete the login and logout scripts
Now you run the application.
-
Click the Run button (
 ) in the PowerBar.
If a message box prompts you to save changes, click Yes to save them.
The workspace closes and your application runs.
-
Type dba in the User ID box.
Type sql in the Password box.
The password text is displayed as asterisks. Because you set the tab order for this window, you can tab from the User ID box to the Password box, and then to the OK button.
-
Click OK.
The database connection is established and the MDI frame for your application displays.
If you enter an invalid user ID or password
If you mistyped the user ID or password, the Connect to SQL Anywhere (ODBC Configuration) dialog box displays. You get a second chance to enter a valid user ID and password on the Login page of this dialog box. If you click the Test Connection button on the ODBC page of the dialog box without changing this information, a message box tells you that your user ID or password is not valid.
-
Select File>Exit from the menu bar.
The application terminates and you return to the development environment.


