About this chapter
After you install the necessary database software and define the database interface, you can connect to the database from PowerBuilder. Once you connect to the database, you can work with the tables and views stored in that database.
This chapter describes how to connect to a database in PowerBuilder, maintain database profiles, and share database profiles.
Terminology
In this chapter, the term database refers to both of the following unless otherwise specified:
-
A database or DBMS that you access with a standard database interface and appropriate driver
-
A database or DBMS that you access with the appropriate native database interface
This section gives an overview of when database connections occur in PowerBuilder. It also explains why you should use database profiles to manage your database connections.
Connections in PowerBuilder
PowerBuilder connects to your database when you:
-
Open a painter that accesses the database
-
Compile or save a PowerBuilder script containing embedded SQL statements (such as a CONNECT statement)
-
Execute an application that accesses the database
-
Invoke a DataWindow control function that accesses the database while executing an application
How PowerBuilder determines which database to access
PowerBuilder connects to the database you used last when you open a painter that accesses the database. PowerBuilder determines which database you used last by reading a setting in the registry.
What's in this book
This book describes how to connect to your database when you are working in the PowerBuilder development environment.
For instructions on connecting to a database in a PowerBuilder application, see the section called “Database connections” in Application Techniques.
What is a database profile?
A database profile is a named set of parameters stored in the registry that defines a connection to a particular database in the PowerBuilder development environment.
Why use database profiles?
Creating and using database profiles is the easiest way to manage your database connections in PowerBuilder because you can:
-
Select a database profile to establish or change database connections. You can easily connect to another database anytime during a PowerBuilder session. This is particularly useful if you often switch between different database connections.
-
Edit a database profile to modify or supply additional connection parameters.
-
Use the Preview tab page to test a connection and copy the connection syntax to your application code.
-
Delete a database profile if you no longer need to access that data.
-
Import and export profiles.
Because database profiles are created when you define your data and are stored in the registry, they have the following benefits:
-
They are always available to you.
-
Connection parameters supplied in a database profile are saved until you edit or delete the database profile.
To establish or change a database connection in PowerBuilder, use a database profile. You can select the database profile for the database you want to access in the Database Profiles dialog box. For how to create a database profile, see Creating a database profile.
Using the Database painter to select a database profile
You can also select the database profile for the database you want to access from the Database painter's Objects view. However, this method requires more system resources than using the Database Profiles dialog box.
You can select a database profile from the Database Profiles dialog box.
To connect to a database using the Database Profiles dialog box:
-
Click the Database Profile button in the PowerBar or select Tools>Database Profile from the menu bar.
Database Profile button
If your PowerBar does not include the Database Profile button, use the customize feature to add the button to the PowerBar. Having the Database Profile button on your PowerBar is useful if you frequently switch connections between different databases. For instructions on customizing toolbars, see the Users Guide.
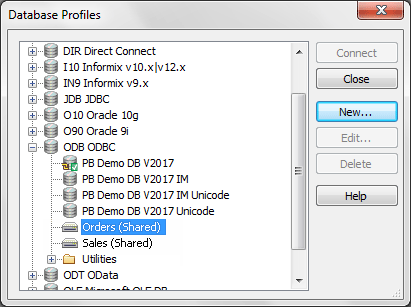
The Database Profiles dialog box displays, listing your installed database interfaces.
Where the interface list comes from
When you run the setup program, it updates the Vendors list in the registry with the interfaces you install. The Database Profiles dialog box displays the same interfaces that appear in the Vendors list.
-
Click the plus sign (+) to the left of the interface you are using or double-click the name.
The list expands to display the database profiles defined for your interface.
-
Select the name of the database profile you want to access and click Connect or display the pop-up menu for a database profile and select Connect.
PowerBuilder connects to the specified database and returns you to the painter workspace.
Database painter Objects view
You can select a database profile from the Database painter Objects view.
To connect to a database using the Database painter:
-
Click the Database painter button in the PowerBar.
The Database painter displays. The Objects view lists your installed database interfaces.
Where the interface list comes from
When you run the setup program, it updates the Vendors list in the registry with the interfaces you install. The Database painter Objects view displays the same interfaces that appear in the Vendors list.
-
Click the plus sign (+) to the left of the interface you are using or double-click the name.
The list expands to display the database profiles defined for your interface.
-
Select the name of the database profile you want to access and click the Connect button, or display the pop-up menu for a database profile and select Connect.
When you connect to a database by selecting its database profile, PowerBuilder writes the profile name and its connection parameters to the registry key HKEY_CURRENT_USER\Software\Sybase\PowerBuilder\19.0\DatabaseProfiles\PowerBuilder.
Each time you connect to a different database, PowerBuilder overwrites the "most-recently used" profile name in the registry with the name for the new database connection.
When you open a painter that accesses the database, you are connected to the database you used last. PowerBuilder determines which database this is by reading the registry.
The three-letter abbreviation for the database interface followed by the name of the database profile displays in PowerBuilder's main title bar. If you are working with a DataWindow object, this visual cue makes it easier to check that you are using the right connection.
For example, if you open the PowerBuilder Code Examples workspace and connect to the Demo database, the title bar displays "pbexamples - ODB [PB Demo DB V2019R3] - PowerBuilder."
Your password does not display when you specify it in the Database Profile Setup dialog box.
However, when PowerBuilder stores the values for this profile in the registry, the actual password does display, in encrypted form, in the DatabasePassword or LogPassword field.
Suppressing display in the profile registry entry
To suppress password display in the profile registry entry, do the following when you create a database profile.
To suppress password display in the profile registry entry:
-
Select the Prompt For Database Information check box on the Connection tab in the Database Profile Setup dialog box.
This tells PowerBuilder to prompt for any missing information when you select this profile to connect to the database.
-
Leave the Password box blank. Instead, specify the password in the dialog box that displays to prompt you for additional information when you connect to the database.
What happens
When you specify the password in response to a prompt instead of in the Database Profile Setup dialog box, the password does not display in the registry entry for this profile.
For example, if you do not supply a password in the Database Profile Setup - Adaptive Server Enterprise dialog box when creating a database profile, the Client Library Login dialog box displays to prompt you for the missing information.
To access a database in a PowerBuilder application, you must specify the required connection parameters as properties of the Transaction object (SQLCA by default) in the appropriate script. For example, you might specify the connection parameters in the script that opens the application.
In PowerBuilder, the Preview tab in the Database Profile Setup dialog box makes it easy to generate accurate PowerScript connection syntax in the development environment for use in your PowerBuilder application script.
For instructions on using the Preview tab to help you connect in a PowerBuilder application, see the section called “Working with Transaction objects” in Application Techniques.
You can easily edit or delete an existing database profile in PowerBuilder.
You can edit a database profile to change one or more of its connection parameters. You can delete a database profile when you no longer need to access its data. You can also change a profile using either the Database Profiles dialog box or the Database painter.
What happens
When you edit or delete a database profile, PowerBuilder either updates the database profile entry in the registry or removes it.
Deleting a profile for an ODBC data source
If you delete a database profile that connects to an ODBC data source, PowerBuilder does not delete the corresponding data source definition from the ODBC initialization file. This lets you re-create the database profile later if necessary without having to redefine the data source.
When you work in PowerBuilder, you can share database profiles among users.
Sharing database profiles between SAP tools
Since the database profiles used by PowerBuilder and InfoMaker are stored in a common registry location, database profiles you create in any of these tools are automatically available for use by the others, if the tools are running on the same computer.
This section describes what you need to know to set up, use, and maintain shared database profiles in PowerBuilder.
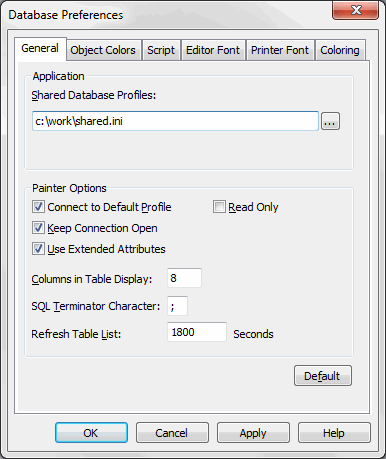
You can share database profiles in the PowerBuilder development environment by specifying the location of a file containing the profiles you want to share. You specify this location in the Database Preferences dialog box in the Database painter.
Where to store a shared profile file
To share database profiles among all PowerBuilder users at your site, store a profile file on a network file server accessible to all users.
When you share database profiles, PowerBuilder displays shared database profiles from the file you specify as well as those from your registry.
Shared database profiles are read-only. You can select a shared profile to connect to a database -- but you cannot edit, save, or delete profiles that are shared. (You can, however, make changes to a shared profile and save it on your computer, as described in Making local changes to shared database profiles.)
You set up shared database profiles in the Database Preferences dialog box.
To set up shared database profiles:
-
In the Database painter, select Design>Options from the menu bar to display the Database Preferences dialog box.
-
In the Shared Database Profiles box on the General tab page, specify the location of the file containing the database profiles you want to share. Do this in either of the following ways:
-
Type the location (path name) in the Shared Database Profiles box.
-
Click the Browse button to navigate to the file location and display it in the Shared Database Profiles box.
In the following example, c:\work\share.ini is the location of the file containing the database profiles to be shared:

-
-
Click OK.
PowerBuilder applies the Shared Database Profiles setting to the current connection and all future connections and saves the setting in the registry.
You select a shared database profile to connect to a database the same way you select a profile stored in your registry. You can select the shared profile in the Database Profiles dialog box or from the File>Connect menu.
Database Profiles dialog box
You can select and connect to a shared database profile in the Database Profiles dialog box.
To select a shared database profile in the Database Profiles dialog box:
-
Click the Database Profile button in the PowerBar or select Tools>Database Profile from the menu bar.
The Database Profiles dialog box displays, listing both shared and local profiles. Shared profiles are denoted by a network icon and the word (Shared).
-
Select the name of the shared profile you want to access and click Connect.
PowerBuilder connects to the selected database and returns you to the painter workspace.
Because shared database profiles can be accessed by multiple users running PowerBuilder, you should not make changes to these profiles. However, if you want to modify and save a copy of a shared database profile for your own use, you can edit the profile and save the modified copy in your computer's registry.
To save changes to a shared database profile in your registry:
-
In the Database Profiles dialog box, select the shared profile you want to edit and click the Edit button.
-
In the Database Profile Setup dialog box that displays, edit the profile values as needed and click OK.
A message box displays, asking if you want to save a copy of the modified profile to your computer.
-
Click Yes.
PowerBuilder saves the modified profile in your computer's registry.
If you maintain the database profiles for PowerBuilder at your site, you might need to update shared database profiles from time to time and make these changes available to your users.
Because shared database profiles can be accessed by multiple users running PowerBuilder, it is not a good idea to make changes to the profiles over a network. Instead, you should make any changes locally and then provide the updated profiles to your users.
To maintain shared database profiles at your site:
-
Make and save required changes to the shared profiles on your own computer. These changes are saved in your registry.
For instructions, see Making local changes to shared database profiles.
-
Export the updated profile entries from your registry to the existing file containing shared profiles.
For instructions, see Importing and exporting database profiles.
-
If they have not already done so, have users specify the location of the new profiles file in the Database Preferences property sheet so that they can access the updated shared profiles on their computer.
For instructions, see Setting up shared database profiles.
Each database interface provides an Import Profile(s) and an Export Profile(s) option. You can use the Import option to import a previously defined profile for use with an installed database interface. Conversely, you can use the Export option to export a defined profile for use by another user.
The ability to import and export profiles provides a way to move profiles easily between developers. It also means you no longer have to maintain a shared file to maintain profiles. It is ideal for mobile development when you cannot rely on connecting to a network to share a file.
To import a profile:
-
Highlight a database interface and select Import Profile(s) from the pop-up menu. (In the Database painter, select Import Profile(s) from the File or pop-up menu.)
-
From the Select Profile File dialog box, select the file whose profiles you want to import and click Save.
-
Select the profile(s) you want to import from the Import Profile(s) dialog box and click OK.
The profiles are copied into your registry. If a profile with the same name already exists, you are asked if you want to overwrite it.
To export a profile:
-
Highlight a database interface and select Export Profile(s) from the pop-up menu. (In the Database painter, select Export Profile(s) from the File or pop-up menu.)
-
Select the profile(s) you want to export from the Export Profile(s) dialog box and click OK.
The Export Profile(s) dialog box lists all profiles defined in your registry regardless of the database interface for which they were defined. By default, the profiles defined for the selected database interface are marked for export.
-
From the Select Profile File dialog box, select a directory and a file in which to save the exported profile(s) and click Save.
The exported profiles can be saved to a new or existing file. If saved to an existing file, the profile(s) are added to the existing profiles. If a profile with the same name already exists, you are asked if you want to overwrite it.
PowerBuilder uses a collection of five system tables to store extended attribute information (such as display formats, validation rules, and font information) about tables and columns in your database. You can also define extended attributes when you create or modify a table in PowerBuilder.
This section tells you how to:
-
Make sure the PowerBuilder extended attribute system tables are created with the proper access rights when you log in to your database for the first time
-
Display and open a PowerBuilder extended attribute system table
-
Understand the kind of information stored in the PowerBuilder extended attribute system tables
-
Control extended attribute system table access
By default, PowerBuilder creates the extended attribute system tables the first time you connect to a database.
To ensure that PowerBuilder creates the extended attribute system tables with the proper access rights to make them available to all users, the first person to connect to the database with PowerBuilder must log in with the proper authority.
To ensure proper creation of the PowerBuilder extended attribute system tables:
-
Make sure the first person to connect to the database with PowerBuilder has sufficient authority to create tables and grant permissions to PUBLIC.
This means that the first person to connect to the database should log in as the database owner, database administrator, system user, system administrator, or system owner, as specified by your DBMS.
Creating the extended attribute system tables when using the DirectConnect interface
When you are using the DirectConnect interface, the PowerBuilder extended attribute system tables are not created automatically the first time you connect to a database. You must run the DB2SYSPB.SQL script to create the system tables, as described in Using the DB2SYSPB.SQL script.
PowerBuilder updates the extended attribute system tables automatically whenever you change the information for a table or column. The PowerBuilder extended attribute system tables are different from the system tables provided by your DBMS.
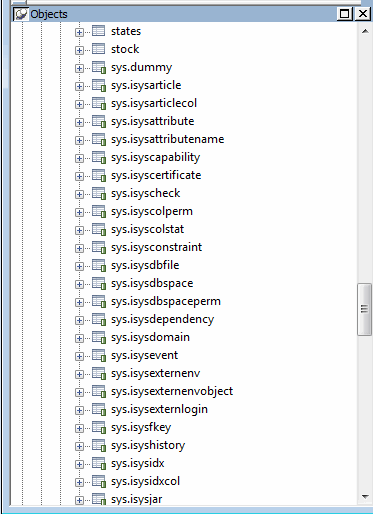
You can display and open PowerBuilder extended attribute system tables in the Database painter just like other tables.
To display the PowerBuilder extended attribute system tables:
-
In the Database painter, highlight Tables in the list of database objects for the active connection and select Show System Tables from the pop-up menu.

-
The PowerBuilder extended attribute system tables and DBMS system tables display in the tables list, as follows:
-
PowerBuilder system tables
The five system tables are: pbcatcol, pbcatedt, pbcatfmt, pbcattbl, and pbcatvld.
-
DBMS system tables
The system tables supplied by the DBMS usually have a DBMS-specific prefix (such as sys or dbo).
-
-
Display the contents of a PowerBuilder system table in the Object Layout, Object Details, and/or Columns views.
For instructions, see The Extended Attribute System Tables in Users Guide.
Do not edit the extended attribute system tables
Do not change the values in the PowerBuilder extended attribute system tables.
PowerBuilder stores five types of extended attribute information in the system tables as described in the following table.
|
System table |
Information about |
Attributes |
|---|---|---|
|
pbcatcol |
Columns |
Names, comments, headers, labels, case, initial value, and justification |
|
pbcatedt |
Edit styles |
Edit style names and definitions |
|
pbcatfmt |
Display formats |
Display format names and definitions |
|
pbcattbl |
Tables |
Name, owner, default fonts (for data, headings and labels), and comments |
|
pbcatvld |
Validation rules |
Validation rule names and definitions |
For more about the PowerBuilder system tables, see The Extended Attribute System Tables in Users Guide.
Prefixes in system table names
For some databases, PowerBuilder precedes the name of the system table with a default DBMS-specific prefix. For example, the names of PowerBuilder system tables have the prefix DBO in a SQL Server database (such as DBO.pbcatcol), or SYSTEM in an Oracle database (such as SYSTEM.pbcatfmt).
The preceding table gives the base name of each system table without the DBMS-specific prefix.
To control access to the PowerBuilder system tables at your site, you can specify that PowerBuilder not create or update the system tables or that the system tables be accessible only to certain users or groups.
You can control system table access by doing any of the following:
-
Setting Use Extended Attributes
Set the Use Extended Attributes database preference in the Database Preferences dialog box in the Database painter.
-
Setting Read Only
Set the Read Only database preference in the Database Preferences dialog box in the Database painter.
-
Granting permissions on the system tables
Grant explicit permissions on the system tables to users or groups at your site.
To control system table access by setting Use Extended Attributes or Read Only:
-
Select Design>Options from the menu bar to display the Database Preferences dialog box.
-
On the General page, set values for Use Extended Attributes or Read Only as follows:
Preference
What you do
Effect
Use Extended Attributes
Clear the check box
Does not create the PowerBuilder system tables if they do not exist. Instead, the painter uses the appropriate default values for extended attributes (such as headers, labels, and text color).
If the PowerBuilder system tables already exist, PowerBuilder does not use them when you create a new DataWindow object.
Read Only
Select the check box
If the PowerBuilder system tables already exist, PowerBuilder uses them when you create a new DataWindow object, but does not update them.
You cannot modify (update) information in the system tables or any other database tables in the DataWindow painter when the Read Only check box is selected.
-
Click OK.
PowerBuilder applies the preference settings to the current connection and all future connections and saves them in the registry.
If your DBMS supports SQL GRANT and REVOKE statements, you can control access to the PowerBuilder system tables. The default authorization for each repository table is:
GRANT SELECT, UPDATE, INSERT, DELETE ON table TO PUBLIC
After the system tables are created, you can (for example) control access to them by granting SELECT authority to end users and SELECT, UPDATE, INSERT, and DELETE authority to developers. This technique offers security and flexibility that is enforced by the DBMS itself.
