About this chapter
This chapter gives an overview of the concepts and procedures for connecting to a database in the PowerBuilder development environment.
When you work with PowerBuilder, you can connect to a database in the development environment or in an application script.
This book describes how to connect to your database in the PowerBuilder development environment.
For information about connecting to a database in a PowerBuilder application script, see Application Techniques.
The following table gives an overview of the connection procedure and indicates where you can find detailed information about each step.
|
Step |
Action |
Details |
See |
|---|---|---|---|
|
1 |
(Optional) Get an introduction to database connections in PowerBuilder |
If necessary, learn more about how PowerBuilder connects to a database in the development environment |
Chapter 1 (this chapter) |
|
2 |
Prepare to use the data source or database before connecting to it for the first time in PowerBuilder |
Outside PowerBuilder, install the required network, database server, and database client software and verify that you can connect to the database |
For ODBC data sources: Using the ODBC Interface For JDBC data sources: Using the JDBC Interface For OLE DB data sources: Using the OLE DB Interface For ADO.NET data sources: Using the ADO.NET Interface For native database interfaces: Using Native Database Interfaces |
|
3 |
Install the ODBC driver, OLE DB data provider, ADO.NET data provider, or native database interface |
Install the driver, database provider, or native database interface required to access your data |
For a list of what is supported on your platform: the section called “Database preferences and supported database interfaces” in Connection Reference and the section called “Database parameters and supported database interfaces” in Connection Reference |
|
4 |
Define the data source (ODBC connections and some OLE DB drivers) |
Create the required configuration for a data source accessed through ODBC |
For ODBC data sources: Using the ODBC Interface |
|
5 |
Define the database interface |
Create the database profile |
For ODBC data sources: Using the ODBC Interface For JDBC data sources: Using the JDBC Interface For OLE DB data sources: Using the OLE DB Interface For ADO.NET data sources: Using the ADO.NET Interface For native database interfaces: Using Native Database Interfaces |
|
7 |
Connect to the data source or database |
Access the data in PowerBuilder |
|
|
8 |
(Optional) Set additional connection parameters |
If necessary, set DBParm parameters and database preferences to fine-tune your database connection and take advantage of DBMS-specific features that your interface supports |
For procedures: Setting Additional Connection Parameters For DBParm descriptions: Database Parameters in Connection Reference For database preference descriptions: Database Preferences in Connection Reference |
|
9 |
(Optional) Troubleshoot the data connection |
If necessary, use the trace tools to troubleshoot problems with your connection |
There are several ways to access data in the PowerBuilder development environment:
-
Through one of the standard database interfaces such as ODBC, JDBC,ADO.NET, or OLE DB
-
Through one of the native database interfaces
A standard database interface communicates with a database through a standard-compliant driver (in the case of ODBC and JDBC) or data provider (in the case of OLE DB and ADO.NET). The standard-compliant driver or data provider translates the abstract function calls defined by the standard's API into calls that are understood by a specific database. To use a standard interface, you need to install the standard's API and a suitable driver or data provider. Then, run the PowerBuilder installer to install the standard database interface you want to use to access your DBMS.
PowerBuilder currently supports the following standard interfaces:
-
Open Database Connectivity (ODBC)
-
Java Database Connectivity (JDBC)
-
Microsoft's Universal Data Access Component OLE DB
-
Microsoft's ADO.NET
A native database interface communicates with a database through a direct connection. It communicates to a database using that database's native API.
To access data through one of the native database interfaces, you must first install the appropriate database software on the server and client workstations at your site. Then, run the PowerBuilder Installer to install the native database interface that accesses your DBMS.
For example, if you have the appropriate SAP Adaptive Server Enterprise server and client software installed, you can access the database by installing the Adaptive Server Enterprise database interface.
Loading database interface libraries
PowerBuilder loads the libraries used by a database interface when it connects to the database. PowerBuilder does not automatically free the database interface libraries when it disconnects.
Although memory use is somewhat increased by this technique (since the loaded database interface libraries continue to be held in memory), the technique improves performance and eliminates problems associated with the freeing and subsequent reloading of libraries experienced by some database connections.
If you want PowerBuilder to free database interface libraries on disconnecting from the database (as it did prior to PowerBuilder 8), you can change its default behavior:
|
To change the default behavior for |
Do this |
|---|---|
|
Connections in the development environment |
Select the Free Database Driver Libraries On Disconnect check box on the General tab of the System Options dialog box |
|
Runtime connections |
Set the FreeDBLibraries property of the Application object to TRUE on the General tab of the Properties view in the Application painter or in a script |
PowerBuilder includes a standalone SQL Anywhere database called the Demo Database which is installed automatically when you run the PowerBuilder setup program. You access tables in the Demo Database when you use the PowerBuilder tutorial.
A SQL Anywhere database is considered an ODBC data source, because you access it with the SQL Anywhere ODBC driver.
What is a database profile?
A database profile is a named set of parameters stored in your system registry that defines a connection to a particular database in the PowerBuilder development environment. You must create a database profile for each data connection.
What you can do
Using database profiles is the easiest way to manage data connections in the PowerBuilder development environment. For example, you can:
-
Select a database profile to connect to or switch between databases
-
Edit a database profile to customize a connection
-
Delete a database profile if you no longer need to access that data
-
Import and export database profiles to share connection parameters quickly
For more information
For instructions on using database profiles, see Managing Database Connections.
You work with two dialog boxes when you create a database profile in PowerBuilder: the Database Profiles dialog box and the interface-specific Database Profile Setup dialog box.
Using the Database painter to create database profiles
You can also create database profiles from the Database painter's Objects view.
Database Profiles dialog box
The Database Profiles dialog box uses an easy-to-navigate tree control format to display your installed database interfaces and defined database profiles. You can create, edit, and delete database profiles from this dialog box.
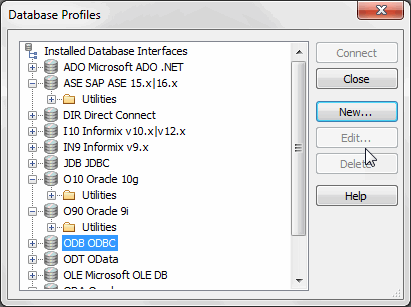
When you run the PowerBuilder setup program, it updates the Vendors list in the PowerBuilder section in the HKEY_LOCAL_MACHINE registry key with the interfaces you install. The Database Profiles dialog box displays the same interfaces that appear in the Vendors list.
Where the Vendors list is stored
The Sybase\PowerBuilder\19.0\Vendors key in HKEY_LOCAL_MACHINE\SOFTWARE is used for InfoMaker as well as PowerBuilder.
For detailed instructions on using the Database Profiles dialog box to connect to a database and manage your profiles, see Managing Database Connections.
Database Profile Setup dialog box
Each database interface has its own Database Profile Setup dialog box where you can set interface-specific connection parameters. For example, if you install the Adaptive Server Enterprise ASE interface and then select it and click New in the Database Profiles dialog box, the Database Profile Setup - Adaptive Server Enterprise dialog box displays, containing settings for the connection options that apply to this interface.
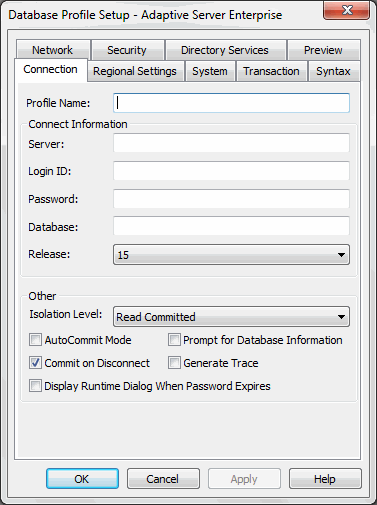
The Database Profile Setup dialog box groups similar connection parameters on the same tab page and lets you easily set their values by using check boxes, drop-down lists, and text boxes. Basic (required) connection parameters are on the Connection tab page, and additional connection options (DBParm parameters and SQLCA properties) are on the other tab pages.
As you complete the Database Profile Setup dialog box in PowerBuilder, the correct PowerScript connection syntax for each selected option is generated on the Preview tab. You can copy the syntax you want from the Preview tab into a PowerBuilder application script.
Supplying sufficient information in the Database Profile Setup dialog box
For some database interfaces, you might not need to supply values for all boxes in the Database Profile Setup dialog box. If you supply the profile name and click OK, PowerBuilder displays a series of dialog boxes to prompt you for additional information when you connect to the database.
This information can include:
| User ID or login ID |
| Password or login password |
| Database name |
| Server name |
For some databases, supplying only the profile name does not give PowerBuilder enough information to prompt you for additional connection values. For these interfaces, you must supply values for all applicable boxes in the Database Profile Setup dialog box.
For information about the values you should supply for your connection, click Help in the Database Profile Setup dialog box for your interface.
To create a new database profile for a database interface, you must complete the Database Profile Setup dialog box for the interface you are using to access the database.
To create a database profile for a database interface:
-
Click the Database Profile button in the PowerBar.
The Database Profiles dialog box displays, listing your installed database interfaces. To see a list of database profiles defined for a particular interface, click the plus sign to the left of the interface name or double-click the interface name to expand the list.
-
Highlight an interface name and click New.
The Database Profile Setup dialog box for the selected interface displays. For example, if you select the SYC interface, the Database Profile Setup - Adaptive Server Enterprise dialog box displays.
Client software and interface must be installed
To display the Database Profile Setup dialog box for your interface, the required client software and native database interface must be properly installed and configured. For specific instructions for your database interface, see the chapter on using the interface.
-
On the Connection tab page, type the profile name and supply values for any other basic parameters your interface requires to connect.
For information about the basic connection parameters for your interface and the values you should supply, click Help.
About the DBMS identifier
You do not need to specify the DBMS identifier in a database profile. When you create a new profile for any installed database interface, PowerBuilder generates the correct DBMS connection syntax for you.
-
(Optional) On the other tab pages, supply values for any additional connection options (DBParm parameters and SQLCA properties) to take advantage of DBMS-specific features that your interface supports.
For information about the additional connection parameters for your interface and the values you should supply, click Help.
-
(Optional) Click the Preview tab if you want to see the PowerScript connection syntax that PowerBuilder generates for each selected option.
You can copy the PowerScript connection syntax from the Preview tab directly into a PowerBuilder application script.
For instructions on using the Preview tab to help you connect in a PowerBuilder application, see the section called “Using Transaction Objects” in Application Techniques.
-
Click OK to save your changes and close the Database Profile Setup dialog box. (To save your changes on a particular tab page without closing the dialog box, click Apply.)
The Database Profiles dialog box displays, with the new profile name highlighted under the appropriate interface. The database profile values are saved in the system registry in HKEY_CURRENT_USER\Software\Sybase\PowerBuilder\19.0\DatabaseProfiles\PowerBuilder.
You can look at the registry entry or export the profile as described in Importing and exporting database profiles to see the settings you made. The NewLogic parameter is set to True by default. This setting specifies that the password is encrypted using Unicode encoding.
For instructions on preparing to use and then defining an ODBC data source, see Using the ODBC Interface.
For instructions on preparing to use and then defining a JDBC database interface, see Using the JDBC Interface.
For instructions on preparing to use and then defining an OLE DB data provider, see Using the OLE DB Interface.
For instructions on preparing to use and then defining an ADO.NET data provider, see Using the ADO.NET Interface.
For instructions on preparing to use and then defining a native database interface, see Using Native Database Interfaces.
