IIS is not installed on Windows 10 by default. You need to manually install it.
Before you install IIS, make sure you have installed .NET Framework 4.x. To install .NET Framework 4.x for Windows 10, please go to the Turn Windows features on or off and check the box for ASP.NET 4.7.
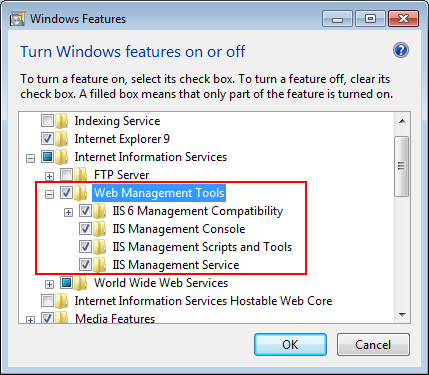
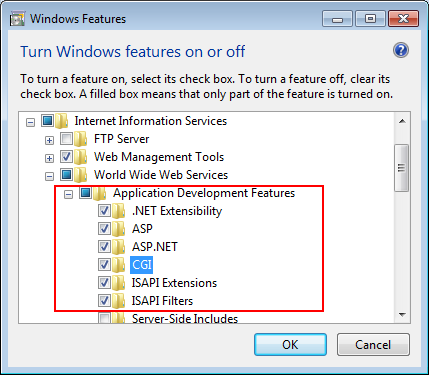
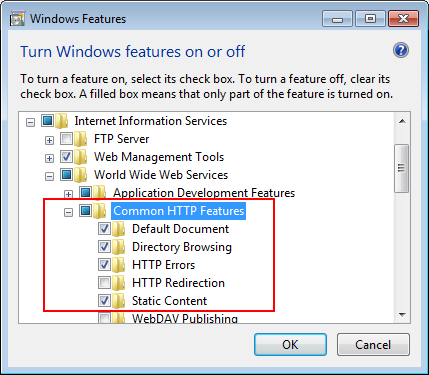
Below are steps for installing IIS. If you already have IIS installed, please carefully verify the correct IIS options are checked (see screenshots below). By default, not all the required components will be installed.
Step 1: Click Start and then click Control Panel. In Control Panel, click Programs and then click Turn on or off Windows features.
Step 2: Select the check box of Internet Information Services, then expand the list and select the items under Web Management Tools, Application Development Features and Common HTTP Features according to the figure below. Click OK to let Windows finish the install.
Step 3: After IIS is installed, go to IIS Manager, right click the Default Web Site, select Binding, and make sure IP Address is indicated with an asterisk "*". If not, please click Edit and select All Unassigned for the IP address, this will display IP Address as an asterisk "*".
Step 4: Run http://IP_Address:80/ in Internet Explorer. If the IIS welcome screen displays, then IIS is working properly.
Tip: to obtain the IP address of the server, open a command prompt window and then type ipconfig<Enter>. Remember this IP address as it is also needed when you configure the mobile app in Appeon Workspace.
If IIS is not working, please re-install IIS or fix the IIS configuration by following the IIS help.


