A package profile is a file containing configurations that are required for packaging the Appeon Workspace. It includes the package type, device type, mobile template, application settings, workspace settings etc.
To create a package profile, follow the steps below:
Step 1: Click the Package
( ) button on the PowerServer Toolkit to open the
PowerServer Application Package
Wizard.
) button on the PowerServer Toolkit to open the
PowerServer Application Package
Wizard.
Step 2: Select the Customized Appeon Workspace package type, select the device type (iOS or Android), and then click Add.

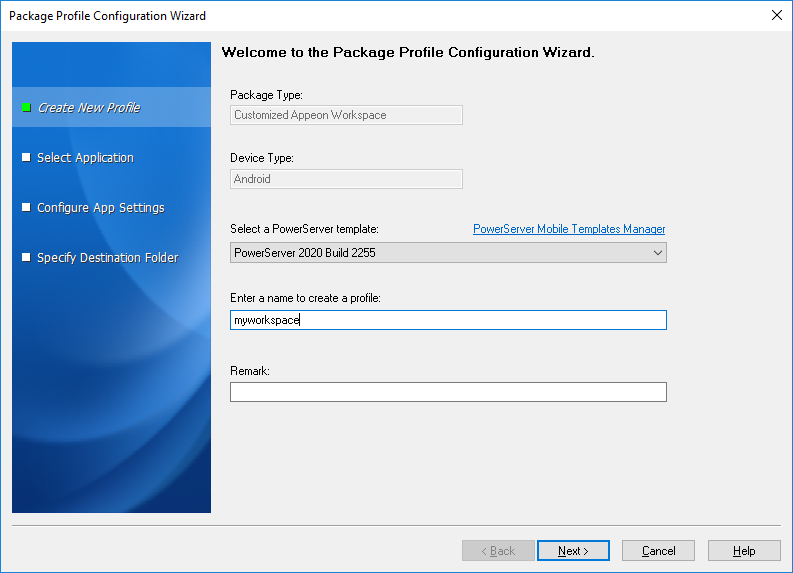
Step 3: In the Package Profile Configuration Wizard that appears, select the mobile template which is compatible with the version of PowerServer server where the application will run.
The template can be downloaded and installed from the Appeon web site. You can click the PowerServer Mobile Templates Manager link to download and install the template. Refer to Installing mobile templates for more details.
Step 4: Enter the text as the profile name and enter the description (if any) for this profile in the Remark box, and then click Next.
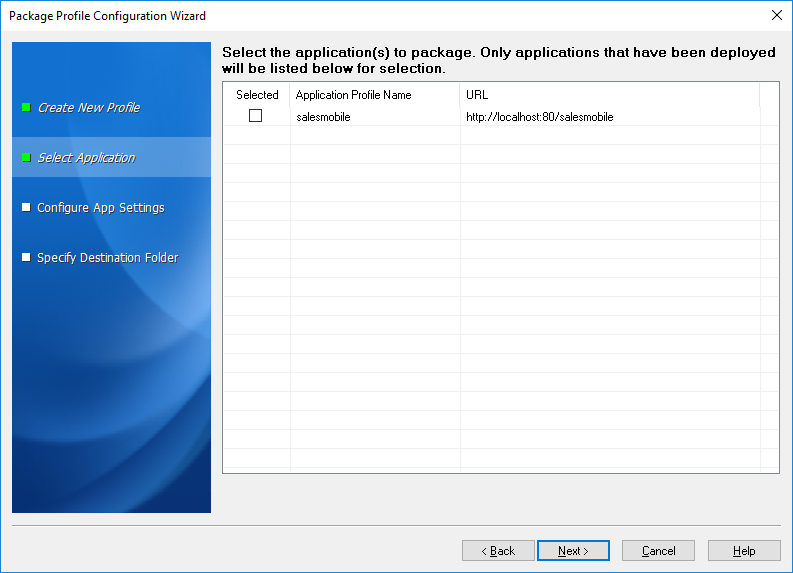
Step 5: (Optional) Select the apps you want to package into the workspace and modify the URL of the apps.
The apps deployed in PowerServer Toolkit are listed by default, and multiple apps can be selected.
For more information about how to specify the app URL, see URLs of PowerServer applications.
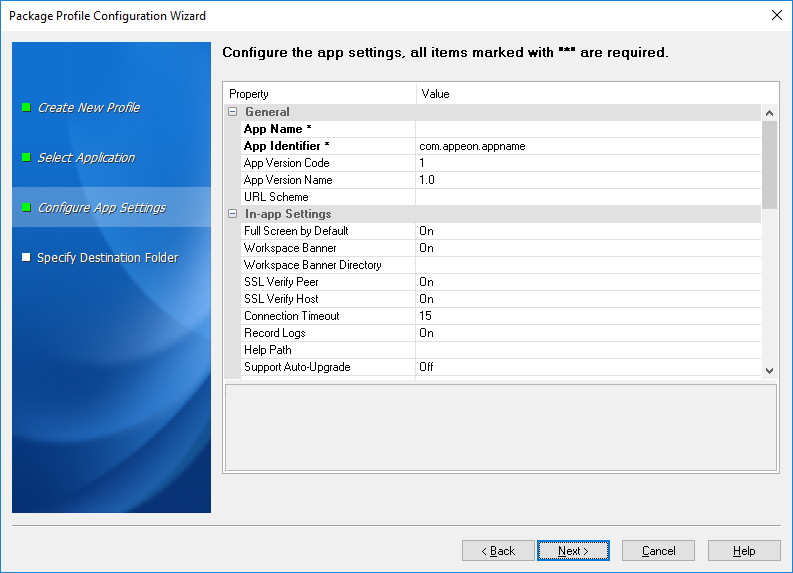
Step 6: Specify and customize the parameters according to the device type and then click Next.
-
For apps running on iOS, follow the instructions in the following table.
Table 39. Workspace parameters for iOS
Group
Parameter
Description
General
Display Name (Required)
Due to a limitation of the package tool, the display name cannot contain double-byte characters (such as Chinese, Korean, or Japanese characters).
The display name will be used in two areas:
-
part of the file name of the generated package.
For your workspace to have the auto-upgrade feature, you should always use the same display name every time when creating the package for the same workspace.
-
the name of your workspace that will appear on the mobile device.
For the name to be displayed completely, it should be about 12 letters but it depends on the width of each individual letter, for example, w takes more room than i.
Team ID Specify the application's Team ID, and it must be the same Team ID used in the provisioning profile for building the Xcode project later.
The Team ID is the prefix of the App ID. It is a 10-character hexadecimal string automatically supplied by Apple when you generate the App ID in the Apple Developer Member Center. It is unique to your development team.
Keep using the same Team ID for different apps, so that these different apps running on the same device can be recognized as running on one device, not on multiple devices by the Appeon license file. For details on the Device control type in the Appeon license file, refer to the section called “License Management” in PowerServer Configuration Guide for .NET.
Bundle Identifier (Required)
Specify the application's Bundle Identifier.
The Bundle Identifier is the suffix of the App ID. It can be explicit or a wildcard. If you have specified a wildcard bundle identifier when creating the App ID, for example, com.abcexample.*, you will need to replace "*" with an explicit string, for example, com.abcexample.app or com.abcexample.1 etc.
The Bungle Identifier is also used as part of the file name of the generated package. To help your app's auto-upgrade feature to work, you should keep it unchanged every time when creating the package for the same app.
Version
The version number of your workspace.
Build
The build number of your workspace. The build number for the same version should be unique and each time when you create an updated package, you should increase it to a greater number.
A URL scheme is a specially formatted URL that allows users to open your app from other PowerServer mobile apps or third-party apps. A typical URL scheme looks like this: schemename://?url=http://ipaddress/appname[&parm1=aaa&parm2=bbb...&parmN=zzz]
schemename is what you specify in the URL Scheme Name field as the unique scheme identifier for the application to be packaged. The scheme name is highly recommended to be unique; if you use the same scheme name as another app, iOS or Android will not know which app to launch. Scheme name is case sensitive; it can only contain lower-case letters and numbers, and can only start with lower-case letters.
[&parm1=aaa&parm2=bbb...&parmN=zzz] is the parameter name and value pair(s) to be passed to the destination app. It is optional. When it is passed to the PowerServer mobile app, it can be obtained by the app using APIs. For more about the APIs, refer to the section called “of_geturlschemeparm” in Workarounds & APIs Guide and the section called “oe_urlschemesucceed” in Workarounds & APIs Guide.
At the time of writing this note, URL scheme is only supported in Safari and Opera Mini. If you want to use the other browser to open an app via URL scheme, please double check that the browser is supported.
Examples
Suppose you specify abcaws as the scheme name for your workspace, then the URL scheme to open your workspace will be: abcaws://
And the URL scheme to open the app XXX (suppose its app URL is http://demo.appeon.com/xxx) installed in your workspace will be: abcaws://?url=http://demo.appeon.com/xxx
Suppose you specify abcyyy as the scheme name for the standalone mobile app YYY, then the URL scheme to open YYY will be: abcyyy://?url=http://192.0.3.111/yyy&name=jacky|age=27
In-app Settings
Full Screen by Default
Whether to display the app in full screen view (with the titlebar hidden) by default when it is opened. In the full scree view, the normal view icon will be available on the top right corner of the window, and when it is tapped, the application will return to the normal view (with the titlebar visible).
Workspace Banner
Whether to display the Workspace Banner in your workspace.
Workspace Banner Directory
If you have created your own workspace banner, you can specify to use your own banner here. For how to create your own workspace banner, refer to Prepare your own workspace banner for details.
Click the Workspace Banner Package button to select the folder containing your own HTML Web app. Make sure the default page of your own banner is "index.html". The Package tool will check whether the specified folder contains the index.html file.
SSL Verify Peer
Enable or disable the SSL peer verification.
SSL Verify Host
Enable or disable the SSL host name verification.
Connection Timeout (seconds)
Specify the timeout seconds for your app connecting to the server.
Record Logs
Set whether to record app logs.
Help Path
If you have created your own help file for the workspace, specify the folder that contains your help file. The startup page of your help must be index.html. The Package tool will check whether the specified folder contains the index.html file.
Support Auto-Upgrade
If the workspace will be provided on your own Web site, it is recommended that you enable this option as well as the "Check for Updates" option, so that the workspace can be automatically upgraded.
This option is disabled by default.
There are other factors affecting the auto-upgrade feature of workspace, refer to the section called “Enabling auto-upgrade of Appeon Workspace” in Appeon Workspace User Guide.
Check for Updates
Set whether to automatically check with the server if updates of workspace are available. If updates are detected, the end user will be prompted whether to install the update.
This option is disabled by default and is configurable only after Support Auto-Upgrade is enabled.
Enable Edit App
Enable or disable the Add App and Delete App functions.
Default App
Specify the default app. The deployed apps are listed.
Default Language
Click the ellipse button to display the Language box.
In the Language box, select the Selected check box for the languages you want to package, and select the Default radio button to specify the default language of your workspace UI.
The workspace UI can be displayed in English, French, Simplified Chinese, Traditional Chinese, Japanese, Korean, Italian, and Spanish. To display the workspace UI in other languages, you will need to prepare the language package by following instructions in Prepare the UI language package.
App Icon
iPhone Settings (2x)
Specify the settings icon for the retina display on iPhone on iOS 9/10 (58 x 58 pixels).
iPhone Settings (3x)
Specify the settings icon for the retina HD display on iPhone on iOS 9/10 (87 x 87 pixels).
iPhone Spotlight (2x)
Specify the spotlight icon for the retina display on iPhone on iOS 9/10 (80 x 80 pixels).
iPhone Spotlight (3x)
Specify the spotlight icon for the retina HD display on iPhone on iOS 9/10 (120 x 120 pixels).
iPhone App (2x)
Specify the app icon for the retina display on iPhone on iOS 9/10 (120 x 120 pixels).
iPhone App (3x)
Specify the app icon for the retina HD display on iPhone on iOS 9/10 (180 x 180 pixels).
iPad Settings (1x)
Specify the settings icon for the standard display on iPad on iOS 9/10 (29 x 29 pixels).
iPad Settings (2x)
Specify the settings icon for the retina display on iPad on iOS 9/10 (58 x 58 pixels).
iPad Spotlight (1x)
Specify the spotlight icon for the standard display on iPad on iOS 9/10 (40 x 40 pixels).
iPad Spotlight (2x)
Specify the spotlight icon for the retina display on iPad on iOS 9/10 (80 x 80 pixels).
iPad App (1x)
Specify the app icon for the standard display on iPad on iOS 9/10 (76 x 76 pixels).
iPad App (2x)
Specify the app icon for the retina display on iPad on iOS 9/10 (152 x 152 pixels).
iPad Pro App (2x)
Specify the app icon for iPad Pro apps targeting iOS 9 and later (167 x 167 pixels).
App Store (1x)
Specify the app icon for App Store (1024 x 1024 pixels).
Splash Image
iPhone Portrait
Specify the launch image in portrait view on iPhone.
iPhone Landscape
Specify the launch image in landscape view on iPhone.
iPad Launch Screen
Specify the launch image on iPad.
-
-
For apps running on Android, follow instructions in the following table.
Table 40. Workspace settings for Android
Group
Parameter
Description
General
App Name (Required)
Due to a limitation of the package tool, the display name cannot contain double-byte characters (such as Chinese, Korean, or Japanese characters).
The display name will be used in two areas:
-
part of the file name of the generated package.
For your workspace to have the auto-upgrade feature, you should always use the same display name every time when creating the package for the same workspace.
-
the name of your workspace that will appear in the Android marketplace.
App Identifier (Required)
Specify the identifier for the app(s).
This field is used to identify the app, and when the app is to be installed on a device where another app with the same identifier has already been installed, the installation will fail.
The app identifier is also used as part of the file name of the generated package. To help your workspace's auto-upgrade feature to work, you should keep this app identifier unchanged every time when creating the package for the same workspace.
This app identifier must follow the same rules as those for naming packages in the Java programming language. It can only contain lower-case letters, dots, and/or numbers without spaces, and cannot start or end with dots or contain only numbers between dots. It is normally a combination of reversed domain name and the app name (com.companyname.appname), such as, com.appeon.aws, net.abc.appcenter, org.xyz.apploader etc.
App Version Code
Specify an integer value that uniquely identifies the APK file of your workspace to be uploaded to Google Play. It is used by Google Play for internal purpose and it is invisible to the end user. You can set the value to any integer you want, but each time when you are going to upload an updated APK file for your workspace, make sure you increase it to a greater integer value.
App Version Name
Specify a string value that represents the release version of your workspace. It will be displayed to the end user.
URL Scheme
A URL scheme is a specially formatted URL that allows users to open your app from other PowerServer mobile apps or third-party apps. A typical URL scheme looks like this: schemename://?url=http://ipaddress/appname[&parm1=aaa&parm2=bbb...&parmN=zzz]
schemename is what you specify in the URL Scheme Name field as the unique scheme identifier for the application to be packaged. The scheme name is highly recommended to be unique; if you use the same scheme name as another app, iOS or Android will not know which app to launch. Scheme name is case sensitive; it can only contain lower-case letters and numbers, and can only start with lower-case letters.
[&parm1=aaa&parm2=bbb...&parmN=zzz] is the parameter name and value pair(s) to be passed to the destination app. It is optional. When it is passed to the PowerServer mobile app, it can be obtained by the app using APIs. For more about the APIs, refer to the section called “of_geturlschemeparm” in Workarounds & APIs Guide and the section called “oe_urlschemesucceed” in Workarounds & APIs Guide.
At the time of writing this note, URL scheme is only supported in Safari and Opera Mini. If you want to use the other browser to open an app via URL scheme, please double check that the browser is supported.
Examples
Suppose you specify abcaws as the scheme name for your workspace, then the URL scheme to open your workspace will be: abcaws://
And the URL scheme to open the app XXX (suppose its app URL is http://demo.appeon.com/xxx) installed in your workspace will be: abcaws://?url=http://demo.appeon.com/xxx
Suppose you specify abcyyy as the scheme name for the standalone mobile app YYY, then the URL scheme to open YYY will be: abcyyy://?url=http://192.0.3.111/yyy&name=jacky|age=27
In-app Settings
Full Screen by Default
Whether to display the app in full screen view (with the titlebar hidden) by default when it is opened. In the full scree view, the normal view icon will be available on the top right corner of the window, and when it is tapped, the application will return to the normal view (with the titlebar visible).
Workspace Banner
Whether to display the Workspace Banner in your workspace.
Workspace Banner Directory
If you have created your own workspace banner, you can specify to use your own banner here. For how to create your own workspace banner, refer to Prepare your own workspace banner for details.
Click the Workspace Banner Directory button to select the folder containing your own HTML Web app. Make sure the default page of your own banner is "index.html". The Package tool will check whether the specified folder contains the index.html file.
SSL Verify Peer
Enable or disable the SSL peer verification.
SSL Verify Host
Enable or disable the SSL host name verification.
Connection Timeout (seconds)
Specify the timeout seconds for your app connecting to the server.
Record Logs
Set whether to record app logs.
Help Path
If you have created your own help file for the workspace, specify the folder that contains your help file. The startup page of your help must be index.html. The Package tool will check whether the specified folder contains the index.html file.
Support Auto-Upgrade
If the workspace will be provided on your own Web site, it is recommended that you enable this option as well as the "Check for Workspace Updates" option, so that the workspace can be automatically upgraded.
This option is disabled by default.
There are other factors affecting the auto-upgrade feature of workspace, refer to the section called “Enabling auto-upgrade of Appeon Workspace” in Appeon Workspace User Guide.
Check for Updates
Set whether to automatically check with the server if updates of workspace are available. If updates are detected, the end user will be prompted whether to install the update.
This option is disabled by default and is configurable only after Support Auto-Upgrade is enabled.
App Project
32bit or 64bit App
Select to generate the project files for 32-bit APK file, or 64-bit APK file, or both.
Application
Enable Edit App
Enable or disable the Add App and Delete App functions.
Default App
Specify the default app. The deployed apps are listed.
Language
Default Language
Click the ellipse button to display the Language box.
In the Language box, select the Selected check box for the languages you want to package, and select the Default radio button to specify the default language of your workspace UI.
The workspace UI can be displayed in English, French, Simplified Chinese, Traditional Chinese, Japanese, Korean, Italian, and Spanish. To display the workspace UI in other languages, you will need to prepare the language package by following instructions in Prepare the UI language package.
App Signing
Key Alias
Enter the alias name for the key.
Only the first 8 characters of the alias name are used.
You can use the default alias name generated by Appeon (which is appeon) or use your own name. If you use the default keystore file in the Directory field, you need to keep this field as default.
Key Alias Password
Enter the password.
You can use the default alias password generated by Appeon (which is appeon) or use your own password. If you use the default keystore file in the Directory field, you need to keep this field as default.
Key Store Path
Click the browse button (...) to select the keystore file.
You use the default keystore file or click the browse button to select your own one.
For how to create the keystore file, refer to Obtain a private key.
Key Store Password
Enter the keystore password.
You can use the default keystore password generated by Appeon (which is appeon) or use your own password. If you use the default keystore file in the Directory field, you need to keep this field as default.
Map Settings
Specify the Google Map API key. The Map API reads the key value and passes it to the Google Maps server, which then confirms that the app has access to Google Maps data.
For how to create the Map API key, refer to Obtain a Google Maps API key.
App Icons
Google Play
Specify the app icon displayed in Google Play (512 x 512 pixels).
MDPI Screen
Specify the app icon for MDPI (~160 DPI) device screens (48 x 48 pixels).
HDPI Screen
Specify the app icon for HDPI (~240 DPI) device screens (72 x 72 pixels).
XHDPI Screen
Specify the app icon for XHDPI (~480 DPI) device screens (96 x 96 pixels).
XXHDPI Screen
Specify the app icon for XXHDPI (~640 DPI) device screens (144 x 144 pixels).
Splash Image
Landscape
Specify the splash image in landscape for the app.
The recommended size is 1024 x 768 pixels, and the tool will stretch or compress the images to accommodate various heights and widths.
Portrait
Specify the splash image in portrait for the app.
The recommended size is 768 x 1024 pixels, and the tool will stretch or compress the images to accommodate various heights and widths..
-


Step 7: Use the default location for the generated package or select a different location and then click Finish.

The profile will be created and listed in the PowerServer Application Package tool. Note that the profile is displayed according to the selected package type and device type.
