Before you start, make sure you have completed the preparation tasks in Preparing for the mobile package (part 1).
To package an Xcode project or an Android project, follow the steps below:
Step 1: Click the Package
( ) button on the PowerServer Toolkit to open the
PowerServer Application Package
tool.
) button on the PowerServer Toolkit to open the
PowerServer Application Package
tool.
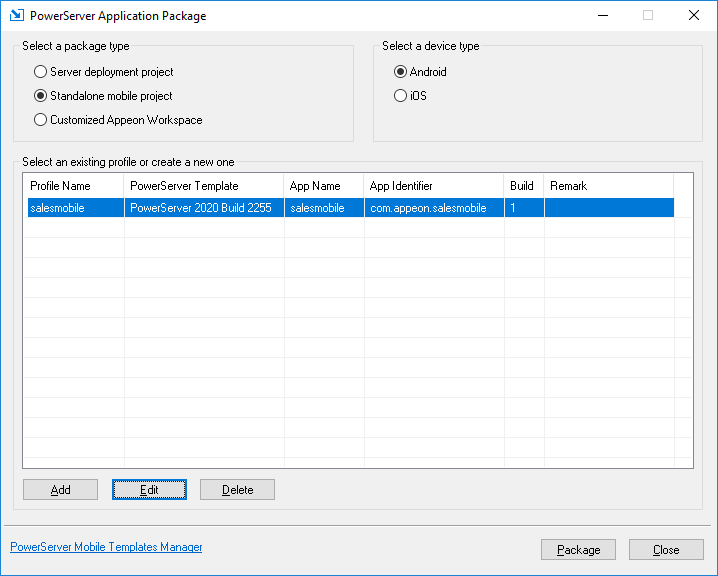
Step 2: Select the Standalone Mobile Project package type.
To package a deployment project that can deploy the application to servers, select Server Deployment Project and follow detailed instructions in Packaging a server deployment project.
To customize Appeon Workspace and then package Appeon Workspace to a standalone application, select Customized Appeon Workspace and follow detailed instructions in Customizing and packaging Appeon Workspace.
Step 3: Select the device type (iOS or Android) on which the application will run after packaged.
Step 4: Select the package profile. The profile is displayed according to the selected package type and device type.
If no package profile is available, you should create one first by following instructions in Creating a package profile.
Step 5: Click Package to start packaging the application files.
Step 6: The PowerServer Application Package Wizard appears. Wait until the package process is complete.
Step 7: Click Finish when the package process is complete.
File/Archive Name setting
During the packaging process, a file/archive name is automatically configured for the Xcode project or the Android project and will be used as the default name of the IPA file or APK file later when compiling. Please do not change this name. This name is stored in the build.gradle of the Android project, or the EonNativeApp.xcscheme of the Xcode project.
The name is composed of the Display Name and Bundle Identifier for iOS or App Name and App Identifier for Android, and the PowerServer Toolkit version and build number, and you should keep this file name unchanged and also when you upgrade the PowerServer product and want to create an updated package of the app, be sure to input the same Display Name and Bundle Identifier for iOS or App Name and App Identifier for Android as before so that the app installed on the device can correctly identify the updated package and automatically get upgraded.
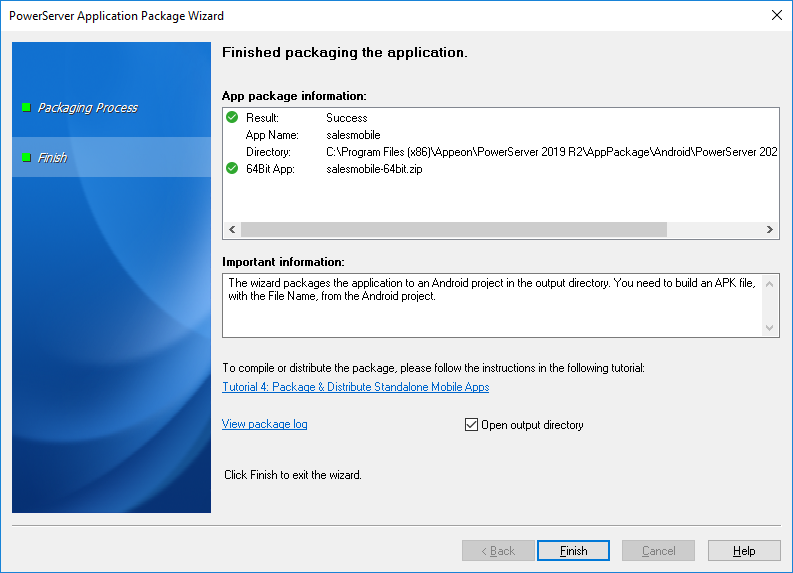
Step 8: Go to the folder for iOS or Android under the specified location.
-
For iOS, you will find the following two zip files:
-
DisplayName.zip: the project files for compiling the iOS app (IPA file)
Including all of the application files, DataWindow syntax, image files, etc. for the iOS application, and also including an Xcode project file and the Xcode project settings which will be run later to compile the IPA file.
-
AppeonMobile.framework.zip: the mobile client libraries
Including the mobile client libraries of the Appeon Workspace. The client libraries support the running of the stand-alone mobile app, such as rendering the mobile-style UI, providing interfaces for calling the mobile SDK, supporting the offline capabilities, etc.
Copy the above packages to a Mac machine with Xcode installed, and then compile them into an IPA file. For detailed instructions, refer to the section called “Package & Distribute iOS Apps” in PowerServer Mobile Tutorials.
-
-
For Android, you will find the following zip file(s):
-
AppName-32bit.zip and/or AppName-64bit.zip: the project files for compiling the 32-bit and/or 64-bit Android application (APK file)
Including all of the application files, DataWindow syntax, image files, etc. for the mobile application, the Android project files and settings, and the mobile client libraries of the Appeon Workspace.
Copy this package to a machine with Android Studio installed, and then compile the APK file. For detailed instructions, refer to the section called “Package & Distribute Android Apps” in PowerServer Mobile Tutorials.
-
