Where you are
Add menu scripts to trigger user events
Attach the new menu and run the application
The frame menu was created automatically by the Template Application wizard. The m_pbtutor_frame menu is the ancestor of all the other menus you work with in the tutorial. Changes you make to this menu are automatically propagated to descendant menus.
In the WYSIWYG (What You See Is What You Get) view of the Menu painter, you see menus as they appear when the application is running. In this tutorial, you use the WYSIWYG view to make changes to the application menus, but you can make the same changes from the Tree Menu view. You use the Properties view to change a toolbar button.
In this exercise you:
Now you modify the File cascading menu of the m_pbtutor_frame menu.
-
Double-click m_pbtutor_frame in the System Tree.
The Menu painter displays the menu associated with the MDI frame window in the application. Because m_pbtutor_sheet inherits from m_pbtutor_frame, changes you make to the frame menu are propagated to the sheet menu.
In the WYSIWIG view, the menu items appear across the top of the view. If a WYSIWYG view is not open, you can select it from the View menu in the Menu painter menu bar.
-
Click the File menu in the WYSIWYG view of m_pbtutor_frame.
When you click a menu item in the WYSIWYG view, its menu items appear just as they would at runtime.
If the File menu does not display its menu items
The File menu is selected when you display the WYSIWYG view. You might need to click one of the other menus (Edit, Window, or Help) and then click again on the File menu to display its menu items.
-
Right-click New under the File menu.
Select Edit Menu Item Text in the pop-up menu.
Click in the New field and replace &New with &Report. Press Enter.
You change the display name of the New menu item to Report. The menu name remains m_new and its purpose (to open new sheet windows) remains the same.
Define accelerator keys with the ampersand character
The character following the ampersand is used as an accelerator key (mnemonic) and appears with an underscore in the WYSIWYG display. In the runtime application, the user can access the File>Report menu by pressing Alt+F+R.
-
Make sure that &Report appears in the Text text box in the Properties view.
Click the Toolbar tab in the Properties view.
The toolbar item text is New, Open New Sheet. There is no selection in the ToolbarItemName box, so no toolbar button appears at runtime for the Report menu item. You do not add a toolbar button here, because you use the Report menu item to access cascading menu items rather than as a command to open a new sheet.
-
Click the Open menu item under the File menu in the WYSIWYG view.
Click the General tab in the Properties view.
Clear the Visible and Enabled check boxes on the General page of the Properties view.
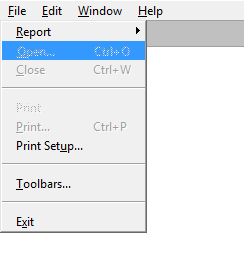
You hide the Open menu item in all runtime menus. When you clear the Visible property, the WYSIWYG view displays the menu item with a dithered (broken) appearance. It is not visible at runtime. When you clear the Enabled property, the WYSIWIG view displays the menu item with a very faint and inverted relief appearance. If it is visible at runtime, the menu item will still be grayed out.

-
Click the Toolbar tab of the Properties view.
Clear the ToolbarItemVisible check box.
This prevents the toolbar button for this menu item from appearing in the frame menu toolbar (a button can be included in a toolbar even if its corresponding menu item is not visible or enabled).
-
Click Exit under the File menu in the WYSIWYG view.
The Toolbar page of the Properties view remains open. The ToolbarItemText and ToolbarItemName values change to show the values for the m_exit menu item.
The Help menu has three items, but only one, Help>About, is enabled. Now you enable the other menu items, using commented-out code that was provided by the Template Application wizard and the pbtutor.chm file in the Tutorial directory.
You call application Help topics with the ShowHelp function, passing it an enumerated value that identifies whether you want the Help contents or index to display, or a specific topic or keyword. ShowHelp can open Windows Help or compiled HTML Help (CHM) files.
-
Click the Help menu in the WYSIWYG view and then double-click the Help Index menu item.
You can double-click the Help Index item even though it is not currently enabled. The full name of the Help Index menu item, m_help.m_helpindex, displays in the Script editor. It includes the m_help prefix to indicate that it is in the Help menu.
-
Select Clicked in the second drop-down box if it is not already selected.
-
Position the cursor in the line that contains the ShowHelp function and click the Uncomment button in the PowerBar.
Change myapp.hlp to pbtutor.chm:
ShowHelp ("pbtutor.chm", Index!)This displays the default topic in the Help file.
-
Select the Enabled check box on the General page of the Properties view for the m_helpindex menu item.
-
Repeat the preceding steps for the Search For Help On menu item using the following Show Help function.
ShowHelp ("pbtutor.chm", Keyword!, "")If the third argument contained a string that was a keyword in the Help file, the associated topic would display. Because the argument is an empty string, the Help Search window displays.
-
Select File>Save from the main PowerBuilder menu bar.
Select File>Close from the main PowerBuilder menu bar.


