About this chapter
This chapter supplements the introduction to MobiLink synchronization presented in the section called “Managing the Database” in Users Guide. It provides additional background on the synchronization process and the use of objects generated by the MobiLink synchronization wizard. It also discusses how to create synchronization objects without using the wizard.
MobiLink is a session-based synchronization system that allows two-way synchronization between a main database, called the consolidated database, and many remote databases.
This section introduces some MobiLink terms and concepts.
Where to find additional information
Detailed information about MobiLink synchronization is provided in the MobiLink Getting Started, the MobiLink - Client Administration, and the Mobilink - Server Administration books. These books are available online on the SQL Anywhere Product Manuals website at http://dcx.sap.com/index.html.
If you are already familiar with MobiLink, go to Working with PowerBuilder synchronization objects to learn about PowerBuilder integration with MobiLink.
Data movement and synchronization
Data movement occurs when shared data is distributed over multiple databases on multiple nodes and changes to data in one database are applied to the corresponding data in other databases. Data can be moved using replication or synchronization.
Data replication moves all transactions from one database to another, whereas data synchronization moves only the net result of transactions. Both techniques get their information by scanning transaction log files, but synchronization uses only updated log file segments instead of the full log file, making data movement much faster and more efficient.
With synchronization, data is available locally and can be modified without a connection to a server. MobiLink synchronization uses a loose consistency model, which means that all changes are synchronized with each site over time in a consistent manner, but different sites might have different copies of data at any instant. Only successful transactions are synchronized.
Consolidated and remote databases
The consolidated database, which can be any ODBC-compliant database, such as SQL Anywhere, SAP Adaptive Server Enterprise, Oracle, IBM DB2 UDB, or Microsoft SQL Server, holds the master copy of all the data.
The remote database contains a subset of the consolidated data. Although MobiLink can synchronize SQL Anywhere and UltraLite databases, for PowerBuilder applications, remote databases must be SQL Anywhere databases.
The MobiLink synchronization server
The MobiLink synchronization server, mlsrv11, manages the synchronization process and provides the interface between remote databases and the consolidated database server. All communication between the MobiLink synchronization server and the consolidated database occurs through an ODBC connection.The consolidated database and synchronization server often reside on the same machine, but that is not a requirement.
The MobiLink server must be running before a synchronization process is launched. You can start the MobiLink synchronization server from the Utilities folder in the Objects view in the Database painter.
For information about starting the server from the command line, see "Running the MobiLink server" in the online MobiLink - Server Administration book.
MobiLink hierarchy
MobiLink typically uses a hierarchical configuration. The nodes in the hierarchy can reside on servers, desktop computers, and handheld or embedded devices. A simple hierarchy might consist of a consolidated database on a server and multiple remote databases on mobile devices. A more complex hierarchy might contain multiple levels in which some sites act as both remote and consolidated databases. For PowerBuilder applications, any consolidated database that also acts as a remote database must be a SQL Anywhere database.
For example, suppose remote sites A1, A2, and A3 synchronize with a consolidated database A on a local server, and remote sites B1, B2, and B3 synchronize with a consolidated database B on another local server. A and B in turn act as remote sites and synchronize with a consolidated database C on a master server. C can be any ODBC-compliant database, but A and B must both be SQL Anywhere databases.
Figure: MobiLink hierarchy

Synchronization scripts
MobiLink synchronization is an event-driven process. When a MobiLink client initiates a synchronization, a number of synchronization events occur inside the MobiLink server. When an event occurs, MobiLink looks for a script to match the synchronization event. If you want the MobiLink server to take an action, you must provide a script for the event.
You can write synchronization scripts for connection-level events and for events for each table in the remote database. You save these scripts in the consolidated database.
You can write scripts using SQL, Java, or .NET. For more information about event scripts and writing them in the MobiLink Synchronization plug-in in SQL Central, see Preparing consolidated databases.
The MobiLink synchronization client
SQL Anywhere clients at remote sites initiate synchronization by running a command-line utility called dbmlsync. This utility synchronizes one or more subscriptions in a remote database with the MobiLink synchronization server. Subscriptions are described in Publications, articles, users, and subscriptions. For more information about the dbmlsync utility and its options, see "dbmlsync utility" in the index of the SQL Anywhere online books.
In PowerBuilder, synchronization objects that you create with the ASA MobiLink Synchronization wizard manage the dbmlsync process. For more information, see Working with PowerBuilder synchronization objects.
Publications, articles, users, and subscriptions
A publication is a database object on the remote database that identifies tables and columns to be synchronized. Each publication can contain one or more articles. An article is a database object that represents a whole table, or a subset of the columns and rows in a table.
A user is a database object in the remote database describing a unique synchronization client. There is one MobiLink user name for each remote database in the MobiLink system. The ml_user MobiLink system table, located in the consolidated database, holds a list of MobiLink user names. These names are used for authentication.
A subscription associates a user with one or more publications. It specifies the synchronization protocol (such as TCP/IP, HTTP, or HTTPS), address (such as myserver.acmetools.com), and additional optional connection and extended options.
Users, publications, and subscriptions are created in the remote database. You can create them in SQL Central with the SQL Anywhere plug-in (not the MobiLink Synchronization plug-in). For information about creating users, publications, and subscriptions, see Creating remote databases.
The synchronization process
Dbmlsync connects to the remote database using TCP/IP, HTTP, or HTTPS, and prepares a stream of data (the upload stream) to be uploaded to the consolidated database. Dbmlsync uses information contained in the transaction log of the remote database to build the upload stream. The upload stream contains the MobiLink user name and password, the version of synchronization scripts to use, the last synchronization timestamp, the schema of tables and columns in the publication, and the net result of all inserts, updates, and deletes since the last synchronization.
After building the upload stream, dbmlsync uses information stored in the specified publication and subscription to connect to the MobiLink synchronization server and to exchange data.
When the MobiLink synchronization server receives data, it updates the consolidated database, then builds a download stream that contains all relevant changes and sends it back to the remote site. At the end of each successful synchronization, the consolidated and remote databases are consistent. Either a whole transaction is synchronized, or none of it is synchronized. This ensures transactional integrity at each database.
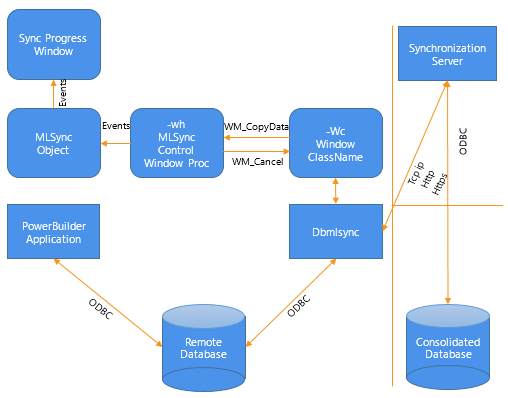
How MLSync events are implemented
The MLSync object in a PowerBuilder application and the dbmlsync process communicate with each other by sending messages between two windows, as shown in the following figure. The window that the MLSync object creates uses an internal function, MlSyncControlWindowProc, to process these messages.
The Synchronize function adds a "-wh window_handle" argument to the end of the command line string that launches dbmlsync. This lets dbmlsync send WM_COPYDATA messages to this window handle. MlSyncControlWindowProc then triggers the appropriate event in the MLSync object.
Figure: How the synchronization process works
How progress window events are triggered
The MobiLink Synchronization Wizard generates an instance of an MLSync object that contains PowerScript code in each of its events. When appropriate, this code triggers an event of the same name in the progress window that is either generated by the wizard or customized for your applications.
How the CancelSync function is implemented
On the dbmlsync command string, there is a "-wc window_class" argument that specifies the class name of a communications window that dbmlsync registers and creates. If the PowerBuilder application needs to cancel the synchronization process during any of its event processing logic, it calls CancelSync. This function finds the window handle associated with the -wc window class and sends a WM_CLOSE message.
When you run the ASA MobiLink Synchronization wizard from the Database page in the New dialog box, the wizard generates objects that let you initiate and control MobiLink synchronization requests from a PowerBuilder application. These objects let you obtain feedback during the synchronization process, code PowerScript events at specific points during synchronization, and cancel the process programmatically.
For more information about the MobiLink synchronization wizard, see the section called “Managing the Database” in Users Guide.
Before you use the wizard in a production application, you need to complete the following tasks:
-
Set up a consolidated database and write synchronization scripts as described in Preparing consolidated databases
-
Create a remote database on the desktop and set up one or more publications, users, and subscriptions as described in Creating remote databases
-
Register the database with the ODBC manager on all remote machines, or create a file DSN for the remote database, as described in Connecting to Your Database and in Using a file DSN instead of a registry DSN
-
Make sure all remote machines have the required supporting files, as described in Runtime requirements for synchronization on remote machines
-
(Optional) Create a database connection profile for the remote database, as described in Connecting to Your Database. This allows the wizard to retrieve a list of publications in the remote database for which MobiLink subscriptions have been entered
The wizard generates two sets of objects.
Objects that initiate and monitor synchronization
The first set of objects lets the end user initiate and monitor synchronization:
-
nvo_appname_mlsync -- a custom class user object that controls the MobiLink client (appname is the name of your application)
-
gf_appname_sync -- a global function that instantiates the user object and calls a function to launch a synchronization request
-
w_appname_syncprogress -- an optional status window that reports the progress of the synchronization process
In the wizard, you can choose whether the application uses the status window. The generated status window includes an OK button that lets the user view the status before dismissing the window, and a Cancel button that lets the user cancel synchronization before it completes. You can also customize the window to fit your application's needs.
Objects that modify synchronization options
The second set of objects is generated only if you select Prompt User for Password and Runtime Changes in the wizard. It lets the end user change synchronization options before initiating synchronization:
-
w_appname_sync_options -- an options window that lets the end user modify the MobiLink user name and password, the host name and port of the MobiLink server, and other options for dbmlsync, and choose how to display status
-
gf_appname_configure_sync -- a global function that opens the options window and, if the user clicked OK, calls gf_appname_sync to initiate synchronization
Most applications that use the options window provide two menu items or command buttons to launch synchronization: one to open the options window so that users can set up or modify dbmlsync options before requesting a synchronization, and one to request a synchronization with the preset options.
You do not have to use the MobiLink Synchronization Wizard to create a nonvisual object that launches Dbmlsync.exe. You can include an MLSync system object in your applications:
-
Programmatically with PowerScript
-
By selecting it from the New dialog box
Adding an MLSync object programatically
The code fragment below creates an instance of an MLSync object and programmatically populates all of the necessary properties as well as some optional properties using an instance of the system SyncParm structure. Then it calls the Synchronize function to start the database synchronization.
SyncParm         Parms
MLSync         mySync
Long         rc

mySync = CREATE MLSync
mySync.MLServerVersion = 11      // required property
mySync.Publication = 'salesapi   '// required property
mySync.UseLogFile = TRUE      // optional
mySync.LogFileName = "C:\temp\sync.log   "// optional
mySync.Datasource = 'salesdb_remote   '// required
Parms.MLUser = '50         '// required
Parms.MLPass = 'xyz123         '// required
//The following values are required if they are not
//set by the DSN
Parms.DBUser = 'dba      '
Parms.DBPass = 'sql      '

//  Apply the property values to the sync object
mySync.SetParm(Parms)
//  Launch the synchronization process
rc = mySync.Synchronize()
destroy mySync
Adding an MLSync object from the New dialog box
You can add an MLSync object to a target PBL using the New dialog box: from the PowerBuilder menu, choose File>New, go to the PB Object tab, select Standard Class, then MLSync. This opens a new MLSync object in the User Object painter, where you can initialize all or some of the properties. When you are finished, you can save it as a new object in your target PBL.
Since all of the properties are already initialized, including userids and passwords, it is ready for immediate use. To launch a synchronization requires very little coding, as this example for an MLsync object that you save as "nvo_my_mlsync" illustrates:
nvo_my_mlsync       mySync
Long      rc
mySync = CREATE nvo_my_mlsync
mySync.Synchronize()
destroy mySync
You would typically add the above code to the Clicked event for a menu item or a command button on one of the application windows.
For more information
For more information on system objects related to synchronization, and their functions, events, and properties, see MLSynchronization, MLSync, and SyncParm in the section called “MLSynchronization object” in Objects and Controls, the section called “MLSync object” in Objects and Controls, and the section called “SyncParm object” in Objects and Controls.
If you create an instance of MLSync by PowerScript code or from the New dialog box, you should also consider using auxiliary objects that are generated automatically by the wizard that you can customize in the PowerBuilder Window painter.
Using an existing synchronization progress window
After you instantiate an MLSync object and call SetParm to enable an end user to set authentication properties at runtime, you can call a Response! type window to document the progress of a database synchronization. You open the progress window with an OpenWithParm call, using the window name and the MLSync object name as arguments. By default, the wizard generates a progress window named w_appname_syncprogress and adds the OpenWithParm call for you.
In the Properties view for an MLSync object, you can select a customized progress window to document the progress of a synchronization call. If you customize a wizard-generated progress window -- typically to hide some of the fields on its tab pages, or even to hide one or two of the tab pages -- you can select the customized progress window for all of your MobiLink applications.
Changing the connection arguments at runtime
To allow a user to override authentication parameters at runtime, you can call a customized options window or the synchronization options window generated by the wizard. The options window can, in turn, call an instance of the SyncParm object that can be initialized with authentication values from a highly secure persistent store, such as a remote database table. You can choose to make some or all of the authentication values writable, allowing the end user to override them at runtime.
Maintaining property settings in the MLSync object
Normally when you call SetParm(SyncParm) from an MLSync object, you automatically override any authentication values (AuthenticationParms, DBUser, DBPass, EncryptionKey, MLUser, and MLPass) that you set for properties of the MLSync object even when the value of a particular SyncParm property is an empty string. However, if you call SetNull to set a particular property of the SyncParm object to NULL before you call SetParm, the property value in the MLSync object will be used instead.
The default synchronization options window, w_appname_sync_options, returns a SyncParm structure to its caller through the PowerObjectParm property of the Message object. This allows the caller to save the highly sensitive authentication property values in a secure location. It also sets the SyncParm ReturnCode property with an integer value that indicates whether to proceed with the actual synchronization.
Default tab pages of the options window
The default synchronization options window has four tab pages: Subscriptions, SQL Anywhere, MobiLink Server, and Settings.
Subscriptions page
When you used the MobiLink wizard, you selected one or more publications from the list of available publications. The selected publications display on the Subscriptions page, but cannot be edited at runtime.
Each remote user can supply a MobiLink synchronization user name on this page. The name must be associated in a subscription with the publications displayed on the page. If the application is always used by the same MobiLink user, this information never needs to be supplied again. The name is saved in the registry and used by default every time synchronization is launched from the application on this device.
The MobiLink password and authentication parameters are never saved to the user's registry. They can either be entered each time by the user or provided from a secure database.
SQL Anywhere page
Remote users can supply a DSN file name on this page to pass all the arguments needed to connect to a remote database.
If a DSN file is not used, or if the DSN file does not include a user name and password, each remote user can supply a remote database user name. The name is saved in the registry and used by default every time synchronization is launched from the application on this device.
The following figure displays the options window SQL Anywhere tab page with DSN, DBUser, DBPass, and Encryption Key fields. The database password and encryption key are never saved in the registry.
Figure: Synchronization options window

MobiLink Server page
When you create a subscription, you specify a protocol, host, port, and other connection options. For ease of testing, the default protocol is TCP/IP and the default host is localhost. The default port is 2439 for TCP/IP, 80 for HTTP, and 443 for HTTPS.
You might need to change these defaults when you are testing, and your users might need to change them when your application is in use if the server is moved to another host or the port changes. If you did not enter values for the host and port at design time, and the user does not make any changes on this page, dbmlsync uses the values in the subscription.
For more information about subscriptions, see Adding subscriptions.
Settings page
The Settings page displays logging options, and any other dbmlsync options you specified at design time and lets the user change any of these options at runtime. It also gives the user a choice of displaying or not displaying a synchronization progress window.
Extended options
Extended options are added to the dbmlsync command line with the -e switch. You do not need to type the -e switch in the text box.
Before you use the generated objects, you should examine them in the PowerBuilder painters to understand how they interact. Many of the function and event scripts contain comments that describe their purpose.
All the source code is provided so that you have total control over how your application manages synchronization. You can use the objects as they are, modify them, or use them as templates for your own objects.
Properties of the user object
The nvo_appname_mlsync user object contains properties that represent specific dbmlsync arguments, including the publication name, the MobiLink server host name and port, and the user name and password for a connection to the remote database.
When you run the wizard, the values that you specify for these properties are set as default values in the script for the constructor event of the user object. They are also set in the Windows registry on the development computer in HKEY_CURRENT_USER\Software\Sybase\PowerBuilder\19.0\appname\MobiLink, where appname is the name of your application.
At runtime, the constructor event script gets the values of the properties from the registry on the remote machine. If they cannot be obtained from the registry, or if you override the registry settings, the default value supplied in the script is used instead and is written to the registry.
You can change the default values in the event script, and you can let the user change the registry values at runtime by providing a menu item that opens the w_appname_sync_options window.
Launching dbmlsync
To enable the user to launch a synchronization process, code a button or menu event script to call the gf_appname_sync global function. This function creates an instance of the nvo_appname_mlsync user object, and the user object's constructor event script sets the appname\MobiLink key in the registry of the remote machine.
If you specified in the wizard that the progress window should display, the global function opens the progress window, whose ue_postopen event calls the nvo_appname_mlsync user object's synchronize function; otherwise, the global function calls the synchronize function. The synchronize function launches dbmlsync as an external process.
Supplying a MobiLink user name and password
The global function takes a structure for its only argument. You can pass a system SyncParm structure that you instantiate. The structure includes six variables with string datatypes (one each for MobiLink and remote database user names and passwords, as well as variables for the authentication parameters and the encryption key) and another variable that takes a long datatype for a return code.
If you assign valid values to the structure that you pass as an argument, the global function passes these values to the user object to enable MobiLink server and remote database connections.
The options window (described in Default tab pages of the options window) provides a mechanism to store certain of these values in the registry the first time a user starts a synchronization. (Sensitive password and encryption information is never saved to the registry.) Subsequent synchronizations can be started without the user having to reenter the information, however, the options window can still be used to override and reset the registry values.
Retrieving data after synchronization
After synchronizing, you would typically test for synchronization errors, then retrieve data from the newly synchronized database. For example:
if gf_myapp_sync(s_opt) <> 0 then
   MessageBox("Error", "MobiLink error")
else
   dw_1.Retrieve()
end if
Capturing dbmlsync messages
The PowerBuilder VM traps messages from the dbmlsync process and triggers events in the user object as the synchronization process runs.
These events are triggered before synchronization begins as the upload stream is prepared:
ue_begin_logscan ( long rescan_log )
ue_progress_info ( long progress_index, long progress_max )
ue_end_logscan ( )
These events correspond to events on the synchronization server, as described in Connection events:
ue_begin_sync ( string user_name, string pub_names)
ue_connect_MobiLink ( )
ue_begin_upload ( )
ue_end_upload ( )
ue_begin_download ( )
ue_end_download ( long upsert_rows, long delete_rows )
ue_disconnect_MobiLink( )
ue_end_sync ( long status_code )
These events are triggered after ue_end_upload and before ue_begin_download:
ue_wait_for_upload_ack ( )
ue_upload_ack ( long upload_status )
These events are triggered when various messages are sent by the server:
ue_error_msg ( string error_msg )
ue_warning_msg ( string warning_msg )
ue_file_msg ( string file_msg )
ue_display_msg ( string display_msg )
The default event scripts created by the wizard trigger corresponding events in the optional progress window, if it exists. The window events write the progress to the multiline edit control in the progress window. Some window events also update a static text control that displays the phase of the synchronization operation that is currently running (log scan, upload, or download) and control a horizontal progress bar showing what percentage of the operation has completed.
You can also add code to the user object or window events that will execute at the point in the synchronization process when the corresponding MobiLink events are triggered. The dbmlsync process sends the event messages to the controlling PowerBuilder application and waits until PowerBuilder event processing is completed before continuing.
Cancelling synchronization
The Cancel button on the progress window calls the cancelsync user object function to cancel the synchronization process. If your application does not use the progress window, you can call this function in an event script elsewhere in your application.
Support files required on remote machine
If you do not install PowerBuilder or SQL Anywhere on remote machines, you must copy the files listed in the following table to use MobiLink synchronization with a PowerBuilder application. These files must be copied to the system path on the remote machine or the directory where you copy your PowerBuilder applications.
|
Required files |
Description |
|---|---|
|
PBDPL.dll, PBVM.dll, PBDWE.dll, PBSHR.dll, PBODB.dll, PBODB.ini, LIBJCC.DLL, LIBJUTILS.DLL, LIBJTML.DLL, NLWNSCK.DLL |
PowerBuilder files that you can copy from the %AppeonInstallPath%\Common\PowerBuilder\Runtime [version]\ directory of the development machine. |
|
GDIPLUS.DLL, MSVCP100.DLL, MSVCR100.DLL |
Microsoft files that ship with PowerBuilder. For restrictions on distributing these files with client applications, see Microsoft files. |
|
DBENG11.EXE, DBMLSYNC.EXE, DBSERV11.DLL, DBTOOL11.DLL, DBODBC11.DLL, DBLIB11.DLL, DBLGEN11.DLL, DBCON11.DLL, DBCTRS11.DLL, DBICU11.DLL, DBICUDT11.DLL |
SQL Anywhere and MobiLink files that you can copy from the SAP\SQL Anywhere 12\bin32 (or bins64) directory of the development machine. You should copy these files to a "bin32" subdirectory of the location where you copy the PowerBuilder application and supporting runtime files. |
Registry requirements for a remote machine
If you install SQL Anywhere on all remote machines that you use with MobiLink synchronization, the required registry entries are assigned automatically. If you copy SQL Anywhere and MobiLink files to a remote machine, you must create the HKEY_CURRENT_USER\SOFTWARE\Sybase\SQL Anywhere\16.0 registry key and add a "Location" string value that points to the parent directory of the bin32 or bin64 subdirectory where you copied SQL Anywhere and MobiLink files. (The code in the uf_runsync function of the nvo_appname_sync user object appends "\bin32\dbmlsync.exe" to the path that you assign to this registry value.)
Objects generated by the MobiLink Synchronization wizard also require registry entries to define the ODBC data source for a remote SQL Anywhere connection. The following table lists the required registry entries. You can create a REG file that installs these registry entries.
|
Registry key |
Name of string value and data to assign it |
|---|---|
|
HKEY_LOCAL_MACHINE\SOFTWARE\ODBC\ODBCINST.INI\SQL Anywhere 16.0 |
Driver = full path to DBODBC11.DLL Setup = full path to DBODBC11.DLL |
|
HKEY_LOCAL_MACHINE\SOFTWARE\ODBC\ODBCINST.INI\ODBC Drivers |
SQL Anywhere 16.0 = "Installed" |
|
HKEY_LOCAL_MACHINE\SOFTWARE\ODBC\ODBC.INI\ODBC Data Sources |
dataSourceName = "SQL Anywhere 16.0" |
|
HKEY_LOCAL_MACHINE\SOFTWARE\ODBC\ODBC.INI\dataSourceName |
Driver = full path to DBODBC11.DLL Userid = user name for remote database Password = password for remote database DatabaseName = remoteDatabaseName DatabaseFile = full path to remote database ServerName = remoteDatabaseName Start = "dbeng16 -c 8M" CommLinks = "shmem" |
Using a file DSN instead of a registry DSN
You can use a file DSN or a registry DSN for your remote database connections. To avoid having to specify a fully qualified path, you can copy file DSNs to a path specified by the ODBC registry key (typically c:\program files\common files\ODBC\data sources).
The following is an example of the contents of a valid file DSN:
[ODBC]
DRIVER=SQL Anywhere 16.0
UID=dba
Compress=NO
AutoStop=YES
Start=dbeng16 -c 8M -zl -ti 0
EngineName=SalesDB_Remote
DBN=SalesDB_Remote
DatabaseFile=C:\work\salesdb\salesdb_remote.db
DatabaseName=SalesDB_remote
The Datasource property of the MLSync object distinguishes a file DSN from a registry DSN using these rules:
-
If the Datasource name ends with a .dsn file extension, it is a file DSN
-
If the Datasource name begins with "drive:\" prefix where drive is any alphabetic character, then it is a file DSN
File DSN location before EBFs are applied to older DBMS versions
If you have not applied the latest EBFs to SQL Anywhere 10.0.0 or Adaptive Server Anywhere 9, dbmlsync looks in the current directory for file DSNs when a full path is not specified -- not in the path specified by the ODBC registry key. The registry key is used by SQL Anywhere 10.0.1 and later to locate file DSNs when their paths are not fully qualified.
Whether you are designing a new database or preparing an existing one to be used as a MobiLink consolidated database, you must install the MobiLink system tables in that database. SQL Anywhere provides setup scripts for SAP Adaptive Server Enterprise, Oracle, Microsoft SQL Server, and IBM DB2. A setup script is not required for SQL Anywhere databases.
MobiLink system tables store information for MobiLink users, tables, scripts, and script versions in the consolidated database. You will probably not directly access these tables, but you alter them when you perform actions such as adding synchronization scripts.
ODBC connections and drivers
To carry out synchronization, the MobiLink synchronization server needs an ODBC connection to the consolidated database. You must have an ODBC driver for your server and you must create an ODBC data source for the database on the machine on which your MobiLink synchronization server is running. For a list of supported drivers, see Recommended ODBC Drivers for MobiLink at https://archive.sap.com/documents/docs/DOC-67711.
Writing synchronization scripts
There are two types of events that occur during synchronization and for which you need to write synchronization scripts:
-
Connection events that perform global tasks required during every synchronization
-
Table events that are associated with a specific table and perform tasks related to modifying data in that table
At the connection level, the sequence of major events is as follows:
begin_connection
   begin_synchronization
      begin_upload
      end_upload
      prepare_for_download
      begin_download
      end_download
   end_synchronization
end_connection
When a synchronization request occurs, the begin_connection event is fired. When all synchronization requests for the current script version have been completed, the end_connection event is fired. Typically you place initialization and cleanup code in the scripts for these events, such as variable declaration and database cleanup.
Apart from begin_connection and end_connection, all of these events take the MobiLink user name stored in the ml_user table in the consolidated database as a parameter. You can use parameters in your scripts by placing question marks where the parameter value should be substituted.
To make scripts in SQL Anywhere databases easier to read, you might declare a variable in the begin_connection script, then set it to the value of ml_username in the begin_synchronization script.
For example, in begin_connection:
CREATE VARIABLE @sync_user VARCHAR(128);
In begin_synchronization:
SET @sync_user = ?
The begin_synchronization and end_synchronization events are fired before and after changes are applied to the remote and consolidated databases.
The begin_upload event marks the beginning of the upload transaction. Applicable inserts and updates to the consolidated database are performed for all remote tables, then rows are deleted as applicable for all remote tables. After end_upload, upload changes are committed.
If you do not want to delete rows from the consolidated database, do not write scripts for the upload_delete event, or use the STOP SYNCHRONIZATION DELETE statement in your PowerScript code. For more information, see Deleting rows from the remote database only.
The begin_download event marks the beginning of the download transaction. Applicable deletes are performed for all remote tables, and then rows are added as applicable for all remote tables in the download_cursor. After end_download, download changes are committed. These events have the date of the last download as a parameter.
Other connection-level events can also occur, such as handle_error, report_error, and synchronization_statistics. For a complete list of events and examples of their use, see the chapter on synchronization events in the MobiLink Administration Guide.
Many of the connection events that occur between the begin_synchronization and end_synchronization events, such as begin_download and end_upload, also have table equivalents. These and other overall table events might be used for tasks such as creating an intermediate table to hold changes or printing information to a log file.
You can also script table events that apply to each row in the table. For row-level events, the order of the columns in your scripts must match the order in which they appear in the CREATE TABLE statement in the remote database, and the column names in the scripts must refer to the column names in the consolidated database.
Generating default scripts
Although there are several row-level events, most tables need scripts for three upload events (for INSERT, UPDATE, and DELETE) and one download event. To speed up the task of creating these four scripts for every table, you can generate scripts for them automatically by running the -- create a synchronization model -- task from the MobiLink plug-in in SQL Central.
For information on the MobiLink plug-in, see the online MobiLink Getting Started book.
The MobiLink plug-in allows you to add more functionality to default scripts than default scripts generated in earlier versions of MobiLink. However, if you are using ASA 8 or ASA 9 instead of SQL Anywhere 10, 11, 12, 16, or 17, you can still generate default synchronization scripts by starting the MobiLink synchronization server with the -za switch and setting the SendColumnNames extended option for dbmlsync.
The following procedure describes how to generate ASA 8 or 9 synchronizations scripts from the PowerBuilder UI.
To generate ASA 8 or 9 synchronization scripts automatically from PowerBuilder:
-
Expand the ODBC Utilities folder in the Database painter and double-click the MobiLink Synchronization Server item.
The MobiLink Synchronize Server Options dialog box displays.
-
Select Adaptive Server Anywhere 8 or 9 from the MobiLink Version drop-down list.
You enable the Automatic Script Generation check box.
-
Select the Automatic Script Generation check box in the MobiLink Synchronize Server Options dialog box and click OK to start the server.
You can open this dialog box from the Utilities folder in the Database painter or the Database Profiles dialog box.
-
In your application, enter SendColumnNames=ON in the Extended text box on the Settings page of the w_appname_sync_options window.
You must have at least one publication, user, and subscription defined in the remote database. If you have more than one publication or user, you must use the -n and/or -u switches to specify which subscription you want to work with.
If there are existing scripts in the consolidated database, MobiLink does nothing. If there are no existing scripts, MobiLink generates them for all tables specified in the publication. The scripts control the upload and download of data to and from your client and consolidated databases.
If the column names on the remote and consolidated database differ, the generated scripts must be modified to match the names on the consolidated database.
You can also generate ASA 8 or 9 synchronization scripts from a command prompt. Start the server using the -za switch, then run dbmlsync and set the SendColumnNames extended option to on. For example:
dbmlsrv9 -c "dsn=masterdb" -za
dbmlsync -c "dsn=remotedb" -e SendColumnNames=ON
Generated scripts
The following table shows sample default scripts generated by the MobiLink plug-in in SQL Central. The scripts are generated for a table named emp with the columns emp_id, emp_name, and dept_id. The primary key is emp_id. The generated download scripts use a timestamp based download.
|
Script name |
Script |
|---|---|
|
upload_insert |
INSERT INTO "GROUP1"."emp" ( "emp_id", "emp_name", "dept_id" ) VALUES ( {ml r."emp_id"}, {ml r."emp_name"}, {ml r."dept_id"} ) |
|
upload_update |
UPDATE "GROUP1"."emp" SET "emp_name" = {ml r."emp_name"}, "dept_id" = {ml r."dept_id"} WHERE "emp_id" = {ml r."emp_id"} |
|
upload_delete |
DELETE FROM "GROUP1"."emp" WHERE "emp_id" = {ml r."emp_id"} |
|
download_cursor |
SELECT "GROUP1"."emp"."emp_id", "GROUP1"."emp"."emp_name", "GROUP1"."emp"."dept_id" FROM "GROUP1"."emp" WHERE "GROUP1"."emp"."last_modified" >= {ml s.last_table_download} |
|
download_delete_cursor |
SELECT "emp_del"."emp_id FROM "emp_del" WHERE "emp_del"."last_modified" >= {ml s.last_table_download} |
The scripts that you generate with the MobiLink plug-in constitute a synchronization model. After you create a synchronization model, you must use the -- Deploy the synchronization model -- task of the plug-in to deploy the scripts to consolidated and remote databases or to SQL files.
The following table shows the scripts that are generated for the same table using the -za command switch for the ASA 9 MobiLink synchronization server. The scripts generated for downloading data perform "snapshot" synchronization. A complete image of the table is downloaded to the remote database. Typically you need to edit these scripts to limit the data transferred.
For more information, see Limiting data downloads.
|
Script name |
Script |
|---|---|
|
upload_insert |
INSERT INTO emp (emp_id, emp_name, dept_id) VALUES (?,?,?) |
|
upload_update |
UPDATE emp SET emp_name = ?, dept_id = ? WHERE emp_id=? |
|
upload_delete |
DELETE FROM emp WHERE emp_id=? |
|
download_cursor |
SELECT emp_id, emp_name, dept_id FROM emp |
Before modifying any scripts, you should test the synchronization process to make sure that the generated scripts behave as expected. Performing a test after each modification will help you narrow down errors.
You can view and modify existing scripts and write new ones in the MobiLink Synchronization plug-in in SQL Central (formerly known as Sybase Central). These procedures describe how to connect to the plug-in and write scripts, and how to add a user to the consolidated database.
To connect to a consolidated database in SQL Central:
-
Start SQL Central and select Connections>Connect with MobiLink 11 from the menu bar.
-
On the Identification page in the Connect to Consolidated Database dialog box, select or browse to a data source name or file, and click OK.
When you expand the node for a consolidated database in the MobiLink Synchronization plug-in, you see folders with the following labels: Tables, Connection Scripts, Synchronized Tables, Users, Versions, and Notifications. All the procedures in this section begin by opening one of these folders.
Script versions
Scripts are organized into groups called script versions. By specifying a particular version, MobiLink clients can select which set of synchronization scripts is used to process the upload stream and prepare the download stream. If you want to define different versions for scripts, you must add a script version to the consolidated database before you add scripts for it.
If you create two different versions, make sure that you have scripts for all required events in both versions.
To add a script version:
-
Open the Versions folder, then select File>New>Version from the SQL Central menu bar.
-
In the Create Script Version wizard, provide a name for the version and optionally a description, then click Finish.
SQL Central creates the new version and gives it a unique integer identifier.
Adding synchronized tables and scripts
Scripts added for connection events are executed for every synchronization. Scripts added for table events are executed when a specific table has been modified. You must specify that a table is synchronized before you can add scripts for it.
To add a table for synchronization:
-
Open the Synchronized Tables folder and select File>New>Synchronized Table.
-
Specify a remote table name you want to synchronize or select a table in the consolidated database that has the same name as a table in the remote database.
-
Click Finish.
To add a script to a synchronized table:
-
Double-click a table name in the Synchronized Tables folder, then select File>New>Table Script.
-
In the Create Table Script wizard, select the version for which you want to add a script, select the event you want to cause the script to execute, and click Next.
-
Choose to create a new script definition and the language (SQL, Java, or .NET) in which you want to write the definition, or select an existing script version that you want to share for the new script.
-
Click Finish.
-
Type your script in the editor that displays, then save and close the file.
For example, if you want to remove rows that have been shipped from the Order table in a remote database, you can place the following SELECT statement in the download_delete_cursor event, where order_id is the primary key column. The first parameter to this event is the last_download timestamp. It is used here to supply the value for a last_modified column:
SELECT order_id
  FROM Order
WHERE status = 'Shipped'
  AND last_modified >= ?
For more information about using the download_delete_cursor event, see the section on "Writing download_delete_cursor scripts" in the online MobiLink - Server Administration book.
To add a connection-level script:
-
Open the Connection Scripts folder and select File>New>Connection Script from the menu bar.
-
Follow steps 2 to 5 in the previous procedure.
Adding users
You can add users directly to the ml_user table in the consolidated database, then provide the user names and optional passwords to your users. To add a user, open the Users folder, select File>New>User, and complete the Create User wizard.
You also have to add at least one user name to each remote database, as described in Creating MobiLink users.
Any SQL Anywhere database can be converted for use as a remote database in a MobiLink installation. You can also create a new SQL Anywhere remote database that uses all or part of the schema of the consolidated SQL Anywhere database.
You create the database on your desktop using the SQL Central SQL Anywhere plug-in, the Create SA Database utility in the Database painter, or another tool. If your database uses an English character set, use the 1252 Latin1 collation sequence.
To use a database as a remote database for MobiLink synchronization, you need to create at least one publication and MobiLink user, then add a subscription to the publication for the user. See Creating and modifying publications, Creating MobiLink users, and Adding subscriptions.
Remote database schemas
Tables in a remote database need not be identical to those in the consolidated database, but you can often simplify your design by using a table structure in the remote database that is a subset of the one in the consolidated database. Using this method ensures that every table in the remote database exists in the consolidated database. Corresponding tables have the same structure and foreign key relationships as those in the consolidated database.
Tables in the consolidated database frequently contain extra columns that are not synchronized. Extra columns can even aid synchronization. For example, a timestamp column can identify new or updated rows in the consolidated database. In other cases, extra columns or tables in the consolidated database might hold information that is not required at remote sites.
You create publications using SQL Central or the SQL CREATE PUBLICATION statement. In SQL Central, all publications and articles appear in the Publications folder. This section describes how to create publications in SQL Central. For information about creating and modifying publications using SQL, see the online MobiLink - Client Administration book.
Connecting to the database in SQL Central
You use the SQL Anywhere plug-in in SQL Central, not the MobiLink Synchronization plug-in, to work with MobiLink clients and remote databases. For information on starting SQL Central from the PowerBuilder design time environment, see the Users Guide.
You must have DBA authority to create or modify publications, MobiLink users, and subscriptions.
To connect to the database in SQL Central:
-
Start SQL Central, select Connections>Connect with SQL Anywhere 16 from the SQL Central menu bar.
-
On the Identification page in the Connect dialog box, enter DBA as the user name and SQL as the password, select or browse to the data source name or file and click OK.
Publishing all the rows and columns in a table
The simplest publication you can create is a single article that consists of all rows and columns of one or more tables. The tables must already exist.
To publish one or more entire tables in SQL Central:
-
Connect to SQL Central as described in Connecting to the database in SQL Central.
-
Open the Publications folder and select File>New>Publication from the SQL Central menu.
-
Type a name for the new publication and click Next.
-
On the Specify Tables page, select a table from the list of available tables and click Add.
The table appears in the list of selected tables on the right.
-
Optionally, add more tables. The order of the tables is not important.
-
Click Finish.
Publishing only some columns in a table
You can create a publication that contains all the rows but only some of the columns of a table.
To publish only some columns in a table in SQL Central:
-
Follow the first four steps of the procedure in Publishing all the rows and columns in a table.
-
Click Next. On the Specify Columns page, double-click the table's icon to expand the list of available columns, select each column you want to publish, and click Add.
The selected columns appear on the right.
-
Click Finish.
Publishing only some rows in a table
You can create a publication that contains some or all of the columns in a table, but only some of the rows. You do so by writing a search condition that matches only the rows you want to publish.
In MobiLink, you can use the WHERE clause to exclude the same set of rows from all subscriptions to a publication. All subscribers to the publication upload any changes to the rows that satisfy the search condition.
To create a publication using a WHERE clause in SQL Central:
-
Follow the first four steps of the procedure in Publishing all the rows and columns in a table, and optionally the first two steps of the procedure in Publishing only some columns in a table.
-
Click Next. On the Specify Where Clauses page, select the table and type the search condition in the lower box.
Optionally, you can use the Insert dialog box to help you format the search condition.
-
Click Finish.
Adding articles
You can add articles to existing publications.
To add articles in SQL Central:
-
Connect to SQL Central as described in Connecting to the database in SQL Central.
-
Open the Publications folder and double-click the name of the publication to which you want to add an article.
-
Select File>New>Article from the SQL Central menu.
-
In the Create Article wizard, select a table and click Next.
-
If you want only some columns to be synchronized, select the Selected Columns radio button and select the columns.
-
If you want to add a WHERE clause, click Next and enter the clause.
-
Click Finish.
Modifying and removing publications and articles
You can modify or drop existing publications in SQL Central by navigating to the location of the publication and selecting Properties or Delete from its pop-up menu. You can modify and remove articles in the same way.
Publications can be modified only by the DBA or the publication's owner. You must have DBA authority to drop a publication. If you drop a publication, all subscriptions to that publication are automatically deleted as well.
Avoid altering publications in a running MobiLink setup
Altering publications in a running MobiLink setup is likely to cause replication errors and can lead to loss of data unless carried out with care.
MobiLink users are not the same as database users. Each type of user resides in a different namespace. MobiLink user IDs can match the names of database users, but there is no requirement that they match.
To add a MobiLink user to a remote database in SQL Central:
-
Connect to SQL Central as described in Connecting to the database in SQL Central.
-
Open the MobiLink Users folder and select File>New>User from the SQL Central menu.
-
Enter a name for the MobiLink user.
The name is supplied to the MobiLink synchronization server during synchronization. In production databases, each user name is usually added to the consolidated database, then provided to the individual user.
-
Click Finish.
To configure MobiLink user properties in SQL Central:
-
Connect to SQL Central as described in Connecting to the database in SQL Central.
-
Open the MobiLink Users folder, right-click the MobiLink user, and select Properties from the pop-up menu
-
Change the properties as needed.
To drop a MobiLink user in SQL Central:
-
Connect to SQL Central as described in Connecting to the database in SQL Central.
-
Open the MobiLink Users folder, right-click the MobiLink user, and select Delete from the pop-up menu.
Dropping MobiLink users
You must drop all subscriptions for a MobiLink user before you drop the user from a remote database.
Adding MobiLink users to the consolidated database
The consolidated database contains a table called ml_user that is used to authenticate the names of MobiLink users when a synchronization is requested. When you add a user to a remote database, you need to be sure that the user is also added to the ml_user table.
You can add users automatically by selecting the Automatic Addition of Users check box in the MobiLink Synchronization Server Options dialog box and then starting the server. You open this dialog box from the Utilities folder in the Database painter or Database Profiles dialog box. You can also start the server from a command prompt, passing it the -zu+ switch.
Any users defined in the remote database are added to the ml_user table in the consolidated database, as long as the script for the authenticate_user connection event is undefined. Typically the -zu+ switch is not used in a production environment. Names are usually added to the ml_user table in the consolidated database, then added to each of the remote databases. Each user is given a unique name and optional password.
A synchronization subscription links a particular MobiLink user with a publication. You must have at least one publication and one user to create a subscription.
A subscription can also carry other information needed for synchronization. For example, you can specify the address of the MobiLink server and other connection options. Values for a specific subscription override those set for individual MobiLink users.
Overriding options in the wizard
You can override the MobiLink server name and port set for the subscription and user with settings in the ASA MobiLink Synchronization wizard in PowerBuilder.
Synchronization subscriptions are required in MobiLink SQL Anywhere remote databases. Server logic is implemented through synchronization scripts, stored in the MobiLink system tables in the consolidated database.
A single SQL Anywhere database can synchronize with more than one MobiLink synchronization server. To allow synchronization with multiple servers, create different subscriptions for each server.
To add a subscription for a MobiLink user in SQL Central:
-
Connect to SQL Central as described in Connecting to the database in SQL Central.
-
Open the Publications folder, select the publication for which you want to enter a subscription, select the Synchronization Subscriptions tab in the right pane of SQL Central, then select File>New>Synchronization Subscription from the menu bar.
Instead of creating a new subscription in the Publications folder, you can create one in the MobiLink Users folder by double-clicking the user for whom you want to create a subscription, and then selecting File>New>Synchronization Subscription from the menu bar.
-
In the Create Synchronization Subscription wizard, select the user for whom you want to enter a subscription and click Finish.
If you started the wizard from the MobiLink Users folder, the wizard prompts you to select the publication to which you want to subscribe. In this case, select the publication and click Finish.
To modify a subscription in SQL Central:
-
Connect to SQL Central as described in Connecting to the database in SQL Central.
-
Open the MobiLink Users folder and double-click the name of the MobiLink user who owns the subscription you want to modify.
-
On the Synchronization Subscriptions tab, right-click the subscription you want to modify and select Properties from the pop-up menu.
-
Change the properties as needed on the Connection and Extended Options pages of the Synchronization Subscription Properties dialog box.
To delete a synchronization subscription in SQL Central:
-
Connect to SQL Central as described in Connecting to the database in SQL Central.
-
Open the MobiLink Users folder and double-click the name of the MobiLink user who owns the subscription you want to delete.
-
On the Synchronization Subscriptions tab, right-click the subscription you want to delete and click Delete.
-
Click Yes in the Confirm Delete dialog box.
This section highlights some issues that you need to consider when designing an application that uses MobiLink synchronization.
One of the major goals of synchronization is to increase the speed and efficiency of data movement by restricting the amount of data moved. To limit the data transferred by the download_cursor script, you can partition data based on its timestamp, the MobiLink user name, or both.
Timestamp partitioning
One way to limit downloads to data changed since the last download is to add a last_modified column to each table in the consolidated database (or, if the table itself cannot be changed, to a shadow table that holds the primary key and that is joined to the original table in the download_cursor script). The last_modified column need only be added to the consolidated database.
In SQL Anywhere, you can use built-in DEFAULT TIMESTAMP datatypes for this column. In other DBMSs, you need to provide an update trigger to set the timestamp of the last_modified column.
The timestamp is generated on the consolidated database and downloaded unmodified to the remote database during synchronization; the time zone of the remote database does not affect it.
User-based partitioning
The download_cursor script has two parameters: last_download, of datatype datetime, and ml_username, of type varchar(128). You can use these parameters to restrict the download not only to rows that have changed since the last synchronization, but also to rows that belong to the current user.
In this sample download_cursor script, only those rows are downloaded that have been modified since the last synchronization, and that apply to the sales representative whose ID matches the MobiLink user ID:
SELECT order_id, cust_id, order_date
   FROM Sales_Order
WHERE last_modified >= ?
   AND sales_rep = ?
For this to work correctly, the MobiLink user ID must match the sales_rep ID. If this is not the case, you might need to join a table that associates these two IDs.
Primary key uniqueness
In a conventional client/server environment where clients are always connected, referential integrity is directly imposed. In a mobile environment, you must ensure that primary keys are unique and that they are never updated. There are several techniques for achieving this, such as using primary key pools.
Handling conflicts
You need to handle conflicts that arise when, for example, two remote users update the same rows but synchronize at different intervals, so that the latest synchronization might not be the latest update. MobiLink provides mechanisms to detect and resolve conflicts.
Deleting rows from the remote database only
By default, when a user starts a synchronization, the net result of all the changes made to the database since the last synchronization is uploaded to the consolidated database. However, sometimes a remote user deletes certain rows from the remote database to recapture space, perhaps because the data is old or a customer has transferred to another sales agent. Usually, those deleted rows should not be deleted from the consolidated database.
One way to handle this is to use the command STOP SYNCHRONIZATION DELETE in a script in your PowerBuilder application to hide the SQL DELETE statements that follow it from the transaction log. None of the subsequent DELETE operations on the connection will be synchronized until the START SYNCHRONIZATION DELETE statement is executed.
For example, you might provide a menu item called Delete Local where the code that handles the delete is wrapped, as in this example:
STOP SYNCHRONIZATION DELETE;
// call code to perform delete operation
START SYNCHRONIZATION DELETE;
COMMIT;
There are other approaches to handling deletes. For more information, see the chapter on synchronization techniques in the online MobiLink - Server Administration book.
