The Configure tool provides an Application Profiles tab for you to modify the settings specified in the PowerServer Toolkit Configuration Wizard, and use the following advanced functions:
-
Specify the default application profile
-
Select the file generation mode for an application
-
Delete an application profile
-
Boost the application runtime performance
-
Specify parsing options
-
Specify runtime settings
-
Configure Web Service profiles
When you click the Configure
button ( ) on the PowerServer Toolkit, the PowerServer
Toolkit Configuration window appears with the Application Profiles
tab selected by default, as shown in the following figure.
To specify which application profile will be used as the default application profile, select the Default radio button.
The PowerBuilder application defined in the default application profile is selected for unsupported features analysis, PowerBuilder-to-Web or PowerBuilder-to-mobile conversion, application packaging, and application undeployment.
Click the Delete button to delete a selected application profile.
Note: You cannot delete the default application profile.
Deleting the application profile will automatically delete the temporary fold for the application profile on the PowerServer Toolkit machine. The folder has the same name as the application profile and is created in the \Project folder under the root directory where PowerServer Toolkit is installed (e.g. C:\Program Files\Appeon\PowerServer\Toolkit\).
The Export and Import buttons are mainly to back up and restore the configuration of application profile(s), for instance, if you want to transfer the configuration of application profile(s) to another PowerServer Toolkit.
-
Click the Export button to export the selected application profile(s). In the pop-up dialog box, type a file name, then the selected application profile(s) will be saved into the file as XML file format.
To select multiple application profiles, you can use Shift+click or Ctrl+click, or drag the mouse pointer to create a selection.
-
Click the Import button to import application profile(s) from the XML file which is generated by using the Export button.
If the application profile being imported has the same name as an existing application profile, you will be asked to overwrite or ignore the existing application profile.
The Application Profiles Configuration window provides eight tab pages for you to edit the required application information:
Table 3. Application Profiles settings
|
Tab |
Settings |
To make changes effective, you must... |
|---|---|---|
|
Basic Settings |
The application profile name, project type, application URL, PBL version and PBL location of an application. See the section called “Basic Settings”. |
Perform a full or incremental deployment on the application. |
|
DB Settings |
The database types, transaction objects and the corresponding data sources. See the section called “DB Settings”. |
Perform a full or incremental deployment on the application. |
|
Additional Files |
INI files, .NET/COM components, image files and External files. See the section called “Additional Files”. |
Perform a full or incremental deployment on the application. |
|
Misc Settings |
Command line arguments, application language, runtime performance, parsing option, and log-writing mode. See the section called “Misc Settings”. |
Perform a full deployment on the application. |
|
Web Service Profiles |
The WSDL file, service name and port for the Web service(s). See the section called “Web Service Profiles”. |
Perform a full or incremental deployment on the application. |
|
Offline Settings |
The offline capacity, start mode, and the local database files. See the section called “Offline Settings”. |
Perform a full or incremental deployment on the application. |
|
Runtime Settings |
Company name and application name displayed on the Web application downloading page, and mobile application name, icon, and description displayed in the Appeon Workspace and the target mobile device the application apply for. See the section called “Runtime Settings”. |
Perform a full or incremental deployment on the application. |
|
Summary |
A summary view of the settings. See the the section called “Summary” section for more details. |
Perform a full deployment on the application. |
After you click Add or Edit on the Application Profiles tab, the Application Profile Configuration window is displayed with the Basic Settings tab selected by default, as shown in the following figure.
The Basic Settings tab allows you to modify the web folder, project type, PBT, PBL version, PBL location, and file generation mode.
Profile Name -- The application profile name is used to identify the PowerBuilder application during the entire PowerBuilder-to-Web or PowerBuilder-to-mobile process. It is also used in the appeondb database in PowerServer to identify the DataWindow syntax, profile, and registry information for a PowerServer application.
The Profile Name cannot contain double-byte characters (such as Chinese, Korean, or Japanese characters) or special characters (such as, \, /, :, *, ?, ", <, >, or |).
Web Folder -- The specified text is used as the name of the folder created under the Web root (or document root) of the Web server for storing the Web or mobile application files when the application is deployed, therefore, the URL for accessing the deployed application will be in this format: http://web_server:port/web_folder/. The Web Folder can contain a combination of letters, underscores ("_"), and numbers.
Avoid setting Web Folder as existing folder names in the Web server Web root (or document root), because: (1) If a Web or mobile application uses an existing folder under the Web root as the Web Folder, a large number of Web or mobile files belonging to the application will be deployed to that folder, making it difficult to use the folder for its original purpose. (2) If a Web or mobile application uses a folder that is reserved for the Web server or PowerServer, some important files belonging to the Web server or PowerServer may be replaced or even removed when the application is undeployed. The following are folder names reserved for the Web server or PowerServer that should not be used as Web Folders: appeon, classes, docs, images, ir, wst, and WEB-INF.
The Web Folder for an application profile can be changed, and the Web or mobile files stored at the Web server can have different versions for the client to access, but PowerServer Toolkit only remembers the Web Folder in the last deployment, and performs the application packaging and application undeployment based on the Web or mobile files generated in the corresponding folder.
Project Type -- The Project Type determines whether your PowerBuilder application will be configured for the Web migration process, or the mobile migration process, or both.
-
Web -- Deploys a Web app only. The Web project type supports the most PB features including Windows PC technologies, such as DLLs/OCXs.
-
Mobile -- Deploys a native Mobile app only. The Mobile project type supports mobile-specific functionalities instead of Windows PC technologies.
-
Both -- Deploys both a native Mobile app and a Web app. The Both project type supports the same features as the Mobile project type. If your app uses Windows PC technologies, such as DLLs/OCXs, you cannot use the Both project type.
Application PBLs -- Select the PBL version and add application PBL files using any of the following methods:
-
Click the browse ... button and choose to add an application Target file (*.pbt).
By adding PBLs using an application Target, all PBLs in the Target are automatically added to the application PBLs list. This is the recommended way to add PBLs, as it reduces the likelihood of forgetting to add a required PBL.
-
Click the Add button and add PBL files without using an application Target.
You can add one or multiple PBL files at the same time. To select multiple files, hold down the Ctrl key and choose which files to add.
-
Copy and paste (Ctrl+C and Ctrl+V) the path list of PBLs into the Application PBLs field.
Keep PBT Updated -- Keep this checkbox checked if you want PowerServer Toolkit to automatically update the PBLs every time you deploy an application. This ensures that any newly added PBLs will be deployed and so avoids missing PBLs after deployment.
Debug -- Select or de-select this checkbox to change the Web/mobile file generation mode between Debug and Release. When you are debugging or tuning the application, you can check this checkbox, and select from Debug PS/JS and Debug JS.
-
Debug PS/JS: Generates unencrypted JavaScript files for debug use; and the PowerBuilder source code is provided as comments in the JavaScript files for easy reference.
-
Debug JS: Generates unencrypted JavaScript files for debug use; no PowerBuilder source code is provided in the JavaScript files.
When you are releasing the application to the production use (after the debug and fine-tune), you are recommended to not check this checkbox, so that encrypted JavaScript files will be generated under the Release mode to prevent the source code being viewed. When you change the mode (between Debug and Release), you must perform a full deployment to make the new setting effective.
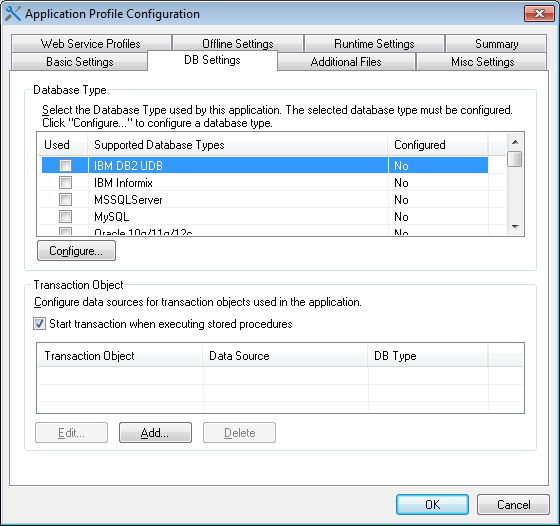
The DB Settings tab allows you to specify the database types and the transaction objects that the application uses, as shown in the following figure. When configuring the database types, it is not necessary to specify the actual databases that the application uses, it can be any database of the same type. However, when specifying the transaction objects, you must specify the actual transaction objects that the application uses.
What the DB Type is used for
PowerBuilder SQL statements must be converted into the correct database syntax before they can be used to retrieve data from the database that the Web or mobile application connects to. The DB Type settings enable PowerServer Toolkit to apply the correct database driver type for generating correct database syntax for PowerBuilder SQL statements.
Set the database types for the application
Select the database type(s) used by the application, as shown in the following figure.
The following table describes each element on the DB Type tab.
Table 4. Database type settings
|
Column |
Description |
|---|---|
|
Used |
You can click the check boxes to select the database types used by the application. More than one database type can be selected, but only the configured database types are selectable. |
|
Supported Database Types |
This column lists all the database types that are supported by PowerServer. |
|
Configured |
This column is identical to the Configured column in the section called “Managing database type profiles”. It indicates whether a profile has been configured for the database type. If this column of the desired database type is "No", you must click the Configure button to configure a profile for it before you can use it. Configuring a database type profile in this tab is the same as configuring it in the DB Type Profiles tab. Once a database type profile is configured successfully, the Configured column in both this tab and the DB Type Profiles tab changes from "No" to "Yes". |
Specify the transaction object and the data source
Click Add or Edit to configure a transaction object and specify the corresponding data source. Refer to the section called “Declaring transaction object(s)” for detailed description.
Start transaction when executing stored procedures
It is strongly recommended that you keep this option enabled. The only circumstance you may consider disabling it is when there is commit statement executed inside a stored procedure (SP) and there is no need to commit in the PB code; the reason is that by default PowerServer will start a transaction once an SP is executed, and the user will be able to see details of this transaction in the Active Transactions tab in AEM; when commit is executed inside the SP, the transaction will end and disappear from the database end, but as there is no commit in the PB code, this transaction will still appear as an active transaction in AEM, which will mislead users to think this is an uncommitted transaction. To avoid this misunderstanding, you can disable this option, so PowerServer will not start a transaction when an SP is executed.
"Additional files" refer to the files that are outside the application source code, but are necessary for running the PowerBuilder application, including INI files, .NET/COM components, image files, and external files, such as DLL/OCX files, text files, etc.
If a PowerBuilder application uses an initialization (INI) file which contains user preferences, specify the INI file in this tab so that PowerServer Toolkit can deploy the file for the application.
Click Add to add the INI file(s) into the Deploy INI Files list box.
How INI files are supported in PowerServer
During deployment, the specified INI file(s) are converted to XML file(s) and deployed to PowerServer. The XML file(s) act as mock INI file(s). When a Client runs the deployed application for the first time, a copy of the XML file is created in PowerServer and keeps the Client's profile information.
For a Client to use the correct profile information in its subsequent visits to the application, the Client browser must be cookie-enabled. Otherwise, each time the Client visits the application, a new copy of the XML file is created in PowerServer, and the new copy only contains the information of the original INI file.
You can delete the XML files that are unused for a period using AEM. For more information on how to maintain XML files in PowerServer, refer to the section called “Auto cleanup” in PowerServer Configuration Guide for .NET.
Deploy .NET/COM components
If a PowerBuilder application uses .NET/COM components which contains executable files (.exe), and COM/COM+ components, specify the .NET/COM components file in this tab so that PowerServer Toolkit can deploy the file for the application.
Click Add to add the .NET/COM components file(s) into the Deploy .NET/COM components list box.
Click Browse to specify which folder contains the image files that will be used in the Web or mobile application. If you do not specify the path of the image files, the path to the application PBL files will be displayed as the default path of the image files.
The image files can be in any format supported by PowerBuilder, apart from:
-
unsupported run-length encoded (RLE), and
-
unsupported Windows metafile (WMF)
All the image files in the specified folder will be deployed to the %Web Folder%/images folder in the Web Server. %Web Folder% stands for the folder storing the Web application files or the mobile application files. The image files may fail to be displayed on the Web or in Appeon Workspace, or on mobile devices if the file names are stored in the database or dynamically generated. To resolve this, you can copy the image files directly to the %Web Folder%/images folder, but make sure that the file names are all lowercase; otherwise, the Web or mobile application may fail to load them.
If your application calls any custom user DLL/OCX files (for Web applications only), which are also called external non-system DLL/OCX files in this tab; or if your application calls any other external files, such as text files, PDF files, image files etc., you can specify them here and deploy them to the Web server. Deploying DLL/OCX files is used as an example in this guide.
Click Option... in the Deploy External Files group box to open the Deploy External Files dialog box (as shown in the following figure) and select the required external files to be deployed.
The following table introduces the elements in the Deploy External Files dialog box.
Table 5. Deploy External Files dialog box
|
Column |
Description |
|---|---|
|
Register |
Allows you to select whether the file will be automatically registered after it is downloaded to the Client at runtime. Click Select All to select all files and Unselect All to de-select all of them. If you choose not to automatically register a file, you can register it manually after it is downloaded. |
|
File Name |
Lists the added files. Click the header of this column to display the files in alphabetical order. You can add any file of any type. |
|
File Path |
Displays the file location. |
The following table describes how to add and remove files in the Deploy External Files dialog box.
Table 6. Deploy External Files dialog box
|
To Do This |
Do This |
|---|---|
|
To add files |
Click the Add button. A standard File Selection dialog box is displayed. And then select the files from your local machine. The files can be stored in any location. |
|
To remove files |
Select a file or multiple files using Ctrl or Shift keys, and click the Delete button to remove the selected files from the list. |
|
To save the settings |
Click OK. PowerServer Toolkit will copy the files to a temporary folder and then deploy them to the Web Server during deployment. |
How the deployed DLL/OCX files work on Web
To successfully call the deployed DLL/OCX files in the Web application, you need to make sure that the DLL/OCX files are successfully downloaded and installed to the Client during the initial run of the deployed Web application.
AEM provides options for manually or automatically downloading and installing the DLL/OCX files, and for specifying the installation location (by default the files are saved to the "plugin" folder under the application directory on the client machine). For detailed instructions, refer to the section called “DLL/OCX Files” in PowerServer Configuration Guide for .NET.
Where the external file will be saved after downloaded to the client
The external file will be automatically downloaded and saved to the client when the deployed application is run for the first time. The default location is the "plugin" folder for each application. For more details, refer to the section called “What files will go to the plugin folder and how to access them” in Workarounds & APIs Guide.
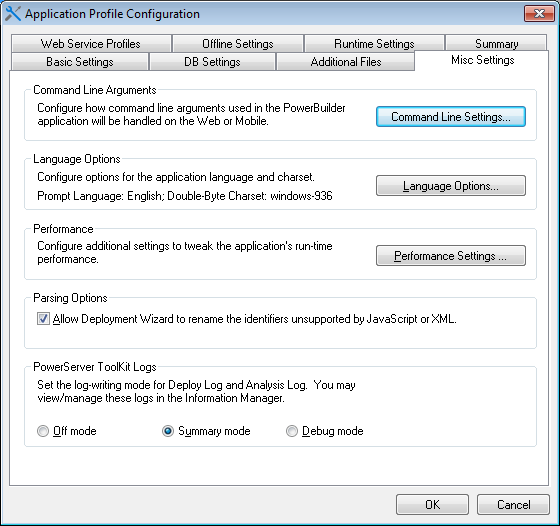
The Misc Settings tab page enables you to modify settings for command line arguments, application languages, double-byte charset, and log-writing modes, and allows you to configure the runtime performance and parsing options.
If an application needs to use command line arguments, enable the command line argument option, as shown in the following figure.
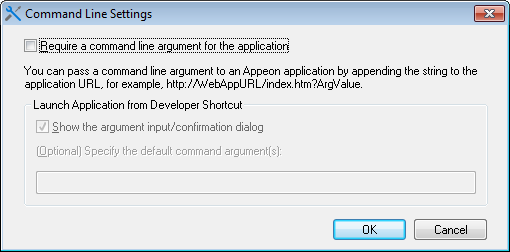
Click Command Line Settings on the Misc Settings tab. The Command Line Settings dialog box is displayed, as shown in the following figure.
Require a command line argument for the application option: Enables the command line argument option.
With this check box selected, the following two options will be enabled. Note that they are effective only if you run the application from the PowerServer Toolkit.
-
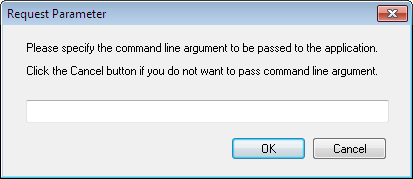
Show argument input/confirmation dialog option: A dialog box is displayed after you launch an application from the PowerServer Toolkit but before the application starts. This dialog box enables you to specify the arguments for the application.
-
Specify the default command arguments field: The specified default arguments are directly attached to the application URL when the application is run from the PowerServer Toolkit.
-
If both options are specified: A dialog box pops up with the default arguments filled in, as shown in the following figure. You can either change the default arguments or leave them alone.
To run an application with arguments from Clients, type the application URL with the arguments. The format of an application URL with arguments is: http://AppURL/index.htm?ArgValue. ArgValue indicates the arguments that will be passed to the application. The arguments must be separated by commas if there are more than one argument.
Application Language and Double-Byte Charset
Step 1: Click Language Options on the Misc Settings tab. The Language Settings dialog box is displayed, as shown in the following figure.
-
System Prompt Language: Select a language from the System Prompt Language dropdown list box (Only English available when you are using an English version of Appeon PowerServer).
System prompts are error messages, informational messages, warnings, notices, and prompts that are displayed when you run PowerServer applications.
-
Client Charset: Skip this if your application is a Web application or if your mobile application does not use any string function that ends with "A", otherwise, select a charset the same as that of your PowerBuilder development environment for the mobile client.
If your application uses string functions that end with "A" (e.g. FillA, LeftA, LenA, MidA, PosA, ReplaceA, and RightA) to process the double-byte character, these functions may return different values on iOS and Windows, because iOS system uses UTF-8 encoding while the Windows system uses UTF16 encoding. Due to this difference, in order for these functions to return the same values on iOS and Windows, you need to specify the charset here the same as the charset of your PowerBuilder development environment.
And make sure the mobile client supports the specified charset, otherwise, these functions could not return the correct values or may even cause the application to crash. For the sake of safety, we suggest you not use string functions that end with "A" (e.g. FillA, LeftA, LenA, MidA, PosA, ReplaceA, and RightA) to process the double-byte character, use the functions without “A” instead (e.g. Fill, Left, Len, Mid, Pos, Replace, and Right), so as to avoid any potential issue that could be caused by specifying an improper charset or the mobile client not supporting the specified charset.
Step 2: Click OK to save the settings.
It is recommended that you take advantage of the performance settings to boost the application's runtime performance. To achieve the best performance, perform the following steps:
Step 1: Click the Performance Settings on the Misc Settings tab. The Performance Settings dialog box is displayed, as shown in the following figure.
Step 2: Select the performance features based on your needs.
The following table describes how to use the performance features.
Table 7. Performance features
|
Setting |
Description |
When To Use |
|---|---|---|
|
10X Web File Compression |
Compresses files when they are transferred over the network. |
Always |
|
Merge files |
Merges the small files during the application deployment. The small files will be downloaded to the client in one file package at one call, instead of being downloaded one by one at separate calls. |
In the production stage. |
|
Download ActiveX files in a single thread (for Web applications only) |
Downloads the two ActiveX files in the same thread at runtime. Using the same thread to download the two ActiveX files can speed up the download under particular network conditions. For more information about the Appeon ActiveX file, refer to the section called “Installing Appeon Xcelerator plug-in” in Supported PB Features for PowerServer Web. |
Always |
Unsupported identifiers refer to identifiers that are supported in PowerBuilder but unsupported in PowerServer, due to the different naming convention between PowerScript and JavaScript/XML. For detailed explanation of such unsupported identifiers, refer to the section called “Identifiers” in Supported PB Features for PowerServer Mobile or in Supported PB Features for PowerServer Web.
With this automatic-renaming option enabled, when the PowerServer Application Deployment Wizard deploys an application, it automatically detects unsupported identifiers in the application and renames these identifiers to supported ones in the files it generates for the application, while keeping the application source code unchanged. After the deployment, you can get the list of all the identifiers that are renamed in the deployment log in Using Information Manager.
The automatic-renaming feature will not work if the option is disabled. In this case, you must rename the unsupported identifiers by yourself, following the guidance of the UFA report and the section called “Identifiers” in Supported PB Features for PowerServer Mobile or in Supported PB Features for PowerServer Web.
PowerServer Toolkit log-writing mode
The log-writing mode determines the content of the log files generated by PowerServer Toolkit, including the deployment logs and feature analysis logs. Select the desired mode from the PowerServer Toolkit Logs box, as shown in the following figure.
The logging options enable you to select the level of information contained in the logs according to your needs:
Table 8. Log writing options
|
Mode |
Description |
|---|---|
|
Off mode |
Generates no log files. This mode offers the fastest performance since nothing is written to a log file. |
|
Summary mode (Default) |
Generates log files with basic execution information. This is useful for tracking errors that have occurred, but inadequate for detailed troubleshooting. Use this mode once the application is stable. |
|
Debug mode |
Generates log files with detailed execution information for troubleshooting obscure and esoteric issues. This is useful for technical support, but performance speed will slow down when using this mode. |
You can view or delete these log files. For detailed instructions, refer to Using Information Manager.
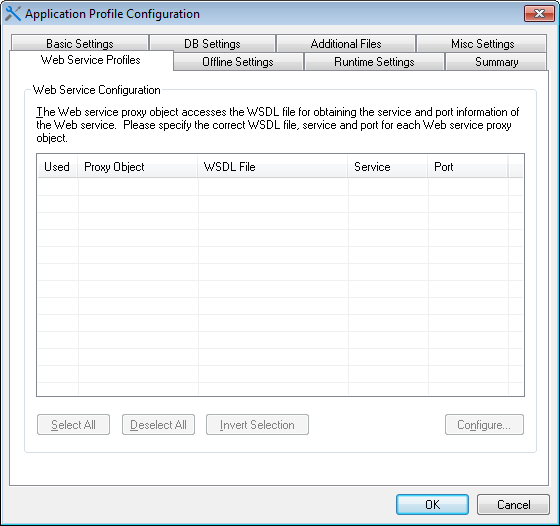
A Web service profile contains the settings for the Web service(s) to be invoked in the PowerServer deployed application, including the WSDL file, service name and port to be used by the Web service.
After you specify the PBL files of the application in the Basic Settings tab, the Web service proxy objects, WSDL files, service, and port, which are used in the application, are automatically added to the Web Service Profiles tab, as shown in the following figure.
A valid WSDL file must meet the following requirements:
-
The WSDL file must be a .wsdl or .asmx file.
-
The WSDL file must reside on the local computer. PowerServer Toolkit cannot access the WSDL file in a remote machine.
-
WSDL files used in the same application cannot have the same name, even if they reside in different locations.
Choose which proxy object(s) will be invoked in the deployed application by selecting the Used column of the object. Click Select All to select all objects; click Deselect All to deselect all objects; or click Invert Selection to select all objects which were not selected and deselect the previously selected objects.
If the WSDL file, service and port are not automatically specified for a proxy object, follow the steps below to select them:
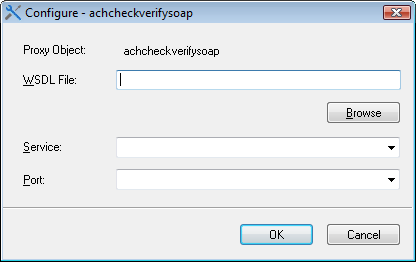
Step 1: Select the proxy object and click Configure. The Configure dialog appears, as shown in the following figure.
Step 2: Click Browse to select a WSDL file on the local computer, and then select the service and port.
A WSDL file may contain multiple services and each service may contain multiple ports.
Step 3: Click OK to save the configuration and return to the Web Service Profiles tab.
This section is for mobile applications with offline capabilities.
The offline feature enables developers to
-
design an application that can read and write data from the local databases (SQLite or UltraLite), and synchronize the local database with the back-end database server.
You will need to first use the DBParm properties (see transaction object in Supported PB Features for PowerServer Mobile) and then configure and deploy the database file to the local device through PowerServer Toolkit, so the application can access the local database. For detailed instructions, refer to PowerServer Mobile Offline Tutorials.
To synchronize the UltraLite local database with the database server, you could take advantage of the PB synchronization object MLSync and the SQL Anywhere synchronization server MobiLink. To synchronize the SQLite local database with the database server, you would need to develop your own synchronization solution, because SQLite cannot work with MobiLink or any other equivalent product or solution.
-
deploy the application to start at the offline mode
If the application is deployed to start at the offline mode, the app can start without connecting to the PowerServer except for the first time when it needs to download the configuration information for local use.
The local database must be either UltraLite or SQLite. When using the local database, be aware of the following requirements or limitations:
-
Required database version.
PowerServer Mobile 2020 only supports UltraLite 17, and the corresponding MobiLink server must be at the same version. If they are not at the required versions, upgrade them by following the steps in the SQL Anywhere 17 help.
The SQLite database should be at version 3.x or later.
-
Using SQL Anywhere for development.
When developing the PowerBuilder application, the SQL Anywhere database should be used rather than the UltraLite database, because there are many issues using UltraLite with PowerBuilder according to our test results. It is recommended that after finishing the PowerBuilder application development, export the table schema and data from the SQL Anywhere database to the UltraLite database (by using the tool provided by Mobilink), and then use the UltraLite database in the offline application.
-
Creating synchronization scripts for SQLite.
Unlike UltraLite which can synchronize data through the MobiLink server, SQLite cannot work with MobiLink servers, or any other synchronization servers similar to MobiLink. Therefore, you would need to develop your own synchronization scripts if synchronizing the SQLite local database with the database server.
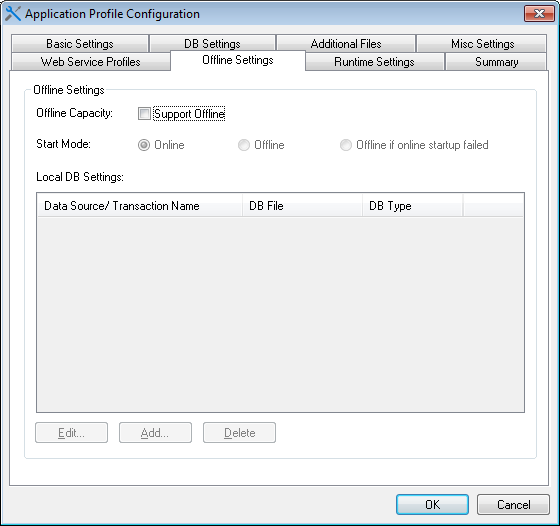
The Offline Settings tab allows you to configure the offline capacity, the start mode, and the local DB settings for the mobile applications. These configurations and configured files will be deployed to the PowerServer along with the application.
Offline Capacity: Check the Support Offline checkbox if your application needs to enable support for the offline features.
If it is not checked, the application works as a standard PowerServer mobile application that always connects to the PowerServer.
Start Mode: Allows you to set whether an application to be launched online or offline. The online mode requires network connections from the mobile device to the PowerServer, while the offline mode does not.
The following table describes the three start modes in details.
Table 9. Start mode
|
Start mode |
Descriptions |
|---|---|
|
Online |
Network connection from the device to the PowerServer is needed when the application starts and runs. If the application is set to start online, then it starts and runs the same way as the standard PowerServer applications (except that the application can access the local database), which means, it must connect to the PowerServer for loading the application file, getting updates, managing user sessions, etc. |
|
Offline |
The application starts without connecting with the PowerServer, except for the first time. For applications that starts offline, the application must connect to the PowerServer to download the configuration information only for the first time, after that, the application can run locally without needing any network connection. If your application needs to access the database, then you would need to enable the local database accessibility using DBParm of transaction object in Supported PB Features for PowerServer Mobile and configure the database file deployment in the Local DB Settings table below, in order for the database file to be downloaded and accessed on the local device. Unlike the other PowerServer applications, the offline application will not be automatically updated, because it runs locally without connecting with the PowerServer; therefore, you will need to write code in the application to call the APIs to get updates from the PowerServer. Refer to the section called “of_checkupdate” in Workarounds & APIs Guide and the section called “of_applyupdate” in Workarounds & APIs Guide. |
|
Offline if online startup failed |
The application will first try to start online (in an attempt to connect with the PowerServer), if the online startup fails (due to the bad network connection, wrong URL, etc.), then it starts offline. |
If the application has already run as an offline application and then is re-deployed as an online application, it will need to get updates (the new start mode) from PowerServer first and then restart, then it will run as an online application. Which means, you will need to write code in the app to call APIs to get updates first, and then the end user will need to quit and run the application again as the application cannot automatically restart.
If the application has already run as an online application and then is re-deployed as an offline application, it will need to restart and then it will run as an offline application. Which means, the end user will need to quit and run the application again as the application cannot automatically restart.
Local DB Settings: Specify the data source/transaction name and the database file that will be deployed to the PowerServer, and later downloaded to the mobile device and accessed by the application at runtime.
You can specify these items by adding a new local database, editing, or deleting an existing one.
-
To add a new local database, click Add, and the Local Database Configuration window appears.
In the Local Database Configuration window, specify the items (according to the following table), click Test to test the connections, and then click OK to save the settings.
The following table describes the items in the Local Database Configuration window.
Table 10. Local database configuration
Items
Descriptions
Type
Select Data Source or Transaction.
To use the transaction object to connect with the local database for the application, select Transaction; to use the CacheName parameter of DBParm in the transaction object to connect with the database, select Data Source. By using the CacheName DBParm, you can conveniently switch database connections in the same transaction object. For more about the preferable scenarios using the PB transaction object or using the CacheName DBParm, refer to the section called “Connect with the local database” in PowerServer Mobile Offline Tutorials.
For more about the syntax of CacheName DBParm, see the section called “Transaction” in Supported PB Features for PowerServer Mobile.
Name
Enter a data source or transaction name.
If the Type is Data Source, the Name must be the same value of the CacheName DBParm; if the Type is Transaction, the Name must be the exact name of the transaction object in the application source code.
Database Type
Select SQLite or UltraLite 17.
Database File
Specify the database file.
The database file must exist and be valid, and the name cannot be "appeondb.db". The database file will be deployed to PowerServer when the application is deployed, and will be downloaded to the local device when the application is downloaded for the first time.
The database file on the local device will not be updated unless you write code in the application to call of_applydbupdate in Workarounds & APIs Guide to get the latest database file from the PowerServer.
User name
Enter the user name for the database.
This field is only required for UltraLite.
Password
Enter the password for the database.
This field is only required for UltraLite.
Encryption Key
Enter the encryption key for the database.
This field only supports UltraLite. You should input the same encryption key which is specified when creating the UltraLite database in the Create Database Wizard in Sybase Central, so that the PowerServer mobile application can read/write the encrypted database.
For more about encrypting the UltraLite database in Sybase Central, see the section called “See also: Encrypt UltraLite database” in PowerServer Mobile Offline Tutorials.
-
To edit a local database, select the local database in the Local DB Settings group box, and then click Edit. In the Local Database Configuration window that appears, make the changes according to your needs, and then click OK.
-
To delete a local database, select the local database in the Local DB Settings group box, and then click Delete. Click Yes to confirm the deletion in the popup message box.
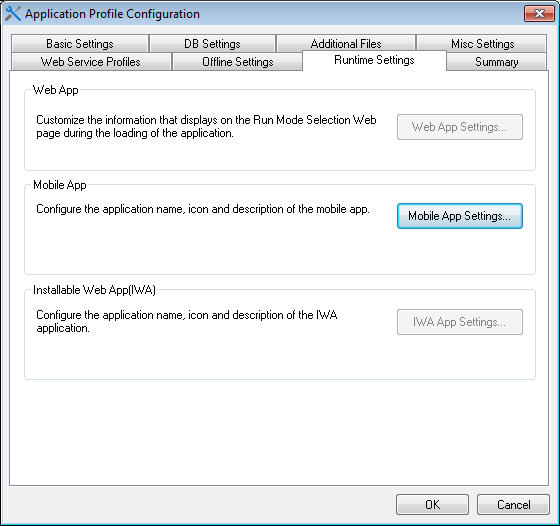
The Runtime Settings tab specifies the runtime settings for the Web application, mobile application, and IWA application.
For the Web application, you can set the company name and the application name that will be displayed on the run mode selection Web page when the application starts.
For the mobile application, you can set:
-
the mobile device type (tablet or smartphone) on which the mobile application will run.
-
the mobile application name, icon, and app description that will be displayed in Appeon Workspace.
For optimal display quality, we recommend using icons with 86 x 86 pixels for low-resolution screens (such as iPad 2), and 172 x 172 pixels for high-resolution screens (such as iPad 4). But generally you can use icons with any size, because icons smaller than the above recommended size will be automatically stretched to the proper size for the corresponding devices; and icons larger than the above recommended size will be automatically shrunk to the proper size for the corresponding devices. Therefore, for convenience, you can use icons with 172 x 172 pixels or above for all devices.
The recommended formats are PNG and JPG. For other supported formats, refer to the section called “Image & Icon” in Mobile UI Design & Development Guide.
If you leave the Mobile App Icon field empty, the default icon will be displayed in Appeon Workspace.
-
the background color of the mobile application. If this option is not set, the default image will be used as the background for the mobile application.
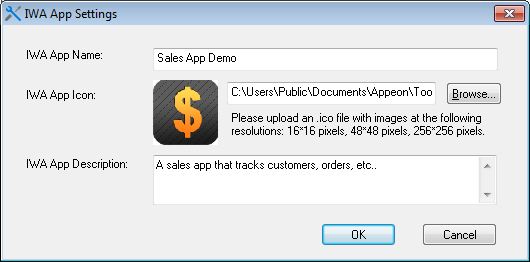
For the IWA app, you can set the application name, icon, and app description. The app name and the icon will be used in the desktop shortcut for the IWA app. If you leave the IWA App Name field empty, the Web Folder value in the Basic Settings tab will be used as the default app name. If you leave the IWA App Icon field empty, the default icon will be used.
The Summary tab offers a summary view of all configurations of an application profile. It lists the configurations in a treeview structure, and allows you to review and modify their values directly.
Use the following two methods to input or modify the configuration (property values):
-
For properties that you can input or select values by using a text field, radio buttons, or dropdown list, such as Mode, Web Folder, PBL version, etc., you can directly double click their Property Values column and then input, modify or select values.
-
For properties that you can add/delete multiple items by using a dialog box, such as application PBLs, INI files, etc., you can right click the property name in the Application column and then select Add or Delete All from the popup menu.
The configuration changes you make in this Summary tab page will be immediately synchronized to the other tab pages, but only after you click the OK button, the changes will be saved.


