The topics in this section describe how to enhance a form by adding controls:
You can add columns to a form: you can restore columns you have deleted or add columns after you have modified the data source to include more columns.
To add a column to a form:
-
Click the Column button in the Controls drop-down toolbar, or select Insert>Column from the menu bar.
-
Click where you want to place the column.
The Select Column dialog box displays, listing columns not currently in the form.
-
Select the column and click OK.
The column is added. No header or label is added, but you can create a header or label by adding a text control to the form.
When InfoMaker generates a basic form from a form style and data source, it places columns and their headings in the Layout view. You can add text anywhere to make the form easier to understand.
To add text to a form:
-
Click the Text button in the PainterBar, or select Insert>StaticText from the menu bar.
-
Click where you want the text.
InfoMaker places the text control in the Layout view, and displays the word text on the control, in the Text box in the StyleBar, and on the General page in the Properties view.
-
Type the new text.
-
(Optional) Change the font, size, style, and alignment for the text by using the StyleBar or changing the properties on the Font page in the Properties view.
You can use computed fields to perform calculations in the form. Typical uses of computed fields include:
-
Calculations based on column data that change for each retrieved row
For example, if you are retrieving yearly salary, you could define a computed field that displays monthly salary (defined as Salary / 12).
-
Summary statistics
For example, you can use a computed field to calculate the average salary of all the retrieved rows.
-
Concatenated fields
For example, if you are retrieving first name and last name, you can define a computed field that concatenates the values so that they appear with only one space between them (defined as Fname + " " + Lname).
-
System information
For example, you can place the current date and time in a form by using computed fields (defined as Today( ) and Now( ) ).
When creating a form, you can define computed columns and computed fields:
-
In the Select painter, you can define computed columns when you are defining the SELECT statement that will be used to retrieve data into the form
-
In the Form painter, you can define computed fields after you have defined the SELECT statement
The difference between the two ways
When you define a computed column in the Select painter, the column's definition is part of the SELECT statement and the value is calculated by the DBMS when the data is retrieved. The computed column's value does not change until data has been updated and retrieved again.
When you define a computed field in the Form painter, the value of the column is calculated by InfoMaker in the form after the data has been retrieved. The value changes dynamically as the data in the form changes.
Recommendation
If you want your DBMS to do the calculations on the server before bringing data down and you do not care about dynamically updating the computed values, define computed columns as part of the SELECT statement.
If you want computed values to change dynamically, define computed fields in the Form painter, as described next.
To add a computed field to a form:
-
Click the Compute button in the Controls drop-down toolbar, or select Insert>Computed Field from the menu bar.
-
Click where you want the computed field.
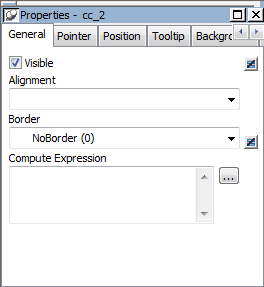
The computed properties of the field display in the Properties view:
-
Do one of the following:
-
In the Compute Expression box, enter an expression to define the computed field.
-
Click the button to the right of the box to display the Modify Expression dialog box. In this dialog box, you can easily enter a complicated expression. When you have finished, you can verify it and click OK.
-
About the Modify Expression dialog box
The Modify Expression dialog box provides you with lists and buttons to help you create the computed field:
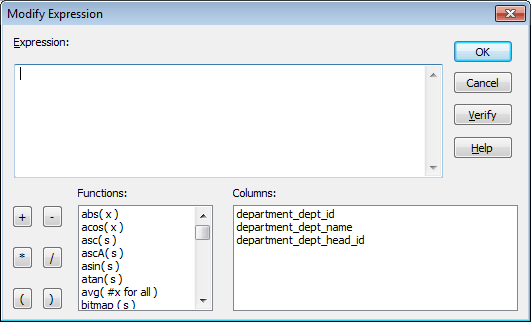
The Modify Expression dialog box contains:
-
A Functions box with a list of built-in functions you can use in the computed field
-
A Columns box with a list of columns, named computed fields, and retrieval arguments in the form
-
Buttons for adding operators and parentheses
Entering the expression
You can enter any valid expression when defining a computed field. You can paste operators, columns, existing computed fields, retrieval arguments, and functions into the expression from information in the Modify Expression dialog box. You can use the + operator to concatenate strings.
InfoMaker expression
The expression you are entering is an InfoMaker expression; it is not a SQL expression processed by the DBMS. The expression follows InfoMaker rules. For complete information about expressions, see Operators and Expressions.
Examples
Here are some examples of computed fields:
|
To display |
Enter this expression |
|---|---|
|
Current date |
Today( ) |
|
Current time |
Now( ) |
|
Concatenation of Fname and Lname columns for each row |
Fname + " " + Lname |
|
Monthly salary if Salary column contains annual salary |
Salary / 12 |
|
Four asterisks if the value of the Salary column is greater than $50,000 |
IF(Salary> 50000, "****", "") |
|
Average salary of all retrieved rows |
Avg(Salary) |
|
Count of retrieved rows, assuming each row contains a value for EmpID |
Count(EmpID) |
For more information about the functions you can use in computed fields in the Form painter, see DataWindow Expression and InfoMaker Functions and online Help.
You can place pictures, such as your company logo, in a form to enhance its appearance.
Tips for using pictures
To display a different picture for each row of data, retrieve a column containing picture file names from the database. For more information, see the section on character columns in Specifying additional properties for character columns.
To compute a picture name when a form is run, use the Bitmap function in the expression defining a computed field. For information about the Bitmap function, see DataWindow Expression and InfoMaker Functions and online Help.
To add a picture to a form:
-
Click the Picture button in the Controls drop-down toolbar, or select Insert>Picture from the menu bar.
-
Click where you want the picture to display.
The container for the picture displays in the Layout view.
-
In the Properties view, enter a file name in the File Name box, or click the Browse button next to the FileName box to display the Select Picture dialog box and navigate to find the picture file.
The picture must be a bitmap (BMP), runlength-encoded (RLE), Windows metafile (WMF), CompuServe Graphics Interchange (GIF), or JPEG file.
You can add command buttons to a form. Command buttons are used to carry out an action. For example, you can add a button that prints the current form.
To add a button to a form:
-
Click the Button button in the Controls drop-down toolbar, or select Insert>CommandButton from the menu bar.
-
Click where you want to place the command button.
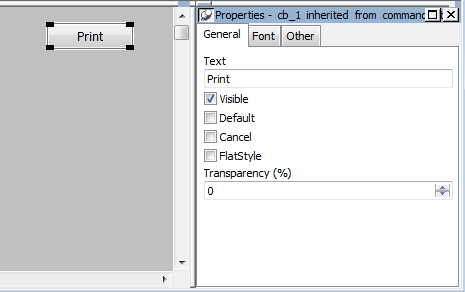
A button with the text none displays. The text none also displays in the text box in the StyleBar and on the General page of the Properties view.
-
Type the new text.
-
(Optional) Specify the command button as a default or cancel button.
For more information, see Specifying default and cancel buttons.
To make the button do something when it is clicked when you run a form, you associate an action with it. Each form style has its own set of actions you can choose from for a button.
To associate an action with a button:
-
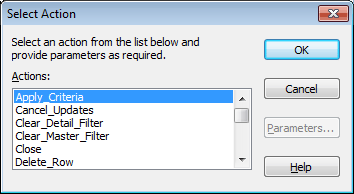
Move the pointer to the button you added to the form, display the pop-up menu, and select Action.
The Select Action dialog box displays the actions that are provided with the form style you are using
-
Select the action from the list.
-
If the action takes parameters, click the Parameters button and supply the parameters.
-
Click OK.
You return to the Form painter Layout view.
For information about the actions provided with the built-in form styles, see Actions in forms. If you need information about actions provided by a style defined in your organization, talk with the style's developer.
You can define a button as the default button in a form and you can define a Cancel button.
Default button behavior
If you define a default button, pressing the Enter key when the focus is not on another button is the same as clicking the default button. If the focus is on another button, pressing enter is the same as clicking the button that has focus.
InfoMaker places a bold border around the default button (or the button with focus if you explicitly tab to a button).
Cancel button behavior
If you define a cancel CommandButton, pressing the Escape key is the same as clicking the cancel button.
Picture buttons are identical to command buttons in their functionality. The only difference is that you can specify a bitmap (BMP), runlength-encoded (RLE), Windows metafile (WMF), CompuServe Graphics Interchange (GIF), or JPEG file to display in the button. Use these controls when you want to be able to represent the purpose of a button using a picture instead of just text.

To add a picture button to a form:
-
Click the PictureButton button in the Controls drop-down toolbar, or select Insert>PictureButton from the menu bar.
-
Click where you want the picture button to display.
A picture button displays in the Layout view.
-
In the Properties view, General page, type the new text (if you want any) in the Text box.
-
Click the Browse button next to PictureName to display the Select Picture dialog box and navigate to find the picture file, or enter a file name in the PictureName box.
-
Specify other properties of the button as needed.
For information about associating the picture button with an action, see Making the command button work. The procedure is the same.
You can add reports that you created in the Report painter to a form. The reports must be in the current library.
To add a report to a form:
-
Click the Report button in the Controls drop-down toolbar, or select Insert>Report from the menu bar.
-
Click where you want the report to display.
A report control displays in the Layout view.
-
In the Properties view, supply the name of the report to show in the control. You can use the browse button search for the report.
InfoMaker places the report in the form (you see everything but the data, which is displayed when you run the form).
At this point, you may want to resize the report or change some of its other properties. For example, you may want to make the report itself resizable.
You can add the following drawing controls to a form to enhance its appearance: Line, Oval, Rectangle, and RoundRectangle.
To add a drawing control to a form:
-
Click the drawing control in the Controls drop-down toolbar, or select one of the following from the menu bar: Insert>Line, Insert>Oval, Insert>Rectangle, or Insert>RoundRectangle.
-
Click where you want the control to display.
-
Resize or move the drawing control as needed.
-
Change the drawing control's properties as needed in the Properties view.
For example, you might want to specify a fill color for a rectangle or thickness for a line. To do so, you work on the General page in the Property view for the rectangle or line control.
Using drawing controls for grouping
Drawing controls are useful for grouping controls in a form or providing design highlights. For example, to group some controls you can place a colored rectangle behind them by selecting Send To Back from the rectangle's pop-up menu.
Here are some controls grouped with a round rectangle and a text label:
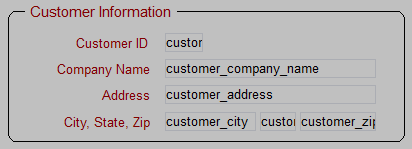
To group controls with a round rectangle and text in the Form painter:
-
Select Insert>RoundRectangle from the menu bar and add a round rectangle to the Layout view.
-
Size the rectangle and place it over the controls you want to group.
-
Select Send To Back from the rectangle's pop-up menu to place the rectangle behind the group of controls.
-
Click the Text button in the Controls drop-down list, add a text control to the Layout view, and place it on the round rectangle.
-
Select a background color for the text control from the Background Color drop-down toolbar and select the color, in this case gray to match the rectangle.
-
Position all controls as needed.


