Here is the Form painter Layout view for a Freeform form style:
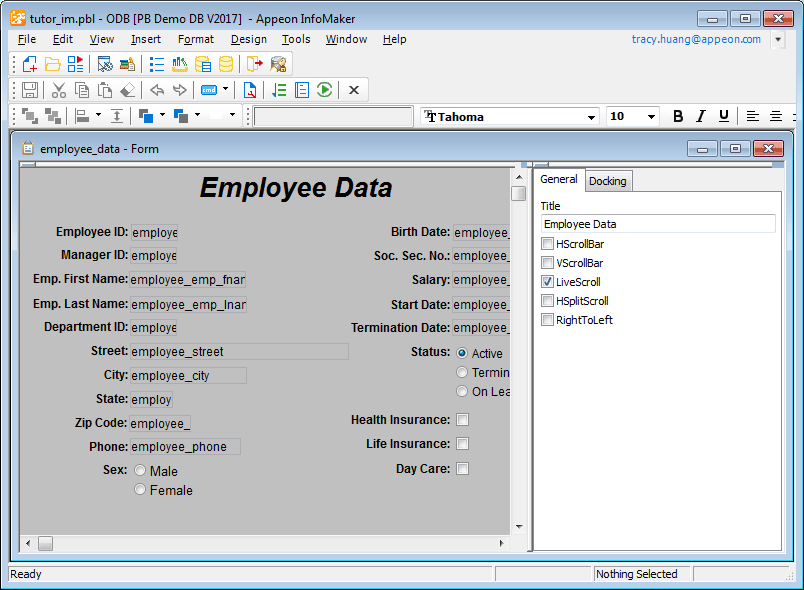
This section describes how to work in the Form painter
The Form painter has customizable PainterBars and a StyleBar. The PainterBars have buttons for form operations. The StyleBar has buttons for modifying text properties such as the font and whether the text is bold or italic. For information on using toolbars, and customizing and manipulating them, see Using toolbars.
The Form painter PainterBars have buttons for operations such as Save, Close, and Run. They also have five drop-down toolbars, which have a small black triangle on the right side of the button:
-
Controls -- shows the controls you can add to a form. For example, to place a computed field in the form, click the Compute button on the Controls drop-down toolbar, then click the location in the form where you want the computed field to appear.
-
Layout -- has alignment, sizing, and spacing options you can choose for selected controls.
-
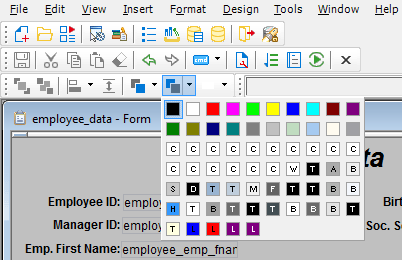
Foreground Color -- has foreground colors that you can choose for one or more selected controls. In a text control, the foreground color specifies the color of the text.
-
Background Color -- has background colors that you can choose for one or more selected controls.
-
Borders -- has borders you can choose for one or more selected controls.
When you click the triangle, the drop-down toolbar displays and you can click a button in the toolbar. The following illustration shows the Background Color drop-down toolbar:
Each element of the form (such as text, columns, computed fields, buttons, even the form itself) has a pop-up menu you can use to perform appropriate actions and display the associated properties in the Properties view.
To use a pop-up menu in the Form painter Layout view:
-
Position the pointer over the control or the background of the form.
-
Press the right mouse button.
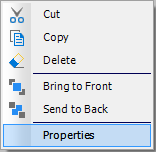
Here is the pop-up menu for a column of data or a text control in a freeform form:
-
Click the menu item you want.
To display the control properties in the Properties view, you select Properties from the pop-up menu. To perform an action, for example Cut, you select the action.
All controls in a form (such as text, columns, computed fields, buttons, and so on) and the form itself have properties you can use to modify the form. The properties that display in the Properties view are appropriate to the control you have selected.
To use the Properties view in the Form painter:
-
Position the pointer over the part you want to modify.
-
Display the pop-up menu and select Properties.
The appropriate properties display in the Properties view.
Here is the Properties view for the column employee_street. It has several tabbed property pages of information, which you access by clicking one of the tabs. For example, to choose an edit style for a column, you click the Edit tab:
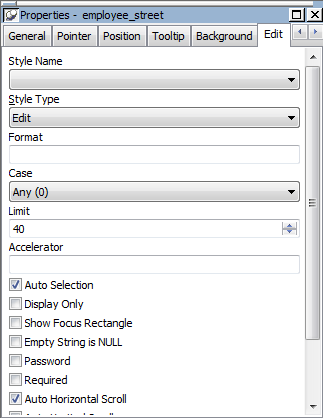
When you want to modify part of a form, select the part and use the Properties view. Click the various tabs to change pages.
The Form painter provides several ways for you to select controls to act on. You can select multiple controls and can perform some actions on all the selected controls as a unit. For example, you can move all of them or change the fonts used to display text for all of them.
To select one control in a form:
-
Click it.
The control displays with handles on it. Previously selected controls are no longer selected.
To select neighboring multiple controls in a form:
-
Press and hold the left mouse button at one corner of the neighboring controls.
-
Drag the mouse over the controls you want to select.
InfoMaker displays a bounding box.
-
Release the mouse button.
All the controls in the region are selected.
To select non-neighboring multiple controls in a form:
-
Click the first control.
-
Press and hold the Ctrl key and click additional controls.
All the controls are selected.
To help you move and resize controls, InfoMaker displays information about the position of selected controls.
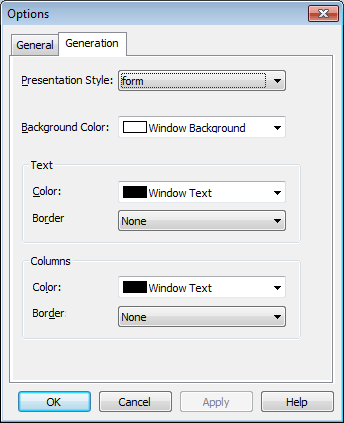
For Freeform and Grid style forms, you can specify the default colors and borders that InfoMaker uses when generating a basic form. Each style can have its own defaults. You can override the defaults for a style for a particular form.
To specify default colors and borders for a Freeform or Grid style form:
-
Select Design>Options from the menu bar and then select the Generation page:
-
Select the style whose defaults you want to change from the Presentation Style drop-down list.
-
Change one or more of the following properties:
Property
Meaning
Background color
The default color for the background of the form
Text border and color
The default border and color used for labels and headings in the form
Column border and color
The default border and color used for data values in the draft form
-
Click OK.
From now on, when you create a new form using the style, InfoMaker uses the defaults you just specified for colors and borders when generating the basic form.
For more information about colors, see Setting colors for a form. For more information about borders, see Using borders in a form.


