When you create an application, all the reports, forms, and pipelines you include must be in one library (PBL). In the Library painter, you can move or copy reports, forms, and pipelines from one library to another as needed.
For information about moving or copying objects, see Working with Libraries
To create an application:
-
Connect to the database that the executable will use.
-
Open the Library painter and the library containing the objects you want to include in the application.
-
Select Design>Create Executable from the menu bar.
If you are creating your first application in the current library, the Create Executable dialog box displays.
If you have created applications in the current library before, a message box displays asking whether you want to reuse the objects in the most recently created application and avoid starting from scratch.
For information, see Reusing an application.
-
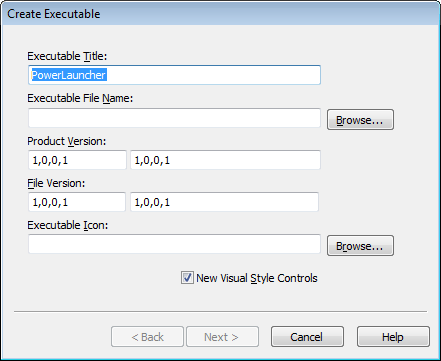
Enter a title that will be used in the title bar of the running application.
-
Name your application's executable file by filling in the Executable File Name box.
The file name you supply is the name of the executable file that will be created. You can use a short or long file name with or without spaces. Be sure to retain the EXE file extension.
-
Specify your own values for the Product Version and File Version fields associated with the executable file.
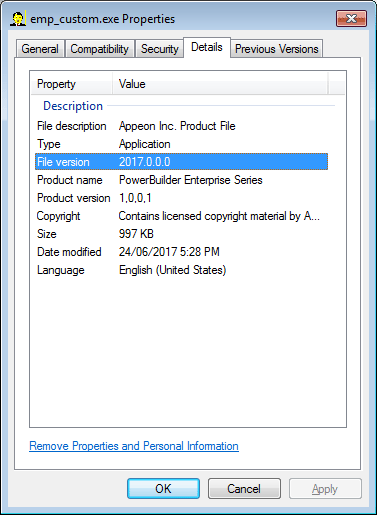
The values you specify become part of the Version resource associated with the executable file. The names you enter on the right display on the Version tab page of the Properties dialog box for the executable file in Windows Explorer. For example, with the settings shown in the illustration in step 9, the Properties dialog box for the executable file looks like this:
The File and Product Version numeric fields, on the left in the painter, are used by Microsoft Installer to determine whether a file needs to be updated when a product is installed. They must have the format:
N,N,N,N
The four numbers can be used to represent the major version, minor version, point release, and build number of your product. They must all be present. If your file versioning system does not use all these components, you can replace the unused numbers with zeroes. For example, 3,1,333 causes an error message to display when you attempt to save or build the project, but 3,1,333,0 does not. The maximum value for any of the numbers in the string is 65535.
-
To specify the location of the executable file, click the Browse button and navigate to the correct folder.
-
Click the Browse button next to the Executable Icon box to assign an icon to the executable file.
The Select Icon dialog box displays.
-
Navigate to an ICO file and click Open.
The icon you choose will be used if you create a shortcut for the executable file and when you minimize the executable.
You return to the Create Executable dialog box. The following example shows the dialog box filled in.

-
Select New Visual Style Controls if you want the application to use the Windows XP style when a user runs the application on Windows XP with the Windows XP style for controls set in the control panel.
-
Click Next.
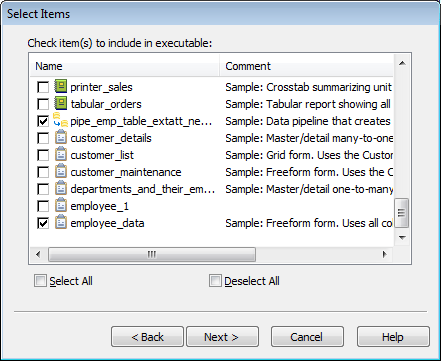
The Select Items dialog box displays listing all the reports, forms, and pipelines in the library you are using for your application.
-
Select the reports, forms, and pipelines you want to package in the application.
-
Click Next.
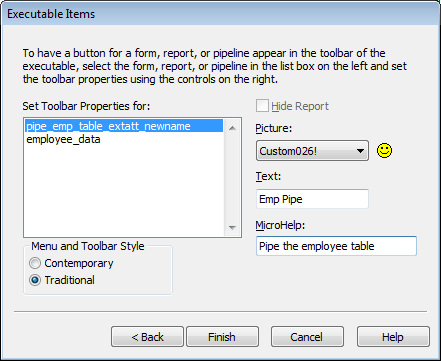
The Executable Items dialog box displays, listing all reports, forms, and pipelines you have selected for the executable file.
In the Executable Items dialog box, you can define the properties of a toolbar button for any of the items in the executable. Then in the application you can run the report, form, or pipeline by simply clicking the toolbar button.
By default, InfoMaker creates an Objects menu in the application that lists all reports, forms, and pipelines. If you do not specify button text for an object, the object name displays in the Objects menu.
InfoMaker also creates a File menu in the application. You can select File>Open Form, File>Open Report, or File>Open Pipeline and then select a form, report, or pipeline from the list that displays.
To quickly prototype an application
The remaining steps describe how to define text, MicroHelp, and pictures for the application's toolbar buttons. You can create an application quickly by clicking Finish now. After you test your prototype, you can reuse the application definition and finish the remaining steps (which define the toolbar buttons).
-
If you want a toolbar button for a report, form, or pipeline, specify a picture for the button, the text you want to show on the button, and MicroHelp text that displays when the button is clicked:
-
Select the report, form, or pipeline in the Executable Items dialog box.
-
In the Picture drop-down list, select the picture you want to display in the button for the report, form, or pipeline. The image you choose displays next to the list.
-
In the Text box, type the text you want to display in the button for the report, form, or pipeline. Up to 14 characters will display on a button.
-
In the MicroHelp box, type the MicroHelp text you want to display when the user of the executable selects the button:
Most of the time you should provide text for a button. If no button text is provided, the object name displays as the button text and in the list of objects in the Objects menu.
-
If you want to omit a report from the list of reports in the generated application so that users cannot run it as a standalone report, select the report and then select the Hide Report check box. This is useful for reports that have been included only to support a:
-
DropDownDataWindow edit style
-
Report added to a form
-
Report nested in another report
-
-
When you have defined all the toolbar items, click Finish.
-
What happens
InfoMaker creates two files:
-
The executable file with the name you supplied.
-
An initialization file with the same name. For example, if you created the executable file sales.exe, InfoMaker also creates a file named sales.ini. The initialization file records which database is used by the executable file.
For information about running an application, see Running an application.
Identifying your application
By default, InfoMaker includes brand information to identify your application when a user displays the Help>About window. You can modify the application's initialization file to customize the information that identifies your application.
For information, see Identifying your application.
An application includes a query governor
InfoMaker includes a query governor in an InfoMaker application automatically. The query governor lets you specify the maximum number of rows to be retrieved and the maximum time for retrieval.
For more information, see Using the query governor in an application.
