The first step in designing a form is to create a basic form. The procedure is similar for most forms whether you are using a built-in style or a custom form style developed in your organization using PowerBuilder.
A basic form is like a draft that you refine until you have exactly what you want. After you create the basic form, you enhance the form to make data entry fast and to present the data usefully.
To create a basic form:
-
Click the New button in the PowerBar.
-
Select the Object tab, the Form icon, and click OK.
The New Form dialog box displays the data sources and form styles you can choose.
-
Choose the data source for the form:
Data source
Pick this data source when
Quick Select
The data is from tables that are connected through a key, and you need only to sort and limit data.
SQL Select
Your data is from tables that are not connected through a key, or you want more control over the SQL SELECT statement generated for the data source.
Query
The data has been defined as a query.
For complete information about using each data source and defining the data for the form, see Selecting a data source.
-
Choose a form style, then click OK.
You can choose one of the built-in form styles of InfoMaker or a custom form style developed in your organization using PowerBuilder.
-
Define the data, then click OK.
If you are told the form is not updatable
After defining the data for the form, you might see a message box telling you that the form is not updatable. For information about these situations, see Defining data so that a form can update a database.
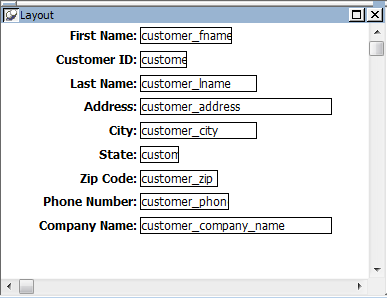
InfoMaker generates the basic form and displays it in the Form painter Layout view. The following illustration shows the basic form for the freeform form using all columns in the Customer table:
-
Save the form.
For information, see Saving the form.
-
Run the form.
For information, see Running forms.
At this point, you can enhance the form. For more information, see Enhancing Forms.
The following steps and screens show how to create a master/detail one-to-many or master/detail many-to-one form.
To create a master/detail one-to-many or master/detail many-to-one form:
-
Click the New button in the PowerBar.
The New dialog box displays.
-
Select the Object tab, the Form icon, and click OK.
The New Form dialog box displays.
-
Select Quick Select and either of the master/detail styles, then click OK.
You must use Quick Select
You must use Quick Select and you can select only one master table and one detail table when creating the form. After the master/detail form is created, if you want to add data from another table, you can modify the data source and add new columns.
For information about modifying the data source, see Enhancing Forms.
The Select Master Table dialog box displays.
-
Select the master table.
For a master/detail one-to-many form, this is the table whose data displays one row at a time at the top of the form. For a master/detail many-to-one form, this is the table whose data displays in a list at the top of the form. In the example, it is the Department table.
-
Select some or all of the columns in the master table, then click OK:

If you are told the data is not updatable
After selecting the columns, you might see a message box telling you that the data is not updatable. For information about these situations, see Defining data so that a form can update a database.
The Select Detail Table dialog box displays.
-
Select the detail table.
This is the table that is related to the master table and whose data displays at the bottom of the form. For a master/detail one-to-many form, the data displays many rows at a time. For a master/detail many-to-one form, the data displays one row at a time. In the example, it is the Employee table.
-
Select some or all of the columns in the detail table, then click OK.
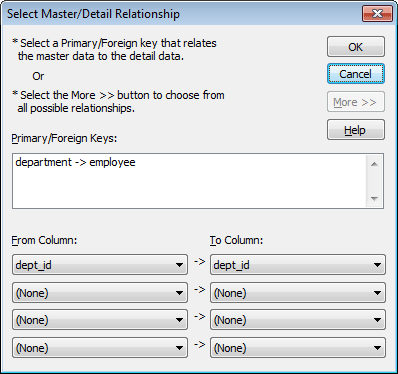
The Select Master/Detail Relationship dialog box displays. It lists primary/foreign key relationships between the master and detail tables:

-
Specify the relationship between the master and detail tables.
To do this, you identify which column or columns in the detail table have the same values as the column or columns in the master table.
InfoMaker needs this information so that it knows which detail rows to display when you display a row in the master table.
-
-
If there is a primary/foreign key relationship, select it and click OK.
-
If there is no primary/foreign key relationship, click More to specify the relationship. Select one or more columns from the master table and the column or columns in the detail table that contain matching values, and click OK.
When the master table and the detail table are the same table, the complete Select Master/Detail Relationship dialog box displays automatically and you specify the relationship:
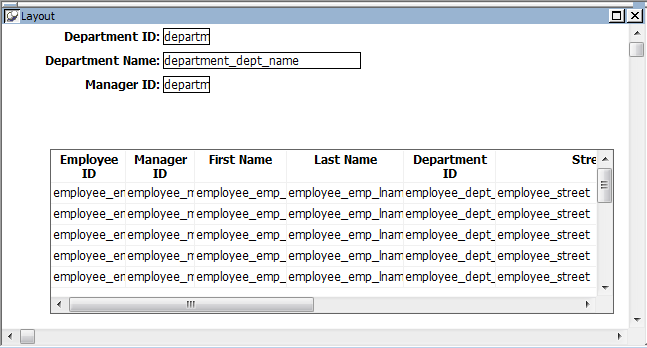
InfoMaker generates the basic form and displays it in the Form painter workspace. The following illustration shows a master/detail one-to-many form:
-
-
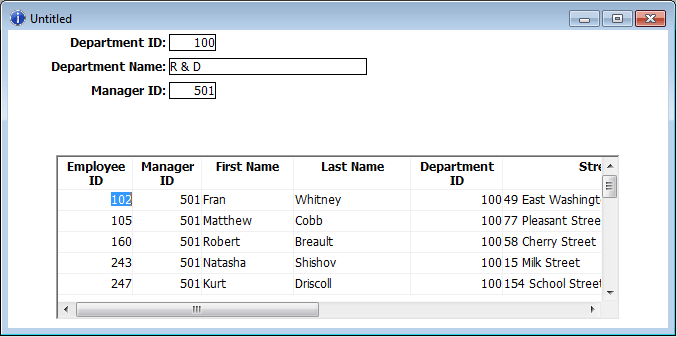
Size the master area if necessary and click the Run button to run the form.
When you run the form, the form displays with data:
At this point, you can enhance the form. To do so, you first click the Close button to return to the Form painter Layout view.
For information about how to enhance the form, see Enhancing Forms.
If you want to be able to use a form to update data in a database, you must include all columns that make up a table's unique key when you define the data for the form. This is how InfoMaker identifies rows in the database.
For example, if you are using Quick Select and have not selected all columns in a unique key of a table, you see the following dialog box:

You can have InfoMaker add the needed columns automatically by clicking Yes. If you click No and proceed with the ones you originally selected, you will not be able to update data in the database unless you modify the data source after you generate the form.
If you are using SQL Select and do not select all the key columns, you are warned, but you cannot add the columns automatically; you can edit the data source after the basic form has been generated.
About the master/detail form styles
The master/detail one-to-many and master/detail many-to-one form styles each have two sources of data, one for the master area and one for the detail area. The data for both the master area and the detail area can be updatable.
If you want to be able to insert new rows in a form, you must include all columns that have been defined in the database as requiring values.
For example, if you are using Quick Select and have not selected all columns that allow null values, InfoMaker displays a message box:

If you want to be able to insert new rows in the form, you can have InfoMaker add the required rows by clicking Yes. You receive this warning only when using the Quick Select data source.
For information about controlling updates, see Controlling Updates in Forms
When you finish supplying information about the form style and data source, InfoMaker generates the form and takes you to the Form painter Layout view.
Here is the Layout view for a freeform form that uses 12 columns of data from the Employee table:
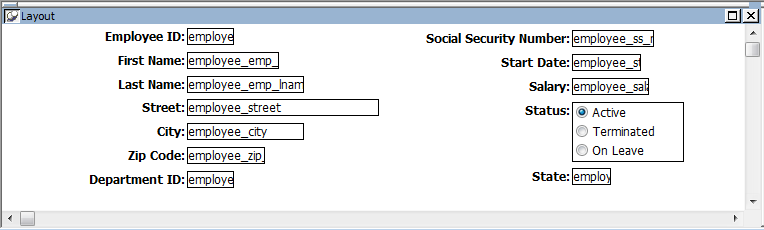
These 12 columns were selected because in the database these columns were defined as requiring values. By selecting these columns, you can use the form to insert new data in the Employee table.
For information about updating data in a form, see Defining data so that a form can update a database.
When generating the basic form, InfoMaker uses the information from the extended attribute system tables.
The extended attribute system tables are a set of tables maintained by the Database painter in InfoMaker or PowerBuilder. The extended attribute system tables contain information about database tables and columns. Extended attribute information extends database definitions.
When creating a form, InfoMaker uses the following information from the extended attribute system tables:
|
For |
InfoMaker uses |
|---|---|
|
Tables |
Fonts specified for labels, headings, and data |
|
Columns |
Text specified for labels and headings Display formats Edit styles |
For example, labels and headings you defined for columns in the Database painter are used in the generated form. Similarly, if you associated an edit style with a column in the Database painter, that edit style is automatically used for the column in the form.
For more information about the repository, see Managing the Database and The Extended Attribute System Tables.
At this point, you have a functioning form. You should save it before making any changes.
When you have generated a form, you should save it. The first time you save the form, you give it a name. As you work, you should save your form frequently so that you do not lose changes.
To save the form:
-
Do one of the following:
-
Click the Save button.
-
Select File>Save from the menu bar.
If you have previously saved the form, InfoMaker saves the new version. If you have not previously saved the form, InfoMaker displays the Save Form dialog box.
-
-
Name the form in the Forms box.
The form name can be any valid identifier up to 40 characters. For information about InfoMaker identifiers, see Identifiers
-
Enter comments to describe the form.
-
Click OK.
InfoMaker saves the form in the current library.
