Where you are
Open forms, reports, and queries
Copy forms, reports, and queries
> Create a new report from an existing one
Now you create a new report from one of the reports on the diskette. You then make a slight modification to the report.
The modification adds powerful options to the report that you can see when you run the report.
-
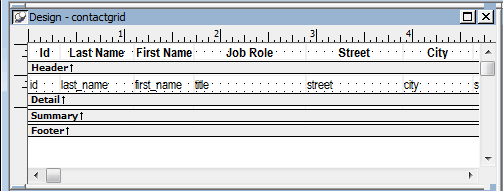
Double-click the contactgrid report.

You go to the Report painter with the contactgrid report open.
-
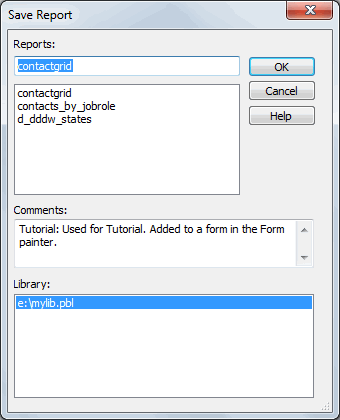
Select File>Save As from the menu bar.
The Save Report dialog box displays. You are going to change the name of the report so that you can keep the old one and create a new one with some changes.
-
Type the name contactgrid_with_prompting and click OK.
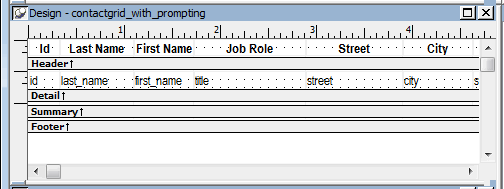
The report name changes. You are now working on a report called contactgrid_with_prompting.
-
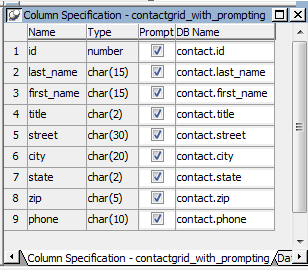
Select View>Column Specifications from the menu bar.
The Column Specifications view displays, listing all the columns in the report. You can choose one, many, or all columns for prompting. The columns you choose here let you control what rows are selected when you run the report.
For example, if you choose the city column here, you can specify a city when you run the report. Then only rows that include that city are retrieved.

-
Select all the check boxes.
You are choosing all columns so that you can enter criteria for any column you want when you run the report.
-
Select Rows>Retrieve from the menu bar.
The Specify Retrieval Criteria dialog box displays. Since you said that you wanted to be prompted for all the columns, the dialog box includes all the columns.

-
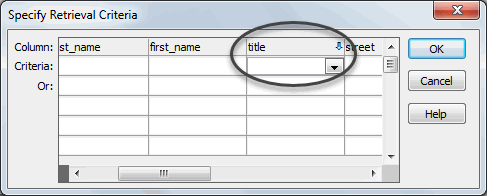
Click in the first cell in the title column.
Use the horizontal scroll bar to move the title column into full view.
A box with an arrow displays to show there is a drop-down list for that column.
-
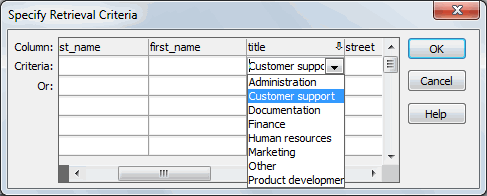
Click the arrow to open the list.
-
Select Customer support.
This puts Customer support in the title column. This means that the report is limited to contacts in Customer support.
-
Click OK.
The report displays. It includes only contacts in Customer support.

By setting up a report to prompt for criteria, you give yourself a lot of power and flexibility when you run the report. You learn more about this when you create an application in the next tutorial.
-
Select File>Close from the menu bar.
When prompted to save changes, click Yes.
The Report painter closes and you return to the Library painter.
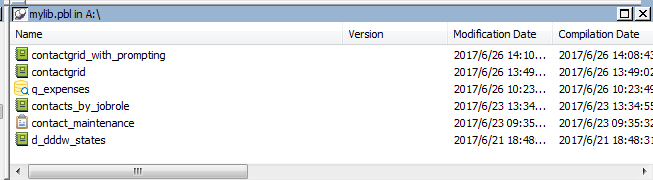
Now your new report is listed. It is a good idea to add comments to document the report. You can do that now.
-
Position the pointer on contactgrid_with_prompting.
Press the right mouse button to display the pop-up menu.
Select Properties.
The Properties dialog box displays. The entry already has comments from the report you started with. You edit the comments.
-
Type This report lets me enter selection criteria when I run the report.

-
Click OK.
The newly added comment displays.
Now you have become familiar with many of the tasks you can do in the Library painter.
-
Continue directly to the next tutorial, the Application tutorial.
(Leave the Library painter open.)
