Where you are
Run the Connection Object wizard
Modify the connection information
Complete the login and logout scripts
In many organizations, database specialists maintain the database. If this is true in your organization, you might not need to create and maintain tables within the database. However, to take full advantage of PowerBuilder, you should know how to work with databases.
Defining a data source
Using the ODBC administrator or other database connection utilities, you can define a database as a data source for your application. You can access the ODBC Administrator from the DataBase Profiles dialog box. The definitions of ODBC data sources are stored in the odbc.ini registry key.
Using database profiles to connect
Once you define a data source, you can create a database profile for it. A database profile is a named set of parameters that specifies a connection to a particular data source or database. Database profiles provide an easy way for you to manage database connections that you use frequently. When you are developing an application, you can change database profiles to connect to a different data source.
When database connections occur
PowerBuilder can establish a connection to the database in either the design-time or runtime environment. PowerBuilder connects to a database when you open certain painters, when you compile or save a PowerBuilder script that contains embedded SQL statements, or when you run a PowerBuilder application that accesses the database.
To maintain database definitions with PowerBuilder, you do most of your work using the Database painter. The Database painter allows you to:
-
Create, alter, and drop tables
-
Create, alter, and drop primary and foreign keys
-
Create and drop indexes
-
Define and modify extended attributes for columns
-
Drop views
In this exercise you:
If you installed PowerBuilder with standard options, you already have a data source and a database profile defined for the Demo Database. You use the Demo Database in this tutorial.
Demo Database is an SQL Anywhere database that is accessed through ODBC. In this lesson you look at the database profile for the Demo Database. PowerBuilder stores database profile parameters in the registry.
-
Click the Database Profile button (
 ) in the PowerBar
or
Select Tools>Database Profile from the menu bar.
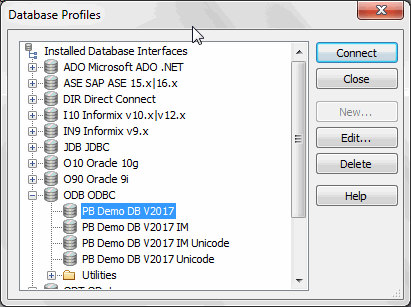
PowerBuilder displays the Database Profiles dialog box, which includes a tree view of the installed database interfaces and defined database profiles for each interface. You can click the + signs or double-click the icons next to items in the tree view to expand or contract tree view nodes.
-
Expand the ODB ODBC node by clicking on the plus sign, and select PB Demo DB V2017.
PowerBuilder created this profile during installation.
If you do not see the PB Demo DB V2017 database profile
If there is no profile for the PB Demo DB V2017 database, you may not have installed the database. You can install it now from the product installation package.
If you did install the database and it is defined as a data source in the ODBC Administrator, select ODBC in the tree view of the Database Profile painter and click New. In the Database Profile Setup dialog box, select the data source from the Data Source drop-down list and type PB Demo DB V2017 in the Profile Name text box. Type dba for the user ID and sql for the password, then click OK to return to the painter.
-
Click Edit.
PowerBuilder displays the Connection page of the Database Profile Setup dialog box.
-
Select the Preview tab.
The PowerScript connection syntax for the selected profile is shown on the Preview tab. If you change the profile connection options, the syntax changes accordingly.

-
Click the Test Connection button.
A message box tells you that the connection is successful.
If the message box tells you the connection is not successful
Close the message box and verify that the information on the Connection page of the Database Profile Setup dialog box is correct. Then check the configuration of the data source in the ODBC Administrator. You can run the ODBC Administrator by expanding the Utilities folder under the ODB ODBC node of the Database Profile painter and double-clicking the ODBC Administrator item.
-
Click OK to close the message box.
Click Cancel to close the Database Profile Setup dialog box.
Click Close to close the Database Profiles dialog box.
Now you look at the definitions for the Customer and Product tables in the Demo Database. This helps you become familiar with the Database painter and the tables you will use in the tutorial.
What happens when you connect
To look at the table definitions, you have to connect to the database. When you connect to a database in the development environment, PowerBuilder writes the connection parameters to the Windows registry.
Each time you connect to a different database, PowerBuilder overwrites the existing parameters in the registry with those for the new database connection. When you open a PowerBuilder painter that accesses the database, you automatically connect to the last database used. PowerBuilder determines which database this is by reading the registry.
-
Click the Database button (
 ) in the PowerBar.
PowerBuilder connects to the database and the Database painter opens. The Database painter title bar identifies the active database connection.
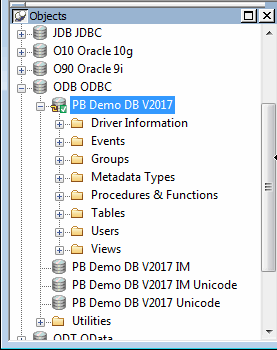
The Objects view of the Database painter displays all existing database profiles in a tree view under the Installed Database Interfaces heading. The PB Demo DB V2017 database is visible under the ODB ODBC node in the tree view.
If the Objects view is not open
The Objects view is part of the default view layout scheme. To reset to this scheme, select View>Layouts>Default. You can also open an Objects view by selecting View>Objects from the menu bar.
-
Expand the PB Demo DB V2017 database node in the Objects view.
Notice the folders under the PB Demo DB V2017 database node.
-
Expand the Tables folder.
You see the list of tables in the database.
Table names might have a prefix
The table names in the Select Tables dialog box might have a prefix such as dba or dbo. This depends on the login ID you are using. You can ignore the prefix.
-
Right-click the customer table and select Add To Layout from the pop-up menu
or
Drag the customer table from the Objects view to the Object Layout view.
Dragging an object from one view to another
When you start dragging an object from the Objects view to another view, the pointer changes to a barred circle. If you continue moving the cursor to a view that can accept the object, the barred circle changes back to a pointer with an additional arrow symbol in a small box. When you see this symbol, you can release the object.
-
Repeat step 4 for the product table.
Widening the Object Layout view
You can widen the Object Layout view by dragging its separator bars toward the painter frame. If the Object Layout view is part of a stack, you might find it easier to separate it from the stack before you change its size.
The Object Layout view shows the two tables you selected.
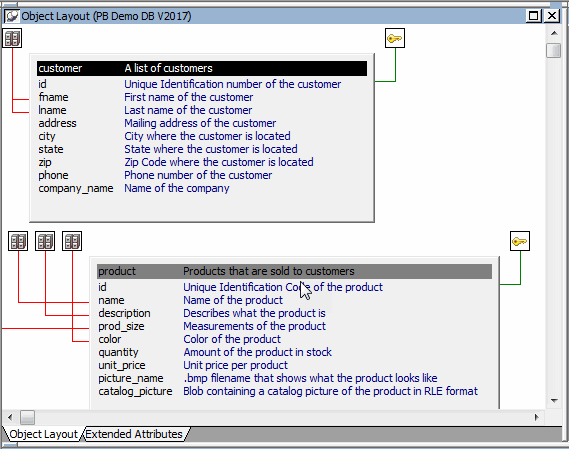
Viewing table data types, comments, keys, and indexes
In the Object Layout view, you can see a description for each column, as well as icons for keys and indexes. If you do not see this, right-click a blank area inside the view and select Show Comments, Show Referential Integrity, and then Show Index Keys from the pop-up menu. If you select Show Datatypes, you also see the data type for each column in the selected tables.
-
Right-click the title bar of the customer table in the Object Layout view and select Alter Table from the pop-up menu
or
Right-click the customer table in the Objects tree view and select Alter Table from the pop-up menu.
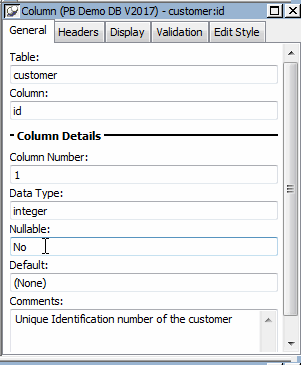
The Columns view displays the column definitions for the table.
-
Right-click a column in the customer table in the Object Layout view.
Select Properties from the pop-up menu.
In the Database painter, the Properties view is also called the Object Details view.
The title bar and tab headings for the Object Details view change dynamically depending on the current object selection. The title bar gives the object type, the database connection, and the object identifier.
The Object Details view for a column has five tabs, one for general database properties, one for column header information, and the others for column extended attributes.
About extended attributes
PowerBuilder stores extended attribute information in system tables of the database. Extended attributes include headers and labels for columns, initial values for columns, validation rules, and display formats.
You can define new extended attributes or change the definitions of existing extended attributes from the pop-up menus of items in the Extended Attributes view of the Database painter.
-
Close the Database painter.
