SnapDevelop User Guide
Last Updated: June 2021
SnapDevelop is a lightweight yet powerful C# IDE for rapidly developing web or cloud applications on top of the cross-OS .NET Core framework. This User Guide explains the wide variety of features of SnapDevelop IDE that make it easy for you to edit, test, debug, compile, build, and publish your applications.
Chapter 1. Personalizing the SnapDevelop IDE
You can personalize your SnapDevelop IDE on Tools > Options.
Environment
In Environment, you can set the color theme for the user interface in the IDE, and configure a few options on how the IDE manages documents (files).
General
You can choose one of the following color themes: Dark and Light. The default theme is Dark.

Documents
The Documents settings provide a few options on how the IDE manages documents (files).
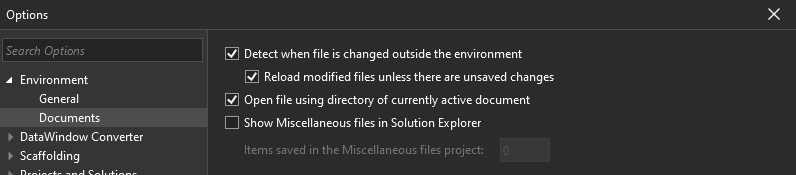
Detect when file is changed outside the environment and Reload modified files unless there are unsaved changes
If you enable the Detect when file is changed outside the environment option, SnapDevelop will automatically track whether a currently-open file is changed in an external editor.
If you enable the Reload modified files unless there are unsaved changes option, when SnapDevelop finds that a currently-open file is changed in an external editor, SnapDevelop will automatically load the latest version of the file. If you disable this option, SnapDevelop will prompt a message to ask you whether to load the new version of the file or not:

Reload modified files unless there are unsaved changes
If you have selected Detect when file is changed outside the environment and an open file in the IDE is changed outside the IDE, a warning message automatically pops up. If you select the current option, no warning message pops up and the file is reloaded into the IDE to adopt the changes made externally.
Open file using directory of currently active document
If you enable this option, the Open File dialog box displays the directory of the active document. Otherwise, it displays the directory that you most recently used to open a file.
Show Miscellaneous files in Solution Explorer and Items saved in the Miscellaneous files project
If you enable the Show Miscellaneous files in Solution Explorer option, the Miscellaneous Files node appears in Solution Explorer.
The Items saved in the Miscellaneous files project option sets the number of files that will appear in the Miscellaneous Files folder in Solution Explorer. You can specify a number between 0 and 256 (inclusive).
DataWindow Converter
For information about the DataWindow Converter settings, go to https://docs.appeon.com/dwconverter2021/Working_with_DataWindow_Converter/index.html
Scaffolding
For information about the Scaffolding settings, go to https://docs.appeon.com/snapdevelop2021/Scaffolding/index.html
Projects and Solutions
Under Projects and Solutions > General, you can configure a basic setting about the file-moving behavior in Solution Explorer.
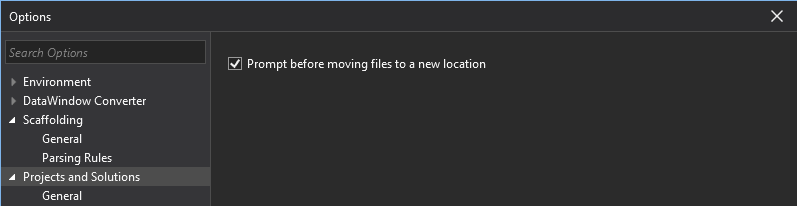
Prompt before moving files to a new location
If you enable this option, a confirmation message box pops up when you attempt to move a file in Solution Explorer.
Source Control
Under Source Control > Plug-in Selection, you can specify the default source control plug-in to use within the IDE.
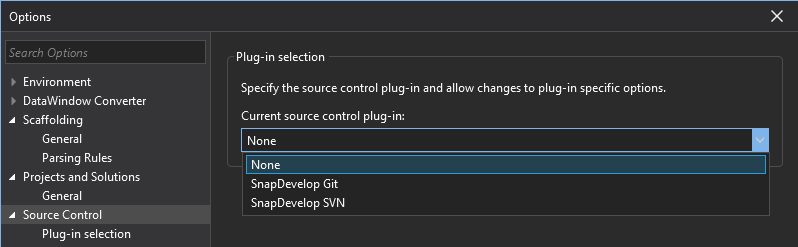
Plug-in Selection
Two source control plug-ins, SnapDevelop Git and SnapDevelop SVN, are provided when you install SnapDevelop. You can add a solution to Git source control which uses SnapDevelop Git plug-in, or to Subversion source control which uses SnapDevelop SVN plug-in.
Although you cannot add a solution to two different source control systems directly in SnapDevelop IDE, you may do it using a third-party source control client. If your solution is in the repositories of two different source control systems at the same time, you can decide which source control system to use for the solution in the SnapDevelop IDE using the Plug-in Selection option.
Text Editor
In Text Editor, you can change global settings for the SnapDevelop code editor and customize the behaviors of the code editor.
General
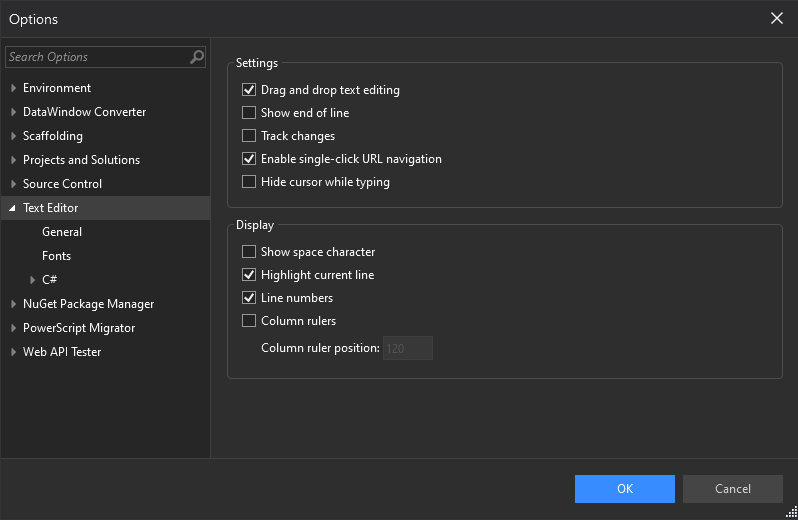
Under Text Editor > General, you can specify the various settings for the text editor and determine how the editor displays the code in it.
Settings
Drag and drop text editing
If you enable this option, you are able to move code to anywhere in the current file by selecting it and dragging it with the mouse.
Show end of line
If you enable this option, you will be able to see the end-of-line markers in text editor, so that you can differentiate CR LF and LF line endings.
Track changes
If you enable this option, a vertical yellow line appears in the left margin of the changed text to indicate that the text has changed since the file was last saved.
Enable single-click URL navigation
If you enable this option, the mouse cursor changes to a pointing hand when it passes over a URL in the editor and Ctrl is pressed. You can then click the URL to go to the indicated page in your web browser.
Hide cursor while typing
This option offers you the ability to make the cursor invisible on screen while you are typing, until you stop typing and move your mouse.
Display
Show space character
If you enable this option, the text editor shows the space characters, making a program more readable.
Highlight current line
If you enable this option, a gray box appears around the line of code where the cursor is located.
Line numbers
If you enable this option, a line number appears next to each line of code.
Column rulers
The column ruler serves to determine line lengths. It is particularly useful when your editor has line length restrictions. The column ruler defaults to the 120th character and can be adjusted according to your needs.
Fonts
Under Fonts, you can set the font family and font size for the editor. Alternatively, you can adjust the font size using Ctrl + Mouse wheel in the editor.
C#
Under C# > General, you can manage the ways the code editor behaves when you are writing C# code.

Statement completion
Synchronization delay time of syntax service
Synchronization delay time of syntax service refers to:
how long the quick info stays visible when your mouse hovers over a particular variable and then leaves the variable;
how soon the code color changes when you write or insert code in the editor;

how soon the code folding updates when you insert blocks of code into the editor;

how soon the header dropdown list updates when you add blocks of code into the editor.

The synchronization delay time defaults to 150 ms. If necessary, you can adjust it within the range from 50 ms to 1,000 ms.
Auto filter the list of members on typing
If you enable this option, as you write code in the code editor, the editor will pop up lists of available values, members, properties, or methods, for you to select and insert into your code.
Settings
Enable virtual space
When this option is selected and Word wrap is cleared, you can click anywhere beyond the end of a line in the Code Editor and type. This feature can be used to position comments at a consistent point next to your code.
Word wrap
If you enable this option, the part of a long line of code that extends horizontally beyond the view of the code editor will automatically wrap to the next line.
The Virtual Space feature is turned off while Word Wrap is on.
Inherit word wrap indentation
This option determines whether to indent the next lines in case of word wrapping. The indentation value represents the number of characters to indent and can be positive or negative, indicating whether to increase or decrease the indentation on the basis of the indentation of the previous line.
Show References If you enable this option, the editor will show the number of references to a class, method, or property.

NuGet Package Manager
In NuGet Package Manager, you specify how the NuGet Package Manager downloads and manages NuGet packages.
General

Under NuGet Package Manager > General, you can configure the general NuGet package management settings.
Package restore
Allow NuGet to download missing packages
If you enable this option, SnapDevelop would first try to retrieve, from the cache, the NuGet packages referenced in a project. If the packages are not available in the cache, NuGet then attempts to download the packages from all enabled sources. If you enable this option, missing packages are automatically restored when you build a project in SnapDevelop.
Automatically check for missing packages during build in SnapDevelop
This option controls whether SnapDevelop automatically checks for missing packages when you build a project in SnapDevelop.
Binding redirects
Skip applying binding redirects
If you enable this option, SnapDevelop will not automatically add the binding redirect entries to the web config file.
Package management
Default package management format
SnapDevelop provides two package management formats - Packages.config and PackageReference. The Package.config file is displayed in Solution Explorer while the PackageReference file is included in the .csproj file in File Explorer.
.NET Core and .NET Standard projects that SnapDevelop currently supports are by default managed via the PackageReference format. The .NET Framework projects that SnapDevelop can open but does not support right now are by default managed via the Package.config format.
Clear all NuGet cache(s)
You can choose to clear all NuGet caches on your computer so as to prevent yourself from using the old or obsolete packages and help your apps run better on your machine.
Package sources

This option allows you to teach NuGet Package Manager where to find packages to download. You can have multiple package sources.
Available package sources
The available package sources are custom package sources. In SnapDevelop, you can add multiple package sources to this list for NuGet Package Manager.
To add a source, select the plus icon at the upper right side of the manager, specify the name and the URL of the package source, and select Update. The added source will appear in the list of Available package sources.

To change a package source, select the desired package source, reedit its name and URL, and select Update.
To disable a package source, clear the box to the left of the package name in the list.
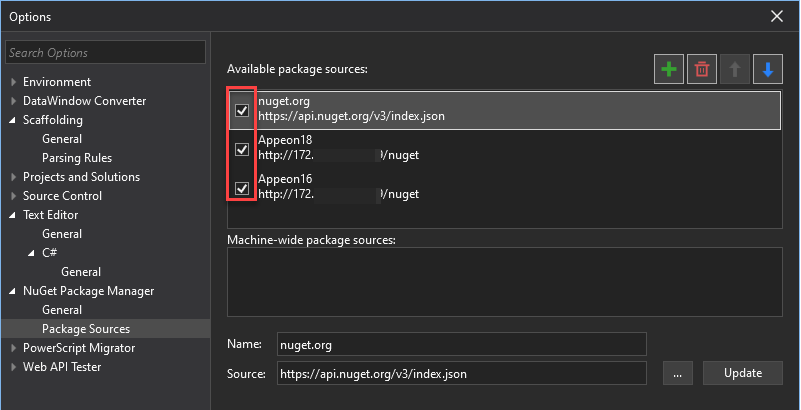
To remove a package source, select it and then select the trash icon.
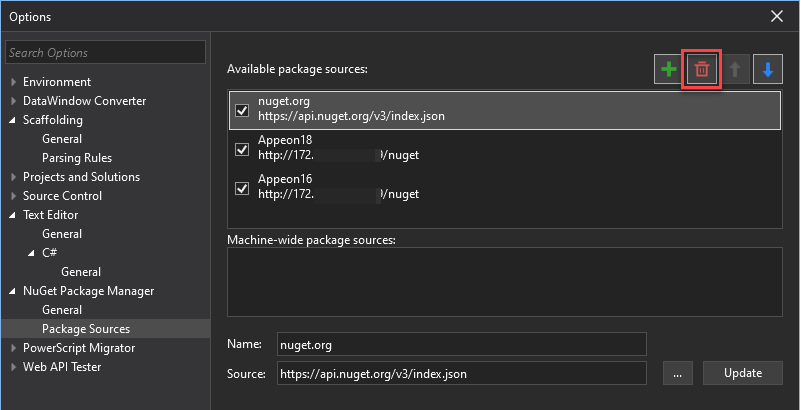
The up and down arrows do not change the order of the package sources. SnapDevelop uses the package that is first to respond to requests, regardless of the order of the package sources.
Machine-wide package sources
The machine-wide package sources list all the package sources that are configured in the \Program Files (x86)\NuGet\Config folder and are not yet listed as an available package sources.
PowerScript Migrator
For information about the PowerScript Migrator settings, refer to Working with PowerScript Migrator.
Web API Tester
For information about the Web API Tester settings, refer to Testing with Web API Tester.
Chapter 2. Working with solutions and projects
Introducing basic concepts
Project
A project contains all the source code files, data files, etc. that are compiled into a library or executable, and also includes compiler settings and other configuration files that might be used by a variety of services or components that your program works with.
Project File
Each C# project contains a project file identifiable from the file extension (.csproj). The project file is an XML file that contains all the information needed to build a project.
Solution
A solution is a container for projects that are related in some way. It contains build information, SnapDevelop window settings, and any miscellaneous files that are not directly related to a particular project. A solution is defined by a text file with the .sln extension that integrates projects, project items and solution items in the solution.
Solution Explorer
After you create a new project, you can use Solution Explorer to view and manage the project and solution and their related items.
A variety of menu commands, such as building/rebuilding a project, managing/restoring NuGet packages, adding a reference, renaming a file, and adding Docker Support are offered by right-clicking on various items in Solution Explorer.

The toolbar at the top of Solution Explorer currently provides four options:
- Sync with Active Document, which allows you to locate the current file in the code editor inside Solution Explorer.
- Collapse All, which collapses all nodes in Solution Explorer.
- Show All Files, which shows all hidden files in the selected project.
- Properties, which allows you to set the various properties of the project/solution.
Creating solutions and projects
Creating a new project
To create a new project, take the following steps:
Select New > Project from the File menu.
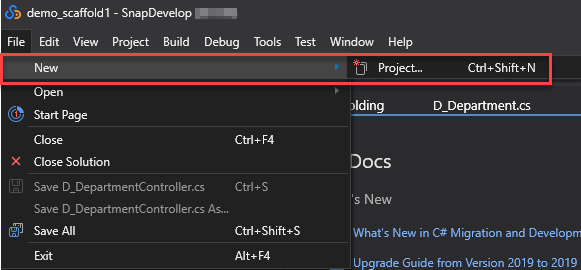
The New Project page will pop up.

On the New Project page, select a project template from the available project templates options.
Specify a name for the project, select where you want the project to be created, and specify the solution name.
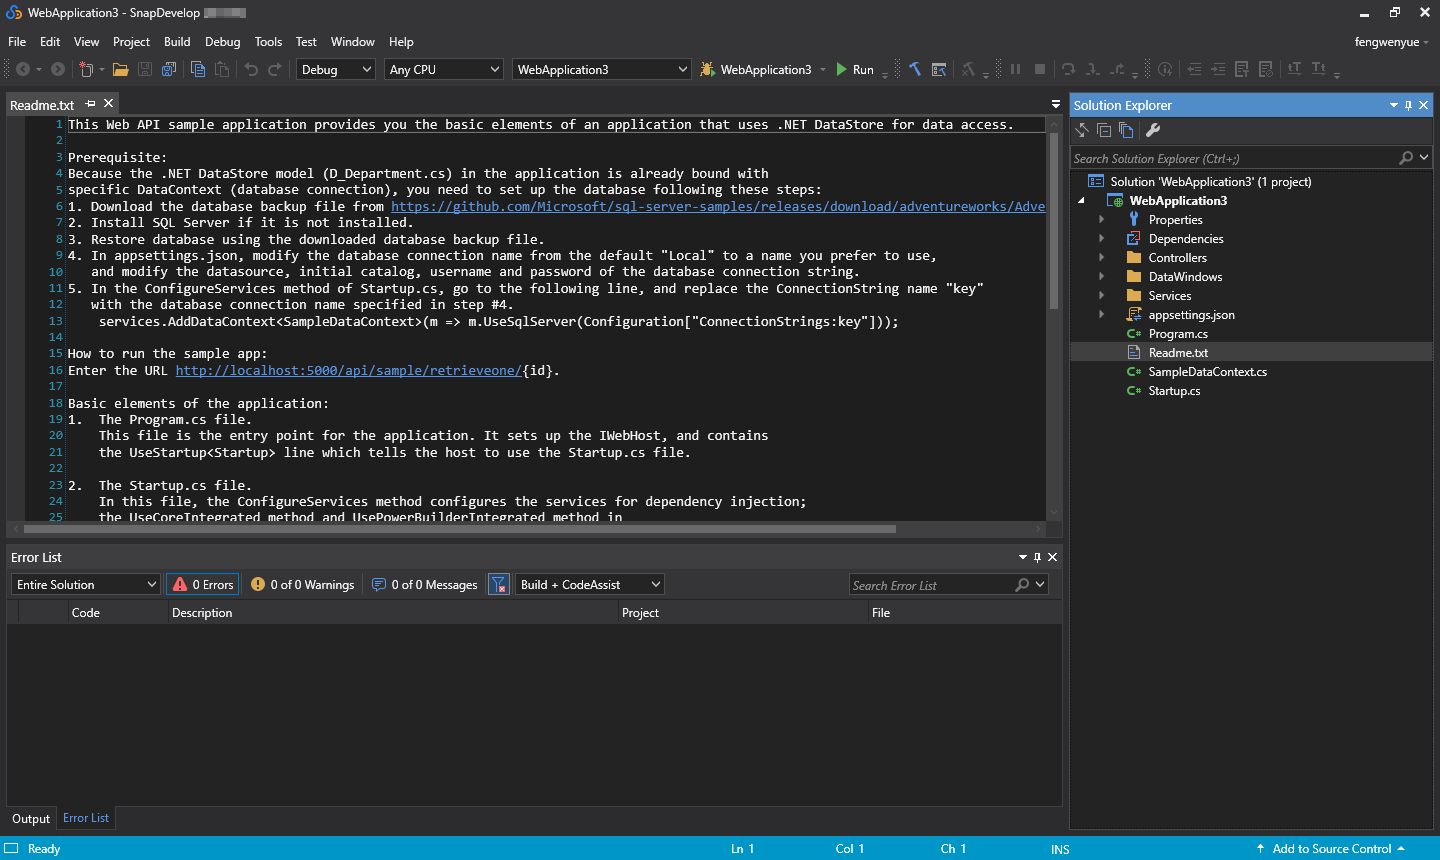
Note that if you select the ASP.NET Core Web API template, there are Sample Code options, which are Basic, .NET DataStore, and SqlModelMapper. The Basic option contains no data access code while the other two options contain their corresponding data access code. For more information about the sample code files, please refer to the Readme text file that appears by default when you create a project with .NET DataStore, or SqlModelMapper sample code.
Click OK to generate the project. The project is then opened by SnapDevelop so that you can start developing.
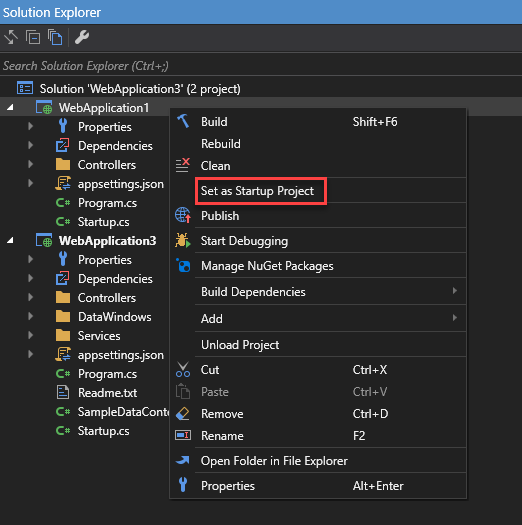
Setting a startup project
You can view your solutions and projects in the Solution Explorer tool window, in which you will see that a project is marked in bold. Such a project is called the startup project, which refers to the project that launches when you run the application.

The startup project can be changed to another by right-clicking on the node of the intended project and then selecting Set as Startup Project. For a library project, you must add an executable project to the solution and sets the executable project as the startup project.
Adding files to a solution
As described earlier, a project contains all items required to build an application in SnapDevelop. When you create a new project, SnapDevelop creates a solution to accommodate the project. When the solution is created, you can also add existing and/or new projects/items to the solution. The newly added items do not necessarily belong to any individual project.

Sometimes, multiple projects in your solution share a file, such as the readme file for the solution, and some files belong at the solution level instead of the project level. In such cases, you can add the files to the solution itself. To do so, right-click on the solution node in Solution Explorer and then select Add > New Item, or Add > Existing Item.
Creating an empty solution
You can also create an empty solution if you want to construct your solution and projects from scratch.
To create an empty solution:
On the menu bar, select File > New > Project.
In the left pane of the New Project dialog box, select Other Project > Solutions.
In the middle pane, select Blank Solution.
Configure your solution, and then click OK.

After the empty solution is created, you can add new/existing projects or items to it by selecting Add > New/Existing Project or Add > New/Existing Item from the right-click context menu.
Deleting a solution, project or item
You can use the SnapDevelop IDE or File Explorer to delete a solution, project or item. The difference is that deleting items within the SnapDevelop IDE only removes them from the current project or solution while deleting items in File Explorer removes them permanently. Before you delete items in File Explorer, however, it is recommended that you back the items up in case you need to use them later.
To delete an item within the SnapDevelop IDE, select the item and then select Delete from the right-click context menu.
To permanently remove an item,
- Right-click on the node of the solution/project/item you want to delete in Solution Explorer and then select Open Folder in File Explorer.
- Navigate up one level in File Explorer.
- Select the folder that contains the solution and then press the Delete key.
Managing project references
Three available referencing methods
SnapDevelop currently supports three referencing methods, which are:
- Project-to-project Reference
- Shared Project Reference
- File Reference
Adding or removing references using the reference manager
To add a reference, right-click on the project node and then select Add > Reference, or right-click on the Dependencies node in Solution Explorer and then select Add Reference.

The Reference Manager dialog box appears and lists the available references by group.
In the Reference Manager dialog box, there are three tabs:
- Projects, which lists all compatible projects within the current solution.
- Shared Projects, which allows you to write common code that can be referenced by various application projects.
- Browse, which allows you to browse for a component in the file system. This tab contains the Recent node, which lists the components newly added to projects.
Note that there is a search bar in the Reference Manager dialog box that can be used to filter items under the tab that is in focus.
Troubleshooting reference-related exceptions
If your application cannot find a referenced component, an exception will be thrown. There are several scenarios in which an exception will be thrown.
- Network failure;
- The file being referenced has been deleted;
- The file being referenced has been renamed.
If any such exception occurs, you need to handle it in order to use the references properly.
Network failure
Fix the network connection problems until you have access to the required resources.
The file being referenced has been deleted
Delete the reference, or read it from another location if the reference exists elsewhere on your computer.
The file being referenced has been renamed
Delete the reference, and then add a reference to the renamed file.
Managing application resources
Specifying an application icon
You can use the default application icon or customize your application icon. To customize your icon,
- Select the project node in Solution Explorer.
- Select Properties from the right-click context menu.
- Select the Application tab in the Project Designer that appears.
- In the Icon list, click Browse to browse to the location of the intended icon file.
Embedding a manifest
To embed a manifest,
- Right-click on the project node in Solution Explorer.
- Select Properties from the context menu.
- Select the Application tab in the Project Designer that appears.
- In the Embed list, select Embed manifest with default settings.
Specifying a resource file
To specify a resource file,
- Right-click on the project node in Solution Explorer.
- Select Properties from the context menu.
- Select the Application tab in the Project Designer that appears.
- Select the Resource file radio button, and then click Browse to browse to the location of the intended resource file.
Application settings
Managing application settings
Application settings allow you to save various application-related information, such as application URL, launch URL, and database connection strings.
The project system automatically stores application settings into two JSON files (launchSettings.json and appsettings.json) when you create a Web application in SnapDevelop.

launchSettings.json
In the file:
- applicationURL: The URL where you can launch any application on your local computer from the browser.
- launchBrowser: Whether to launch the browser when you run your application.
- launchURL: The URL to launch on your local computer.
- environmentVariables: Variables that ASP.NET Core reads at app startup and that ASP.NET Core uses to configure app behaviors.
appsettings.json

In the file:
- LogLevel: Indicates the minimum level to log for selected categories.
- AllowedHosts: The hosts headers that are allowed to access this site.
- ConnectionStrings: Strings that specify information about a data source and the way of accessing to it.
Note: There are two configuration files that manage the Web app at run time. The default application configuration is stored in the appsettings.json file. However, you can use the appsettings.Development.json file to override these settings.
Adding an application configuration file to your project
You can customize the way the common language runtime locates and loads assembly files by adding an application configuration file to your project.
When you build your project, SnapDevelop automatically copies your application configuration file, changes the file name of the copy to match your executable, and then moves the copy to the bin directory.
To add an application configuration file to your project,
Right-click on the project node in Solution Explorer and then select Add > New Item.

In the New Item dialog box that appears, expand C# and then select the Web Configuration File template.

Enter a name for the configuration file in the Name text box, and then click OK.
A file named web.config is then added to your project.
Managing database connections
You may add DataContext classes to your projects. DataContext contains the connection string with which to connect to the target database for CRUD operations.
To create a database connection:
Right-click on the project node in Solution Explorer and then select Add > New Item.
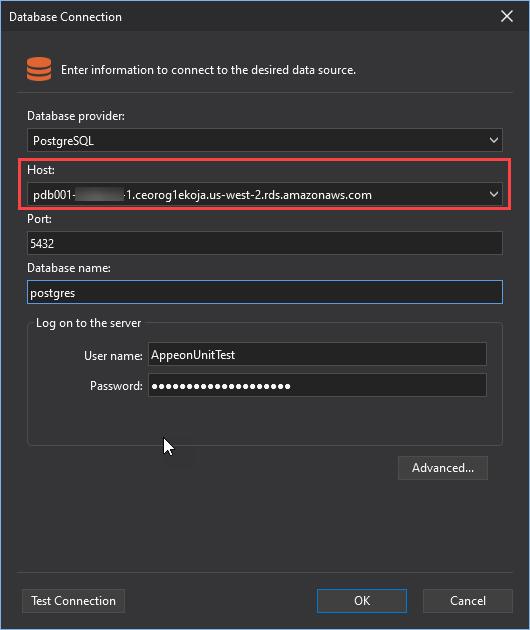
In the New Item dialog box that appears, expand C# and then select the DataContext item. The Database Connection dialog opens.
In the Database Connection dialog, click New to configure the database connection. If you have already created a database connection and selected the option Remember this connection for the connection, you can directly use the existing connection by selecting it from the list of Connection name, or click Edit to modify the settings. To rename an existing connection, type the new name in the Modify the connection name to field.

Select a data source from the Database provider list.

Configure the basic and advanced connection settings for the selected data source.
Refer to Appendix D: Database Connection Settings for the settings to configure for each data source.
Click Test Connection to check the connection state.

Check the connection string in the Database Connection dialog to make sure the properties are configured as expected. You may also copy the connection string to use it elsewhere.

Managing assembly and manifest signing
Asset types that can be signed
You can sign the following .NET assemblies and application manifests:
- Executables (.exe)
- Application manifests (.exe.manifest)
- Deployment manifests (.application)
- Shared component assemblies (.dll)
Signing an assembly in SnapDevelop
To sign an assembly,
- Right-click on the project node in Solution Explorer.
- Select Properties from the context menu.
- Select the Signing tab and then select the Sign the assembly check box.
- Specify a key file.
Refer to Signing for details about how to sign an assembly.
Targeting a framework
SnapDevelop allows you to specify the .NET Core version that you want your project to target. If a .NET Core application is to run on another computer, it is necessary that the .NET Core version that the application targets should be compatible with the .NET Core version installed on the computer.
SnapDevelop supports the following versions of .NET Core target framework:
- .NET Core 3.1
- .NET Core 3.0
- .NET Core 2.2
- .NET Core 2.1
- .NET Core 2.0
- .NET Core 1.1
- .NET Core 1.0
A SnapDevelop solution can contain projects that target different .NET Core versions.
Changing the target framework
When you create a .NET Core project, you have no option to select the target .NET Core version. The latest .NET Core version is selected by default. However, you can change the target .NET Core version if you want to.
To change the target framework:
- Select the project you want to change in Solution Explorer, and then select Properties from the right-click context menu.
- In the Properties window, select the Application tab.
- In the Target framework list, select the intended version.
Managing project and item templates
Introducing project and item templates
A variety of predefined project and item templates are automatically installed when you install SnapDevelop. These templates provide a basic set of pre-generated code and structure based on which developers just need to add some other code and resources to the project/item, thus reducing a lot of repetitive work during development.
SnapDevelop currently provides the following project templates:
- ASP.NET Core Web API
- Console App (.NET Core)
- Class Library (.NET Core)
- Class Library (.NET Standard)
- Shared Project
- xUnit Test (.NET Core)
and the following item templates:
- Class
- Interface
- Enum
- DataContext
- API Controller Class
- Service (.NET DataStore)
- Service (SqlModelMapper)
- JSON File
- Text File
- XML File
- Web Configuration File
These templates are available to choose from when you create a new project/item. All project or item templates, including the default templates and custom ones, share the following items:
- The files to be created when the template is used. These files include source code files, embedded resources, project files, etc.
- A .template file, which contains the metadata needed to create a project or item from the template and to display the template in the New Project and New Item dialog boxes.
When these files are compressed into a .zip file and put in the correct folder:
Project templates appear in the New Project dialog box.
Item templates appear in the New Item dialog box.
Editing project and item templates
It is recommended that you do not change the configuration and design of system templates. If you insist to modify a template, navigate to the storage location of the specific template and modify it. After you have properly modified the template, you should save the modification so that it becomes effective in the New Project and New Item dialog boxes.
By default, project templates are stored in:
- Program Files\Appeon\SnapDevelop 2021\Tools\Templates\ProjectTemplates
And item projects are stored in:
- Program Files\Appeon\SnapDevelop 2021\Tools\Templates\ItemTemplates
Managing NuGet packages
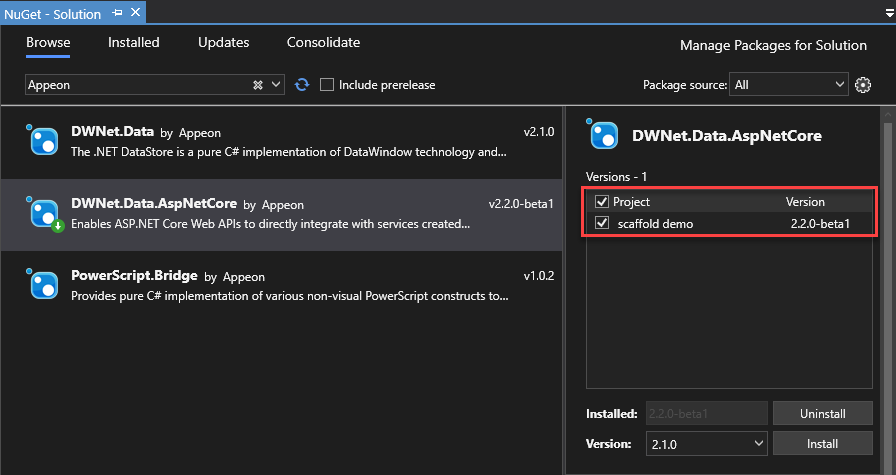
The NuGet Package Manager in SnapDevelop allows you to install, uninstall, and update NuGet packages for your projects and solutions. It contains the following tabs, and each tab displays a list of related packages on the left side of the manager and details about the selected package on the right side.
- Browse, which displays packages to install. If a package is already installed, the Install button on the right side changes to Uninstall.
- Installed, which displays all installed and loaded packages. A green down arrow next to a package indicates that the package is already loaded. The red X icon to the right of a package or the Uninstall button on the right side of the manager can be used to uninstall the package. A blue up arrow to the right of a package can be used to update the package if a newer version of the installed package is available.
- Updates, which displays packages that have available updates from the currently selected package source.
- Consolidate, which displays packages that have been installed in multiple versions. You can consolidate the different versions to the one you specified.
The NuGet Package Manager remembers the following settings you configure for a single project or an entire solution, and restores your settings next time you open the NuGet Package Manager on the project or solution:
- Package source
- Include prerelease
- Show preview window
Managing packages for a single project
Finding and installing a package
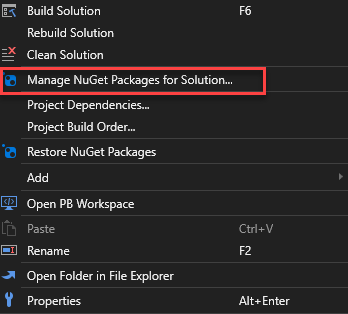
In Solution Explorer, select either a project node or Dependencies node and then select Manage NuGet Packages from the right-click context menu.

Select the Browse tab to display packages from the currently enabled package source. Search for the desired package using the search box on the upper left side of the package manager and select the package to view its detailed information.
Note
To include prerelease versions in the search, and to make prerelease versions available in the Version drop-down, select the Include prerelease option.

Select the desired version from the Version drop-down and select Install. SnapDevelop installs the package and its dependencies into the project. You may be asked to accept license terms. When installation is complete, the installed package appears under the Installed tab and in the Dependencies node in Solution Explorer, indicating that you can use the using directives to refer to them in your project.
Uninstalling a package
In Solution Explorer, select either the desired project node or Dependencies node and then select Manage NuGet Packages from the right-click context menu.
Select the Installed tab to display all installed packages.
Select the package to uninstall and select Uninstall.
Updating a package
In Solution Explorer, select either the desired project node or Dependencies node, and then select Manage NuGet Packages from the right-click context menu.
Select the Update tab to display packages that have available updates from the enabled package source. Select Include prerelease to include prerelease packages in the update list.
Select the package to update, select the desired version from the Version drop-down list, and select Update.
To update multiple packages to their latest versions, select them individually in the list or enable the Select all packages option and select the Update button above the list.
Managing packages for a solution
If you want to manage NuGet packages for multiple projects simultaneously, it is recommended that you manage packages for the entire solution. Compared with the package manager for single projects, the package manager for solution has a Consolidate tab, in addition to the three tabs.
To manage packages for solution, you:
Select the solution and Manage NuGet Packages for Solution from the right-click context menu. Alternatively, select Tools > NuGet Package Manager > Manage NuGet Packages for Solution.
When you are managing packages for the entire solution, you are required to select the affected project(s).
Consolidating package versions
It is uncommon to use different versions of the same NuGet package across different projects in the same solution. When you manage NuGet packages for solution, you will see a Consolidate tab, which allows you to easily see where packages with distinct version numbers are used by different projects in the solution.
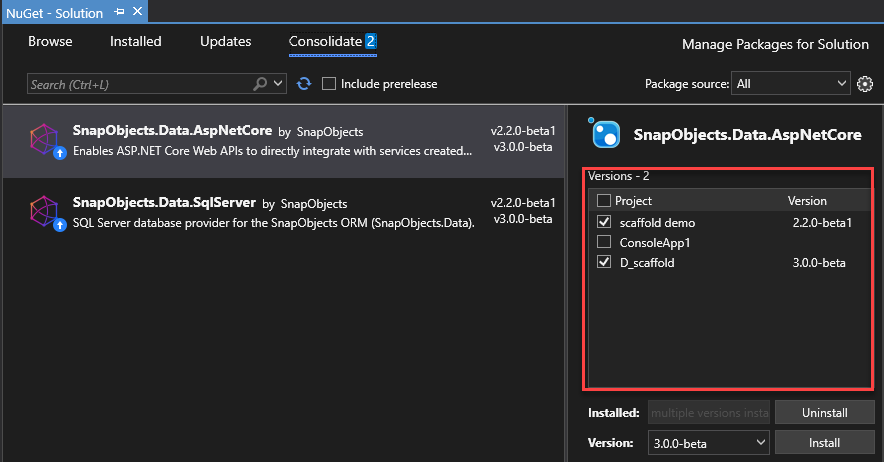
To consolidate package versions, you:
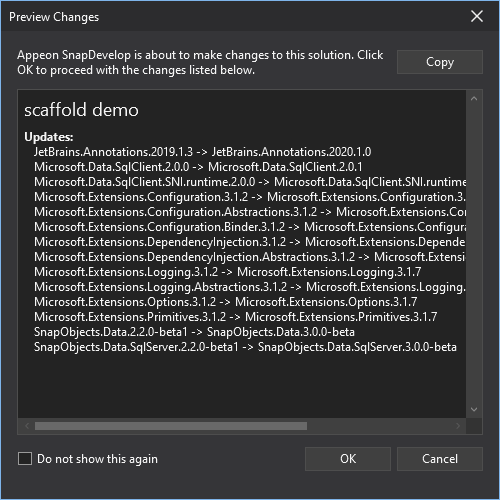
Select the project(s) to update in the project list.
Select the version to use in all those projects from the Version dropdown.
Select Install.
The Package Manager installs the selected package version into all selected projects. Then, the package disappears from the list under the Consolidate tab.
Specifying package sources
To change the source from which SnapDevelop obtains packages, select the desired one from the Package source dropdown list:

For information on how to manage package sources, refer to Package Sources.
Understanding the package manager options
When you select a package, you will see an expandable Options control below the version selector. For some project types (for example, .NET Core projects), only the Show preview window option is provided.

Showing preview window
If you enable the Show preview window option, a window shows the dependencies of a selected package before the package is installed.
Install and update options
Dependency behavior specifies how NuGet selects the version of dependent packages to install.
| Option | Description |
|---|---|
| Ignore Dependencies | Doesn’t install any dependencies. |
| Lowest | Installs the dependency with the minimum version number that meets the requirements of the primary selected package. It is the default option. |
| Highest Patch | Installs the version with the same major and minor version numbers but the highest patch number. If version 3.2.2 is specified, for instance, the highest version starting with 3.2 will be installed. |
| Highest Minor | Installs the version with the same major version number but the highest minor number and patch number. If version 3.2.2 is specified, for instance, the highest version starting with 3 will be installed. |
| Highest | Installs the highest available version of the package. |
File conflict action specifies how NuGet deals with packages existing in the project or local machine.
| Option | Description |
|---|---|
| Prompt | Requires NuGet to ask whether to retain or overwrite existing packages. |
| Ignore All | Requires NuGet to skip overwriting any existing packages. |
| Overwrite All | Requires NuGet to overwrite any existing packages. |
Uninstall options
| Option | Description |
|---|---|
| Remove dependencies | Removes any dependent packages not referenced elsewhere in the project. |
| Force uninstall, even if there are dependencies on it | Uninstalls a package even if it is still being referenced in the project. This option is often used together with Remove dependencies to remove a package. However, applying this option may lead to broken references in the project. |
Migrating from packages.config to PackageReference
SnapDevelop supports migrating a .NET Framework project from the packages.config management format to the PackageReference format. Package references, using the PackageReference node, manage NuGet dependencies directly within project files (as opposed to a separate packages.config file).
To migrate packages.config to PackageReference
- Open a solution containing project using
packages.config. - In Solution Explorer, right-click on the References node or the
packages.configfile and select Migrate packages.config to PackageReference. - The migrator analyzes the project's NuGet package references and attempts to categorize them into Top-level dependencies (NuGet packages that you installed directly) and Transitive dependencies (packages that were installed as dependencies of top-level packages).
- (Optional) You may choose to treat a NuGet package classified as a transitive dependency as a top-level dependency by selecting the Top-Level option for the package. This option is automatically set for packages containing assets that do not flow transitively (those in the
build,buildCrossTargeting,contentFiles, oranalyzersfolders) and those marked as a development dependency (developmentDependency = "true"). - Select OK to begin the migration.
Chapter 3. Working with the code editor
The SnapDevelop editor offers a considerable number of features that make it easy for you to write and manage your code. For example, you can find and replace text in single or multiple files, in current project, or in the entire solution. You can collapse and expand the various blocks of code by using the Outlining feature. You can find code by using such features as Go To Definition, and Find All References.
Moving around in the IDE
The SnapDevelop IDE allows you to move from file to file and window to window using keyboard shortcuts so that you can significantly increase productivity when you are developing in this IDE.
You can use the following methods to navigate through open files or tool windows in the code editor:
Press Ctrl+- to activate open files in the code editor in the order they were most recently accessed.
Press Ctrl+Tab to navigate through active tool windows and active files in spite of the order they were accessed. Just hold down the Ctrl key and press Tab repeatedly until you select the intended file.
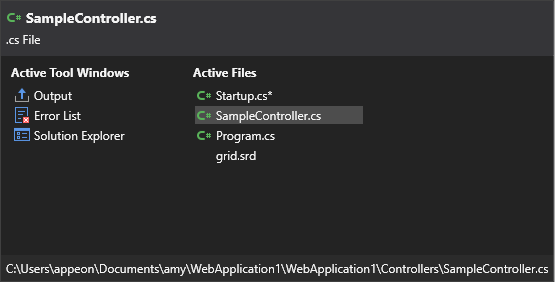
Click the Active Files button in the upper right corner of the editor, and then select the intended file from the list.

Using the code editor
Basic features
This section describes the basic features of the SnapDevelop code editor, which can help you edit your code quite efficiently and easily.
Reference count
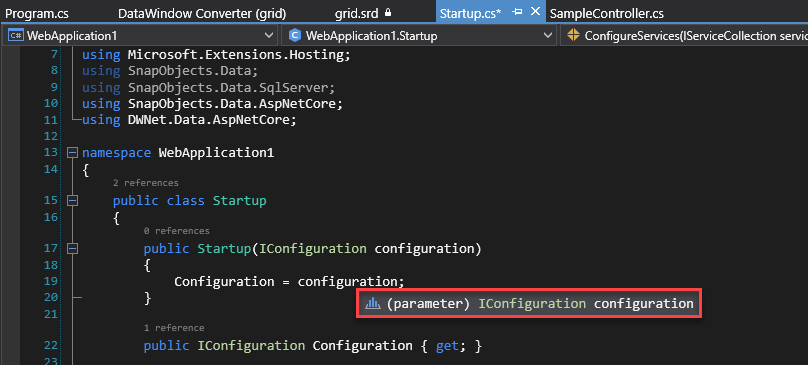
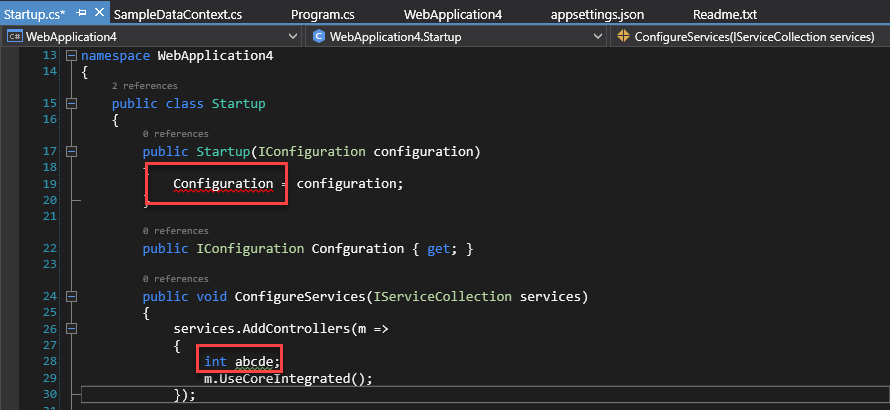
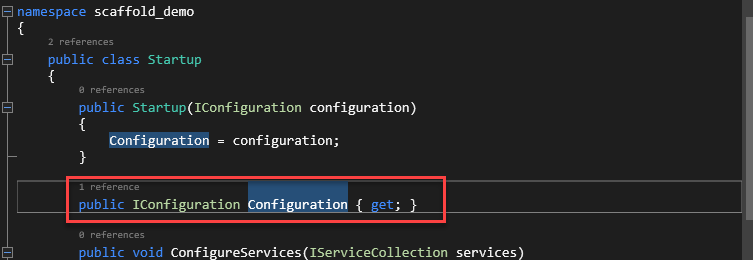
When you write code, you may see a reference count above each class and method. The reference count indicates the number of references to the class, method, or property. The reference count feature is disabled by default. To enable it, go to Tools > Options > Text Editor > C# >General, and select Show References.

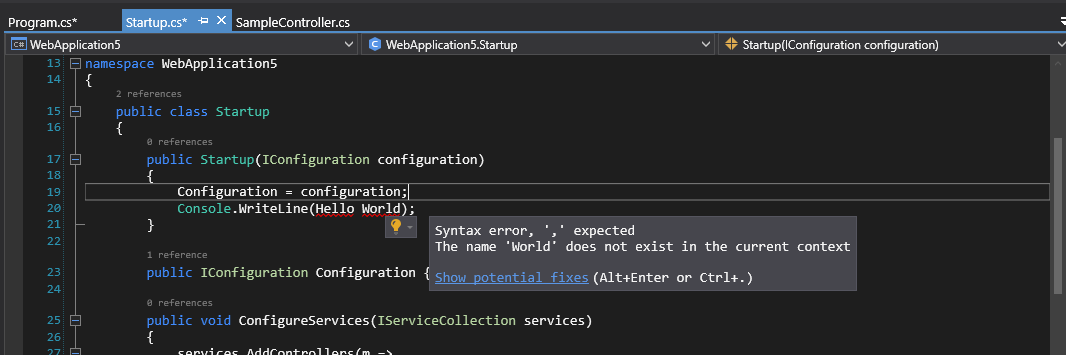
Error and warning marking
When you write code, you may see wavy underlines of different colors or light bulbs in your code. Red wavy underlines indicate syntax errors and green underlines indicate warnings. If your mouse hovers over an error, potential fixes for the error are suggested right below.
Brace matching
Placing the cursor to the left of an open brace, or to the right of a closing brace, will automatically highlight the brace pair. This allows you to find out which braces are misplaced or missing.

Code auto completion
Code Auto Completion offers all possible options alphabetically as you type the trigger characters in the code editor, and highlights the option that best matches the trigger characters.

Line numbering
Line numbers are enabled by default and display in the left margin of the code editor. To disable line numbers, go to Tools > Options > Text Editor > General.
Change tracking
If you enable the Track changes option in the Tools > Options > Text Editor > General settings, changes you have made since the file was opened but not saved are indicated by yellow vertical lines in the right margin of the code editor.
Code and text selecting
You can select code either in box mode or in the standard continuous stream mode. To select code in box mode, press Alt as you drag the mouse over the selection (or press Alt+Shift+<arrow key>). The selection includes all characters within the rectangle defined by the first character and the last character in the selection. Anything typed or pasted into the selected area is inserted at the same point on each line.

Pasting JSON/XML as classes
Your JSON or XML code can be automatically converted into classes by a simple copy and paste in SnapDevelop. To do so, copy your JSON or XML data, and select Edit > Paste Special > Paste JSON As Classes or Paste XML As Classes to paste the automatically generated classes to the editor.
For example, if you select Paste JSON as Classes, you will get a number of classes formatted like below:
  public class Rootobject
        {
            public Logging Logging { get; set; }
            public string AllowedHosts { get; set; }
            public ConnectionStrings ConnectionStrings { get; set; }
        }

   public class Logging
        {
            public LogLevel LogLevel { get; set; }
        }
Creating GUID
SnapDevelop provides a GUID generation tool that allows you to create a GUID in one of the available formats, and copy it to the clipboard.
To open the GUID generation tool, go to Tools > Create GUID.
Virtual space
If you enable virtual space in the Tools > Options > Text Editor > C# dialog box, a long line of code that is displayed on more than one line will be displayed on one line only. Note that you can enable either Word Wrap or Virtual Space, but not both at the same time.
Word wrapping
You can select or clear the Word Wrap option in the Tools > Options > Text Editor > C# dialog box. If you select the option, part of a long line extending beyond the current width of the editor window is displayed on the next line.
Connecting strings using "+"
If you press Enter in a string to start a new line, the two strings are automatically connected using "+".

Multi-Line editing
The editor allows you to edit text in several lines as a vertical square zone. To do so, press Shift +Alt + Arrow Keys to select the text, or hold the Alt key and select the text using your mouse, and then edit the text.

Undo and redo
You can run the undo or redo command to actions in the current SnapDevelop session by selecting Edit > Undo or Edit > Redo.
Advanced features
A variety of advanced editing features are available on the Edit > Advanced menu on the toolbar.
Format document
Indents all the code properly in the document.
Format selection
Indents the selected code properly in the document.
Make uppercase
Changes all selected characters to uppercase.
Make lowercase
Changes all selected characters to lowercase.
Comment selection
Adds comment characters to the selected line(s), or to the current line if no characters are selected.
Uncomment selection
Removes comment characters from the selected line(s), or from the current line.
Increase line indent
Adds spaces to the selected lines or the current line.
Decrease line indent
Removes spaces from the selected lines or the current line.
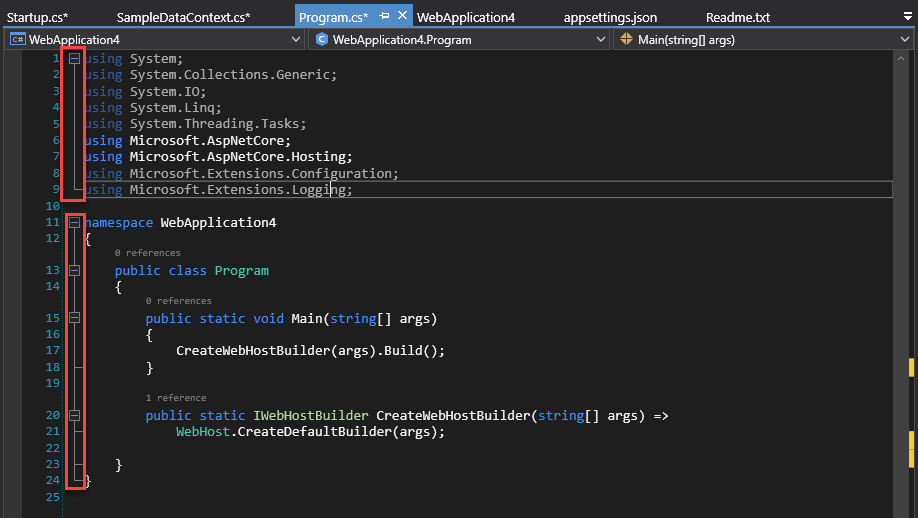
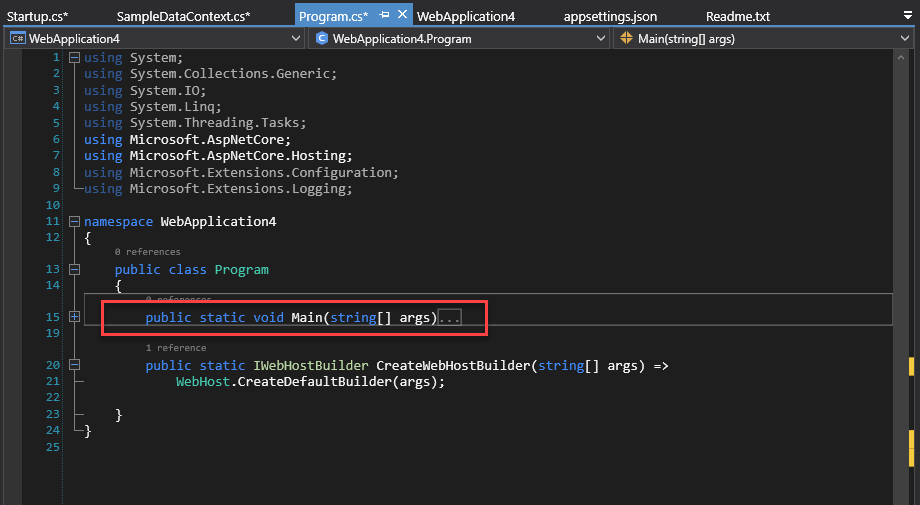
Outlining
You can use the Outlining feature to display the outline of your code the way you want. To use this feature, select Edit > Outlining. We use the following text code as an example to demonstrate how you can perform the various outlining operations.
The Outlining feature allows you to:
Toggle Outlining Expansion, which reverses the current collapsed or expanded state of the innermost outlining section when you put the cursor in a nested collapsed section.
Toggle All Outlining, which sets all blocks of code to the same state, expanded or collapsed.

Stop Outlining, which removes all outlining information throughout the file.
Collapse to Definitions, which collapses the members of all types.
Start Automatic Outlining, which automatically sets all blocks of code to the expanded state. Note that this feature can be used only after you have selected the Stop Outlining feature.
Note: You are allowed to copy and paste a collapsed method in the editor.
Finding and replacing
Finding and replacing text
The SnapDevelop editor allows you to find and replace text by using Find and Replace (Ctrl+F or Ctrl+H). If you select a string in the current file and then press Ctrl+F or Ctrl+H, the Find and Replace control displays in the upper right corner of the code editor, with every matching string in the current file highlighted. You can navigate from one matching string to another by clicking the Find Next button or the Find Previous button on the search control.

On this search control, you can access replacement options by clicking the button immediately before the Find search box. If you want to replace the matching strings one by one, click the Replace Next button immediately following the Replace text box. If you want to replace all matching strings, click the Replace All button instead. The dropdown list provides the search scope options, including Current Document, Current Project, Entire Solution and All Open Documents.

Please note that there are several other buttons such as Match Case, Match Whole Word, and Use Regular Expressions, which can help you find and replace more accurately, and there is a dropdown list, which allows you to specify the scope of the Find and Replace actions. If you want to know how to use regular expressions, please refer to Appendix C: Regular Expression Examples.
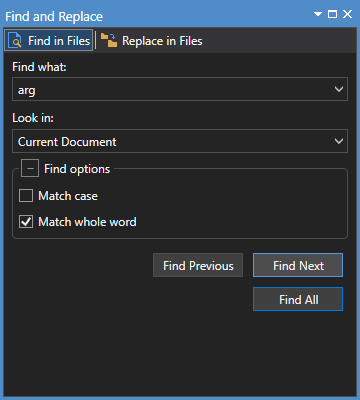
Find in files and replace in files
Find/Replace in Files works much like the Find and Replace control. To access the Find/Replace in Files dialog box, press Ctrl+Shift+F, or select Find and Replace on the Edit menu.
When you select Find All, the Find Results window opens and lists all matches for your search. If you select a result in the list, the related file displays even if the file is not already active for editing and the match in the file is highlighted.
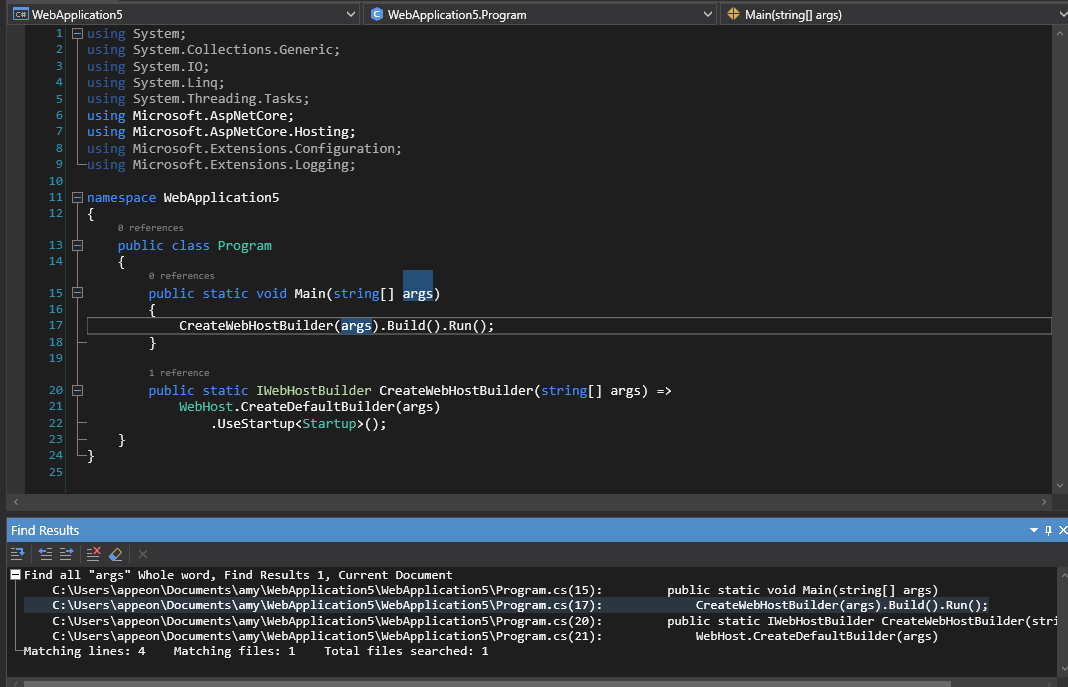
Finding in files
If you want to display Find in Files, select Find and Replace on the Edit menu and then select Find in Files. You can also display Find in Files by using the keyboard shortcut (Ctrl+Shift+F).
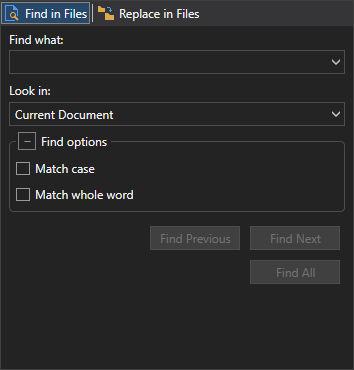
Find what
If you want to search for a particular string, specify it in the text box. Note that the Find what dropdown list stores 20 searches you've made most recently. If you want to search for any of the stored strings, open the dropdown list and then select the desired string.
Look in
The Look in dropdown list has several options, including Current Document, Current Project, Entire Solution and All Open Documents, which determine the scope for your searches.
Find options
Find options can be expanded or collapsed. The following options can be enabled or disabled:
Match case: If enabled, a Find Results search will be case-sensitive.
Match whole word: If enabled, the Find Results windows will only return whole word matches.
Replacing in files
If you want to display Replace in Files, select Find and Replace on the Edit menu and then select Replace in Files. You can also display Replace in Files by using the keyboard shortcut (Ctrl+Shift+H). Replace in Files works virtually the same way as Find in Files, except for the fact that Replace in Files additionally provides the Replace with option.
Replace with
To replace the string in the Find what field with a desired string, enter the replacement string in the Replace with filed. If you want to delete the occurrence(s) of the string specified in the Find what field, leave this field blank. The Replace with dropdown list stores the 20 searches you've made most recently. You can open the list to select a particular string if necessary.
Generating and refactoring code
Performing quick actions
Quick Actions allow you to easily generate and refactor code with a single action, and Quick Actions can be performed using the light bulb or screwdriver icons that appear when you put your cursor on a line of code for which an action is available.
Icons
The icon that displays when a quick action is available indicates the type of fix or refactoring. The light bulb icon indicates that you should perform an available action to improve your code. The screwdriver icon indicates that you can perform an available action to change the code, but you shouldn't necessarily perform the action.
Using light bulb or screwdriver icons to perform quick actions
In the following situations, the light bulb or screwdriver icons appear:
You hover your mouse over an error and there is a fix for the error;
You select the applicable line of code and select then Quick Actions and Refactorings from the right-click context menu.
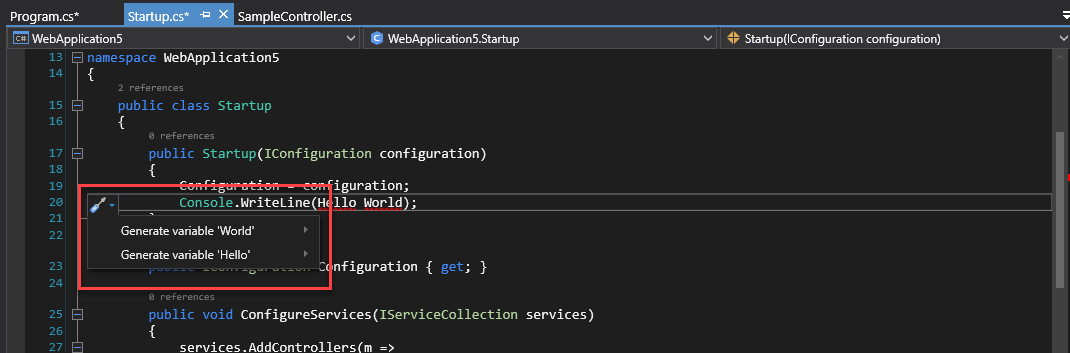
To show potential fixes, select either the Show potential fixes link or the down arrow next to the light bulb. Then, you will see a list of possible Quick Actions.
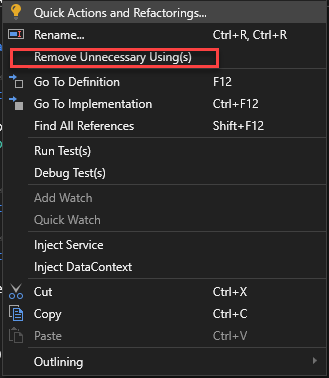
Removing unnecessary using(s)
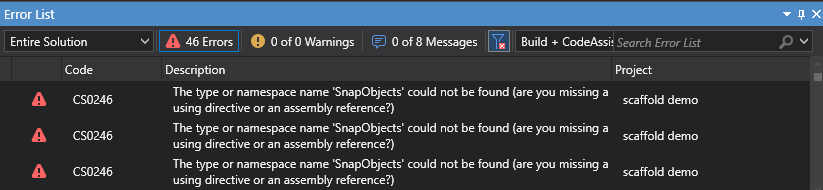
The Remove Unnecessary Using(s) command removes all unused using directives in the current file. When you select this command from the right-click context menu, unused namespace imports are removed.
Refactoring code
This feature allows you to reconstruct your existing code without changing its external behavior. It offers the following three options:
Rename
Allows you to rename identifiers for code symbols, such as namespaces, local variables, types, methods and properties. You can use this feature when you want to safely rename something without having to find all instances, and copy/paste the new name.
To use this feature, place your insertion point at an identifier and then select Refactor > Rename on the Edit menu (or right-click and then select Rename).

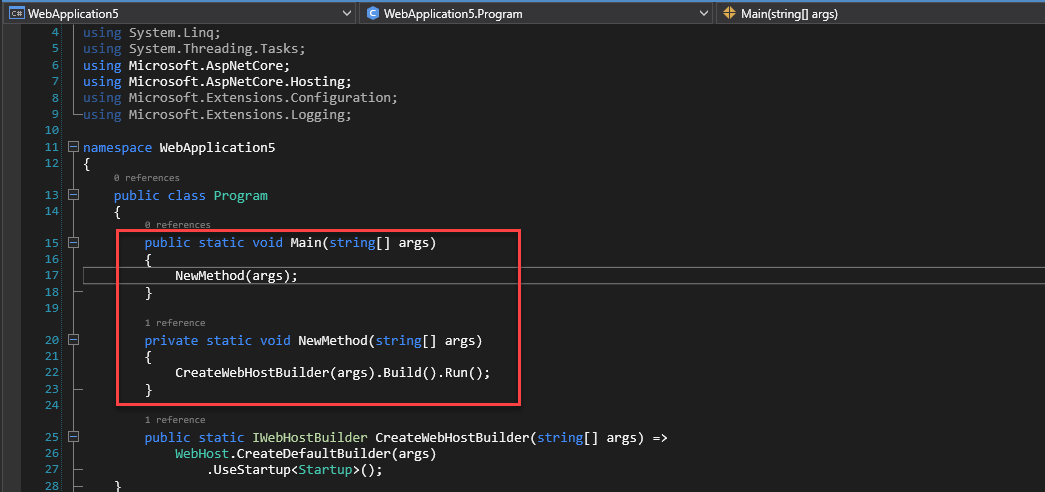
Extract method
Allows you to turn a block of code into its own method. You can use this feature when you have a fragment of existing code in some method that needs to be called from another method.
To use this feature,
Select the code to be extracted.

Select Refactor > Extract Method on the Edit menu.
Extract interface
Allows you to create an interface using existing members from an interface, struct, or class. You can use this feature when you have members in a class, struct, or interface that could be inherited by other classes, structs, or interfaces.
To use this feature,
Put your cursor in the class name.

Select Refactor > Extract Interface on the Edit menu.
Enter the necessary information in the popup Extract Interface dialog box.
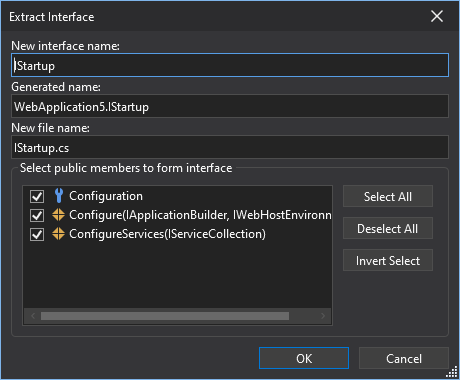
Select OK.
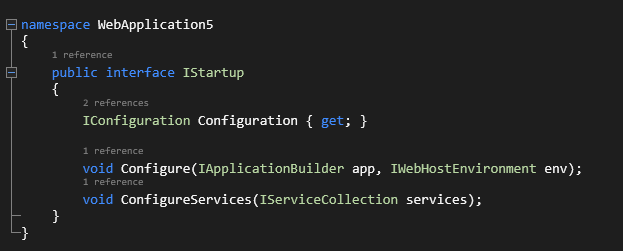
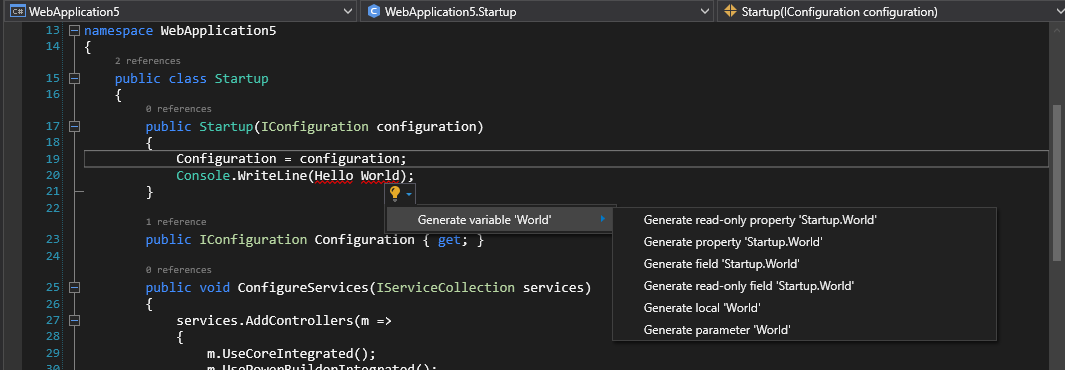
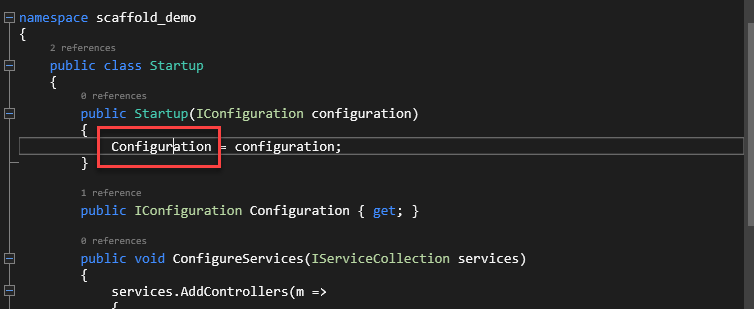
Injecting service/DataContext
Injecting services
You can only inject services in the ConfigureServices method in the Startup.cs file of your project.

To inject service into the service container:
Right-click at an empty line in the ConfigureServices method and then select Inject Service.

In the Inject Service(s) configuration page that appears, specify the project and folder that accommodates the services and then select the services to inject.

Specify the project and folder where the services reside.
Project
Specifies the project that accommodates the services you may want to inject.
Folder
Specifies the folder that accommodates the services you may want to inject. The backslash indicates that all folders are selected.
Select the services to inject.
Uses *Service to filter out all services in the selected folder in the target project. You can select the service to inject from all available services by selecting the corresponding checkbox.
Select the injection mode:
Scoped
Scoped lifetime services (AddScoped) are created once each time they are requested.
Singleton
Singleton lifetime services (AddSingleton) are created the first time they are requested, or when Startup.ConfigureServices is run and an instance is specified with the service registration. All following requests use the same instance. If the application requires singleton behavior, it is recommended that you allow the service container to manage the service’s lifetime and that you should not implement the singleton design pattern and provide user code to manage the object's lifetime in the class.
Transient
Transient lifetime services (AddTransient) are created each time they are requested from the service container. This lifetime works best for lightweight and stateless services.
Injecting DataContext
DataContext sets up the connection that your project uses to connect to the database. You can inject the DataContext into the service container of the project:
Right-click at an empty line in the ConfigureServices method and then select Inject DataContext.
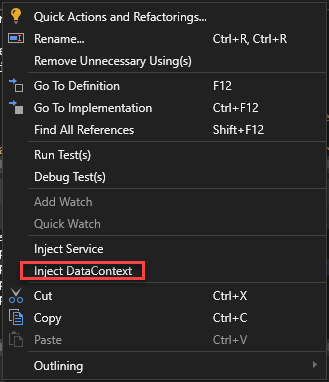
In the Inject DataContext(s) configuration page that appears, specify the project and folder that accommodates the DataContexts and then select the DataContexts to inject.

Specify the project and folder where the DataContext resides.
Project
Specifies the project that accommodates the DataContexts you may want to inject.
Folder
Specifies the folder that accommodates the DataContexts you may want to inject. The backslash indicates that all folders are selected.
Select the DataContext to inject.
Uses *DataContext* to filter out all DataContexts in the selected folder in the target project.
Connection Key
Refers to the connection string name in the appsettings.json file that sets up the site connection automatically.

Moving around in your code
Navigating backward and forward
You can move the insertion point to the previous locations by pressing Ctrl+-, or return to a more recent location from the previous location by pressing Ctrl+Shift+-. The maximum number of forward/backward movements is 20.
Using the navigation bar
The navigation bar, which appears when you begin to edit code in a code base, allows you to navigate to code in the code base.
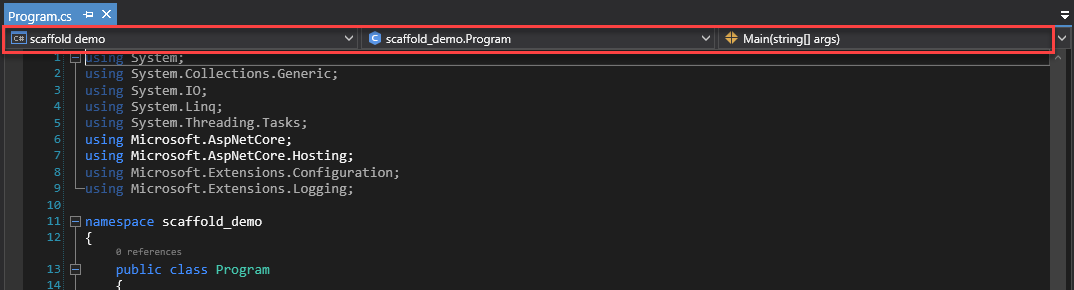
You will find that there are several dropdown boxes on the navigation bar. You can use the dropdown boxes to navigate in various ways.
- The left dropdown allows you to navigate to another project that hosts the current file.
- The middle dropdown allows you to navigate to a class/type in the current file.
- The right dropdown allows you to navigate directly to a procedure or other member of a class.
- You can press Tab to shift focus between the dropdown boxes on the navigation bar.
Finding all references
Find All References allows you to see where specific elements are referenced in the code base. To find all references for a particular element, select the element, and then press Shift+F12 or select Find All References from the right-click context menu.
A tool window named 'element' references appears (element being the name of the selected item), with the references displayed in a list.

A toolbar is available in the tool window at the top and enables you to:
- Change the scope of the search in a drop-down list box. You can choose to look only in changed documents all the way up to the entire solution.
- Copy a selected item by choosing the Copy button.
- Click the Go to the previous location in the list and Go to the next location in the list icons to go to the previous or next location in the list.
- Keep the current search results window by selecting the Keep Results button. If this button is selected, the current search results stay in this window, and new search results appear in a new window.
- Search for strings within the search results by entering text in the Search Find All References text box.
Finding code using Go To commands
To go to a definition,
Place the insertion point at a particular symbol.

Right-click the symbol and then select Go To Definition, or simply press F12.
To go to an implementation,
Place the insertion point inside a symbol.
Press Ctrl+F12 or select Go To Implementation from the right-click context menu.
If more than one implementations exist, a tool window named 'element' implementations appears (element being the name of the selected item), with the implementations displayed in a list.
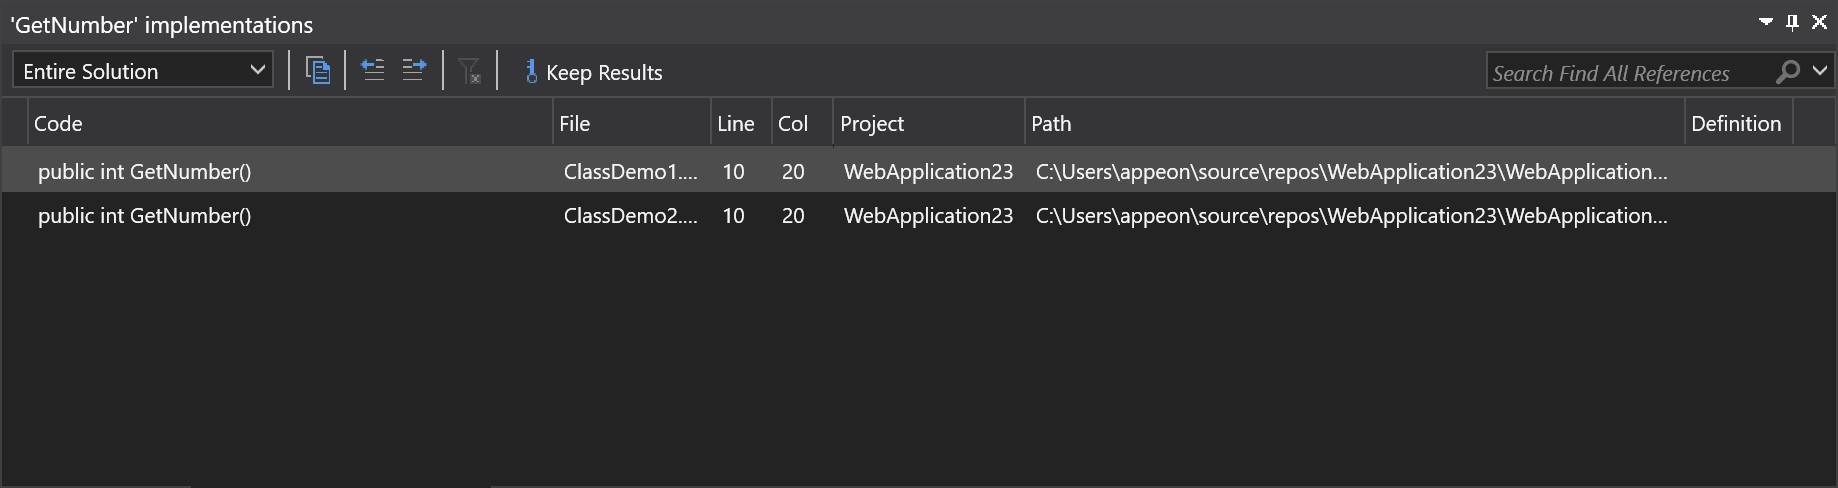
A toolbar is available in the tool window at the top and enables you to:
- Change the scope of the search in a drop-down list box. You can choose to look only in changed documents all the way up to the entire solution.
- Copy a selected item by choosing the Copy button.
- Click the Go to the previous location in the list and Go to the next location in the list icons to go to the previous or next location in the list.
- Keep the current search results window by selecting the Keep Results button. If this button is selected, the current search results stay in this window, and new search results appear in a new window.
- Search for strings within the search results by entering text in the Search Find All References text box.
Go To Line
The Go To Line feature allows you to move to a specific line in the active document. To access this feature, select Edit > Go To Line.
Improving your code
After you have finished editing your code in SnapDevelop, you need to figure out whether your code works properly. SnapDevelop offers an integrated set of project building, debugging, and testing tools that can be used to detect problems in your code.
Like most other IDEs, SnapDevelop tests your code in two separate phases:
- Building code, which catches and fixes project and compiler errors.
- Running code, which detects runtime errors.
Building your code
SnapDevelop supports two basic types of build configuration: Debug and Release, and uses Debug as the default build configuration.
To build your entire solution, simply press F6 or select Build > Build Solution.

To build a specific project in your solution, set the project as the startup project first, and then press Shift+F6 or select Build > Build [Project] (project being the name of the specified startup project).

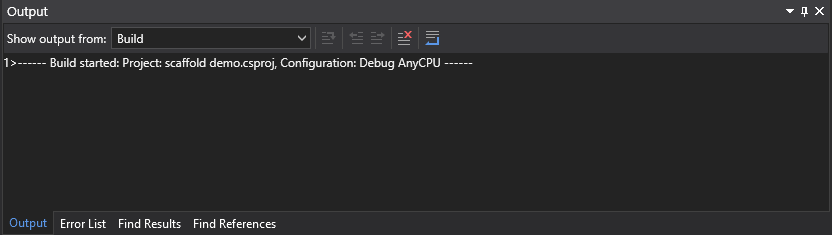
You can watch the build process in the the Output pane and view errors and warnings in the Error List pane. Should any error occur or the number of warnings exceed the specified level, your build fails. In this case, you need to click on the errors and warnings to go to the corresponding lines, resolve the errors, and then rebuild your solution/project.
Checking the error list
When you build your solution/project, you may encounter a variety of errors and warnings. To view these errors and warnings, navigate to the the bottom of the Output pane, and select the Error List tab.
Double-click on the error line in the Error List pane to go to the corresponding line in your code. You will notice that the error is marked with a red squiggly underscore. Hover your mouse over it for error details, and resolve the error according to the detailed information.
Fixing or refactoring code using quick actions
You can use Quick Actions to resolve errors. For details about how to fix and refactor code using Quick Actions, refer to Generating and Refactoring Code.
Debugging
Refer to Debugging Your Code for details on how to debug your code in SnapDevelop.
Running unit tests
Refer to Unit Testing for details on how you can run unit tests in SnapDevelop.
Chapter 4. Unit Testing
Use SnapDevelop to run unit tests to keep code health, and find errors before the release of an application. Run your unit tests frequently to make sure your code is working properly.
Adding a new xUnit test project to an existing solution
Opening an existing project for testing
Load the starting project that you downloaded from here. Now, open the Calculator.cs file, we need to add the actual business logic to it. This is how the Calculator class should be:
using System;
using System.Collections.Generic;
using System.Linq;
using System.Threading.Tasks;

namespace Calculator
{
    public class Calculator
    {
        public static double Addition(double num1, double num2)
        {
            return num1 + num2;
        }

        public static double Subtraction(double num1, double num2)
        {
            return num1 - num2;
        }

        public static double Multiplication(double num1, double num2)
        {
            return num1 * num2;
        }

        public static double Division(double num1, double num2)
        {
            return num1 / num2;
        }
    }
}
As you can see, it is a very simple class. It only performs some very simple operations and returns the result of each operation. But this is enough to start using the xUnit Test projects.
Also notice the use of the static keyword. We will use this to avoid having to instantiate it later on.
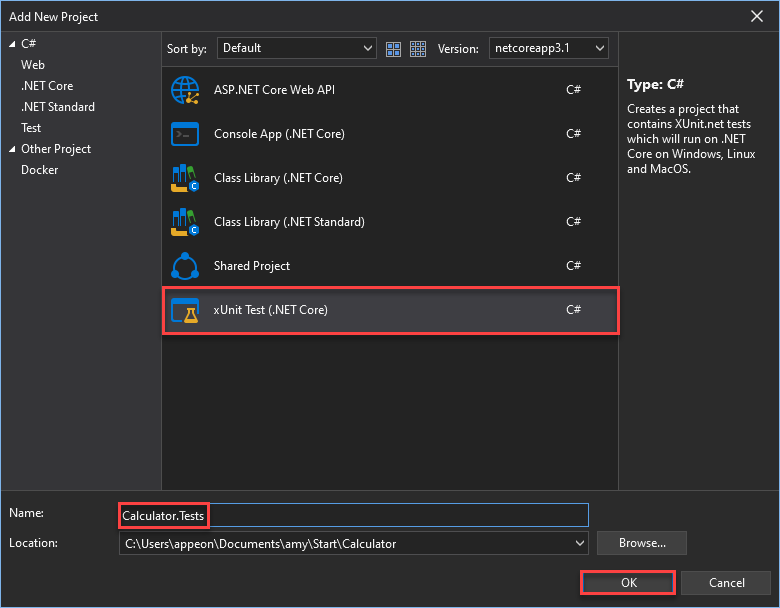
Creating an xUnit Test (.NET Core) project
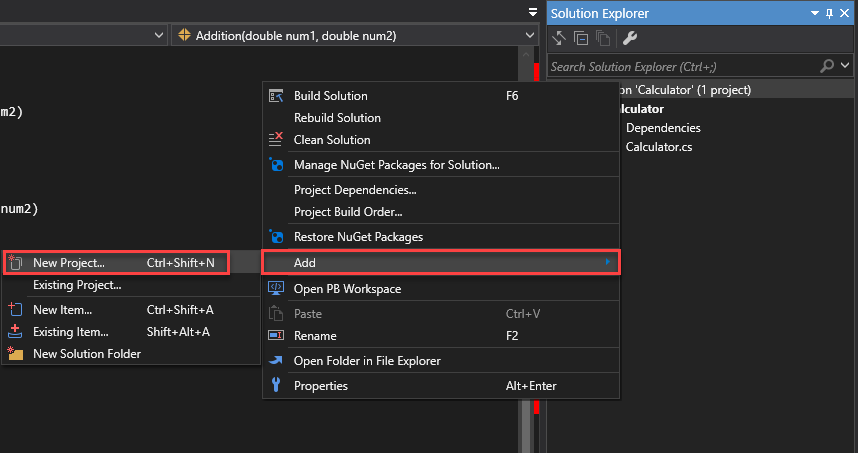
Let's add a new xUnit Test project to our solution. Right-click on the solution. Then click on Add > New Project.
Name the project Calculator.Tests and click OK.
This will create a simple project with one class for the basic starting point of your tests.
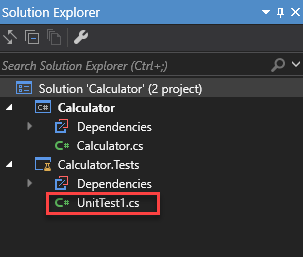
Since we will create our own class to test our code, we can proceed to delete this object. So, right-click on the UnitTest1.cs object and then select Delete.
Performing unit test using the Fact attribute
Adding a test class
Then create your own class by right-clicking on the Calculator.Tests project and selecting Add > xUnitTest Class. Name it Calculator.Tests.cs and click OK.

The following code will be generated for CalculatorTests class. Delete the Test1() method and the [Fact] attribute.
using System;
using Xunit;
using System.Collections.Generic;
using System.Linq;
using System.Threading.Tasks;

namespace Calculator.Tests
{
    public class CalculatorTests
    {
      	// ***Delete these lines of code*** //
        [Fact]
        public void Test1()
        {

        }
      	// ******************************* //
    }
}
Now that we have our testing class, we will add a reference to the Calculator.Tests project. To do so, right-click on the Calculator.Tests project and select Add Reference….
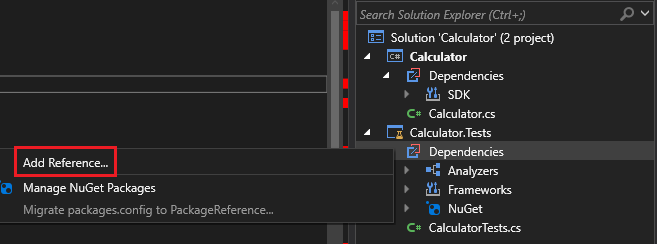
Then select the checkbox for the project Calculator and click OK.

This will add a reference to our project and make it available to our testing project.

Our class is ready for us to start coding our tests.
using System;
using Xunit;
using System.Collections.Generic;
using System.Linq;
using System.Threading.Tasks;

namespace Calculator.Tests
{
    public class CalculatorTests
    {

    }
}
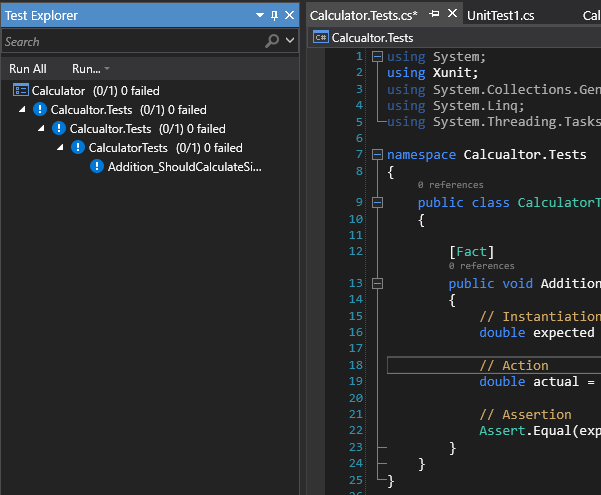
Developing the test method
Here is where we start developing our first method that will test the Addition method from our Calculator class. The coding of our tests will be done on the CalculatorTests class, and any required changes to the actual app will be done to the methods of the Calculator class.
One very useful thing to keep in mind is to applying a naming convention for our test methods. One of these conventions states that you need to use the word Should in the name of your test method in order to make it clear that the method should perform certain testing task. But for this section we will use our own naming convention that will start with the name of the method to test, then a simple and short explanation of what it should do. So we will name it:
public void Addition_ShouldCalculateSimpleValues()
{

}
Notice that it returns void. That is because testing methods usually don't need to return any value. So this method will test the Addition method.
The testing methods usually have three main sections inside of its lines of code: Instantiation, Action and Assertion.
The Instantiation section is where we set up what's needed for the test to run. The Action section is where we define the method that we want to test, and any other operations needed for it to run. Then, the Assertion section is where we actually assert that the method should do what we expect it to do. For that, we will use the Assert object.
The Assert object has many APIs that help you determine if the test passed or failed. You can find all of the APIs of Assert using the Intelligent Code Completion feature of the SnapDevelop IDE.

So let's add the code to our test method for the actual Test:
[Fact]
public void Addition_ShouldCalculateSimpleValues()
{
    // Instantiation
    double expected = 9;

    // Action
    double actual = Calculator.Addition(3, 6);

    // Assertion
    Assert.Equal(expected, actual);
}
Notice how we decorated our test method with the attribute [Fact]. That is because there are mainly two different types of test methods:
- Facts are tests which are always true. They test invariant conditions.
- Theories are tests which are only true for a particular set of data.
We will start by testing a Fact because we know, for sure, that 3 plus 6 equals 9. We'll test a Theory after that in this section.
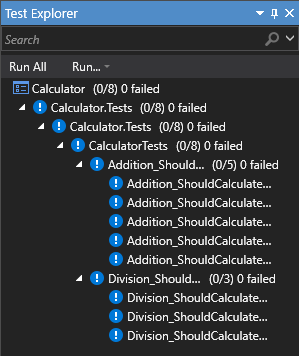
So now, click on the Test > Test Explorer menu option to open the Test Explorer window. You will notice that our test already appears there:
Running your test!
It's time to run your test! Click on Run All in the Test Explorer window. Wait a few seconds for the projects to build and the test to run. Then you will notice that the test has actually passed!

This was an actual test that asserts that if you pass a 3 and a 6 to the Addition method, it should return 9.
Performing unit test using the Theory attribute
Even though this was very simple, it illustrates the basics of how Facts are developed and tested against our code. But we will now perform a more close to the real-world test, where we want to test Theories that challenge our code against several different set of values, thus actually testing different scenarios that our methods could, would, or should stumble upon. So, we'll change our Fact to a Theory.
Developing the test method
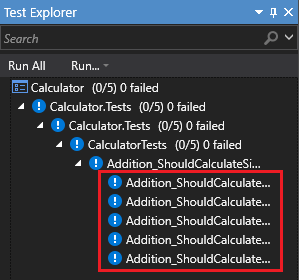
Theories usually test different scenarios, or values, of data. We need to pass these values to our test method. In order to do that, we use the [InlineData] attribute. This attribute will set the different scenarios that will test the different values of our data. We will now add some of these scenarios to our method:
[Theory]
[InlineData(3, 6, 9)]
[InlineData(4, 3, 7)]
[InlineData(-10, 10, 0)]
[InlineData(34, 5.33, 39.33)]
[InlineData(-10, -10, -20)]
public void Addition_ShouldCalculateSimpleValues(double num1, double num2, double expected)
{
    // Action
    double actual = Calculator.Addition(num1, num2);

    // Assertion
    Assert.Equal(expected, actual);
}
Notice the changes we made to our method. We have added three new parameters in order to receive the values from our Theory. Plus, calling our actual method, it passes the parameters making it more real-worldish.
If we do a build to our solution (press F6), you will notice that now, each one of, the InlineData attributes we added have become tests in our Test Explorer window.
Running your test!
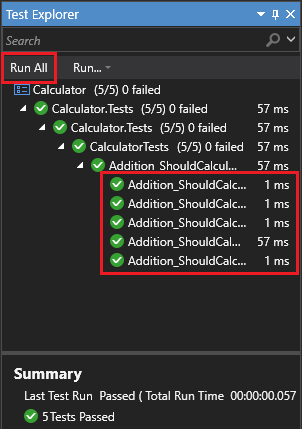
We can now click on Run All again to run all our tests. They should all pass!
Fixing a failed test
So far we have tested theories that all pass. But what if one of them didn't? Well, that's the whole purpose of this approach. How to tackle a test that doesn't pass? What to do next? Well… let's see another test method example:
[Theory]
[InlineData(8, 4, 2)]
[InlineData(-9, 3, -3)]
[InlineData(15, 0, 0)]
public void Division_ShouldCalculateSimpleValues(double num1, double num2, double expected)
{
    // Action
    double actual = Calculator.Division(num1, num2);

    // Assertion
    Assert.Equal(expected, actual);
}
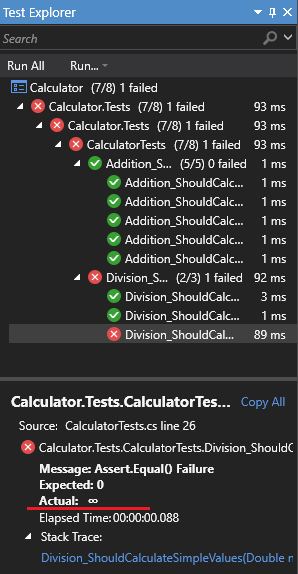
This testing method example, tests three theories of the Division method.
If you run these tests, you'll notice that one of them fails.

But this is actually useful information, because it is telling us that our method is not prepared to divide by zero and return a zero. It is actually returning undetermined or infinite.
This means that we need to refactor our code so that it can pass this particular test too. And this is where we actually make changes to our Calculator class in order to comply with all the requirements, or tests, that our method should.
Calculator.cs
public static double Division(double num1, double num2)
{
    if (num2 == 0)
    {
        // Refactored logic for Division by zero
        return 0;
    }
    else
    {
        return num1 / num2;
    }
}
And, since we now know for a Fact that all divisions by zero should return zero, then we can make that test a Fact:
CalculatorTests.cs
[Theory]
[InlineData(8, 4, 2)]
[InlineData(-9, 3, -3)]
public void Division_ShouldCalculateSimpleValues(double num1, double num2, double expected)
{
    // Action
    double actual = Calculator.Division(num1, num2);

    // Assertion
    Assert.Equal(expected, actual);
}

[Fact]
public void Division_ShouldDivideByZero()
{
    // Instantiation
    double expected = 0;

    // Action
    double actual = Calculator.Division(15, 0);

    // Assertion
    Assert.Equal(expected, actual);
}
If we build the solution (press F6), the tests in the Test Explorer window will update.

At this point, if we Run All the tests again, then all our tests should pass!
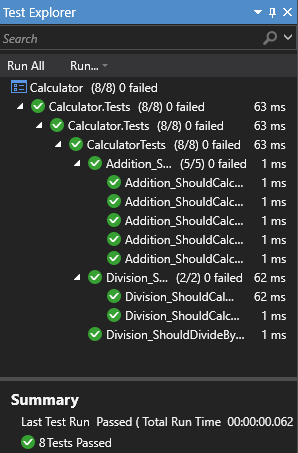
This is exactly what we are aiming for!
Debugging your tests
Now that we have several tests, there may be the need to debug a test to make sure that it is actually doing what it is expected to do. This is actually quite simple: First you need to add a breakpoint to your code. You can do that by clicking on the sidebar on the Code Editor window in the line you want to add the breakpoint to, or by right-clicking on the line of code where you want to insert the breakpoint, and then selecting Breakpoint > Insert Breakpoint.

Then right-click on the test you want to debug, and select Debug Selected Tests.
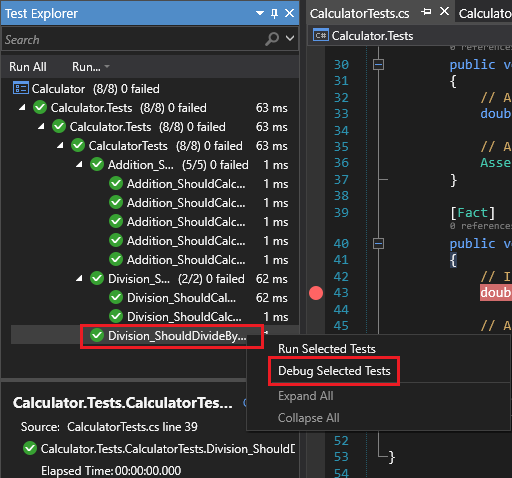
Now you can continue debugging your code as you would normally do.

Final notes
Keep in mind that:
- You should develop your code to pass your tests, not develop your tests so that your code can pass your tests.
- You want to create tests for as many possible scenarios (Facts and Theories) as you can. This provides confidence that you will deploy better working code to production.
- Your testing project (Calculator.Tests in this section) is not necessarily needed in a production environment.
- xUnit Test projects are actually projects that will assist you to develop better working code from the very beginning.
We encourage you to continue creating tests for this Calculator class to better grasp the concepts mentioned in this section.
Chapter 5. Debugging Your Code
Debugging is used to track the running process of code. Exceptions may occasionally occur during the running of a program. A debugger can be used to effectively and accurately locate an exception so that you can fix it in a timely manner.
This section presents a brief introduction to the basic features of the SnapDevelop debugger in a step-by-step manner. You will learn to:
- Set a breakpoint;
- Navigate code in the debugger;
- Check variables via data tips and Locals window;
- Add a watch on a variable;
- Check the call stack.
Creating a project
This section shows you how to create a C# project using SnapDevelop and to add code that can help to demonstrate the key features of the SnapDevelop debugger. The code added here is simple enough for demonstration purposes.
Open SnapDevelop.
From the top menu bar, choose File > New > Project. In the left pane of the New Project dialog box, under C#, choose .NET Core, and then in the middle pane choose Console App (.NET Core). Then, give a name for the project and click OK.
SnapDevelop creates the project.
In Program.cs, replace the current code
using System;
using System.Collections.Generic;
using System.Linq;
using System.Threading.Tasks;
namespace Debugging
{
    class Program
    {
        static void Main(string[] args)
        {
            Console.WriteLine("Hello World!");
        }
    }
}
with the following code:
using System;
using System.Collections.Generic;

public class Animal
 {
 	public int X { get; private set; }
 	public int Y { get; private set; }
 	public int Appetite { get; set; }
 	public int Weight { get; set; }
 	public virtual void Feed()
 		{
 			Console.WriteLine("Performing base class feeding tasks");
 		}
 }

 class Dog : Animal
 {
 	public override void Feed()
 		{
 			Console.WriteLine("Feeding a dog");
 			base.Feed();
 		}
 }

 class Cat : Animal
 {
 	public override void Feed()
 		{
 			Console.WriteLine("Feeding a cat");
 			base.Feed();
 		}
 }

 class Pig : Animal
 {
 	public override void Feed()
 		{
 			Console.WriteLine("Feeding a pig");
 			base.Feed();
 		}
 }

 class Program
 {
 	static void Main(string[] args)
 		{
 			var animals = new List<Animal>
 				{
 					new Dog(),
 					new Cat(),
 					new Pig()
 				};
                  foreach (var animal in animals)
                        {
 						animal.Feed();
                        }
 					Console.WriteLine("Press any key to exit.");
                        Console.ReadKey();
            }
 }
Launching the debugger
Press F5 (or select Debug > Start Debugging) or the Debugging button on the toolbar.
F5 starts the app with the debugger attached to the app process. Since nothing was done to debug the code, the app just loads and generates the following console output.
Feeding a dog
Performing base class feeding tasks
Feeding a cat
Performing base class feeding tasks
Feeding a pig
Performing base class feeding tasks
Press any key to exit.
Stop the debugger by pressing the red stop button on the toolbar.
Setting a breakpoint and launching the debugger
Breakpoints are the most basic feature of the SnapDevelop debugger. A breakpoint indicates where the debugger should suspend your running code so that you can look at the values of variables, or whether or not a block of code is executed.
In the foreach loop of the Main function, set a breakpoint by clicking animal.Feed() and then pressing F9:
A red dot (
 ) appears in the left margin of the line of code you clicked.
You can configure conditions and actions for the breakpoint. To do so, right-click on the red dot of the breakpoint and select Settings.
Conditions. The conditions control when and where the breakpoint shall execute. A condition can be any valid expression that is supported by the debugger. If there are multiple conditions, they are joined by "AND".
Breakpoints with conditions appear as a red dot with a plus sign (+) in the center (
 ).
).Actions. You can redefine the actions to occur when the specified conditions are met at the breakpoint. For example, the action can be, writing a message in the Output window but still continue code execution. The breakpoint red pot changes to a diamond (
 ) when you select Continue code execution for the action.
Press the Debugging button or F5, the app launches, and the debugger runs to the line of code where you set the breakpoint.
The yellow arrow in the left margin points to the line of code where the debugger paused, which suspends app execution simultaneously (this line of code has not yet been executed).
If the app is not yet running, F5 launches the debugger and stops at the first breakpoint. Otherwise, F5 continues running the app to the next breakpoints (if any).
Breakpoints are useful when you know a block of code or a line of code that you decide to examine in detail. If you want to delete or disable a breakpoint, hover over the breakpoint, right-click your mouse and make the choice accordingly. If disabled, the breakpoint red pot changes to a red circle( ).
).
Navigating code in the debugger
Usually we use the step commands (step into, step over, and step out) and Run to Cursor command to navigate code in the debugger.
Step Into
When the debugger pauses at the animal.Feed method call in the Main method, press F11 (or select Debug > Step Into) to advance into code for the Dog class.
F11 is the Step Into command. It advances the app execution one statement each time and serves to examine the execution flow in the most detail. By default, the debugger skips over non-user code.
Step Over
When the debugger advances to the Feed method in the Dog class, press F10 (or select Debug > Step Over) several times until the debugger stops on the base.Feed method call, and then press F10 one more time.
The debugger does not step into the Feed method of the base class. F10 steps over the methods or functions in your app code, but the block of code is still executed. By pressing F10, rather than F11, on the base.Feed method call, we skip over the implementation code for base.Feed.
Step Out
When you have examined the Feed method in the Dog class, press Shift + F11 (or select Debug > Step Out) to get out of the method but stay in the debugger.
The Step Out command resumes app execution and advances the debugger until the current function returns.
You will be back in the foreach loop in the Main method.
Run to Cursor
While the program is in debug mode, right-click a line of code in your app and select Run to Cursor. This command sets a temporary breakpoint at the current line of code. If breakpoints have already been set, the debugger pauses at the first breakpoint that it hits. You can use this command when you need to quickly set a temporary breakpoint.
Checking variables with Data Tips and Locals window
Variables can be checked via data tips and Locals window.
Checking variables with Data Tips
Usually, when you are debugging an issue, you try to figure out whether variables are storing the desired values. The data tips are a good way to do it.
- When you pause on the animal.Feed() method, hover over the animal object and you see its default property value, which is Dog.
- Expand the animal object to see its properties, such as the Weight property, which has a value of 0.
- Press F10 (or select Debug > Step Over) several times to iterate once through the foreach loop until the debugger pauses again on the animal.Feed() method.
- Hover over the animal object again, and this time you have a new object type Cat.
Please note that a warning flag will appear on the data tip when it cannot get the current value of a variable.
Checking variables with the Locals window
The Locals window displays the variables that are in the current execution context.
When the debugger pauses in the foreach loop, click the Locals window, which is by default open in the lower left pane of the code editor. If it is closed, open it by selecting Debug > Windows > Locals from the top menu bar.
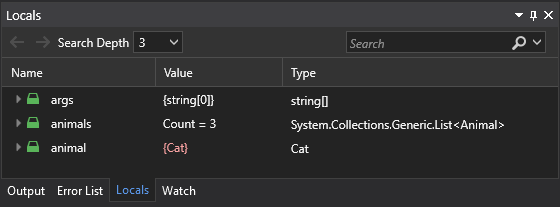
Press F11 to advance the debugger so that you can check the variables in the execution contexts.
Adding a Watch
In the code editor window, right-click the animal object and select Add Watch.
The Watch window opens at the bottom left corner of the code editor. You can use a Watch window to specify an expression or a variable you want to monitor.
After you have set a watch on the animal object, you can see its value change as you run through the debugger. Unlike the other variable windows, the Watch window always displays the variables you are monitoring.

An alarm icon will appear on the left of an variable name when the variable is out of scope or an error occurs.
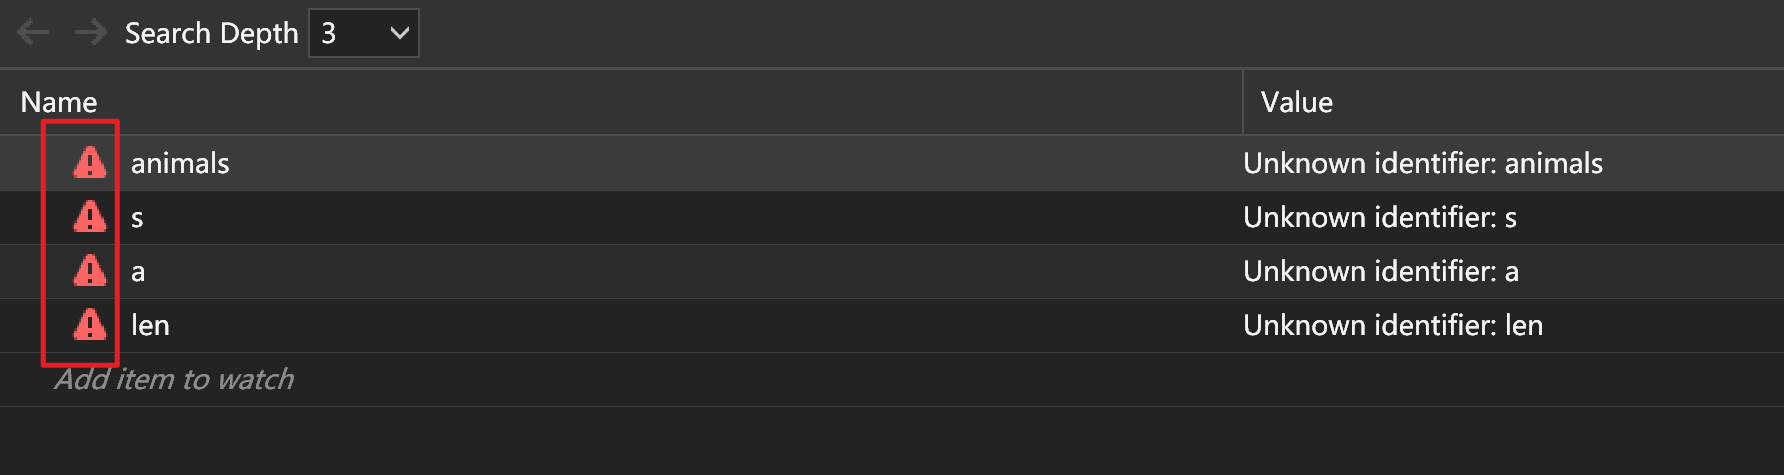
Checking the Call Stack
The Call Stack window displays the order in which functions or methods are called. It can be used to examine and understand the execution flow of a program.
When the debugger pauses in the foreach loop, click the Call Stack window, which is by default open in the lower right pane. If it is closed, open it while paused in the debugger by selecting Debug > Windows > Call Stack.

Click F11 several times until you see the debugger pause in the base.Feed method for the Dog class in the code editor. Look at the Call Stack window.
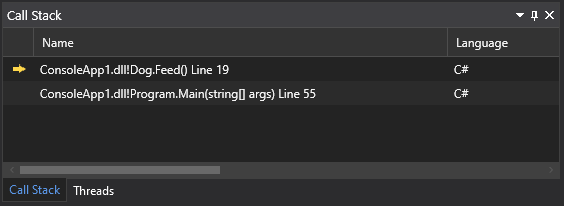
The first line displays the current function (the Dog.Feed method in this app). The second line shows that Dog.Feed is called from the Main method.
Selecting multiple or all items from debug windows
SnapDevelop allows you to select multiple or all the items from a list in the Breakpoints, CallStack, Locals, Watch, and QuickWatch windows. To select multiple items in a list, hold the Shift key and click the items you want to select one by one. To select all the items in a list, right click on an item in the list, and select Select All.
Managing exceptions
In the Exception Settings window, you can add or delete exceptions, and edit conditions for an exception. To open the Exception Settings window, select Debug > Windows > Exception Settings.
Note: A popup window appears as you step into a line where an unhandled exception occurs. See an example below:
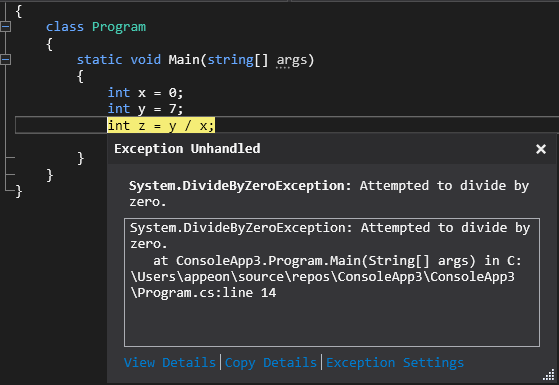
Adding and deleting an exception
To add an exception,
- In the Exception Settings window, select an exception category in the exception list.
- Click the plus icon (+) in the toolbar.
- Enter the exception name in the text box.
- Press Enter.
To delete an exception, select the exception you want to delete from the list, and click the minus icon (-) in the toolbar. Alternatively, you can deselect the exception, and the debugger will not break when the exception is thrown.
Editing conditions for an exception
You can edit conditions for an exception in the Exception Settings window. When you add a condition, you can include or exclude a module for the exception by setting the module name. This allows you to choose to break or avoid break for the exception on the specified modules.
To edit conditions for an exception,
- In the Exception Settings window, right-click on the exception and select Edit Conditions.
- In the Edit Conditions window, select a comparison operator, Equals or Not Equals, and type the name of module to include or exclude for the exception.
- To add an extra condition, click Add condition.
- To delete a condition, click the X icon at the end of condition.
- Click OK.
Chapter 6. Compiling and Building
Project files must be compiled and built before they can be used to generate an application to be deployed to the users. Before you compile and build a project or solution, you need to configure the various project properties and solution properties so that you can build your project or solution in desired ways.
Configuring project properties
This section describes how you can configure the various project properties, including properties related to application, build, build events, package, debug and signing, so that you can build your projects in ways that best fit your needs. To configure the Project Properties settings, right-click a project node in Solution Explorer, and then select Properties so that the project designer pops up.
Application
The Application tab in the project designer allows you to specify the various application configurations, such as assembly name, target framework, output type, and ways of resources management.
The following settings allow you to specify some basic configurations for the application, including the assembly name, default namespace, target framework, output type, as well as the entry point when you start an application.
Assembly name
Designates the name of the output files that contain the assembly metadata. If it is changed here, the output assembly name will be changed too.
Default namespace
Specifies the base namespace for files newly added to the project.
Target framework
Defines the .NET version that your application targets. The dropdown list can have different values depending on the .NET versions that are installed on your current machine. If your project targets .NET Core, you can choose one of the supported .NET Core versions listed in the section Targeting a framework.
Output type
Specifies the type of application to build. The output type varies depending on the type of project you create. For a Web application project, for example, you must select Console Application as the output type. For a Console App project, you can select Windows Application, Console Application, or Class Library.
Startup
Designates the entry point to be called when you start an application. The entry point is usually set either to the main form in your program or to the Main procedure that runs when you start the application. If your compilation has multiple types that contain a Main method, you can specify which type contains the Main method that you want to use as the entry point into the application. This property for class libraries defaults to (Not set) because they don’t have an entry point.
Generate the COM host
This option is only available for Class Library (.NET Core 3.1). Selecting this option will create the file projectname.comhost.dll.
Assembly information...
SnapDevelop supports opening and compiling .NET Framework projects created in other IDEs. This option allows you to edit the assembly information for a .NET Framework project.
Resources
The Resources settings allow you to specify how resources of your application will be managed.
Icon and manifest
The Icon and Manifest option is enabled by default. These settings allow you to select your own icon, or to select different manifest generation options. In most cases, you can rely on this radio button to manage your application resources. If you want to provide a resource file for the project, select the Resource file radio button instead.
Icon
Designates the .ico file that you want to use as the icon for your application. Enter the name of the .ico file, or click Browse to select an existing icon. Note that this feature is available only for .NET Framework apps created outside SnapDevelop.
Manifest
Selects a manifest generation option when the application runs on Windows Vista under User Account Control (UAC). This option can have the following values:
Embed manifest with default settings. This is the default option. It embeds security information into the executable file of the application, specifying that
requestedExecutionLevelbeAsInvoker.Create application without a manifest. This method is known as virtualization. Use this option for compatibility with earlier applications.
Resource file
Select this radio button when you want to provide a resource file for the project. Enter a path name of a resource file or click Browse to add a Win32 resource file to the project.
Build
The Build settings allow you to configure the various build properties, such as conditional compilation symbols, target platform, warning and error treatment, as well as output management. To access these settings, click the Build tab in the project designer.
Configuration and platform
SnapDevelop currently supports two ways of build: Debug and Release, and the platform on which an application runs is set to Any CPU by default. Therefore, you can choose to perform the Debug configuration on any CPU or the Release configuration on any CPU. However, the Debug and Release options cannot be selected at the same time. The Configuration and Platform options make it possible for you to select the specific configuration and platform you want to display or modify.
Configuration
Specifies the configuration settings (Debug or Release) you want to display or modify.
Platform
By default, the platform is set to Any CPU, which means that you can build and deploy your application on any development platform.
Conditional compilation symbols
Designates one or more symbols to perform conditional compilation. Use a semi-colon or comma to separate symbols if you specify multiple symbols here. If you designate a conditional compilation symbol here, you can use the symbol to compile your project-wide source files conditionally without having to define such a symbol in individual files.
The -define option defines names as symbols in all source code files in your program. The -define option is equivalent to a #define preprocess directive except that this option is applicable for all files in your project. A symbol specified here remains defined unless otherwise undefined using an #undef directive. If you use the -define option, an #undef directive in one file has no project-wide effect.
You can use symbols created by this option with #if, #else, #elif, and #endif to perform conditional compilation for the source files in your project.
For example, if you have created a Console App using SnapDevelop and you enter ABC; HelloWorld in the Conditional compilation symbols box,
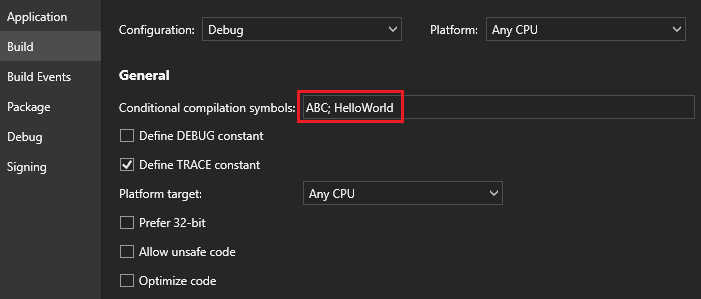
you can set the project compilation conditions in the .cs file in Solution Explorer.
class Program
    {
        static void Main(string[] args)
        {
        #if (ABC)
            Console.WriteLine("ABC");

        #else
            Console.WriteLine("Hello World!");

        #endif

        #if (HelloWorld)
            Console.WriteLine("Hello World!");

        #else
            Console.WriteLine("Hello World!");

        #endif
            Console.ReadKey();
        }
    }
If you run the application, you will get the following output.
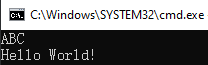
If you un-define ABC using an #undef directive and then run your application again,
#undef ABC
using System;
using System.Collections.Generic;
using System.Linq;
using System.Threading.Tasks;

namespace ConsoleApp1
{
    class Program
    {
        static void Main(string[] args)
        {
        #if (ABC)
            Console.WriteLine("ABC");

        #else
            Console.WriteLine("Hello World!");

        #endif

        #if (HelloWorld)
            Console.WriteLine("Hello World!");

        #else
            Console.WriteLine("Hello World!");

        #endif
            Console.ReadKey();
        }
    }
}
you will get the following output:
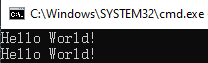
Define DEBUG constant
Select this option to treat DEBUG as a constant symbol in all source code files in your project. Enabling this option has the same effect as entering DEBUG in the Conditional compilation symbols box.
Define TRACE constant
Select this option to treat TRACE as a constant symbol in all source code files in your project. Enabling this option has the same effect as entering TRACE in the Conditional compilation symbols box.
Platform target
Designates the processor on which the output file is to run. Select Any CPU if you want your output file to run on any processor, select x86 if you want it to run on any 32-bit Intel-compatible processor, or select x64 if you want it to run on any 64-bit Intel-compatible processor.
Prefer 32-bit
If you enable this option, your application runs as a 32-bit application on both 32-bit and 64-bit Windows operating systems. If you disable this option, your application runs as a 32-bit application on 32-bit Windows operating systems and as a 64-bit application on 64-bit Windows operating systems. Note that the Prefer32-bit option is available only if the Platform target list is set to Any CPU. This option is not available for Class Library projects.
If you run an application as a 64-bit application, the pointer size doubles, and incompatibility may occur with other libraries that are exclusively 32-bit. Run a 64-bit application only if the application requires over 4 GB of memory or 64-bit instructions significantly improve performance.
Allow unsafe code
Allows code that uses the unsafe keyword to compile. By default, C# does not support pointer arithmetic in order to ensure type security. However, you can use the unsafe keyword to define an unsafe context in which pointers can be used. Unsafe code has the following properties:
- Unsafe code can be types, methods, or code blocks.
- Unsafe code may improve an application’s performance by removing array bounds checks.
- Unsafe code must be compiled with the unsafe compiler option.
- Unsafe code causes security problems.
- Unsafe code is necessary when you call native functions that require pointers.
Optimize code
If you enable this option, the C# compiler optimizes your code by making your output files smaller, faster, and more efficient.
Errors and warnings
The following settings configure the error and warning options when you are building your project.
Warning level
Specifies the warning level for the compiler to display. The warning levels range from 0 to 4. Higher warning levels show more warnings while lower warning levels show more serious warnings. The following table illustrates the meanings of individual warning levels.
Warning Level Description 0 Does not show any warning messages. 1 Shows serious warning messages. 2 Shows level 1 warnings and less serious warnings. 3 Shows level 2 warnings and less serious warnings. 4 Shows all level 3 warnings plus informational warnings. Suppress warnings
Blocks the generation of one or more warnings. Use semi-colon or comma to separate warning numbers if there is more than one warning, for example, 1701;1702.
Treat warnings as errors
The following settings allow you to determine which warnings are treated as errors.
None
Treats no warnings as errors.
All
Treats all warnings as errors.
Specific warnings
Treats specific warnings as errors. Use a semi-colon or comma to separate warning numbers if you want to specify multiple warnings as errors.
Output
The following settings allow you to specify the output configuration for the build process.
Output path
Designates the path of the output files. Select Browse to specify a path, or directly enter a path in this box. If you don’t specify a path, the compiled files will be output into the default path, which is bin\Debug or bin\Release\.
XML documentation file
Designates the name of a file which contains documentation comments. If you enable this option and build your project, you will see a .xml file in Solution Explorer. For example,

Register for COM Interop
Specifies that your managed application will generate a COM callable wrapper that allows a COM object to interact with your managed application. COM is a language-neutral way of implementing objects that can be used in environments other than the one in which they are created, even across machine boundaries. It offers a stable application binary interface that does not change between compiler releases.
Note that your application should be a .NET Framework application and the Output type in the Application page of the project designer for this application must be Class Library so that the Register for COM interop option is available.
Advanced build settings
The Advanced Build Settings dialog box allows you to specify advanced build configurations, including the version of a programming language, the way compiler errors are reported, debugging information, file alignment, as well as library base address.
Language version
Designates the version of the programming language to use. Each version has its own specific features. This option makes it possible for you to force the compiler to enable some of the implemented features, or to allow only the features that are compatible with an existing standard. The following table displays the various language versions that are currently available in the SnapDevelop compiler.
Language Version Meaning C# latest major version (default) The compiler recognizes all valid language syntax from the latest major version that it can support. C# latest minor version (latest) The compiler recognizes all valid language syntax from the latest minor version that it can support. ISO-1 The compiler only recognizes syntax included in ISO/IEC 23270:2003 C# (1.0/1.2). ISO-2 The compiler only recognizes syntax included in ISO/IEC 23270:2006 C# (2.0). C# 3 The compiler only recognizes syntax included in C# 3.0 or earlier versions. C# 4 The compiler only recognizes syntax included in C# 4.0 or earlier versions. C# 5 The compiler only recognizes syntax included in C# 5.0 or earlier versions. C# 6 The compiler only recognizes syntax included in C# 6.0 or earlier versions. C# 7 The compiler only recognizes syntax included in C# 7 or earlier versions. C# 7.0 The compiler only recognizes syntax included in C# 7.0 or earlier versions. C# 7.1 The compiler only recognizes syntax included in C# 7.1 or earlier versions. C# 7.2 The compiler only recognizes syntax included in C# 7.2 or earlier versions. C# 7.3 The compiler only recognizes syntax included in C# 7.3 or earlier versions. Internal compiler error reporting
Specifies whether to report internal compiler errors. The prompt is selected by default, which means that you will receive a prompt if any compiler error occurs. If you select none, the error will be reported only in the output of the text compiler. If you select send, an error report will be sent automatically. If you select queue, error reports will be queued.
Check for arithmetic overflow/underflow
Specifies whether runtime exceptions occur if an integer arithmetic statement exceeds the scope of the checked or unchecked keywords and leads to a value that exceeds the range of the data type.
Debugging information
Determines the type of debugging information that is generated by the compiler. The following table displays the various types of debugging information and their respective meanings.
Type Description Full Attaches a debugger to the running program. None Does not generate debugging information. PdbOnly Allows debugging of the source code with the program launched in the debugger but displays only assembler with the running program attached to the debugger. Portable Generates a .PDB file, a symbol file which is portable and not platform-specific. This file contains information about what is in the main executable file and how it was generated. Embedded Inserts portable symbol information into the assembly. File alignment
Determines the size of the output file. You can select any value, measured in bytes, from the dropdown list, which includes 512, 1024, 2048, 4096, and 8192. The size of the output file is determined by aligning a section on a boundary that is a multiple of this value.
Library base address
Designates the preferred base address where a DLL can be loaded. The default base address for a DLL is specified by the .NET Framework common language runtime.
Build events
The Build Events settings allow you to specify build configuration instructions and specify the conditions for the running of post-build events. To access these settings, click the Build Events tab in the project designer.
Pre-build event command line
Allows you to write commands to execute before the build starts. If you want to write long commands, you can enter your commands in the Pre-build Event Command Line input box that pops up when you click Edit Pre-build.
The command line input boxes allow you to insert a variety of macros, which are case-insensitive, and which can be used to designate locations for files or to get the actual name of the input file.
Appendix B: List of Pre-build and Post-build Macros lists and explains the macros that you can add in the command line.
Post-build event command line
Allows you to write commands to execute after the build finishes. If you want to write long commands, you can enter your commands in the Post-build Event Command Line input box that pops up when you click Edit Post-build.
The command line input boxes allow you to insert a variety of macros, which are case-insensitive, and which can be used to designate locations for files or to get the actual name of the input file.
Appendix B: List of Pre-build and Post-build Macros lists and explains the macros that you can add in the command line.
Run the post-build event
Specifies the conditions for the running of the post-build events. The following table lists the various conditions and the results of applying these conditions.
Option Result Always Post-build events will run regardless of the condition. On successful build Post-build events will run if a project is successfully built. When the build updates the project output Post-build events will run only if the compiler's output files (.exe files or .dll files) differ from the previously compiled files.
Package
The Package settings allow you to configure the various package properties, such as package generation, package ID, package version, package author, output path, as well as all details about the package. To access these settings, click the Package tab in the project designer.
Generate NuGet package on build
If you enable this option, you can use SnapDevelop to automatically generate the NuGet package when you build the project. You can meaningfully configure the various package properties only if the Generate NuGet Package on Build option is enabled.
Require license acceptance
If you enable this option, you will be asked whether to accept the package license before you install a particular package.
Packaging options
The following table lists the variety of package properties and the meanings of individual package properties.
Property Description Package ID A unique and case-insensitive package identifier. IDs generally follow the .NET namespace naming conventions and do not allow spaces or characters, which are invalid for a URL. Package version The version of the package. Authors The author(s) of a package. Use comma to separate authors if the package is created by a group of authors. Company The creator(s) of a package. Use comma to separate creators if there are several creators. Product The name of the product. Description A general description of the package. Copyright Copyright details for the package. License URL Path to the license file. Project URL URL for the package's home page. Icon URL URL for an image used as the icon of the package. Repository URL URL for the repository. Repository type The type of the currently used repository. Tags Keywords that represent the characteristics of a package and that may help you find the particular package on nuget.org. Release notes A description of the changes made in the current release package. Assembly version Each assembly has a unique version number that represents its identity and this version number consists of four parts: <major version>.<minor version>.<build number>.<revision>. Assembly file version A version number given to file as in file system.
Debug
The Debug settings allow you to specify how the SnapDevelop debugger behaves in a C# project. To access these settings, click the Debug tab in the project designer.
The following table lists the debug options you can configure for your application and explains the meaning of each option.
| Option | Description |
|---|---|
| Profile | Displays the currently active project. You can click Create to add a new project for which you want to configure the start options. Or you can click Delete to remove a project from the dropdown list. |
| Launch | Specifies the launch action when you select Start from the Debug menu. If you select Project, which is the default option, the debugger launches the startup project for debugging. If you select Executable, the debugger launches and attaches to an executable (for Windows/Console Application projects) outside SnapDevelop when you debug the application. If you select the Executable option, you will be asked to provide a path to the executable to run in the Execute file input box that follows immediately on the next line. |
| Application arguments | Specifies command line arguments for the application being debugged. |
| Working directory | Specifies the working directory of the application being debugged. By default, the working directory for C# applications is \bin\debug. |
| Launch browser | Specifies that a particular URL should be accessed when you debug a Web application. |
| Environment variables | .NET Core reads environment variables stored in the launchSetting.json file when you launch an application. You can set the environment to any value, but .NET Core supports three common values: Development, Staging, and Production. Development: The Development environment can enable features that should not be enabled in Production environment. Staging: The Staging environment is used primarily to test all the installation/configuration/migration scripts and procedures before they are applied to a Production environment. In addition, staging is used to run performance test, particularly load test, since this is often sensitive to the environment. Production: The Production environment should be selected to maximize security, performance, and application robustness. Production environment differs from the Development environment in a variety of ways: caching; client-side resources are bundled, minified, and potentially served from a CDN; diagnostic error pages disabled; friendly error pages enabled; production logging and monitoring enabled. Note that if the environment isn’t set, it defaults to Production. |
| App URL | Designates the location of the Web application you want to debug. Use semi-comma to separate URLs if there is more than one URL. There are two default URLs (https://localhost:5001 and http://localhost:5000). |
Signing
The Signing settings allow you to sign the application and deployment manifests and also to sign the strong named assembly. To access these settings, click the Signing tab in the project designer.
Sign the assembly
You can enable this check box to sign the assembly and create a strong name key file. Enabling this option allows you to sign the assembly using the Al.exe tool supported by the Windows Software Development Kit (SDK).
Choose a strong name key file
You can specify a new or existing strong name key file that can be used to sign the assembly. Select New to create a new key file or Browse to choose an existing one. If you select New, the Create Strong Name Key dialog box pops up, which allows you to designate a key file name and protect the key file with a password. The password must be at least six characters in length. If you specify a password, a Personal Information Exchange (.pfx) file is created. If you don’t specify a password, a Strong Name Key (.snk) file is created. The two types of files are briefly introduced in the following table.
If you build a project with one of the key files created, the created file will be used to sign the assembly.
File Type Description .pfx file Contains certificate and its public and private keys. It is used for code signing and serves to prevent malicious tampering with assemblies distributed publicly. .snk file Contains the strong key. It is used for strong-naming, which uses a key pair to uniquely identify an assembly. Delay sign only
You can enable this check box to delay assembly signing. If you enable this option, your project cannot be debugged and will not run. However, you can use the strong name tool (Sn.exe) with the
-Vroption to skip verification during development.
You can view the components (for example, .dll files) in the compiled project files to check if an assembly is signed.
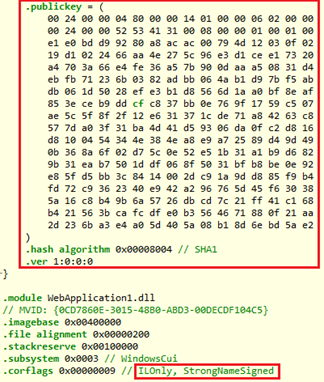
This image indicates that an assembly is signed.
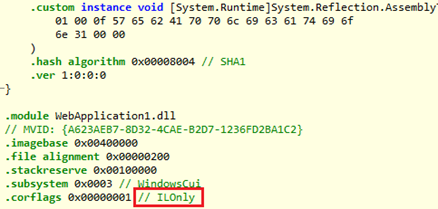
This image indicates that an assembly is not signed (probably because the Sign the assembly option is not enabled).
If you enable the Delay sign only option, you will obtain the public key but the assembly is currently not signed.
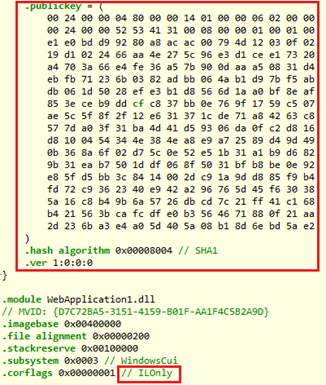
Configuring solution properties
A solution configuration specifies how projects in the solution are to be built. To configure the Solution Properties, right-click your solution node in Solution Explorer, and then select Properties so that the Solution Properties dialog box pops up.
Startup project
The Startup Project options allow you to specify which project to run when you launch the SnapDevelop debugger. To configure the Startup Project settings, expand the Common Properties node, and then select Startup Project.
Current selection
Enable this option if you want the current project to run when you launch the SnapDevelop debugger.
Single startup project
Enable this option if you want any project to run when you launch the SnapDevelop debugger.
Project dependencies
When you build a solution, you need to build some projects first in order to generate executable code that can then be used by the other projects. The Project Dependencies settings allow you to determine the desired build order for projects in your solution. To configure the Project Dependencies settings, expand the Common Properties node, and then select Project Dependencies.
Projects
The dropdown list has all projects in your solution. You can select any project that uses executable code generated by another project or other projects.
Depends on
You can select any project that generates executable code used by the project you selected in the Projects dropdown list.
Note that circular dependency is not allowed. For example, if project A depends on project B, which in turn depends on project C, then project C cannot depend on project A or project B and project B cannot depend on project A.
Please also note that the projects selected on the Depends on pane may not be actually built. Whether the projects are built or not depends on the selection of the check boxes for the projects in the active solution build configuration.
Configuration properties
The Configuration Properties settings allow you to manage the various properties for the entire solution. You can decide whether to build a particular project, and what configuration of a particular project to build on what development platform. To configure the Configuration Properties settings, expand the Configuration Properties node, and then select Configuration.
Configuration manager
When you click Configuration Manager... in the Solution Properties dialog, the Configuration Manager dialog box displays and allows you to create and specify configurations and platforms at both the solution level and the project level.
Active solution configuration
Specifies what configuration is built at the solution level when you select Build Solution on the Build menu. You can select one of the two default configurations - Debug and Release, or you can add new ones. If you realize that an existing configuration name is not appropriate, you can rename it. If you do not need a particular configuration anymore, you can remove it from the Active Solution Configuration box. This will remove all solution and project configurations you specified for that combination of configuration and platform.
To add a new configuration:
Select <New> from the Active Solution Configuration box.
Enter a name for the new configuration on the New Solution Configuration window.
Select a configuration from the Copy settings from box if you want to use the settings from an existing solution configuration or select <Empty> otherwise.
Select the Create new project configurations check box if you want to create project configurations simultaneously.
To rename a solution configuration:
Select <Edit> from the Active Solution Configuration box.
Select the configuration you want to modify on the Edit Solution Configurations window.
Click Rename and then enter a new name.
To remove a solution configuration:
Select <Edit> from the Active Solution Configuration box.
Select the configuration you want to remove on the Edit Solution Configurations window.
Click Remove.
Active solution platform
Specifies the solution-level development platform you want your solution to target. The development platform defaults to Any CPU, but you can also create new platforms. If you realize that an existing platform name is not appropriate, you can rename it. If you do not need a particular platform anymore, you can remove it from the Active Solution Platform box. This will remove all solution and project configurations you specified for that combination of configuration and platform.
To create a new solution platform:
Select <New> from the Active Solution Platform box.
Select a new platform (x64 or x86) from the Type or select the new platform box.
Select a platform from the Copy settings from box if you want to use the settings from an existing solution platform or select <Empty> otherwise.
Select the Create new project configurations check box if you want to create project platforms simultaneously.
To rename a solution platform:
Select <Edit> from the Active Solution Platform box.
Select the platform you want to modify on the Edit Solution Platforms window.
Click Rename and then enter a new name.
To remove a solution platform:
Select <Edit> from the Active Solution Platform box.
Select the platform you want to remove on the Edit Solution Configurations window.
Click Remove.
Project contexts
Although the combination of configuration and development platform has been specified at the solution level when you specify active solution configuration and active solution platform, Project Contexts allows you to finally decide whether to build a particular project, and what configuration of the project to build on what development platform. The following table lists the various project contexts and their respective meanings.
| Item | Description |
|---|---|
| Project | Lists all projects in your solution. |
| Configuration | Lists the type of build currently active for each project. You can select Debug, Release, or any custom configuration from the dropdown list. You can perform the same operations as you set the active solution configuration. But the configurations you specify here are applicable project-wide only. |
| Platform | Selects the development platform you want your project to target. You can perform the same operations as you set the active solution platform. But the platform you select here applies project-wide only. |
| Build | Specifies whether to include a particular project when you build the solution. The check boxes for all projects are selected by default, but you can uncheck the box(s) for the project(s) you don’t want to build. |
Configuration
Displays the results of your setting of the Active Solution Configuration in Configuration Manager.
Platform
Displays the results of your configuration of the Active Solution Platform in Configuration Manager.
Project contexts
Displays the results of your configuration of the project contexts in Configuration Manager. Note that the configurations specified in Configuration Manager can be modified here. The modifications made here are equivalent to those made in Configuration Manager. If you have modified the project contexts properly, you need to click Apply to validate such modifications.
Building, rebuilding, or cleaning projects and solutions
After you have configured the project properties and solution properties, you can then build, rebuild, or clean the projects and solutions.
Building, rebuilding, or cleaning a single project
You can take the following steps to build, rebuild, or clean a single project.
Select the node of a project you want to build/rebuild/clean in Solution Explorer.
Select Build on the menu bar, and then select one of the following options:
Option Description Build ProjectName Compiles only the project files that have changed since the project was most recently built. Rebuild ProjectName Cleans the project and then builds all project files. Clean ProjectName Removes all compiled project files (such as .dll files and .exe files).
Building, rebuilding, or cleaning an entire solution
You can take the following steps to build, rebuild, or clean an entire solution.
Select the solution node in Solution Explorer.
Select Build on the menu bar, and then select one of the following options:
Option Description Build Solution Compiles only the solution files that have changed since the solution was most recently built. Rebuild Solution Cleans the solution and then builds all solution files. Clean Solution Removes all compiled solution files (such as .dll files and .exe files).
Chapter 7. Source Control
SnapDevelop currently supports two types of source control systems:
- SnapDevelop Git;
- SnapDevelop SVN (To use SnapDevelop SVN, make sure that you have installed TortoiseSVN 1.9 or a later version).
This section describes how you can perform source control using SnapDevelop Git or SnapDevelop SVN in SnapDevelop. You will learn how to:
- Configure source control plug-in;
- Work with Git source control using SnapDevelop Git, including:
- Create a Git repository;
- Connect to a Git repository;
- Commit changes to a Git repository;
- Sync code changes to a Git repository;
- Share code among the team;
- View Git commit history;
- Work with Subversion source control using SnapDevelop SVN, including:
- Import code into a Subversion repository;
- Check out a working copy of a Subversion repository;
- Commit changes to a Subversion repository;
- Update a local working copy;
- Merge different revisions;
- Resolve conflicts;
- Lock/release a file.
Configuring source control plug-in
Two source control plug-ins, SnapDevelop Git and SnapDevelop SVN, are provided by default when you install SnapDevelop. In SnapDevleop IDE, you can add a solution (instead of single projects) to Git source control which uses SnapDevelop Git plug-in, or Subversion source control which uses SnapDevelop SVN plug-in.
Although you cannot add a solution to two different source control systems directly in SnapDevelop IDE, you may do it using a third-party source control client. If your solution is in the repositories of two different source control systems at the same time, you can decide which source control system to use for the solution in the SnapDevelop IDE using the Plug-in Selection option.
Working with Git source control using SnapDevelop Git
Git source control allows you to fully copy a remote repository housing the source code to your own computer. You can then commit the changes on your own computer and perform source control operations without network connection. When you need to switch contexts, you can create a private local branch. You can quickly switch from one branch to another to pivot among different variations of your codebase. Then, you can merge, or publish the branch.
Creating a Git repository
Manage a SnapDevelop solution in Git by creating a repo for them. Later you can connect this Git repo to a remote Git repo to share your work with others.
Creating a local Git repository
From an existing solution
To create a repository from an existing solution not in source control, select Add to Source Control in the bottom right corner of the SnapDevelop IDE and click SnapDevelop Git. This creates a new Git repository in the same directory as your solution and opens up the Push view in Team Explorer, which allows you to push your code to a remote Git repository.

In an empty folder
Open the Connections view by selecting the Manage Connections icon in Team Explorer. Under Local Git Repositories, select New and enter a folder where the repository will be created. This directory must be empty. Then, select Create to create the repository.
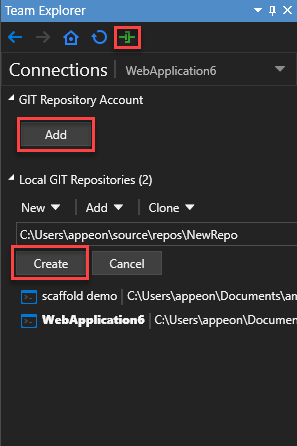
Creating a remote Git repository
You may need to create a remote Git repository to which your local repository can connect so that you can share your code with other developers. For the purpose of demonstration, we signed up for the Bonobo Git Server and created a new Git repository.
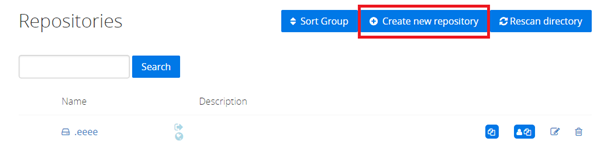
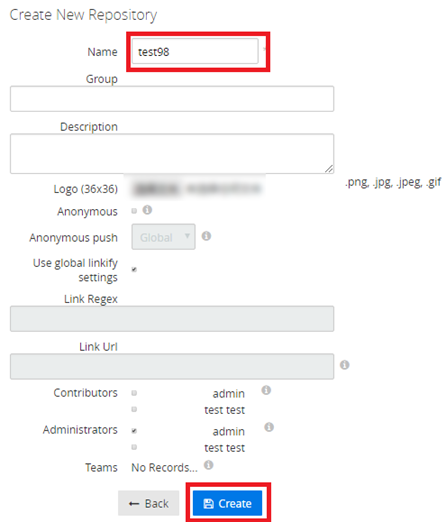
Cloning an existing Git repository
In the Connections page in Team Explorer, you can copy an existing Git repository to your local computer. Before you can copy the Git repository, you are required to provide its URL, which represents the source of the repository you want to clone. If you want to clone a particular Git repository on the Bonobo Git Server, for example, you simply select the repository and then copy the Git URL.

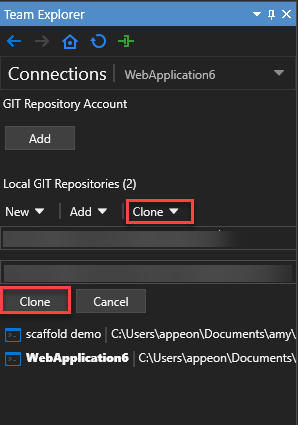
Connecting to a remote Git repository
To connect a local repository to a remote Git repository to share your code, go to the Settings page in Team Explorer. Under Remotes, select Add. Enter ‘origin’ in the Name field and enter the clone URL for your repository in the Fetch field. Make sure that Push matches fetch is checked and select Save.
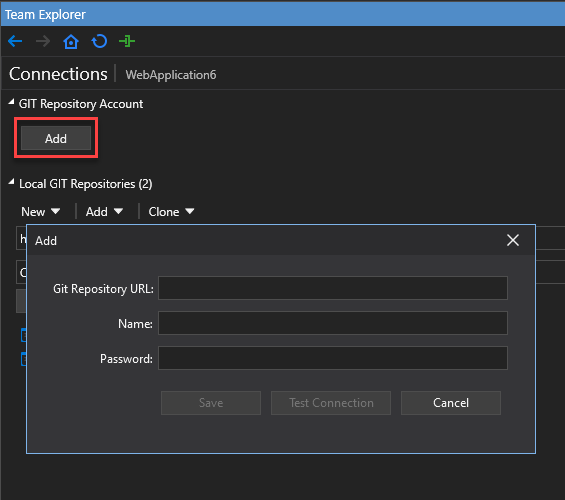
Specifying global settings
To navigate to Settings, click Home icon and select Settings.

Providing user name and email
You need to specify the user name and Email address so that your team members can know exactly who committed changes to the branches and, if necessary, contact the user who committed the changes.
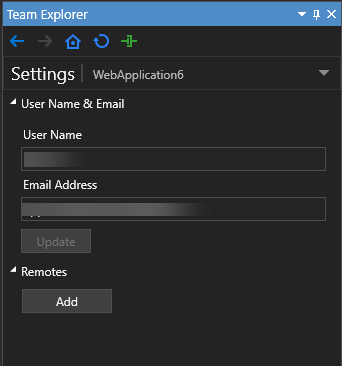
Adding remotes
You need to add a remote Git repository so that you can specify the name of the remote repository (usually ‘origin’) and the URL of the repository that you can use for fetch and push purposes. The push and fetch URLs are the same by default. If you want them to be different, you can uncheck the Push matches fetch box.

Working with Git tags
Creating a tag
In SnapDevelop, you can create lightweight tags, which are a pointer to specific commit. To create a tag, you need to:
In Home page, select Tags and then Create Tag.
To select a branch to create a tag from, designate a tag name in the Enter a tag name box (no space allowed), optionally supply a tag message, uncheck the Create tag against tip of current branch box, select a branch from the Select a branch dropdown list and select Create Tag.

To create a tag against the tip of the current branch, designate a tag name in the Enter a tag name box (no space allowed), optionally supply a tag message, check the Create tag against tip of current branch box, and select Create Tag.
Right-click the new tag and select Push to push it to the remote repository. Select Push All to push all new local tags to the remote repository.
Deleting a tag
To delete a local tag, you right-click the tag to delete and select Delete Locally.

Creating a branch from a tag
Take the following steps to create a branch from a tag:
Select Create Branch From Tag; Alternatively, right-click a tag and select New Local Branch From.
Specify a branch name, select a tag from the local tag list, optionally check the Checkout branch box (if you want to check out the newly created branch) and then select Create Branch.

Select Branches from the Home view to view your newly created branch.

Right-click the new tag and select Push Branch to push the branch to the remote repository.
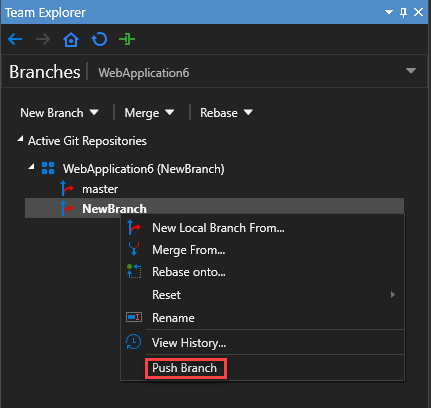
Viewing tags
Viewing tags in the tags view
You can select Tags from the Home view to view all tags in a local repository. All tags are listed under the currently connected repository. If you want to learn more about the tagged commit, you can right-click the tag and then select View Commit Details.
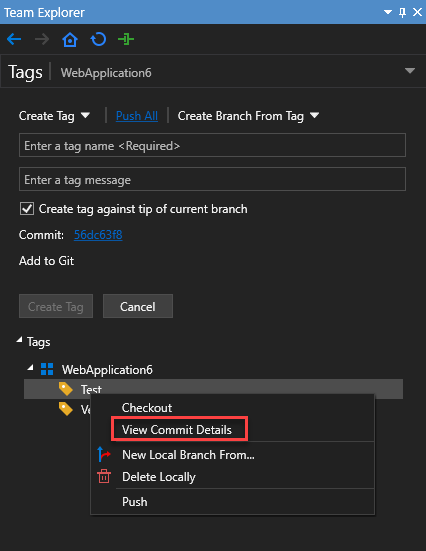
Viewing tags in the history view
You can also view tags by following the steps below:
Navigate to the Branches view.
Right-click the desired branch.
Select View History from the right-click context menu.
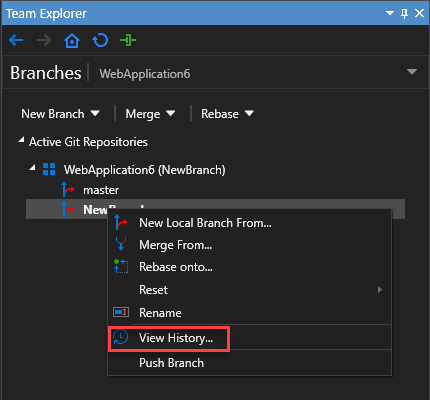
Select the Show Tags icon in the upper left corner of the History view that appears.

Saving changes with commits
When you have finished editing the files in Solution Explorer, you can go to the Changes page in Team Explorer to commit your changes to your repository. Git does not automatically snapshot your code as you edit the files in your local repository. You need to tell Git exactly what changes you want to add to the next snapshot before you can create a commit to save the snapshot to your repository.
You are offered three commit options:
Commit All, which means that you can commit all changes to the local branch.
Commit and Push, which means that you can commit all changes to the local branch and then push the changes to the remote repository.
Commit and Sync, which means that you can commit all changes to the local branch and then synchronize synchronizes the commits on the local and remote branch.

A commit contains the following information:
A brief description of what changes you have made in the commit.
A snapshot of the changed files saved in the commit.
A reference to the parent commit(s).

Working with Git branches
Git branches are simply a reference that records the history of commits. A Git branch allows you to isolate changes for a feature or a bug fix from the master branch, which makes it very easy to change what you are working on by simply changing your current branch. You can create multiple branches in a repository and work on a branch without affecting the other branches, and you can share branches with your team members without merging the changes into the master branch.
It is easy to switch between branches in the same repository because the branches are lightweight and independent. When working with branches, Git uses the history information stored in commits to recreate the files on a branch, rather than creating multiple copies of your source code.
Creating a Git branch
Take the following steps to create a Git branch:
In Team Explorer and then open the Branches view.
Right-click the parent branch (usually master) to base your changes and then select New Local Branch From.
Give a branch name in the required field, (optionally) check the Checkout branch box (SnapDevelop automatically checks out to the newly created branch), and then click Create Branch.

Deleting a Git branch
Take the following steps to delete a Git branch:
In Team Explorer and then open the Branches view.
Locate the branch you want to delete. Make sure the branch is not checked out since you can't delete the branch you are currently working in.
Right-click the branch name and select Delete.
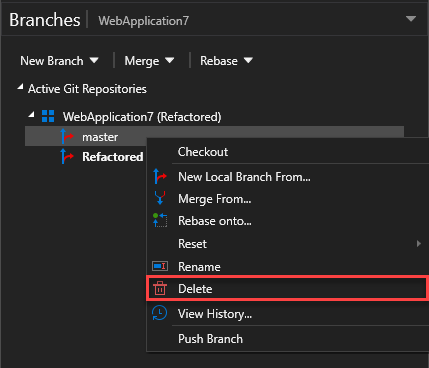
Sharing code with Push
If you have committed changes to the branches in the local repository, you can then share your code with team members by pushing your local branches to the remote repository. Your commits are added to an existing remote branch or to a new remote branch that contains the same commits as your local branch. Team members can then fetch or pull your commits from the remote repository and review the commits before merging them into the master branch of their local repository.
Take the following steps to share your code in the local repository:
In Team Explorer, select Home and then Sync; or, click the title of the current view and select Sync.
Select Push to upload your commits to the remote branch.
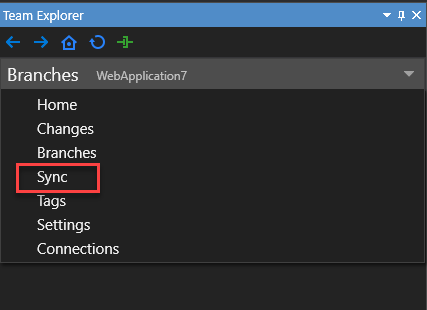

Updating code with Sync, Fetch, Pull, Merge and Rebase
Synchronizing local/remote commits with Sync
The Sync command pulls remote changes and then pushes local ones. It synchronizes the commits on the local and remote branches.
Take the following steps to synchronize the local/remote commits:
In Team Explorer, select Home and then Sync.
Select Sync.

Downloading changes with Fetch
The Fetch command allows you to download all commits and new branches pushed to the remote repository but absent in your local repository into your own local repository. It downloads the new commits for your review only, without merging any changes into your local branches.
Take the following steps to fetch changes from the remote repository:
In Team Explorer, select Home and then Sync.
Select Fetch.

Fetching and merging with Pull
The Pull command performs a fetch and then a merge to download the commits and integrate them into your local branch.
Take the following steps to perform a pull operation.
In Team Explorer, select Home and then Sync.
Select Pull.

Updating branches with Merge
The Merge command takes the commits retrieved from fetch and integrates the latest changes from one branch into another.
Take the following steps to merge the latest changes from one branch into another:
In Team Explorer, select Home and then Branches.
Check out your target branch and then select Merge.
Select a source branch from the Merge from branch dropdown list.
Check the box for Commit changes after merging (optional) and then select Merge.
Note
If any merge conflict occurs, you will see a message reminding you to resolve the conflict and commit the change. Refer to Resolving Merge Conflicts for instructions on how to resolve merge conflicts.
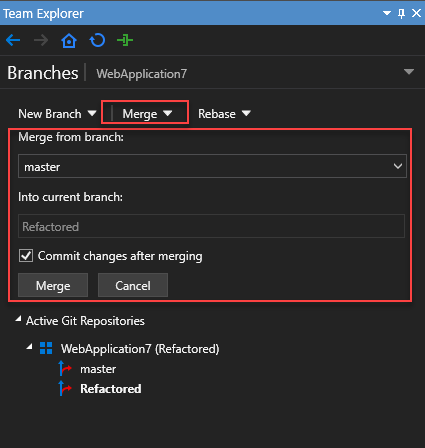
Updating branches with Rebase
Rebase serves to address the problem of updating a branch with the latest changes from the main branch. It takes the commits in your current branch and replays them on the commit history of another branch. The commit history of your current branch will be rewritten so that it starts from the most recent commit in the target branch, thus keeping a clean commit history.
Take the following steps to perform a rebase operation:
In Team Explorer, select Home and then Branches.
Check out your source branch for rebasing and then select Rebase.
Select a target branch from the Onto branch dropdown list.
Select Rebase.
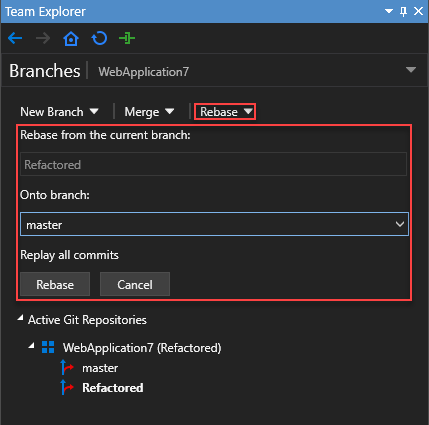
Resolving merge conflicts
If any merge conflicts occur, you need to resolve the conflicts manually.
Reviewing commit history
Git manages a full history of your development by using the parent reference information stored in each commit. The commit history allows you to figure out when file changes are made, who made the changes, and what differences exist between the various versions of commits.
To review the commit history, you:
Navigate to the Branches view.
Right-click the desired branch.
Select View History from the right-click context menu.
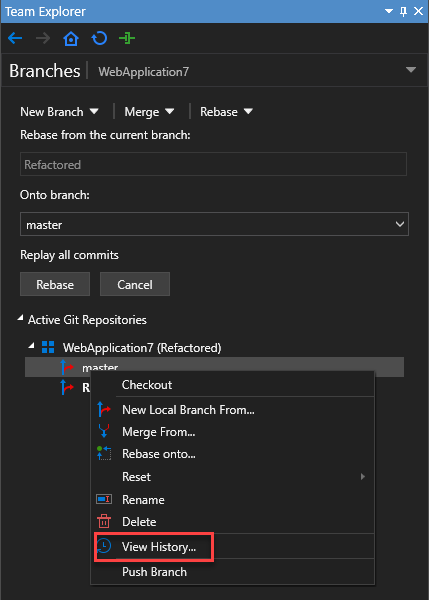
Working with Subversion source control using SnapDevelop SVN
Subversion source control system maintains all your files, including a complete history of all changes to the files, in a central database called repository. With SnapDevelop SVN in SnapDevelop, you can save changes to your repository with commits, show what changes are made to the repository and who makes the changes, merge various revisions, update your code to a particular revision, and resolve conflicts, if any.
Importing code into a Subversion repository
To use SnapDevelop SVN for source control, you need to select Add to Source Control in the bottom right corner of the SnapDevelop IDE and then select SnapDevelop SVN.

Then, verify the working copy root.
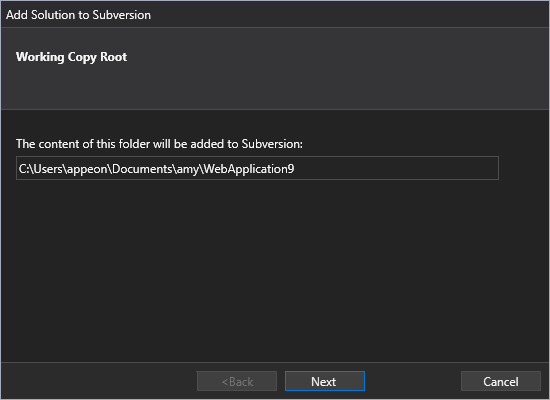
Importing code into a new repository
If you want to import your solution to a new repository, you should:
Select the New Repository radio button.

Specify the location of the new repository. The new repository can be created on the local disk or on a remote server.
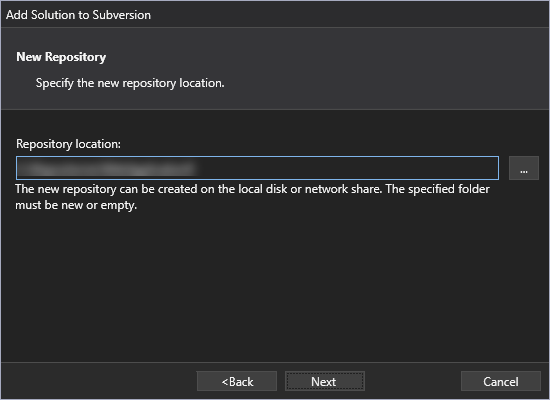
Select Import to add your solution to the new repository.

Select Finish to close the Add Solution to Subversion dialog box.
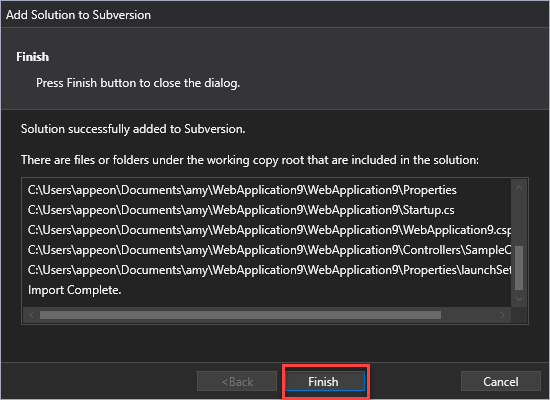
Importing code into an existing repository
If you want to import your solution to an existing repository, you should:
Select the Existing Repository radio button.

Enter the URL of the existing repository.
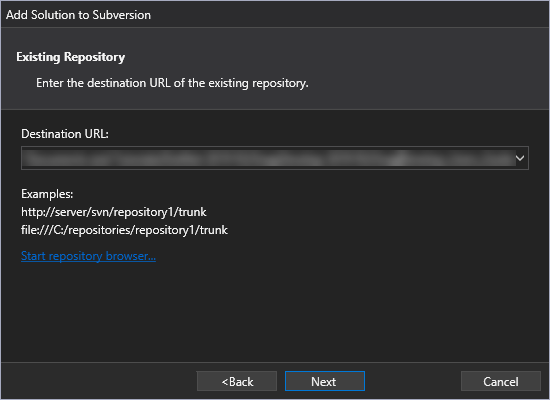
Select Import to add your solution to the existing repository.
Select Finish to close the Add Solution to Subversion dialog box.
Checking out a working copy
You need to check out a working copy from the connected repository. In so doing, you need to specify a directory where you want to place your working copy. Right click in the directory so that the context menu pops up and then select the SVN Checkout command.

In the Checkout dialog box that appears, specify the URL of the repository and the checkout directory, and leave the default settings unchanged.

Committing changes to the connected repository
When you have checked out a working copy from the repository, you can edit and modify the files in Solution Explorer. When you have finished modifying a file, you can commit your changes to the remote repository so that other team members can see your changes and update the changes to their own local working copy.
Note: It is recommended that you always commit the whole project or solution folder instead of a single file or folder. If you commit a single file or folder, it is possible that another user may fail to get the updated version correctly.
To save changes with commits, you simply select the modified project, or solution and then select Commit from the right-click context menu.

Then, you will see the Commit dialog box, which displays the changed files, such as versioned, non-versioned, added, and deleted files. The changed files are selected by default. If you don’t want a changed file to be committed, you can simply uncheck that file. If you want to commit a non-versioned file, you can check that file. You can quickly check or uncheck files by clicking the links immediately above the list of displayed items. In addition, you need to enter a message that describes the changes you have made so that your team members can know what happened.
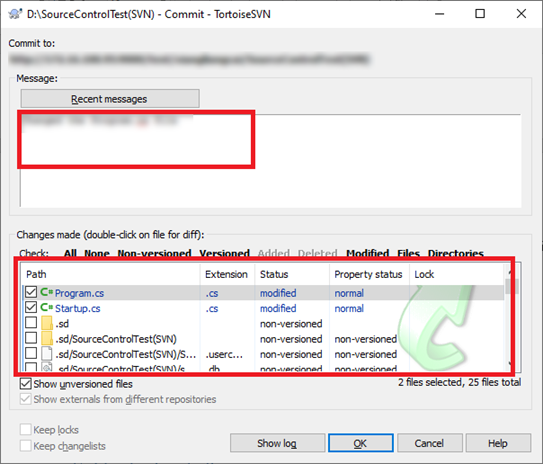
Updating your local working copy
When working on a project involving multiple developers, you should periodically ensure that the changes made by your team members are updated into your local working copy.
Note: It is recommended that you always update the whole project or solution folder instead of a single file or folder. If you update a single file or folder, it is possible that you may fail to get the updated version correctly.
Two update options are offered in SnapDevelop: update to the latest revision and update to a non-latest revision.
Updating to the latest revision
To update your local working copy with the latest changes from the remote repository, you simply select a desired project, solution, or directory, and select Update from the right-click context menu.

Updating to a non-latest revision
To update your local working copy with the changes from a specific earlier revision, you need to:
Select a desired project, solution, or directory.
Select SnapDevelop SVN and then Update to Revision from the right-click context menu.
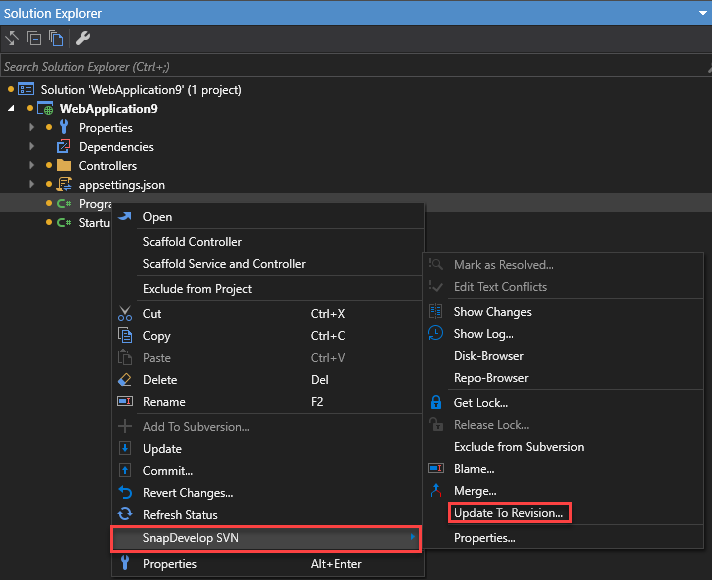
Specify the specific revision.
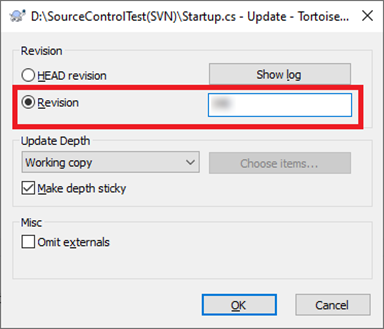
Reverting changes
If you change a file in your solution and you find that the changes are not appropriate, you can undo the changes by right-click the modified file and select Revert Changes. Note that you can revert changes only when they are not committed to the Subversion repository.

Refreshing status
After a project is loaded into the SnapDevelop IDE, it might be changed outside the IDE. For example, if a developer merges certain changes from the other revisions, such changes will not be detected by the SnapDevelop IDE. Therefore, you need to reload the project into the IDE by selecting an affected file, folder, project or solution and selecting Refresh Status from the right-click context menu.
Showing change lists
When you have modified the files, you can view the changes by selecting a modified file, project, or solution and then SnapDevelop SVN > Show Changes from the right-click context menu before committing the changes to the Subversion repository.
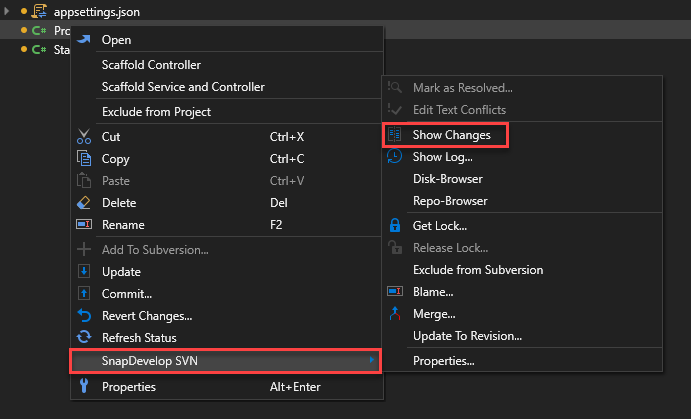
Showing revision logs
For every change you make and commit, you should provide a log message so that you can later figure out what changes you made and why you made such changes.
To view the file revision logs, you need to select a particular file, folder, project, or solution and then SnapDevelop SVN > Show Log from the right-click context menu.

Specifying Subversion properties
You can read and set the Subversion properties in the Subversion property page. To go to this page, select a particular file, folder, project or solution and SnapDevelop SVN > Properties from the right-click context menu.
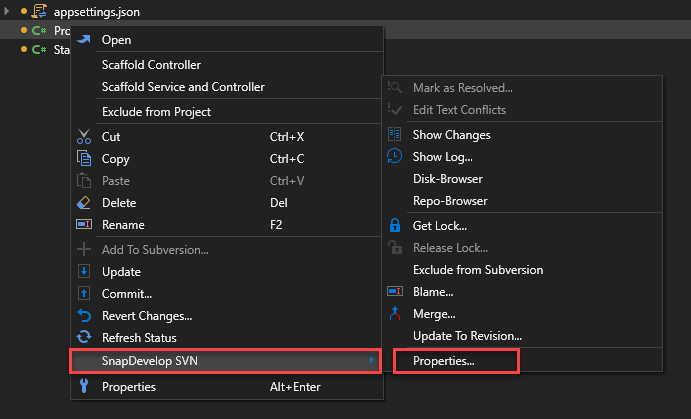

Merging
Branches are used to maintain separate lines of development. At some stage of development, you need to merge the changes made on one branch back into the trunk, or vice versa. SnapDevelop allows you to perform two types of merge: merge a range of revisions and merge two different trees.
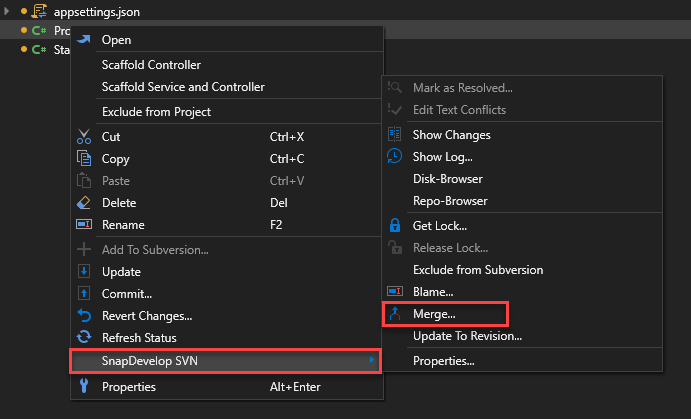
Merging a range of revisions
To merge a range of revisions, you need to:
Specify the URL of the branch that contains the changes you want to incorporate into your local working copy.
Specify the list of revisions you want to merge.

Merging two different trees
To merge two different trees, you need to:
Specify the URL of the trunk in the From field.
Specify the URL of the feature branch in the To field.
Enter the revision number at which the two trees are synchronized in both the From and To fields.
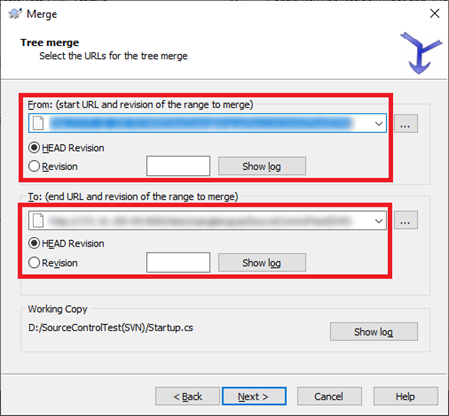
Resolving conflicts
Conflicts may occur when more than one developer is changing the same lines of code in the same file and committing the changes to the shared repository.
If any conflict occurs, you will see the name of the conflicted file(s) and a warning message.
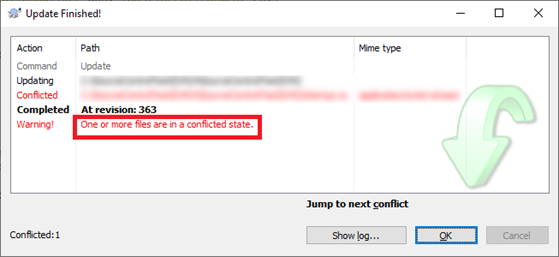
In Solution Explorer, the conflicted file(s) will be marked with a little red dot. You have to resolve the conflict(s) manually if you want to synchronize the code successfully.
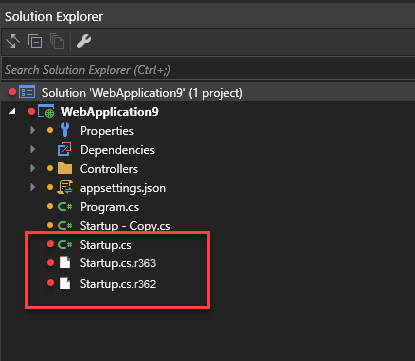
Editing text conflicts
To resolve conflicts, you need to:
Select the conflicted file (marked with little red dot).
Select SnapDevelop SVN and Edit Text Conflicts from the right-click context menu.
Edit the text conflicts.
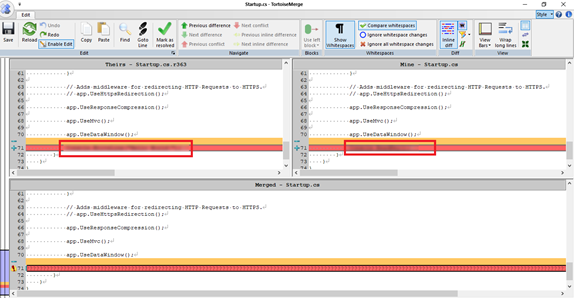
Marking as resolved
When you have resolved the text conflicts, you can mark them as resolved by selecting SnapDevelop SVN > Mark as Resolved from the right-click context menu.
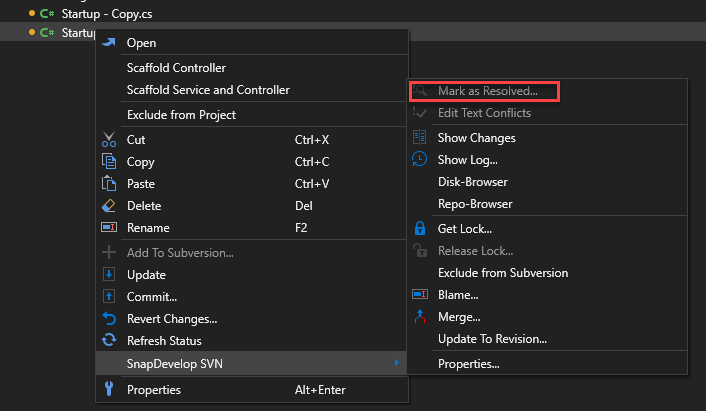
Locking
No file is locked by default and any team member who has commit access can commit changes to any file in the repository. If you lock a file, only you can commit changes to that file, and commits by other team members will be rejected until you release the lock. A locked file cannot be modified in any way in the repository.
Getting a lock
To lock a file, you simply select the file in your working copy and then select SnapDevelop SVN > Get Lock.

Then, you will see the Lock Files dialog box, where you can optionally enter a message so that your team members can see why you have locked the file. If you want to steal the locks from someone else, you can check the Steal the locks box.
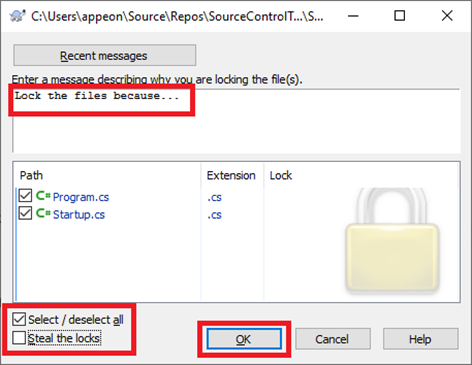
Releasing a lock
To release a lock, you should first know which file is locked. Locked files are displayed in the commit dialog box and selected automatically. If you proceed with the commit, the locks on the selected files are removed even if the files haven’t been modified. If you don’t want to unlock particular files, you can uncheck them. If you want to keep a lock on a file you have modified, you have to check the Keep locks box before committing your changes.
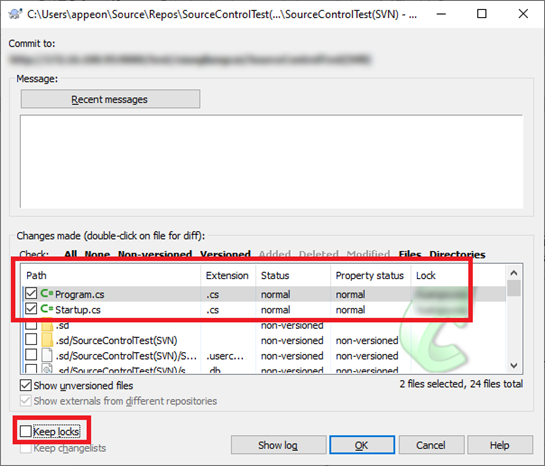
You can release a lock manually by selecting the locked file in your working copy and then selecting SnapDevelop SVN > Release Lock.
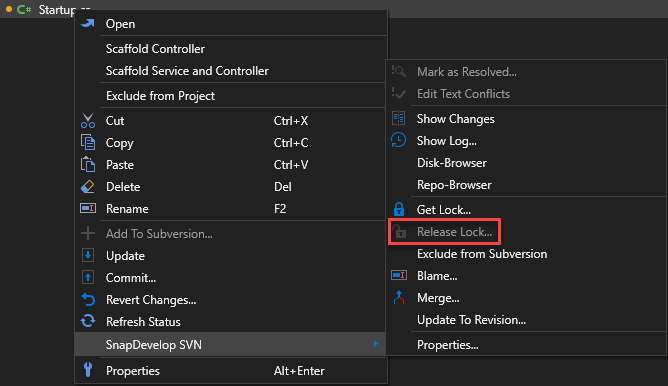
Tracking changes with Blame
Blame displays the author and revision information for the specified files or URLs. Each line of text is annotated at the beginning with the user name and the revision number for the last change to that line.

Showing disk-browser and repo-browser
The repository browser allows you to view the structure and status of the repository and to work directly on the repository without checking out a working copy.
To display the repository in your local disk, select a file, folder, project or solution and SnapDevelop SVN > Disk-Browser.

To display the repository in the repository browser, select a file, folder, project or solution and SnapDevelop SVN > Repo-Browser.

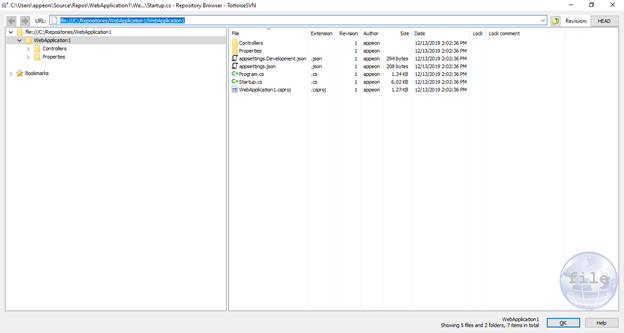
Excluding from Subversion/adding to Subversion
Sometimes you don’t want to commit all edited files into the central Subversion repository. In the event that you want to selectively commit the edited files, you can do this by selecting the files you don’t want to include in the repository and selecting SnapDevelop SVN > Exclude from Subversion.
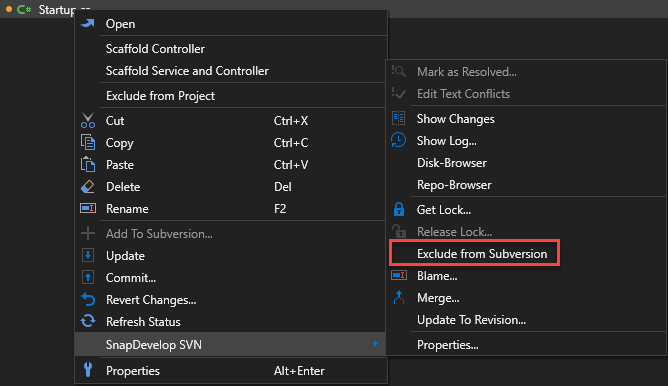
When you have excluded a file from Subversion, the little (yellow or green) dot preceding the file in Solution Explorer disappears. You can add the file to Subversion by selecting the file and then Add to Subversion from the right-click context menu.

Chapter 8. Working with Database Connections
This section teaches you how to work on databases, such as viewing data from the database, drafting and executing SQL statements, and creating C# models from the database tables.
The Appendix D: Database Connection Settings at the end of the document lists the databases that are supported by this feature, and the related connection settings.
For step-by-step instructions on how to connect with different databases in SnapDevelop, refer to Tutorial: Database Connection in SnapDevelop.
Managing Database Connections
Creating a Database Connection
Use the Database Connection dialog to create a database connection. There are three ways to open the Database Connection dialog:
Right-click on the project node in Solution Explorer and then select Add > New Item. Select to add a DataContext item for the project.
Select Tools > SQL Query > New Query.
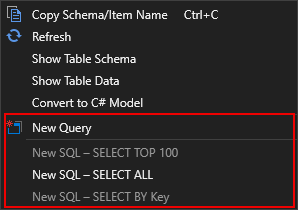
Select View on the top menu bar, and then select DB Server Explorer. In the DB Server Explorer, click on the Connect to the database icon to open the Database Connection dialog.

To create a database connection:
In the Database Connection dialog, click New to configure the database connection. If you have already created a database connection and selected the option Remember this connection for the connection, you can directly use the existing connection by selecting it from the list of Connection name, or click Edit to modify the settings. To rename an existing connection, type the new name in the Modify the connection name to field.
Select a data source from the Database provider list.
Configure the basic and advanced connection settings for the selected data source.
Refer to Appendix D: Database Connection Settings for the settings to configure for each data source
Click Test Connection to check the connection state.
Check the connection string in the Database Connection dialog to make sure the properties are configured as expected. You may also copy the connection string to use it elsewhere.
If you have successfully established a connection to the database, you are now ready to access the database objects in the database in DB Server Explorer, including tables, views, stored procedures, functions, and triggers.
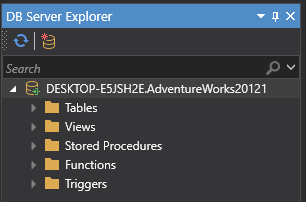
Note: If the database is connected via ODBC, SQL Query cannot get access to the stored procedures, functions, or triggers in the database.
Changing a Database Connection
After you have successfully connected to a database, you are able to change the database connection by the right-click menu. You can refresh, delete, modify, or close the database connection, or define a query based on the connection.

Refresh
After you have successfully created a connection to a database, some modifications might be made to the database. In this case, you can select Refresh to update the database.
Convert to C# Model
You can generate C# models from database tables. See Convert to C# Model for more information.
Delete
If you want to remove a database connection, you can right-click on the connected database and then select Delete.
Modify Connection
If you want to modify certain database connection properties, you can right-click on the connected database and then select Modify Connection, which leads you back to the Database Connection page.
Close Connection
Connections are a limited and relatively expensive resource. Therefore, you should always close the connection when you don't have to use it anymore so that it is returned to the connection pool.
New Query
Check the Querying section for steps on creating and executing SQL queries.
Working on Database Objects
After you have successfully connected to a database, you can work on the database objects in the database in DB Server Explorer, including tables, views, stored procedures, functions, and triggers. You can do this by right-clicking on the object and selecting one of the pop-up menu options:
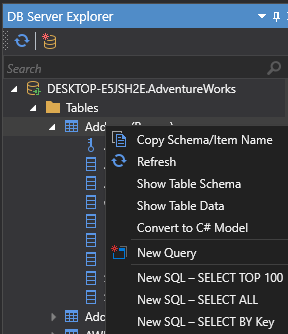
Common Operations
Filter
If you want to search for particular items from a database object that contains too many items, you can use the search box at the top of DB Server Explorer to filter the items based on the supplied criteria.
Copy Schema/Item Name
Copies the name of the selected item in the folders so that you don't have to type every segment manually when you are writing your SQL statements.
Refresh
If some modifications have been made to the connected database, you can select Refresh for a particular folder so as to update the entire folder. In addition, you can select Refresh for a particular item in any folder so as to update the selected item.
Show Table Schema
Shows the collection of a table's relation schemas, which indicate the organization of data as a blueprint of how the table is constructed.
Note: If your database is connected via ODBC, SQL Query cannot show which column is the primary key for a table.
Show Table Data
Shows all data about the table you select.
Convert to C# Model
The function Convert to C# Model is provided for the convenience of generating C# models from database tables.
Note: Currently the table relationships (for example, master-slave) cannot be converted.
To convert database tables to C# models,
Right click the Tables node, or a table under the Tables node, in the DB Server Explorer, and select Convert to C# Model.
The C# Model Generator window opens.

Select the desired table(s) from which you want to generate C# models.
A default name is provided for the model to be generated. If you click on the name, the field becomes editable, and then you can change the name.
Select the C# model type.
SqlModelMapper -- to generate a SqlModelMapper model. SqlModelMapper is a SnapObjects model. For introduction on SqlModelMapper, please refer to this document: https://docs.appeon.com/snapobjects/api_reference/.
Standard C# Model -- to generate a standard C# model.
Select the model destination.
Project -- Select the target project and folder. The model will be generated as a .cs file and saved to the folder.
Clipboard -- The model will be generated and saved to the clipboard.
Select the overwrite strategy.
You can choose from the following three options if a model .cs file with the same name already exist in the target project folder:
Increment the file name -- to append a number (1, 2, 3...) to the end of the file name.
Overwrite the existing file -- to overwrite the existing model.
Skip the file -- to keep the existing model and the model with the same name will not be exported.
Click Export to generate the model (or model .cs file) and save it in the destination (folder or clipboard).
Querying
This section offers a walkthrough of how you can create and execute SQL queries.
Accessing the SQL Query editor
There are three possible ways to access the query editor:
Select Tools > SQL Query > New Query.
Select a table, view, stored procedure or function in the database treeview, and then select New Query from the right-click context menu.
Select a table, or view in the database treeview, and then select one of the three common SQL commands (New SQL - SELECT TOP 100, New SQL - SELECT ALL, and New SQL - SELECT BY Key) to automatically generate SQL statements.
New SQL - SELECT TOP 100
Automatically generates a SQL statement that selects the first 100 rows of data from the selected table. For example,
SELECT TOP 100 * FROM [Person].[ContactType];Note: This feature is not available if the database is connected via ODBC.
New SQL - SELECT ALL
Automatically generates a SQL statement that selects all data from the selected item in the Table or View folder. For example,
SELECT * FROM [Person].[ContactType];New SQL - SELECT BY Key
Automatically generates a SQL statement that selects from the selected table a row uniquely identified by the primary key. For example,
SELECT * FROM [Person].[ContactType] WHERE ContactTypeID = 1;Note: This feature is not available if the database is connected via ODBC.
Executing SQL queries
When you finish writing a SQL query, you can click the Execute icon to execute it.

Viewing query results
This section describes how you can select the format to view the SQL query execution results, split results panels, check the query message, etc.
You can choose to view the query results in one of the three different modes, grid, text, and file.
View Results as Grid
Displays the query results in grid format, which is the default format.
View Results as Text
Displays the query results in text format.

View Results as File
Displays query results in file format. If you choose this way to display your query results, you need to export the results to an external file.
If the SQL query contains multiple SQL statements, the option Split the Result panel into two (left and right) determines whether the returned results display horizontally, or vertically, side by side. As the screenshot below shows, if the option is enabled, the results display horizontally side by side.
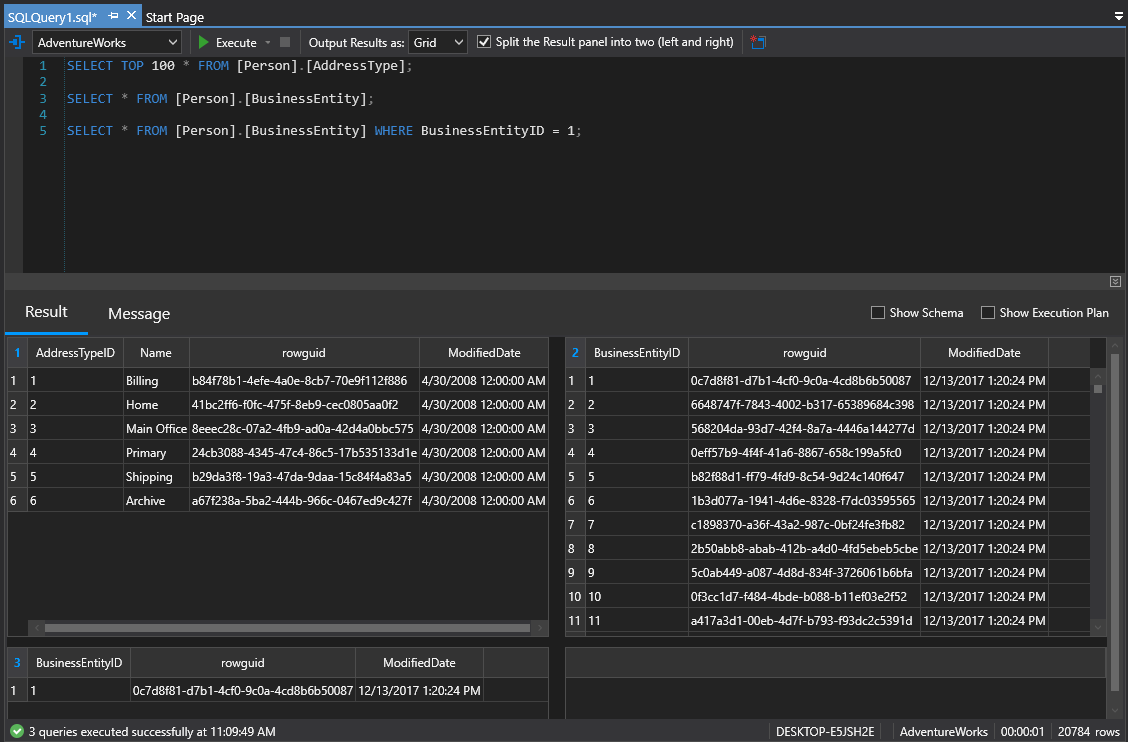
After the SQL statements are executed, a message displays in the Message tab, indicating the state of the query execution.

Showing Schema
You can enable this option to view the collection of the relation schemas for the table(s) involved in your SQL statements.
Note: This feature is supposed to provide the same function as Show Table Schema, however, it cannot work as well as in Show Table Schema yet. For example, the data type information of the columns may be missing when you show schema here.
Showing Execution Plan
An execution plan is generated as a consequence of the query optimizer's effort to calculate the most efficient way to implement a particular SQL query. If you enable this option, you will see how a query was executed or how a query will be executed.

Note: This feature is not available if the database is connected via ODBC.
Dealing with Query Results
If you have chosen to display your query results in grid format, you can select a table item and then select an action you want to perform from the right-click context menu.
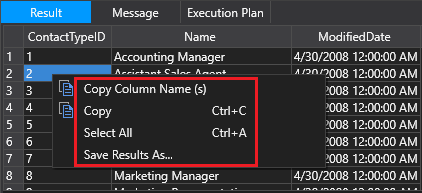
Copy
Copies a table item so that you can paste it to the SQL Query editor or to an external file.
Copy Column Name(s)
Copies the column name of the table so that you can paste it to the SQL Query editor or to an external file.
Select All
Selects all table items.
Save Results As
Exports the query results to an external CSV file.
Appendix A: Keyboard Shortcuts for SnapDevelop
The following table lists all keyboard shortcuts for SnapDevelop functionalities.
| Group | Functionality | Keyboard Shortcut |
|---|---|---|
| Menu | File | |
| New Project | Ctrl+Shift+N | |
| Open Project/Solution | Ctrl+Shift+O | |
| Open File | Ctrl+O | |
| Close | Ctrl+F4 | |
| Save | Ctrl+S | |
| Save All | Ctrl+Shift+S | |
| Exit | Alt+F4 | |
| Edit | ||
| Find in Files | Ctrl+Shift+F | |
| Replace in Files | Ctrl+Shift+H | |
| Undo | Ctrl+Z | |
| Redo | Ctrl+Y | |
| Cut | Ctrl+X | |
| Copy | Ctrl+C | |
| Paste | Ctrl+V | |
| Select All | Ctrl+A | |
| Format Document | Ctrl+K, Ctrl+D | |
| Format Selection | Ctrl+K, Ctrl+J | |
| Make Uppercase | Ctrl+Shift+U | |
| Make Lowercase | Ctrl+U | |
| Comment Selection | Ctrl+K, Ctrl+B | |
| Uncomment Selection | Ctrl+K, Ctrl+E | |
| Toggle Outlining Expansion | Ctrl+M, Ctrl+M | |
| Toggle All outlining | Ctrl+M, Ctrl+L | |
| Stop Outlining | Ctrl+M, Ctrl+P | |
| Collapse to Definitions | Ctrl+M, Ctrl+O | |
| CodeAssist | Ctrl+K, Ctrl+G | |
| Rename | Ctrl+R, Ctrl+R | |
| Retract Method | Ctrl+R, Ctrl+M | |
| Extract Interface | Ctrl+R, Ctrl+I | |
| View | ||
| Solution Explorer | Ctrl+Alt+L | |
| Error List | Ctrl+\, Ctrl+E | |
| Output | Ctrl+Alt+O | |
| Find Results | Ctrl+Alt+F | |
| Project | ||
| Add New Item | Ctrl+Shift+A | |
| Add Existing Item | Shift+Alt+A | |
| Properties | Alt+Enter | |
| Build | ||
| Build Solution | F6 | |
| Build Selection | Shift+F6 | |
| Debug | ||
| Stop Debugging | Shift+F5 | |
| Watch | Ctrl+Alt+W | |
| Locals | Ctrl+Alt+V | |
| Call Stack | Ctrl+Alt+C | |
| Threads | Ctrl+Alt+H | |
| Breakpoints | Ctrl+Alt+B | |
| Exception Settings | Ctrl+Alt+E | |
| Break All | Ctrl+Alt+Break | |
| Start Without Debugging | Ctrl+F5 | |
| Attach to Process | Ctrl+Alt+P | |
| Step Into | F11 | |
| Step Over | F10 | |
| Step Out | Shift+F11 | |
| Toggle Breakpoint | F9 | |
| Toolbar | Standard Toolbar Options | |
| Navigate Backward | Ctrl+- | |
| Navigate Forward | Ctrl+Shift+- | |
| New Project | Ctrl+Shift+N | |
| Open File | Ctrl+O | |
| Save | Ctrl+S | |
| Save All | Ctrl+Shift+S | |
| Cut | Ctrl+X | |
| Copy | Ctrl+C | |
| Paste | Ctrl+V | |
| Undo | Ctrl+Z | |
| Redo | Ctrl+Y | |
| Start Debugging | F5 | |
| Start Without Debugging | Ctrl+F5 | |
| Build Toolbar Options | ||
| Build | Shift+F6 | |
| Build Solution | F6 | |
| Cancel | Ctrl+Break | |
| Debugger Toolbar Options | ||
| Stop Debugging | Shift+F5 | |
| Break All | Clt+Alt+Break | |
| Step Into | F11 | |
| Step Over | F10 | |
| Step Out | Shit+F11 | |
| Text Editor Toolbar Options | ||
| Display Quick Info | Ctrl+K, Ctrl+G | |
| Comment out the selected lines | Ctrl+K, Ctrl+B | |
| Uncomment the selected lines | Ctrl+K, Ctrl+E | |
| Make Uppercase | Ctrl+Shift+U | |
| Make Lowercase | Ctrl+U | |
| Solution Explorer | Solution’s Right-Click Menu | |
| Search Solution Explorer | Ctrl+; | |
| Build Solution | F6 | |
| Paste | Ctrl+V | |
| Rename | F2 | |
| Properties | Alt+Enter | |
| Project’s Right-Click Menu | ||
| Build | Shift+F6 | |
| Cut | Ctrl+X | |
| Paste | Ctrl+V | |
| Remove | Ctrl+D | |
| Rename | F2 | |
| Properties | Alt+Enter | |
| Add New Item | Ctrl+Shift+A | |
| Add Existing Item | Shift+Alt+A | |
| Delete | Del | |
| Code Editor | .cs File’s Right-Click Menu | |
| Rename | Ctrl+R, Ctrl+R | |
| Go To Definition | F12 | |
| Go To Implementation | Ctrl+F12 | |
| Find All References | Shift+F12 | |
| Cut | Ctrl+X | |
| Copy | Ctrl+C | |
| Paste | Ctrl+V | |
| Toggle Outlining Expansion | Ctrl+M, Ctrl+M | |
| Toggle All outlining | Ctrl+M, Ctrl+M | |
| Stop Outlining | Ctrl+M, Ctrl+P | |
| Collapse to Definitions | Ctrl+M, Ctrl+O | |
| .js File’s Right-click Menu | ||
| Cut | Ctrl+X | |
| Copy | Ctrl+C | |
| Paste | Ctrl+V | |
| Output | Right-Click Menu | |
| Copy | Ctrl+C | |
| Go To Next Location | F8 | |
| Go To Previous Location | Shift+F8 | |
| Error List | Right-Click Menu | |
| Copy | Ctrl+C | |
| Next Error | Ctrl+Shift+F12 | |
| Find And Replace | Find And Replace | |
| Find in Files | Ctrl+Shift+F | |
| Replace in Files | Ctrl+Shift+H | |
| Quick Find | Ctrl+F | |
| Find Next | F3 | |
| Find Previous | Shift+F3 | |
| Quick Replace | Ctrl+H | |
| Debug | Toolbar’s Debug | |
| Watch | Ctrl+Alt+W | |
| Locals | Ctrl+Alt+V | |
| Call Stack | Ctrl+Alt+C | |
| Threads | Ctrl+Alt+H | |
| Breakpoints | Ctrl+Alt+B | |
| Exception Settings | Ctrl+Alt+E | |
| Locals | ||
| Copy | Ctrl+C | |
| Watch | ||
| Copy | Ctrl+C | |
| Delete | Del | |
| Call Stack | ||
| Copy | Ctrl+C |
Appendix B: List of Pre-build and Post-build Macros
The following table lists the macros and illustrates the meanings of individual macros.
| Macro | Meaning |
|---|---|
| OutDir | Path to the output file directory, relative to the project directory. |
| ConfigurationName | The name of the current project configuration. |
| PlatformName | The name of the target platform. |
| TargetName | The base name of the primary output file for the build. |
| TargetExt | The file extension of the primary output file for the build. |
| TargetFileName | The file name of the primary output file for the build (defined as base name and file extension). |
| TargetPath | The absolute path name of the primary output file for the build (defined with drive, path, base name, and file extension). |
| TargetDir | The directory of the primary output file for the build (defined with drive and path). |
| ProjectPath | The absolute path name of the project (defined with drive, path, base name, and file extension). |
| ProjectExt | The file extension of the project. |
| ProjectDir | The directory of the project (defined with drive and path). |
| ProjectFileName | The file name of the project (defined with base name and file extension). |
| ProjectName | The base name of the project. |
| Configuration | The name of the current project configuration. |
| Platform | The name of the currently targeted platform. |
| SolutionFileName | The file name of the solution (defined with base name and file extension). |
| SolutionPath | The absolute path name of the solution (defined with drive, path, base name, and file extension). |
| SolutionDir | The directory of the solution (defined with drive and path). |
| SolutionName | The base name of the solution. |
| SolutionExt | The file extension of the solution. |
Appendix C: Regular Expression Examples
The following table contains some regular expression characters, operators, constructs, and pattern examples.
| Expression | Description | Example |
|---|---|---|
| . | Matches any single character (except a line break). | a.o matches "aro" in "around" and "abo" in "about" but not "acro" in "across". |
| * | Matches zero or more occurrences of the preceding expression (match as many characters as possible). | a*r matches "r" in "rack", "ar" in "ark", and "aar" in "aardvark". |
| .* | Matches any character zero or more times. | c.*e matches "cke" in "racket", "comme" in "comment", and "code" in "code". |
| + | Matches one or more occurrences of the preceding expression (match as many characters as possible). | e+d matches "eed" in "feeder" and "ed" in "faded". |
| .+ | Matches any character one or more times. | e.+e matches "eede" in "feeder" but finds no matches in "feed". |
| *? | Matches zero or more occurrences of the preceding expression (match as few characters as possible). | \w*?d matches "fad" and "ed" in "faded" but not the entire word "faded" due to the lazy match. |
| +? | Matches one or more occurrences of the preceding expression (match as few characters as possible). | e\w+? matches "ee" in "asleep" and "ed" in "faded" but finds no matches in "fade". |
| \^ | Anchors the match string to the beginning of a line or string. | \^car matches the word "car" only when it appears at the beginning of a line. |
| \r?$ | Anchors the match string to the end of a line. | car\r?$ matches "car" only when it appears at the end of a line. |
| $ | Anchors the match string to the end of the file. | car$ matches "car" only when it appears at the end of the file. |
| [abc] | Matches any single character in a set. | b[abc] matches "ba", "bb", and "bc". |
| [a-f] | Matches any character in a range of characters. | be[n-t] matches "bet" in "between", "ben" in "beneath", and "bes" in "beside", but finds no matches in "below". |
| () | Captures and implicitly numbers the expression contained within parenthesis. | ([a-z])X\1 matches "aXa"and "bXb", but not "aXb". "\1" refers to the first expression group "[a-z]". |
| (?!abc) | Invalidates a match. | real(?!ity) matches "real" in "realty" and "really" but not in "reality." It also finds the second "real" (but not the first "real") in "realityreal". |
| [\^abc] | Matches any character that is not in a given set of characters. | be[\^n-t] matches "bef" in "before", "beh" in "behind", and "bel" in "below", but finds no matches in "beneath". |
| | | Matches either the expression before or the one after the symbol. | (sponge|mud) bath matches "sponge bath" and "mud bath". |
| \ | Escapes the character following the backslash. | \\^ matches the character \^. |
| {n}, where 'n' is the number of occurrences | Specifies the number of occurrences of the preceding character or group. | x(ab){2}x matches "xababx". x(ab){2,3}x matches "xababx" and "xabababx" but not "xababababx". |
| \p{X}, where "X" is the Unicode number. | Matches text in a Unicode category. | \p{Lu} matches "T" and "D" in "Thomas Doe". |
| \b (Outside a character class \b specifies a word boundary, and inside a character class \b specifies a backspace.) | Matches a word boundary. | \bin matches "in" in "inside" but finds no matches in "pinto". |
| \r?\n | Matches a line break (that is, a carriage return followed by a new line). | End\r?\nBegin matches "End" and "Begin" only when "End" is the last string in a line and "Begin" is the first string in the next line. |
| \w | Matches any word character. | a\wd matches "add" and "a1d" but not "a d". |
| \s | Matches any whitespace character. | Public\sInterface matches the phrase "Public Interface". |
| \d | Matches any decimal digit character. | \d matches "4" and "0" in "wd40". |
Appendix D: Database Connection Settings
This appendix explains the various database connection settings required for each supported database. For the supported versions of the databases, refer to the SnapDevelop Installation Guide.
Adaptive Server Enterprise (ODBC)
Basic Properties
The following table lists the basic connection properties you need to configure for Adaptive Server Enterprise (ODBC).
| Property | Description |
|---|---|
| Use user or system data source name | Whether to use the user or system data source name. |
| Use connection string | Whether to use the connection string. |
| User name | Indicates the server login name. |
| Password | Indicates the server login password. |
Advanced Properties
The following table lists the advanced properties you can configure for SQL Anywhere (ODBC).
| Property | Sub-Property | Description |
|---|---|---|
| Misc | Connection Name | Specifies the connection name. |
| Database Provider | The provider that uses the services of the driver to connect to the target database. | |
| Server Host | The host name or IP address of the ODBC server to connect to. | |
| Other | Connection String | The connection string to use when connecting to the data source. |
| DelimitIdentifier | Encloses table and column names in quotes. | |
| Driver-Specific Parameters | You can customize the connection string. Each field segment is separated by “;”. | |
| Is Nullable Type | This setting only applies to the Convert DataWindow to C# Model feature available in .NET DataStore. It shall be consistent with the database setting for the DataWindow in PowerBuilder. | |
| Outer Join Syntax | This setting only applies to the Convert DataWindow to C# Model feature available in .NET DataStore. It shall be consistent with the database setting for the DataWindow in PowerBuilder. | |
| TrimSpaces | Trims trailing spaces in char columns. | |
| Safety | Password | Indicates the password to use when connecting to the data source. |
| User ID | Indicates the user ID to use when connecting to the data source. | |
| Source | Command Timeout | Specifies the time in seconds to wait for a command execution to be completed before the attempt is terminated. |
| Data Source | Indicates the data source address or name to connect to. | |
| DSN | The DSN to use when connecting to the data source. | |
| Initial Catalog | The name of the initial directory or database in the data source. |
HANA (ODBC)
Basic Properties
The following table lists the basic connection properties you need to configure for HANA (ODBC).
| Property | Description |
|---|---|
| Use user or system data source name | Whether to use the user or system data source name. |
| Use connection string | Whether to use the connection string. |
| User name | Indicates the server login name. |
| Password | Indicates the server login password. |
Advanced Properties
The following table lists the advanced properties you can configure for SQL Anywhere (ODBC).
| Property | Sub-Property | Description |
|---|---|---|
| Misc | Connection Name | Specifies the connection name. |
| Database Provider | The provider that uses the services of the driver to connect to the target database. | |
| Server Host | The host name or IP address of the ODBC server to connect to. | |
| Other | Connection String | The connection string to use when connecting to the data source. |
| DelimitIdentifier | Encloses table and column names in quotes. | |
| Driver-Specific Parameters | You can customize the connection string. Each field segment is separated by “;”. | |
| Is Nullable Type | This setting only applies to the Convert DataWindow to C# Model feature available in .NET DataStore. It shall be consistent with the database setting for the DataWindow in PowerBuilder. | |
| Outer Join Syntax | This setting only applies to the Convert DataWindow to C# Model feature available in .NET DataStore. It shall be consistent with the database setting for the DataWindow in PowerBuilder. | |
| TrimSpaces | Trims trailing spaces in char columns. | |
| Safety | Password | Indicates the password to use when connecting to the data source. |
| User ID | Indicates the user ID to use when connecting to the data source. | |
| Source | Command Timeout | Specifies the time in seconds to wait for a command execution to be completed before the attempt is terminated. |
| Data Source | Indicates the data source address or name to connect to. | |
| DSN | The DSN to use when connecting to the data source. | |
| Initial Catalog | The name of the initial directory or database in the data source. |
Informix (Beta feature)
The following table lists the basic connection properties you need to configure for Informix.
| Property | Description |
|---|---|
| Server name | Indicates the IP address of the server where the database you want to connect to is located. |
| Port | Indicates the port on a host bus adapter that offers the physical connection to a controller and is used for I/O operations. |
| User name | Indicates the server login name. |
| Password | Indicates the server login password. |
| Connect to a database | Specifies the name of the database you want to connect to. |
Advanced Properties
The following table lists the advanced properties you can configure for SQL Anywhere (ODBC).
| Property | Sub-Property | Description |
|---|---|---|
| Authentication | SSLClientKeystash | Specifies the SSL stash file that is used for an SSL connection with or without the CERTIFICATE authentication. |
| SSLClientKeystoredb | Specifies the SSL keystore database file that is used for an SSL connection with or without the CERTIFICATE authentication. | |
| SSLClientKeystoreDBPassword | Specifies the password for the keystore database when the SSL protocol is specified with or without the CERTIFICATE authentication. | |
| SSLClientLabel | Specifies a unique SSL label that is mapped to a specific certificate to use with the CERTIFICATE authentication. | |
| SSLServerCertificate | Specifies the fully qualified name of a self-signed server certificate or a CA certificate. | |
| Connection | Command Timeout | Specifies the time in seconds to wait for a command execution to be completed before the attempt is terminated. |
| Connect Timeout | Specifies the time in seconds to wait for a reply when an application tries to establish a connection to a server before the attempt is terminated. | |
| Database | The database being connected.. | |
| Enlist | Whether to enlist in an ambient TransactionScope. | |
| Pooling | Specifies whether the connection pooling will be used. | |
| QueryTimeout | Specifies the time in seconds to wait for a query execution to be completed before the attempt is terminated. | |
| Misc | Connection Name | Specifies the connection name. |
| Database Provider | The provider that uses the services of the driver to connect to the target database. | |
| Server Host | The host name or IP address of the Oracle server to connect to. | |
| Other | allowDynamicSQL | Specifies whether to allow an application to run the following types of SQL statements dynamically: SQL statements that are not captured in a pureQueryXML file, and SQL statements that are captured in a pureQueryXML file but which have not been bound by the StaticBinder utility. |
| Authentication | Specifies the type of authentication to be used with file DSN or DSN-less connectivity. | |
| captureOnly | Specifies whether to run only the SQL statements that are in the pureQueryXML file. | |
| ClientAccountingString | Sets the client accounting string to be sent to the database. | |
| ClientApplicationName | Sets the client application name to be sent to the database. | |
| ClientCorrelationToken | Sets the client correlation token to be sent to the database. | |
| ClientEncAlg | Specifies the type of encryption algorithm to be used when encrypting user IDs and passwords. | |
| ClientUserID | Sets the client user ID to be sent to the database. | |
| ClientWorkstationName | Sets the client workstation name to be sent to the database. | |
| CLISchema | Sets the schema to be used. | |
| CodePage | Sets the current encoding's code page identifier. | |
| ConcurrentAccessResolution | Specifies the concurrent access resolution to use. | |
| ConnectNodeNumber | Specifies the database partition server to which a connection is to be made. | |
| ConvertToLong | Specifies whether to convert an integer to long. | |
| CurrentFunctionPath | Specifies the list of schema names that can be used to resolve function references and data type references in dynamic SQL statements. | |
| CurrentPackageSet | Issues SET CURRENT PACKAGE after every connection. | |
| CurrentSchema | Specifies the schema used in a SET CURRENT SCHEMA statement upon a successful connection. | |
| CurrentSQLID | Specifies the ID used in a SET CURRENT SQLID statement sent to the DBMS upon a successful connection. | |
| Db2dumpSQLCodes | Specifies whether diagnostic logs are gathered when specified SQLCODEs are encountered in a connection to the database. | |
| Db2DumpSQLCodesInterval | Specifies the time period in seconds during which the log information for the SQLCODE is not captured. | |
| DB2Explain | Determines whether Explain snapshot, Explain table information, or both information are gathered by the server. | |
| DBName | Specifies the database name to reduce the time it takes for the application to query table information. | |
| DelimIdent | Specifies whether any string within double quotation marks is treated as an identifier, and any string within single quotation mark is treated as a string literal. | |
| DelimitIdentifier | Encloses table and column names in quotes. | |
| DisableCursorHold | Specifies whether the cursors that the application opens on the server should be left open after committing a transaction. | |
| EnableDynamicSQLReplacement | Specifies whether to run alternative SQL statements in a pureQueryXML file, where neither whose alternative statements nor the corresponding original statements were bound by the StaticBinder utility. | |
| EnableEFCaseSensitivity | Enables the case sensitivity in EF. | |
| EnsureDefaultDFRM | Ensures default DecFloat Rounding mode. | |
| FetchBufferSize | Specifies the default query block size to optimize the data flow. | |
| FitHighPrecisionType | Gets or sets a value that indicates how the database convers the high precision data to the .NET system types. | |
| Graphic | Specifies if CLI returns SQL_GRAPHIC as a supported SQL data type and what unit is used to report GRAPHIC column length. | |
| HostVarParameters | Specifies whether host variable support are enabled. Host variables are parameters prefixed with a colon. | |
| Instance | Specifies the instance name for a local IPC connection for file DSN or DSN-less connectivity. | |
| Interrupt | Sets the interrupt processing mode. | |
| Is Nullable Type | This setting only applies to the Convert DataWindow to C# Model feature available in .NET DataStore. It shall be consistent with the database setting for the DataWindow in PowerBuilder. | |
| IsolationLevel | Sets the default isolation level. | |
| LibraryList | Specifies which libraries are to be loaded by the server for the connection. | |
| MapDate | Controls the SQL data type returned when DATE columns and parameter markers are described. | |
| MapTime | Controls the SQL data type returned when TIME columns and parameter markers are described. | |
| MapTimeStamp | Controls the SQL data type returned when TIMESTAMP columns and parameter markers are described. | |
| MaxNonParmSQL | Specifies the maximum number of non-parameterized SQL statements to capture. | |
| NewPWD | Sets the new password. | |
| Outer Join Syntax | This setting only applies to the Convert DataWindow to C# Model feature available in .NET DataStore. It shall be consistent with the database setting for the DataWindow in PowerBuilder. | |
| ProgramId | Sets the application ID to a user-defined ID that associates a connection to the database. | |
| ProgramName | Sets the application name to a user-defined name that is used to identify the application. | |
| PropertiesGroupId | Specifies a runtime group ID in a repository that is created in the database. | |
| repositoryRequired | Specifies the pureQuery client optimization behavior if errors occur during retrieving or writing pureQuery data. | |
| RetrieveXmlInBinaryFormat | Specifies the value that represents whether XML data is returned in binary format. | |
| RetryParameterBindingOnError | Sets the value that indicates whether failed statements, which are result of data type mismatch in its parameters, are rerun after implicitly recasting parameters. | |
| SchemaList | Restricts schemas that are used to query table information. | |
| Security | Specifies whether the SSL protocol is used for a connection to the database server. | |
| Server | Species the host and port number to connect to. | |
| ServerType | Indicates whether the connection is to be made to UniData or UniVerse. | |
| SkipSynonymProcessing | Specifies whether the dastabase provider for .NET sends a connection string as is to the DbPermission.Add method. | |
| sqlLiteralSubstitution | Specifies whether to capture and consolidate SQL statements that share syntax and differ only in the literal values by having the pureQuery client substitute parameter markers for the literal values. | |
| StatementConcentrator | Specifies whether dynamic statements that contain literal values use the statement cache. | |
| StaticLatch | Sets the static latch. | |
| SysSchema | Sets an alternative schema to be searched in place of the sys schema. | |
| TableType | Defines a default list of table types that are returned when querying table information. | |
| TargetPrincipal | Specifies the fully qualified Kerberos principal name of the instance owner for the target server. | |
| TraceLevel | Sets the trace level. | |
| TrimSpaces | Trims trailing spaces in char columns. | |
| TrustedContextSystemPassword | Specifies the password to be used with the connection. | |
| TrustedContextSystemUserID | Specifies the ID to be used with the connection. | |
| TrustedContextUserRegistryName | Specifies the user registry name to be used with the connection. | |
| WalletID | Sets the wallet ID. | |
| WalletPwd | Sets the wallet password. | |
| Pooling | Connection Lifetime | When a connection is returned to the pool, the creation time of the connection is compared with the current time, and the connection is destroyed if the time span (in seconds) exceeds the value specified ty connection lifetime. |
| Connection Reset | Indicates whether the connection will be placed in the connection pool upon being closed. | |
| Max Pool Size | The maximum number of connections allowed in the pool. | |
| Min Pool Size | The minimum number of connections allowed in the pool. | |
| Safety | Password | Indicates the password to use when connecting to the data source. |
| Security | PersistSecurityInfo | Indicates whether security-sensitive information, such as password, can be returned as part of the connection string after the connection has been opened or if the connection has ever been in an opened state. |
| Source | Data Source | Indicates the data source address or name to connect to. |
MySQL
Basic Properties
The following table lists the basic connection properties you need to configure for MySQL.
| General | Description |
|---|---|
| Server name | Indicates the server machine on which an MySQL database resides. |
| Port | Indicates the port on a host bus adapter that offers the physical connection to a controller and is used for I/O operations. |
| Protocol | Specifies the connection protocol. |
| User name | Indicates the server login name. |
| Password | Indicates the server login password. |
| Connect to a database | Specifies the name of a database you want to connect to in the MySQL data source. |
| SSL | Description |
| SSL mode | SSL properties for connection. Available options: Preferred or Prefered: Use SSL if the server supports it. None: Do not use SSL. Required: Always use SSL. Deny connection if the server does not support SSL. Does not validate CA or hostname. VerifyCA: Always use SSL. Validates the CA but tolerates hostname mismatch. VerifyFull: Always use SSL. Validates CA and hostname. |
| SSL private key | Name of the SSL key file in PEM format to use for establishing an encrypted connection. |
| SSL CA certificate | Path to a local file that contains a list of trusted TLS/SSL CAs. |
| SSL certificate | Name of the SSL certificate file in PEM format to use for establishing an encrypted connection. |
Advanced Properties
The following table lists the advanced connection properties you can configure for MySQL.
| Property | Sub-property | Description |
|---|---|---|
| Advanced | Allow User Variables | Should the provider expect user variables to appear in the SQL. |
| Allow Zero DateTime | Should zero datetime be supported. | |
| Auto Enlist | Should the connection automatically enlist in the active connection, if there are any. | |
| Character Set | Character set this connection should use. | |
| Authentication | Integrated Security | Use Windows authentication when connecting to the server. |
| Connection | Allow Batch | Allows execution of multiple SQL commands in a single statement. |
| Allow Load Data Local Infile | Allows reading data from a text file. | |
| Connect Timeout | The time (in seconds) to wait for a connection to the server before terminating the attempt and generating an error. | |
| Database | Database to use initially. | |
| Default Command Timeout | The default timeout that MySqlCommand objects will use unless changed. | |
| Logging | Enables output of diagnostic messages. | |
| Port | Port to use for TCP/IP connections. | |
| Misc | Keep Alive | For TCP connections, the idle connection time (in seconds) before the first keepalive packet is sent. A value of 0 indicates that keepalive is not used. |
| Server Host | The host name or IP address of the MySQL server to connect to. | |
| Other | DelimitIdentifier | Encloses table and column names in quotes. |
| Driver-Specific Parameters | You can customize the connection string. Each field segment is separated by “;”. | |
| Is Nullable Type | This setting only applies to the Convert DataWindow to C# Model feature available in .NET DataStore. It shall be consistent with the database setting for the DataWindow in PowerBuilder. | |
| Outer Join Syntax | This setting only applies to the Convert DataWindow to C# Model feature available in .NET DataStore. It shall be consistent with the database setting for the DataWindow in PowerBuilder. | |
| TrimSpaces | Trims trailing spaces in char columns. | |
| Pooling | Connection Lifetime | Maximum lifetime (in seconds) of the connection. |
| Connection Reset | When true, indicates the connection state is reset when removed from the pool. | |
| Max Pool Size | The maximum number of connections allowed in the pool. | |
| Min Pool Size | The minimum number of connections allowed in the pool. | |
| Pooling | When true, the connection object is drawn from the appropriate pool, or if necessary, is created and added to the appropriate pool. | |
| Safety | Password | Indicates the password to use when connecting to the data source. |
| Persist Security Info | When false, sensitive information (e.g., password) is not returned as part of the connection if the connection is open or has ever been in an open state. | |
| SslCa | Path to a local file that contains a list of trusted TLS/SSL CAs. | |
| SslCert | Name of the SSL certificate file in PEM format to use for establishing an encrypted connection. | |
| SslKey | Name of the SSL key file in PEM format to use for establishing an encrypted connection. | |
| SslMode | SSL properties for connection. | |
| User ID | Indicates the user ID to use when connecting to the data source. | |
| Source | Data Source | Indicates the data source address or name to connect to. |
| Initial Catalog | The name of the initial directory or database in the data source. |
Oracle
Basic Properties
The following table lists the basic connection properties you need to configure for Oracle.
| Property | Description |
|---|---|
| Host | Indicates the server machine on which an Oracle database resides. |
| Port | Indicates the port on a host bus adapter that offers the physical connection to a controller and is used for I/O operations. |
| Protocol | Select a connection protocol, TCP or TCPS. Select TCPS if TLS is enabled for your Oracle database, otherwise select TCP. |
| Wallet Location | Browse to the folder where your wallet file is stored. This setting is visible only when you select the TCPS protocol. |
| Service name | Specifies that a database can register itself with the listener. |
| User name | Indicates the server login name. |
| Password | Indicates the server login password. |
Advanced Properties
The following table lists the advanced connection properties you can configure for Oracle.
| Property | Sub-property | Description |
|---|---|---|
| DataSource | Host | The host name or IP address of the Oracle server to connect to. |
| Port | The TCP port of the Oracle server. | |
| Protocol | N/A | |
| Server | N/A | |
| Service Name | N/A | |
| Users | When you need to access objects from other users, you can add users here. Note that this data will not be saved, so you must edit this content each time you use the database connection. The format is as follows: user1, user2 | |
| Wallet Location | Specifies the location of the wallet. | |
| Initialization | Metadata Pooling | Caches metadata information. |
| Statement Cache Size | Maximum number of SQL statements that can be cached. | |
| Misc | Connection Name | Specifies the connection name. |
| Database Provider | The provider that uses the services of the driver to connect to the target database. | |
| Server Host | The host name or IP address of the Oracle server to connect to. | |
| Other | DelimitIdentifier | Encloses table and column names in quotes. |
| Driver-Specific Parameters | You can customize the connection string. Each field segment is separated by “;”. | |
| Is Nullable Type | This setting only applies to the Convert DataWindow to C# Model feature available in .NET DataStore. It shall be consistent with the database setting for the DataWindow in PowerBuilder. | |
| Outer Join Syntax | This setting only applies to the Convert DataWindow to C# Model feature available in .NET DataStore. It shall be consistent with the database setting for the DataWindow in PowerBuilder. | |
| TrimSpaces | Trims trailing spaces in char columns. | |
| Pooling | Connection Lifetime | Maximum lifetime (in seconds) of the connection. |
| Connection Timeout | Maximum time (in seconds) to wait for a free connection from the pool. | |
| Enlist | Specifies whether automatic enlistment to the distributed transaction coordinator (DTC) is enabled. | |
| Incr Pool Size | Number of new connections to be created when all connections in the pool are in use. | |
| Max Pool Size | The maximum number of connections allowed in the pool. | |
| Min Pool Size | The minimum number of connections allowed in the pool. | |
| Pooling | The time to wait before closing unused connections in the pool if the count of all connections exceeds MinPoolSize. | |
| Statement Cache Purge | Statement cache purged when the connection goes back to the pool. | |
| Validation Connection | Validation of connections coming from the pool. | |
| RAC | HA Events | Proactively removes connections from the pool when an Oracle RAC service, service member, or node goes down. |
| Load Balancing | Balances work requests across Oracle RAC instances based on the load balancing advisory and service goal. | |
| Safety | Password | Indicates the user password to use when connecting to the data source. |
| User ID | Indicates the user ID to use when connecting to the data source. | |
| Security | Persist Security Info | Retrieval of the password in the connection string. |
| Proxy Password | Password for the proxy user specified by Proxy User ID. | |
| Proxy User ID | User name of the proxy user. | |
| Source | Data Source | Indicates the data source address or name to connect to. |
| DBA Privilege | Administrative privileges: SYSDBA or SYSOPER. | |
| Initial Catalog | The name of the initial directory or database in the data source. | |
| Promotable Transaction | Indicates whether or not a transaction is local or distributed throughout its lifetime. | |
| Self Tuning | Enables or disables self-tuning for a connection. |
PostgreSQL
Basic Properties
The following table lists the basic connection properties you need to configure for PostgreSQL.
| General | Description |
|---|---|
| Host | Indicates the server machine on which a PostgreSQL database resides. |
| Port | Indicates the port on a host bus adapter that offers the physical connection to a controller and is used for I/O operations. |
| Protocol | Indicates the connection protocol. |
| Connect to a database | Indicates the name for the database you want to connect to. |
| User name | Indicates the server login name. |
| Password | Indicates the server login password. |
| SSL | Description |
| SSL mode | Available options: Disable: Do not use SSL. Prefer: Use SSL if the server supports it. Require: Always use SSL. |
| Client certificate | Specifies the path to the client's SSL certificate file. |
Advanced Properties
The following table lists the advanced properties you can configure for PostgreSQL.
| Property | Sub-Property | Description |
|---|---|---|
| Advanced | Auto Prepare Min Usages | The minimum number of usages a SQL statement is used before it is automatically prepared. This number defaults to 5. |
| Keepalive | The number of seconds of connection inactivity before Npgsql sends a keepalive query. | |
| Load Table Composites | Load table composite type definitions, and not just free-standing composite types. | |
| Max Auto Prepare | The maximum number of SQL statements that can be automatically prepared at any given point. Beyond this number the least-recently-used statement will be recycled. Zero (the default) disables automatic preparation. | |
| No Reset On Close | If set to true, a pool connection's state won't be reset when it is closed (improves performance). Do not specify this unless you know what you are doing. | |
| Read Buffer Size | Determines the size of the internal buffer Npgsql uses when reading. Increasing may improve performance if transferring large values from the database. | |
| Socket Receive Buffer Size | Determines the size of socket receive buffer. | |
| Socket Send Buffer Size | Determines the size of socket send buffer. | |
| TCP Keepalive | Whether to use TCP keepalive with system defaults if overrides isn't specified. | |
| TCP Keepalive Interval | The interval, in milliseconds, between when successive keep-alive packets are sent if no acknowledgement is received. | |
| TCP Keepalive Time | The number of milliseconds of connection inactivity before a TCP keepalive query is sent. | |
| Use Perf Counters | Writes connection performance information to performance counters. | |
| Write Buffer Size | Determines the size of the internal buffer Npgsql uses when writing. Increasing may improve performance if transferring large values to the database. | |
| Compatibility | Convert Infinity Date Time | Makes MaxValue and MinValue timestamps and dates readable as infinity and negative infinity. |
| Connection | Application Name | The optional application name parameter to be sent to the backend during connection initiation. |
| Client Encoding | Gets or sets the client encoding parameter. | |
| Encoding | Gets or sets the .NET encoding that will be used to encode/decode PostgreSQL string data. | |
| Enlist | Whether to enlist in an ambient TransactionScope. | |
| Host | The host name or IP address of the PostgreSQL server to connect to. | |
| Passfile | Path to a PostgreSQL password file (PGPASSFILE), from which the password would be taken. | |
| Port | The TCP port of the PostgreSQL server. | |
| Search Path | Gets or sets the schema search path. | |
| Time Zone | Gets or sets the PostgreSQL session time zone, in Olson/IANA database format. | |
| User Name | The user name to connect with. Not required if using IntegratedSecurity. | |
| Entity Configurations | Entity Admin Database | N/A |
| Entity Template Database | The database template to specify when creating a database in Entity Configurations. If not specified, PostgreSQL defaults to \"template1\". | |
| Misc | Connection Name | Specifies the connection name. |
| Database Provider | The provider that uses the services of the driver to connect to the target database. | |
| Server Host | The host name or IP address of the ODBC server to connect to. | |
| Other | DelimitIdentifier | Encloses table and column names in quotes. |
| Driver-Specific Parameters | You can customize the connection string. Each field segment is separated by “;”. | |
| Is Nullable Type | This setting only applies to the Convert DataWindow to C# Model feature available in .NET DataStore. It shall be consistent with the database setting for the DataWindow in PowerBuilder. | |
| Outer Join Syntax | This setting only applies to the Convert DataWindow to C# Model feature available in .NET DataStore. It shall be consistent with the database setting for the DataWindow in PowerBuilder. | |
| TrimSpaces | Trims trailing spaces in char columns. | |
| Pooling | Connection Idle Lifetime | The time to wait before closing unused connections in the pool if the count of all connections exceeds MinPoolSize. |
| Connection Pruning Interval | How many seconds the pool waits before attempting to prune idle connections that are beyond idle lifetime. | |
| Max Pool Size | The maximum connection pool size. | |
| Min Pool Size | The minimum connection pool size. | |
| Pooling | Specifies whether connection pooling should be used. | |
| Safety | Password | Indicates the password to use when connecting to the data source. |
| User ID | Indicates the user ID to use when connecting to the data source. | |
| Security | Certificate | Location of a client certificate to be sent to the server. |
| Check Certificate Revocation | Specifies whether to check the certificate revocation list during authentication. | |
| Include Realm | Specifies whether to use the Kerberos for authentication. | |
| Integrated Security | Specifies whether to use Windows integrated security to log in. | |
| Persist Security Info | Gets or sets a Boolean value that indicates if security-sensitive information, such as the password, is not returned as part of the connection if the connection is open and has ever been in an open state. | |
| SSL Mode | Specifies whether SSL is required, disabled, or preferred, depending on server support. | |
| Trust Server Certificate | Specifies whether to trust the server certificate without validating it. | |
| Use SSL Stream | Npgsql uses its own internal implementation of TLS/SSL. Turn this on to use .NET SslStream instead. | |
| Source | Data Source | Indicates the data source address or name to connect to. |
| Initial Catalog | The name of the initial directory or database in the data source. | |
| Timeouts | Command Timeout | The time to wait (in seconds) while trying to execute a command before terminating the attempt and generating an error. Set to zero for infinity. |
| Internal Command Timeout | The time to wait (in seconds) while trying to execute a command before terminating the attempt and generating an error. -1 uses CommandTimeout while 0 means no timeout. | |
| Timeout | The time to wait (in seconds) while trying to establish a connection before terminating the attempt and generating an error. |
SQL Anywhere (ODBC)
Basic Properties
The following table lists the basic connection properties you need to configure for SQL Anywhere (ODBC).
| Property | Description |
|---|---|
| Use user or system data source name | Whether to use the user or system data source name. |
| Use connection string | Whether to use the connection string. |
| User name | Indicates the server login name. |
| Password | Indicates the server login password. |
Advanced Properties
The following table lists the advanced properties you can configure for SQL Anywhere (ODBC).
| Property | Sub-Property | Description |
|---|---|---|
| Misc | Connection Name | Specifies the connection name. |
| Database Provider | The provider that uses the services of the driver to connect to the target database. | |
| Server Host | The host name or IP address of the ODBC server to connect to. | |
| Other | Connection String | The connection string to use when connecting to the data source. |
| DelimitIdentifier | Encloses table and column names in quotes. | |
| Driver-Specific Parameters | You can customize the connection string. Each field segment is separated by “;”. | |
| Is Nullable Type | This setting only applies to the Convert DataWindow to C# Model feature available in .NET DataStore. It shall be consistent with the database setting for the DataWindow in PowerBuilder. | |
| Outer Join Syntax | This setting only applies to the Convert DataWindow to C# Model feature available in .NET DataStore. It shall be consistent with the database setting for the DataWindow in PowerBuilder. | |
| TrimSpaces | Trims trailing spaces in char columns. | |
| Safety | Password | Indicates the password to use when connecting to the data source. |
| User ID | Indicates the user ID to use when connecting to the data source. | |
| Source | Command Timeout | Specifies the time in seconds to wait for a command execution to be completed before the attempt is terminated. |
| Data Source | Indicates the data source address or name to connect to. | |
| DSN | The DSN to use when connecting to the data source. | |
| Initial Catalog | The name of the initial directory or database in the data source. |
SQL Server
Basic Properties
The following table lists the basic connection properties you need to configure for SQL Server.
| Property | Description |
|---|---|
| Server name | Indicates the IP address of the server where the database you want to connect to is located. |
| Port | Indicates the port on a host bus adapter that offers the physical connection to a controller and is used for I/O operations. |
| Authentication | Indicates the method of authentication. There are four methods of authentication, which are: Windows authentication, SQL Server authentication, Active Directory Password authentication, and Active Directory Integrated authentication. |
| User name | Indicates the server login name. |
| Password | Indicates the server login password. |
| Connect to a database | Specifies the name of the database you want to connect to. |
Advanced Properties
The following table lists the advanced properties you can configure for SQL Server.
| Property | Sub-Property | Description |
|---|---|---|
| Advanced | MultipleActiveResultSets | When true, multiple result sets can be returned and read from one connection. |
| Connection | Command Timeout | The default time in seconds to wait for the command to execute. |
| Port | The TCP port of the SQLServer server. | |
| Initialization | Application Intent | Declares application workload type when connecting to the server. |
| Misc | Connection Name | Specifies the connection name. |
| Database Provider | The provider that uses the services of the driver to connect to the target database. | |
| Server Host | Specifies the server host. | |
| Other | DelimitIdentifier | Encloses table and column names in quotes. |
| Driver-Specific Parameters | You can customize the connection string. Each filed segment is separated by “;”. | |
| Is Nullable Type | This setting only applies to the Convert DataWindow to C# Model feature available in .NET DataStore. It shall be consistent with the database setting for the DataWindow in PowerBuilder. | |
| Outer Join Syntax | This setting only applies to the Convert DataWindow to C# Model feature available in .NET DataStore. It shall be consistent with the database setting for the DataWindow in PowerBuilder. | |
| TrimSpaces | Trims trailing spaces in char columns. | |
| Pool | Enlist | Sessions in the Environment of Component Service (MTS if Microsoft Windows NT is used) should be automatically enlisted in global transactions if necessary. |
| Load Balance Timeout | The minimum amount of time (in seconds) that this connection survives in the pool until it is destroyed. | |
| Max Pool Size | The maximum number of connections allowed in the pool. | |
| Min Pool Size | The minimum number of connections allowed in the pool. | |
| Pool Blocking Period | Defines pause time behavior for connection pooling. | |
| Pooling | When true, the connection object is drawn from the appropriate pool, or if necessary, it is created and added to the appropriate pool. | |
| Safety | Column Encryption Setting | Default column encryption settings for all commands on the connection. |
| Encrypt | If true, and the server has a certificate installed, SQL Server will use SSL encryption for all data sent between the client and the server. | |
| Integrated Security | Whether the connection is a secure connection. | |
| Password | Indicates the password to use when connecting to the data source. | |
| TrustServerCertificate | When true (and encrypt=true), SQL Server uses SSL encryption for all data sent between the client and server without validating the server certificate. | |
| User ID | Indicates the user ID to use when connecting to the data source. | |
| Source | Attach DB Filename | The name of the primary file, including the full path name, of an attachable database. |
| Data Source | Indicates the data source address or name to connect to. | |
| Initial Catalog | The name of the initial directory or database in the data source. |
SQLite
Basic Property
If you connect to SQLite database, you only need to specify the data source.
Advanced Properties
The following table lists the advanced properties you can configure for SQLite.
| Property | Sub-Property | Description |
|---|---|---|
| Misc | Connection Name | Specifies the connection name. |
| Database Provider | The provider that uses the services of the driver to connect to the target database. | |
| Server Host | The host name or IP address of the SQLite server to connect to. | |
| Other | DelimitIdentifier | Encloses table and column names in quotes. |
| Driver-Specific Parameters | You can customize the connection string. Each field segment is separated by “;”. | |
| Is Nullable Type | This setting only applies to the Convert DataWindow to C# Model feature available in .NET DataStore. It shall be consistent with the database setting for the DataWindow in PowerBuilder. | |
| Outer Join Syntax | This setting only applies to the Convert DataWindow to C# Model feature available in .NET DataStore. It shall be consistent with the database setting for the DataWindow in PowerBuilder. | |
| TrimSpaces | Trims trailing spaces in char columns. | |
| Safety | Password | Indicates the password to use when connecting to the data source. |
| User ID | Indicates the user ID to use when connecting to the data source. | |
| Source | Data Source | Indicates the data source address or name to connect to. |
| Initial Catalog | The name of the initial directory or database in the data source. |
Cloud Database Servers
The following connections to cloud database servers have been tested and proven to be successful:
| Database | Cloud Database Server | DB Engine Version |
|---|---|---|
| MySQL | Amazon Aurora for MySQL | 5.6.10a |
| MySQL | Amazon RDS for MySQL | MySQL 8.0.20 |
| PostgreSQL | Amazon Aurora for PostgreSQL | 11.6 |
| PostgreSQL | Amazon RDS for PostgreSQL | PostgreSQL 12.3-R |
| SQL Server | Amazon RDS for SQL Server | 14.00.3281.6.v1 (SQL Serve 2017) |
| Oracle | Amazon RDS for Oracle | 12.1.0.1 |
| SQL Server | Microsoft Azure SQL | Latest SQL Server engine (as at September, 2020) |
| MySQL | Microsoft Azure database for MySQL | 5.6 |
| PostgreSQL | Microsoft Azure database for PostgreSQL | 11 |
Note: The steps to connect to a cloud database server are the same as what you do to connect to a local database, except that you shall specify the endpoint of the DB instance created in the cloud database server as the server or host. For information on how to create a DB instance on a cloud database server, please refer to the documentation from the provider.