Step 1: Get the Appeon cluster plug-in installation package.
After you install PowerServer Web Component, you can find the Appeon Cluster plugin folder under the WebComponent[version]\appeon\IISSupport\ directory, and this folder is the Appeon cluster plug-in installation package, as shown in the following figure. You can copy this installation package to any Web server associated with the PowerServer cluster.
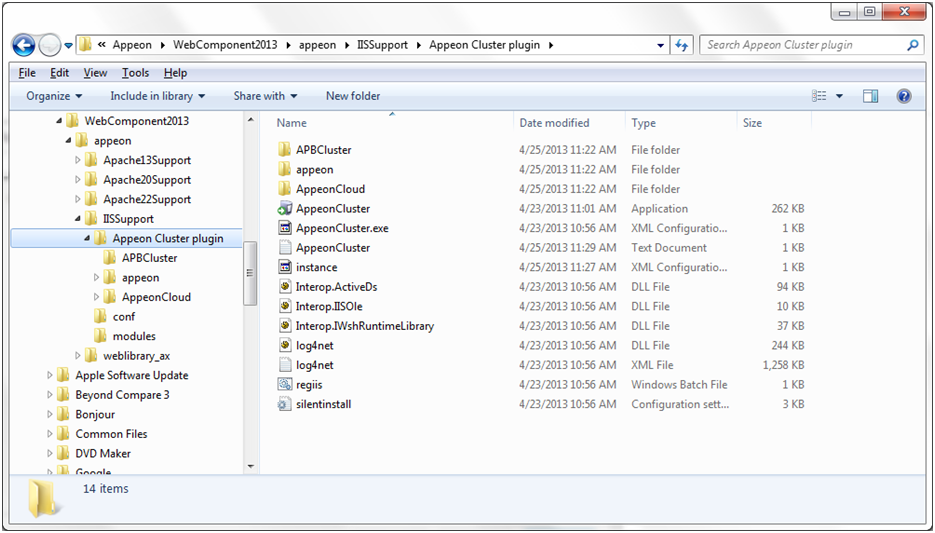
Step 2: Double-click AppeonCluster.exe under the Appeon Cluster plugin folder to install the Appeon cluster plug-in to the Web server.
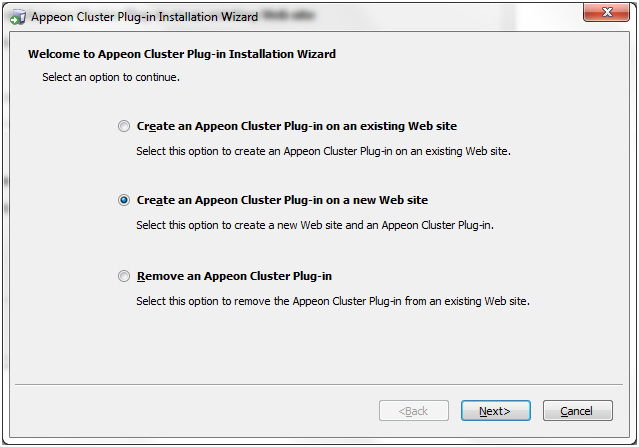
The Appeon Cluster Plug-in Installation Wizard is displayed.
Step 3: Select Create an Appeon Cluster Plug-in on a new Web site, and click Next.
If you want to install to an existing Web site, select Create an Appeon Cluster Plug-in on an existing Web site, and click Next.
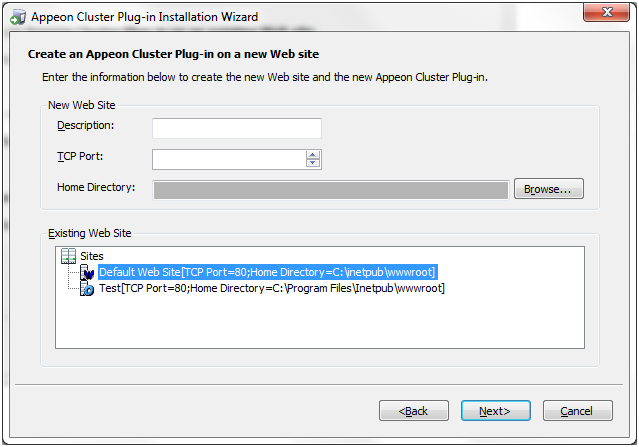
Step 4: To create the Appeon cluster plug-in on a new Web site, configure Description, Port and Home Directory, then click Next.
The new Web site will be created.
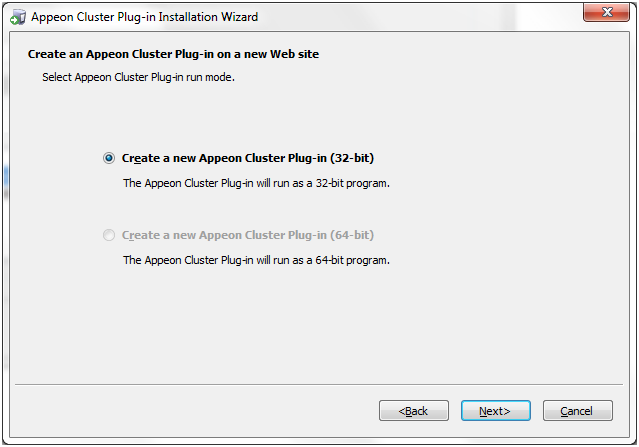
Step 5: Select to install a 32-bit or 64-bit Appeon cluster plug-in, and click Next. The program will detect if the server is on 32-bit OS or 64-bit OS and disable the inappropriate option.
32-bit plug-in works with 32-bit server and 64-bit server, and 64-bit plug-in works with 64-bit server only.
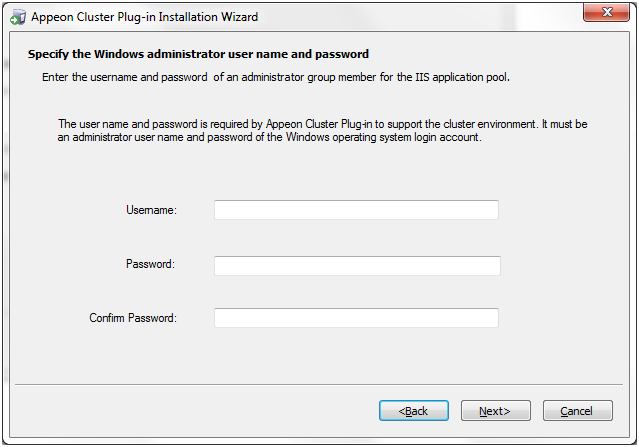
Step 6: Specify the Windows administrator user name and password, and click Next. Make sure to input the correct user name and password, otherwise you may not be able to access the Appeon Cluster Manager in the Web browser.
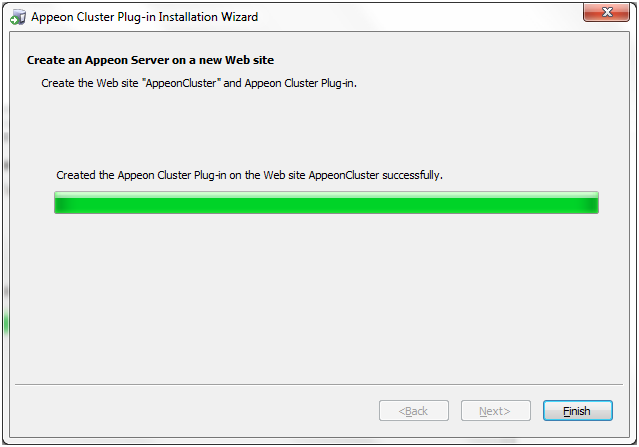
Step 7: When the plug-in is created successfully, click Finish to exit the Appeon Cluster Plug-in Installation Wizard.
Step 8: Restart IIS to make the new settings effective.
After successfully installing and configuring the Appeon cluster plug-in, you can find AppeonCloud Web console (though it is named "Cloud", it also applies to non-cloud platform) under the specified IIS Web site, as shown in the figure below. You can configure here to which PowerServer(s) and in what order the user requests should be redirected. Detailed instructions are provided below.
Another important advantage that the cluster provides is failover. To enable the failover functionality, you will need to go to the AEM, add PowerServer to the cluster and configure the failover settings there. For details, refer to the section called “Cluster” in PowerServer Configuration Guide for .NET or PowerServer Configuration Guide for J2EE.
The Appeon cluster currently supports three kinds of platforms including Local (non-cloud platform), Amazon Web Services and Windows Azure. The AppeonCloud console will display different settings according to the specific platform.

Step 1: Run the AppeonCloud console (browse the console in the right Actions pane in the IIS manager). The Appeon Cluster Manager displays.
Step 2: Input the user name and password (both "admin") to log into the Appeon Cluster Manager.
Step 3: Click Cluster Settings. The following settings will be display for the non-cloud platform.
Add the PowerServer to the list one by one. The Web server will redirect the user requests to the PowerServer in the list.
-
Specify the host name (or IP address) and port number of PowerServer.
-
Click Save. PowerServer will be added to the cluster.

Step 4: Configure the other settings of the cluster if necessary, such as load balancing algorithm, timeout, and interval.

|
Settings |
Description |
|---|---|
|
Load Balancing |
Specify the load balancing algorithm which determined how requests will be distributed among the servers in the cluster. Random indicates that the plug-in distributes requests across PowerServer in random order, regardless of the status of PowerServer; Sequence indicates that the plug-in distributes requests to PowerServer in an allocated order. |
|
Timeout |
Specify the timeout for distributing a request, and the default value is 30 seconds. |
|
Interval |
Specify the interval (in seconds) for the plug-in to refresh the PowerServer list. |
Choose an existing Web site, or create a new site. The Default Web Site will be used as examples in the following guide.
-
Installing PowerServer Web component to the Web root of the IIS server.
Make sure you have installed PowerServer Web Component to the Web root of the IIS server. To verify it, go to the IIS Web root (by default C:\inetpub\wwwroot) and check if there is an appeon folder which at least contains the IISSupport and weblibrary_ax sub-folders. If any folder is missing, go to the default installation directory of PowerServer Web Component (C:\Program Files\Appeon\WebComponent[version]) and manually copy the entire appeon folder to the IIS Web root.
-
Creating a virtual directory.
Step 1: Open Control Panel | Administrative Tools | Internet Information Service (IIS) Manager.
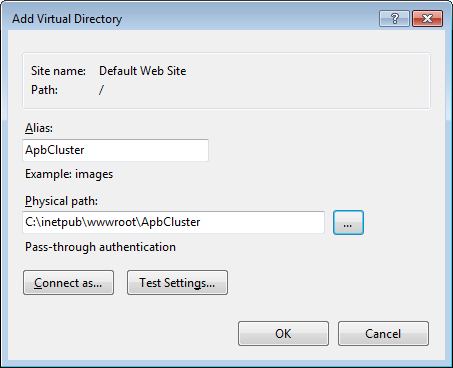
Step 2: Right click the Default Web Site and select Add Virtual Directory.
Step 3: Input the alias name, for example, "ApbCluster".
Step 4: Choose a local path in the Physical path box; for example, "C:\inetpub\wwwroot\ApbCluster".
Step 5: Click OK.
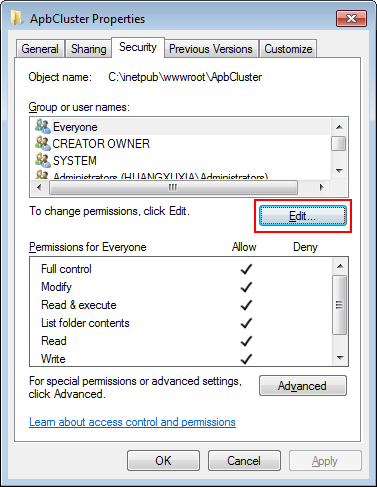
Step 6: Right click the ApbCluster virtual directory and select Edit Permissions.
Step 7: Choose the Security tab, and then click the Edit button.
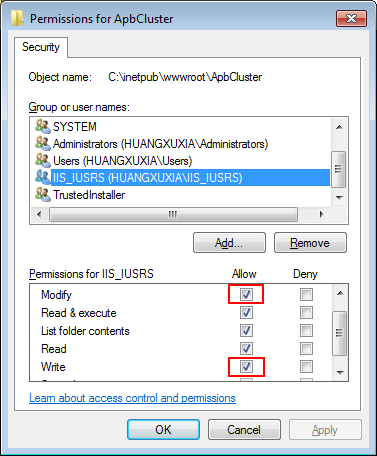
Step 8: Select IIS_IUSRS, for example, IIS_IUSRS (HUANGXUXIA\IIS_IUSRS)from the Group or user names list, and then select the Allow check box for Modify and Write in the Permissions for IIS_IUSRS list.
Step 9: Click OK to go back to the IIS window.
-
Copying the Appeon plug-in (ApbCluster.dll or ApbCluster64.dll).
Copy the ApbCluster.dll (for 32-bit OS) or ApbCluster64.dll (for 64-bit OS) plug-in from appeon\IISSupport\modules to the newly created virtual directory (C:\inetpub\wwwroot\ApbCluster in this guide).
In the 64-bit OS, you can either use ApbCluster.dll or ApbCluster64.dll. If you use ApbCluster.dll, you will need to set the Enable 32-Bit Applications to True for the application pool used by the current Web site. If you use ApbCluster64.dll, then set this option to False.
-
Creating the Appeon cluster configuration file (cluster-config.xml).
Create the cluster-config.xml file in the newly created virtual directory (C:\inetpub\wwwroot\ApbCluster in this guide) or directly copy this file from the PowerServer AEM configuration folder (for example C:\inetpub\wwwroot\appeon\AEM\config\cluster-config.config) after configuring the cluster in AEM. The cluster-config.xml file acts as the redirector configuration file which helps the Web server redirect requests to the PowerServer according to the IP addresses/ports of PowerServer, and the load balancing algorithm that it stores.
<?xml version="1.0" encoding="UTF-8" ?>
<cluster-config local="true" log="debug" timeout="30" polling="5" arithmetic="sequence">
    <extention>/ApbCluster/ApbCluster.dll</extention>
    <filters>
        <filter>/AEM</filter>
        <filter>/servlet</filter>
        <filter>/reportfile</filter>
        <filter>/imagefile</filter>
        <filter>/dwfile</filter>
        <filter>/ajsdown</filter>
    </filters>
    <app-servers>
        <app-server host="192.0.0.168" port="88" />
        <app-server host="192.0.3.131" port="80" />
        <app-server host="192.0.3.145" port="80" />
    </app-servers>
    <app-servers-https>
        <app-server-https id="2218220616687201197240" host="172.16.8.10" port="443" />
    </app-servers-https>
</cluster-config>
Notes:
-
local specifies whether to read the configurations on the local server or the cloud server. For the cloud server, set Local to False.
-
log specifies the level of information to be recorded in the log file. It can be set to the following level: debug, info, warning, error, or off.
-
timeout specifies the number of seconds the Web server waits between sending an HTTP request to PowerServer and receiving information from it. The HTTP connection timeout value is 2 times of this value.
-
polling indicates the number of seconds when the configurations will be read again.
-
arithmetic="random" indicates that the random algorithm is used to pick a PowerServer; arithmetic="sequence" indicates that the round-robin algorithm is used.
-
extention specifies the location of the virtual directory which contains ApbCluster.dll (or ApbCluster64.dll), that is /virtual-directory-alias-name/ApbCluster.dll (/ApbCluster/ApbCluster.dll in this guide).
-
filter specifies the type of pages to redirect.
-
host indicates the IP address (recommended) or machine name of the PowerServer in the cluster.
-
port indicates the port number of the PowerServer in the cluster.
-
-
Installing the Appeon plug-in as ISAPI Filters.
Step 1: Open Control Panel | Administrative Tools | Internet Information Services (IIS) Manager.
Step 2: Select Default Web Site and then double-click ISAPI Filters on the right side.
Step 3: Right-click the blank area on the ISAPI Filters page, and click Add.
Step 4: Input ApbCluster in the Filter name box and specify ApbCluster.dll (or ApbCluster64.dll) as the ISAPI filter in the Executable box (C:\inetpub\wwwroot\ApbCluster\ApbCluster.dll in this guide). Click OK.
-
Copying the redirector configuration file (ApbCluster.cfg).
Copy the ApbCluster.cfg redirector configuration file from appeon\IISSupport\conf\ to the virtual directory (C:\inetpub\wwwroot\ApbCluster in this guide) and edit the file when necessary.
Extension_URI=/ApbCluster/ApbCluster.dll
MatchExpression=/AEM
MatchExpression=/servlet
MatchExpression=/reportfile
MatchExpression=/imagefile
MatchExpression=/dwfile
MatchExpression=/ajsdown
Log=On
Notes:
-
The Extension_URI command points to the virtual directory where ApbCluster.dll (or ApbCluster64.dll) resides, that is /virtual-directory-alias-name/ApbCluster.dll (/ApbCluster/ApbCluster.dll in this guide).
-
The MatchExpression command specifies the pages to be redirected.
-
The Log command specifies whether logging is enabled. On indicates logging is enabled; Off indicates logging is disabled.
-
The commands and parameters are case insensitive.
-
-
Setting ISAPI and CGI Restrictions.
Step 1: Open Control Panel | Administrative Tools | Internet Information Services (IIS) Manager.
Step 2: Select the local machine (the top node), and then double-click ISAPI and CGI Restrictions on the right side.
Step 3: Right-click the blank area of the ISAPI and CGI Restrictions page and click Add.
Step 4: Specify the local path of ApbCluster.dll (or ApbCluster64.dll) in the ISAPI or CGI path box and input the descriptive text in the Description box, and then select Allow extension path to execute.
Step 5: Click OK.
-
Enabling ISAPI-dll.
Step 1: Open Control Panel | Administrative Tools | Internet Information Services (IIS) Manager.
Step 2: Expand Default Web Site, select ApbCluster, and then double-click Handler Mappings on the right side.
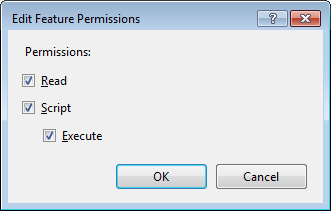
Step 3: Right-click ISAPI-dll, and select Edit Feature Permissions.
Step 4: Select Read, Script, Execute, and click OK.
-
Adding MIME type for loading the pages without extension names or pages without MIME types defined.
Step 1: Select Default Web Site and then double-click MIME Types on the right of the page.
Step 2: Right-click the blank area of the MIME Types page, and click Add.
Step 3: Specify the following settings:
-
Extension: *
-
MIME Type: application/octet-stream
Step 4: Click OK.
-
-
Restarting IIS.
Restart IIS to make the new settings effective.


J2EE servers refer to the Java application servers, such as WebLogic, WebSphere, JBoss, JEUS etc. The configuration is the same for the J2EE application servers that PowerServer supports.
Choose an existing Web site, or create a new site. The Default Web Site will be used as examples in the following guide.
-
Installing PowerServer Web component to the Web root of the IIS server.
Make sure you have installed PowerServer Web Component to the Web root of the IIS server. To verify it, go to the IIS Web root (by default C:\inetpub\wwwroot) and check if there is an appeon folder which contains the IISSupport and weblibrary_ax sub-folders. If any folder is missing, go to the default installation directory of PowerServer Web Component (C:\Program Files\Appeon\WebComponent[version]) and manually copy the entire appeon folder to the IIS Web root.
-
Creating a virtual directory.
Step 1: Open Control Panel | Administrative Tools | Internet Information Service (IIS) Manager.
Step 2: Right click Default Web Site and select Add Virtual Directory.
Step 3: Input the alias name, for example, "ApbCluster".
Step 4: Choose a local path in the Physical path box; for example, "C:\inetpub\wwwroot\ApbCluster".
Step 5: Click OK.
Step 6: Right click the ApbCluster virtual directory and select Edit Permissions.
Step 7: Choose the Security tab page and then click the Edit button.
Step 8: Select IIS_IUSRS, for example, IIS_IUSRS (HUANGXUXIA\IIS_IUSRS)from the Group or user names list, and then select the Allow check box for Modify and Write in the Permissions for IIS_IUSRS list.
Step 9: Click OK to go back to the IIS window.
-
Copying the Appeon plug-in (ApbCluster.dll or ApbCluster64.dll).
Copy the ApbCluster.dll (for 32-bit OS) or ApbCluster64.dll (for 64-bit OS) plug-in from appeon\IISSupport\modules to the newly created virtual directory (C:\inetpub\wwwroot\ApbCluster in this guide).
In the 64-bit OS, you can either use ApbCluster.dll or ApbCluster64.dll. If you use ApbCluster.dll, you will need to set the Enable 32-Bit Applications to True for the application pool used by the current Web site. If you use ApbCluster64.dll, then set this option to False.
-
Creating the Appeon cluster configuration file (cluster-config.xml).
Create the cluster-config.xml file in the newly created virtual directory (C:\inetpub\wwwroot\ApbCluster in this guide) or directly copy this file from the PowerServer AEM configuration folder (for example C:\inetpub\wwwroot\appeon\AEM\config\cluster-config.config) after configuring the cluster in AEM. The cluster-config.xml file acts as the redirector configuration file which helps the Web server redirect requests to the PowerServer according to the IP addresses/ports of PowerServer, and the load balancing algorithm that it stores.
<?xml version="1.0" encoding="UTF-8" ?>
<cluster-config local="true" log="debug" timeout="30" polling="5" arithmetic="sequence">
    <extention>/ApbCluster/ApbCluster.dll</extention>
    <filters>
        <filter>/AEM</filter>
        <filter>/servlet</filter>
        <filter>/reportfile</filter>
        <filter>/imagefile</filter>
        <filter>/dwfile</filter>
        <filter>/ajsdown</filter>
    </filters>
    <app-servers>
        <app-server host="192.0.0.168" port="88" />
        <app-server host="192.0.3.131" port="80" />
        <app-server host="192.0.3.145" port="80" />
    </app-servers>
    <app-servers-https>
        <app-server-https id="2218220616687201197240" host="172.16.8.10" port="443" />
    </app-servers-https>
</cluster-config>
Notes:
-
local specifies whether to read the configurations on the local server or the cloud server. For the cloud server, set Local to False.
-
log specifies the level of information to be recorded in the log file. It can be set to the following level: debug, info, warning, error, or off.
-
timeout specifies the number of seconds the Web server waits between sending an HTTP request to PowerServer and receiving information from it. The HTTP connection timeout value is 2 times of this value.
-
polling indicates the number of seconds when the configurations will be read again.
-
arithmetic="random" indicates that the random algorithm is used to pick a PowerServer; arithmetic="sequence" indicates that the round-robin algorithm is used.
-
extention specifies the location of the virtual directory which contains ApbCluster.dll (or ApbCluster64.dll), that is /virtual-directory-alias-name/ApbCluster.dll (/ApbCluster/ApbCluster.dll in this guide).
-
filter specifies the type of pages to redirect.
-
host indicates the IP address (recommended) or machine name of the PowerServer.
-
port indicates the port number of the PowerServer.
-
-
Installing the Appeon plug-in as ISAPI Filters.
Step 1: Open Control Panel | Administrative Tools | Internet Information Service (IIS) Manager.
Step 2: Select Default Web Site and then double-click ISAPI Filters on the right side.
Step 3: Right-click the blank area on the ISAPI Filters page, and click Add.
Step 4: Input ApbCluster in the Filter name box and specify ApbCluster.dll (or ApbCluster64.dll) as the ISAPI filter in the Executable box ( C:\inetpub\wwwroot\ApbCluster\ApbCluster.dll in this guide). Click OK.
-
Copying the redirector configuration file (ApbCluster.cfg).
Copy the ApbCluster.cfg redirector configuration file from appeon\IISSupport\conf\ to the virtual directory (C:\inetpub\wwwroot\ApbCluster in this guide) and edit the file when necessary.
Extension_URI=/ApbCluster/ApbCluster.dll
MatchExpression=/AEM
MatchExpression=/servlet
MatchExpression=/reportfile
MatchExpression=/imagefile
MatchExpression=/dwfile
MatchExpression=/ajsdown
Log=On
Notes:
-
The Extension_URI command specifies the location of the virtual directory which contains ApbCluster.dll (or ApbCluster64.dll), that is /virtual-directory-alias-name/ApbCluster.dll (/ApbCluster/ApbCluster.dll in this guide).
-
The MatchExpression commands specify the type of pages to redirect.
-
The Log command specifies whether to enable logging. On indicates logging is enabled; Off indicates logging is disabled.
-
The commands and parameters are case insensitive.
-
-
Setting ISAPI and CGI Restrictions.
Step 1: Open Control Panel | Administrative Tools | Internet Information Services (IIS) Manager.
Step 2: Select the local machine (the top node), and then double-click ISAPI and CGI Restrictions on the right side.
Step 3: Right-click the blank area of the ISAPI and CGI Restrictions page and click Add.
Step 4: Specify the local path of ApbCluster.dll (or ApbCluster64.dll) in the ISAPI or CGI path box and input the descriptive text in the Description box, and then select Allow extension path to execute.
Step 5: Click OK.
-
Enabling ISAPI-dll.
Step 1: Open Control Panel | Administrative Tools | Internet Information Services (IIS) Manager.
Step 2: Expand Default Web Site, select ApbCluster, and then double-click Handler Mappings on the right side.
Step 3: Right-click ISAPI-dll, and select Edit Feature Permissions.
Step 4: Select Read, Script, Execute, and click OK.
-
Adding MIME type for loading the pages without extension names or pages without MIME types defined.
Step 1: Select Default Web Site and then double-click MIME Types on the right of the page.
Step 2: Right-click the blank area of the MIME Types page, and click Add.
Step 3: Specify the following settings:
-
Extension: *
-
MIME Type: application/octet-stream
Step 4: Click OK.
-
-
Restarting IIS.
Restart IIS to make the new settings effective.
J2EE servers refer to Java application servers, such as WebLogic, WebSphere, JBoss, JEUS etc. The configuration is the same for the J2EE application servers that PowerServer supports.
-
Installing PowerServer Web component to the document root of the Apache Web server.
Make sure you have installed PowerServer Web Component to the document root of the Apache Web server. To verify it, go to the Apache document root (by default %APACHE%\htdocs) and check if there is an appeon folder which contains the Apache20Support, Apache22Support and weblibrary_ax sub-folders. If any folder is missing, go to the default installation directory of PowerServer Web Component (C:\Program Files\Appeon\WebComponent[version]) and manually copy the entire appeon folder to the Apache document root.
-
Copying Appeon plug-in.
Copy the mod_appeon2.so or mod_appeon22.so plug-in file from %APACHE%\htdocs\appeon\Apache2xSupport\modules to the %APACHE%\modules folder.
-
Copying Appeon Cluster configuration file.
Copy the cluster-config.xml file from the %appeon%\repository\<instancename>\config folder to the %APACHE%\conf folder, where %appeon% is the installation directory of PowerServer, and <instancename> refers to the name of the PowerServer instance.
Note: The cluster-config.xml file acts as the redirector configuration file which helps the Web server redirect requests to PowerServer according to the IP addresses/ports of PowerServer, and the load balancing algorithm that it stores. This file should not be modified manually as it will be automatically updated when you change the settings in the Cluster tool of AEM. Each time after you change the settings, be sure to copy this file and replace the old file in the %APACHE%\conf folder and restart Apache.
-
Modifying httpd.conf.
If the application server (such as WebLogic, WebSphere, JBoss, or JEUS) is running on Windows, add the following statements into the httpd.conf file under the %APACHE%\conf folder (take mod_appeon2.so as an example):
LoadModule appeon_module modules\mod_appeon2.so
<IfModule mod_appeon.c>
MatchExpression /AEM
MatchExpression /servlet
MatchExpression /reportfile
MatchExpression /imagefile
MatchExpression /dwfile
MatchExpression /ajsdown
</IfModule>
If the application server is running on UNIX/LINUX, add the following statements into the httpd.conf file under the %APACHE%\conf folder (take mod_appeon2.so as an example):
LoadModule appeon_module modules/mod_appeon2.so
<IfModule mod_appeon.c>
MatchExpression /AEM
MatchExpression /servlet
MatchExpression /reportfile
MatchExpression /imagefile
MatchExpression /dwfile
MatchExpression /ajsdown
</IfModule>
-
Restarting Apache.
Restart Apache for the new settings to take effect.
J2EE servers refer to the Java application servers, such as WebLogic, WebSphere, JBoss, JEUS etc. The configuration is the same for the J2EE application servers that PowerServer supports.
-
Installing PowerServer Web component to the document root of the Apache Web server.
Make sure you have installed PowerServer Web Component to the document root of the Apache Web server. To verify it, go to the Apache document root (by default %APACHE%\htdocs) and check if there is an appeon folder which contains the Apache20Support, Apache22Support and weblibrary_ax sub-folders. If any folder is missing, go to the default installation directory of PowerServer Web Component (C:\Program Files\Appeon\WebComponent[version]) and manually copy the entire appeon folder to the Apache document root.
-
Copying Appeon plug-in.
Copy the mod_appeon.so plug-in file from %APACHE%\htdocs\appeon\Apache13Support\modules to the %APACHE%\modules folder.
-
Copying Appeon Cluster configuration file.
Copy the cluster-config.xml file from the %appeon%\repository\<instancename>\config folder to the %APACHE%\conf folder, where %appeon% is the installation directory of PowerServer, and <instancename> refers to the name of a server instance.
Note: The cluster-config.xml file acts as the redirector configuration file which helps the Web server redirect requests to PowerServer according to the IP addresses/ports of PowerServer, and the load balancing algorithm that it stores. This file should not be modified manually as it will be automatically updated when you change the settings in the Cluster tool of AEM. Each time after you change the settings, be sure to copy this file and replace the old file in the %APACHE%\conf folder and restart Apache.
-
Modifying httpd.conf.
Add the following statements into the httpd.conf file under the %APACHE%\conf folder:
LoadModule appeon_module modules\mod_appeon.so
<IfModule mod_appeon.c>
MatchExpression /AEM
MatchExpression /servlet
MatchExpression /reportfile
MatchExpression /imagefile
MatchExpression /dwfile
MatchExpression /ajsdown
</IfModule>
-
Restarting Apache.
Restart Apache for the new settings to take effect.
