The Client Features helps you configure various clients settings related to the user interface and general user experience of applications, for example, graphics theme, start and exit behaviors, and client deployment locations.
You can configure the text shown in the title bar when the Web or mobile application is run. The default text is what defined in the Appeon license file.
This setting is effective only when you are using a Developer, Workgroup, or Enterprise Edition of PowerServer.
Note: This tool is for the browser-based Web application running in Internet Explorer only.
The Web Application Theme specifies the theme of the browser-based Web application that will be used on the client side. The IWA Web app will not take this theme setting, instead they will directly use the theme of OS.
There are two options for Web Application Theme:
-
Windows Vista: Applying this theme enables Appeon Web applications to show in Windows Vista style. The Windows Vista style also requires the end user set the Windows desktop Theme to Windows Vista.
-
Windows Classic: Applying this theme makes Appeon Web application presented in traditional Windows 2000 style.
When an Appeon Web application or Appeon mobile application is re-deployed and run, it will compare the application files on the client with the files on the server, if there are updated files on the server, it will download the files to the client if "Auto Update Web Files" is set to Yes, and will not download the files but directly use the cached files on the client if set to No. However, if there are new files on the server that do not exist on the client, then the new files will be downloaded regardless auto update is Yes or No.
If auto update is set to No, then the "Allow user to select run mode" setting in application Start & Exit Settings should be set to "No" and the "Default run mode" setting should be set to "Run after download", this will download all files to the client when the application is run for the first time, thus can avoid the following problems:
-
If "Run now" rather than "Run after download" is selected, the files will be downloaded only when needed, which may cause the updated files (or part of them) to be downloaded unexpectedly, as they may not be used and downloaded already (thus do not exist on the client).
-
If you switch the file generation mode (from release mode to debug mode, or vice versa, on PowerServer Toolkit | Configure button | Application Profiles tab page) and re-deploy the application, and if you select "Run now" rather than "Run after download", then you will see Web page errors when launching the Web application, as the application re-deployed under release mode (or debug mode) cannot directly use the cached files which were generated under debug mode (or release mode).
Note: This tool is for Web applications only.
The Run Mode sets whether the parameters transferred between the application and the server can be read and analyzed by stress-testing tools such as LoadRunner, UFT (Unified Functional Testing).
There are two Run Mode options:
-
Normal Mode: This is the default and recommended mode for running the Appeon Web or Appeon mobile applications.
-
Test Mode: This is the mode specifically for applications under performance testing. It enables the script to be recorded and transferred in the plain-text format, so that the script can be modified or parameterized to simulate a more realistic stress scenario.
Note:
-
If Test Mode is selected, be sure to disable the data cache in the DataWindow Data Cache page before the application is run.
-
If the setting of Test Mode has been changed, restart the Web browser to begin a new session. The changes will not take effect if you only click the Refresh button of the Web browser.
-
Mobile applications cannot run in Test Mode.
The Error Message Mode sets whether the errors occurred at runtime shall block the running of the application or not.
Click an application in the Application Name column of the table. The Error Message Mode settings page displays.
-
Display in the status bar mode means that the error displays in the Web browser status bar, and does not require the user to respond to it. The status bar only shows high-level error information.
-
Display in a popup message mode means that the error shows in a popup message box, and requires the user to respond to it first before continuing with the application. The popup message shows all the information available for locating the error, including error ID, error description, most possible cause, solution, and links to the Online Help and Appeon Technical Support.
Note: Appeon mobile apps, IWA apps, as well as Web apps running in non-IE browser (such as Edge, Chrome, Firefox, or Opera) can only support this mode.
PowerServer divides all runtime errors into 4 levels according to their severity, and enables you to specify different display modes for different error levels.
-
Level 0 - Not severe. The error has little impact to the functions of the application and displays in the status bar.
-
Level 1 - Quite severe. The error is caused by incorrect configuration, and affects the running of the application. For example, no data source is set for the application. It displays in a popup message.
-
Level 2 - Very severe. The error is caused by incompatibility with Appeon product. For example, the specification of invalid Web URL. The error displays in a popup message.
-
Level 10 - Most severe. The error reflects a bug in the Appeon product and displays in a popup message.
Note: These settings are available for Web apps running in the browser only, and not available for mobile and IWA apps.
The Start & Exit settings determine the modes when you start or exit the Web application. It includes the settings for Allow user to select run mode, Default Run Mode, and Exit Mode when exiting the Web application.
Before you start the Web application, you can set whether to allow the user to set the run mode of the Web application.
-
Yes: When you run a Web application, a run mode page will be displayed to allow you to select the running mode of the Web application, there are two modes: Run Now or Run After Download. Note: These two modes are not related with that are set in Default run mode, even you set the value of Default run mode, you can still change it and select the running mode according to your actual need in the run mode page.
-
No: When you run a Web application, there will be no run mode page being displayed, the Web application is directly running under the mode selected in Default run mode.
This option provides feasible download modes to the end user if they use slow bandwidth. Depending on the bandwidth, the end user can select from the following run modes when the application starts:
-
Run now: The application runs immediately and files will be downloaded only when used. This mode is recommended for high speed network.
-
Run after download: The application runs after all files are downloaded to the client. This is recommended for clients using low bandwidth.
You can control the behavior of the Web browser when you exit the Web application.
-
Close browser: Select this option if you want the Web browser to automatically close when you exit the Web application.
This option is only effective to Internet Explorer 7.0 or above.
-
Close tab: Select this option if you want the Web browser to stay opened and only the tab page running the Web application to be closed when you exit the Web application.
This option is only effective to Internet Explorer 7.0 or above.
-
Redirect to: Select this option if you want the current browser or tab page which runs the Web application to be redirected to run the specified URL.
Note: This setting is available for Web applications only.
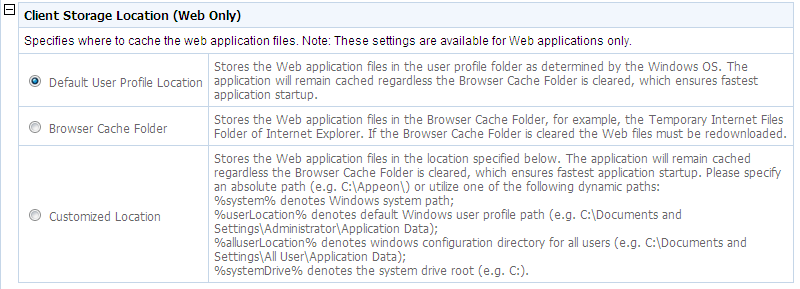
Specify a location to store the Web application files on the client side.
No matter which location is specified, you can call AppeonGetCacheDir function in Workarounds & APIs Guide to get the current directory for the application.
There are three options. Choose one of them to best fit your environment.
-
Default User Profile Location: The Web application files will be stored permanently in the %appdata%\appeon folder allocated by the Windows system, unless you remove them manually. The %appdata%\appeon folder in Windows 7/8 is: %SYSTEMDRIVE%\users\{username}\AppData\Roaming\appeon
-
Browser Cache Folder: The Web application files will be stored in the IE cache, no matter the application is run in IE, Edge, Chrome, Firefox, or Opera, or run as IWA. If the IE cache is cleared, the files will be downloaded again the next time the application runs. The IE cache directory varies depending on the Windows OS:
Windows 7: %SYSTEMDRIVE%\Users\{username}\AppData\Local\Microsoft\Windows\Temporary Internet Files\
Windows 8/8.1: %SYSTEMDRIVE%\Users\{username}\AppData\Local\Microsoft\Windows\INetCache\
-
Customized Location: The Web application files will be stored in the location specified here. You must specify absolute path here (e.g. C:\Appeon\) or use one of the following dynamic paths:
%SYSTEMDRIVE% which stands for system drive root, e.g. C:\.
%SYSTEM% which stands for the Windows system directory. In Windows 7 and later, C:\Windows.
%USERPROFILE% which stands for the Windows user profile folder. In Windows 7 and later, C:\Users\{username}.
%HOMEPATH% which stands for the home folder for the Windows user. In Windows 7 and later, C:\Users\{username}.
%USERLOCATION% which stands for the Windows user profile folder. In Windows 7 and later, C:\Users\{username}\AppData\Roaming.
%ALLUSERLOCATION% which stands for the Windows user profile folder for all users. In Windows 7 and later, C:\ProgramData.
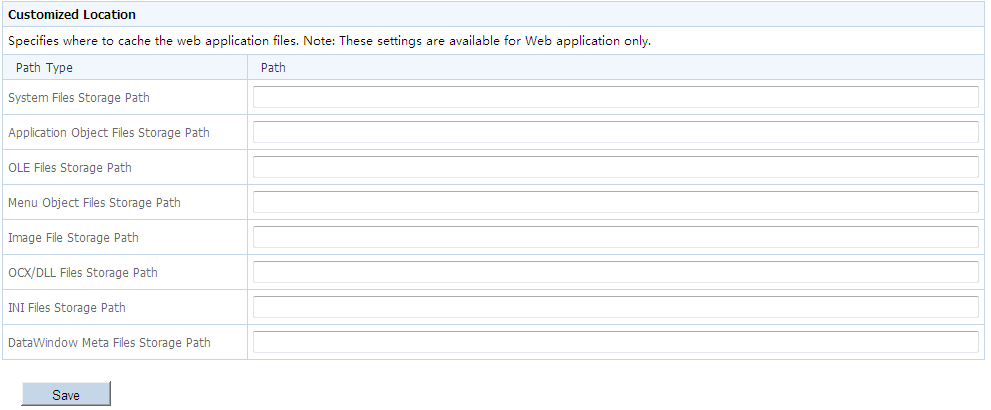
When this option is selected, the following table will display for you to specify the storage location for the Web files of different types. Note that the first path System Files Storage Path cannot be empty or null, and it should be specified first, because the value specified here will be used automatically as the root path for the following items by default. You can change the path for each file type according to the actual needs.
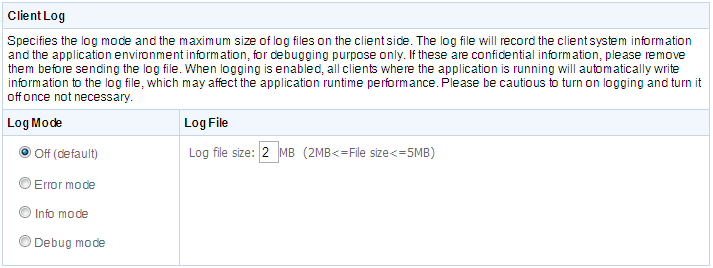
Select one of the following modes for the logs generated on the client side, and specify the maximum size for the log files.
See the following table for details on the mode options.
Table 27. Client Log Mode
|
Client Log Mode |
Description |
|---|---|
|
OFF |
Does not generate any log file. |
|
ERROR |
Only generates error log files. |
|
INFO |
Generates log files that are informative to users. |
|
DEBUG |
Generates detailed log files that are sufficient for routine checking and troubleshooting. |
Log File: Enter a number between 2 to 5 here to specify the log size to be generated. If the log generated reaches the specified number, the generated logs will be automatically removed from the client.
Log path:
-
For Web applications:
-
If you select Default User Profile Location as the client storage location in Client Storage Location, the log is saved in C:\Users\{username}\AppData\Roaming\appeon\%appname%\log\appeonclient.log. {username} is the Windows login name you are using, for example, administrator.
-
If you select Browser Cache Folder as the client storage location in Client Storage Location, the log is saved in C:\Users\{username}\AppData\Local\Microsoft\Windows\Temporary Internet Files\{systemfolder1}\{subsystemfolder1}\appeonclient.log.
{username} is the Windows login name you are using, for example, administrator.
{systemfolder1} is a system-hidden directory (not the general hidden files) that cannot be displayed even by enabling the Show hidden files, folders, and drivers option (Computer > Organize > Folder and search options > View > Show hidden files, folders, and drivers), and the name for the {systemfolder1} is usually content.IE5 or similar, so you just can open the {systemfolder1} by typing C:\Users\{username}\AppData\Local\Microsoft\Windows\Temporary Internet Files\content.IE5\ into the Address bar.
The name for {subsystemfolder1} is random.
An automatic way to determine the browser cache directory for the current application is by calling an API Appeon provides. See AppeonGetCacheDir function in Workarounds & APIs Guide.
-
If you select Customized Location as the client storage location in Client Storage Location, the log is saved in %System Files Storage Path%\log\appeonclient.log. For example, if you type e:\App in the System Files Storage Path text box in Client Storage Location, the log will be saved in e:\App\log\appeonclient.log.
-
-
For mobile applications (that run in Appeon Workspace): The log file is saved in the Log folder under the application folder on your mobile device. You cannot view the log file on mobile device as how you view the Web application log on PCs; but you can view the log or send the log via email in Appeon Workspace. For details on how to view the log or send the log via email, refer to the section called “Configuring logs” in Appeon Workspace User Guide.
-
For native mobile applications: You can call the of_sendmail function of eon_mobile_awsex object to send the log as attachment, and the log file path and name is: AppeonGetCacheDir()+"/Log/EonMob.log".
Refer to the section called “of_sendmail” in Workarounds & APIs Guide for details.
Note: This tool is for iOS mobile apps only.
Configures whether to support retina display or not on retina-supported iOS devices using this Retina Display tool. When enabled, the UI including controls, text, and images will not be scaled. As a result, the application will look very crisp at the expense of higher memory.


