Note: the configuration files and the DLL files used here are actually the same as those used in the PowerServer cluster, therefore even though their file names contain text like "cluster", it does not necessarily mean they are for the PowerServer cluster only, they are also applicable to a single PowerServer or multiple PowerServer (not PowerServer cluster).
Choose an existing Web site, or create a new site. The Default Web Site will be used as examples in the following guide.
-
Installing PowerServer Web component to the Web root of the IIS server.
Make sure you have installed PowerServer Web Component to the Web root of the IIS server. To verify it, go to the IIS Web root (by default C:\inetpub\wwwroot) and check if there is an appeon folder which at least contains the IISSupport and weblibrary_ax sub-folders. If any folder is missing, go to the default installation directory of PowerServer Web Component (C:\Program Files\Appeon\WebComponent2017R3) and manually copy the entire appeon folder to the IIS Web root.
-
Creating a virtual directory.
Step 1: Open Control Panel | Administrative Tools | Internet Information Service (IIS) Manager.
Step 2: Right click the Default Web Site and select Add Virtual Directory.
Step 3: Input the alias name, for example, "ApbCluster".
Step 4: Choose a local path in the Physical path box; for example, "C:\inetpub\wwwroot\ApbCluster".
Step 5: Click OK.
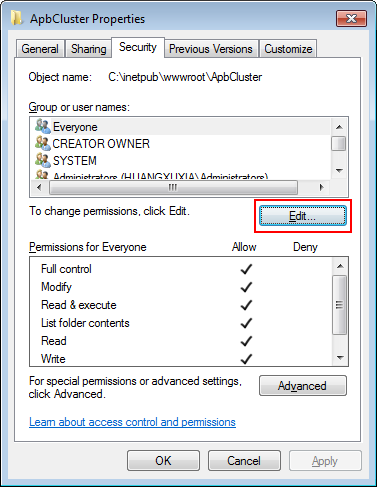
Step 6: Right click the ApbCluster virtual directory and select Edit Permissions.
Step 7: Choose the Security tab, and then click the Edit button.
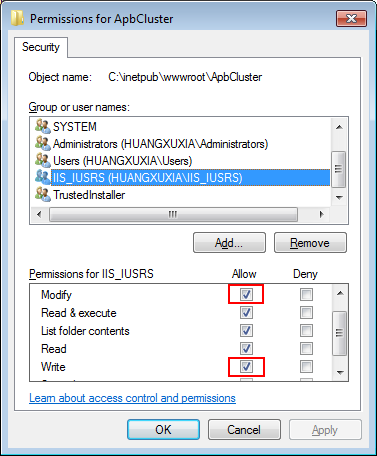
Step 8: Select IIS_IUSRS, for example, IIS_IUSRS (HUANGXUXIA\IIS_IUSRS) from the Group or user names list, and then select the Allow check box for Modify and Write in the Permissions for IIS_IUSRS list.
Step 9: Click OK to go back to the IIS window.
-
Copying the Appeon plug-in (ApbCluster.dll or ApbCluster64.dll).
Copy the ApbCluster.dll (for 32-bit OS) or ApbCluster64.dll (for 64-bit OS) plug-in from appeon\IISSupport\modules to the newly created virtual directory (C:\inetpub\wwwroot\ApbCluster in this guide).
In the 64-bit OS, you can either use ApbCluster.dll or ApbCluster64.dll. If you use ApbCluster.dll, you will need to set the Enable 32-Bit Applications to True for the application pool used by the current Web site. If you use ApbCluster64.dll, then set this option to False.
-
Creating the Appeon cluster configuration file (cluster-config.xml).
Create the cluster-config.xml file in the newly created virtual directory (C:\inetpub\wwwroot\ApbCluster in this guide). The cluster-config.xml file acts as the redirector configuration file which helps the Web server redirect requests to the PowerServer according to the IP addresses/ports of PowerServer, and the load balancing algorithm that it stores.
<?xml version="1.0" encoding="UTF-8" ?>
<cluster-config local="true" log="debug" timeout="30" polling="5" arithmetic="sequence">
    <extention>/ApbCluster/ApbCluster.dll</extention>
    <filters>
        <filter>/AEM</filter>
        <filter>/servlet</filter>
        <filter>/reportfile</filter>
        <filter>/imagefile</filter>
        <filter>/dwfile</filter>
        <filter>/ajsdown</filter>
    </filters>
    <app-servers>
        <app-server host="192.0.0.168" port="88" />
        <app-server host="192.0.3.131" port="80" />
        <app-server host="192.0.3.145" port="80" />
    </app-servers>
</cluster-config>
Notes:
-
local specifies whether to read the configurations on the local server or the cloud server. For the cloud server, set Local to False.
-
log specifies the level of information to be recorded in the log file. It can be set to the following level: debug, info, warning, error, or off.
-
timeout specifies the number of seconds the Web server waits between sending an HTTP request to PowerServer and receiving information from it. The HTTP connection timeout value is 2 times of this value.
-
polling indicates the number of seconds when the configurations will be read again.
-
arithmetic="random" indicates that the random algorithm is used to pick a PowerServer; arithmetic="sequence" indicates that the round-robin algorithm is used.
-
extention specifies the location of the virtual directory which contains ApbCluster.dll (or ApbCluster64.dll), that is /virtual-directory-alias-name/ApbCluster.dll (/ApbCluster/ApbCluster.dll in this guide).
-
filter specifies the type of pages to redirect.
-
host indicates the IP address (recommended) or machine name of the PowerServer.
-
port indicates the port number of the PowerServer.
-
-
Installing the Appeon plug-in as ISAPI Filters.
Step 1: Open Control Panel | Administrative Tools | Internet Information Services (IIS) Manager.
Step 2: Select Default Web Site and then double-click ISAPI Filters on the right side.
Step 3: Right-click the blank area on the ISAPI Filters page, and click Add.
Step 4: Input ApbCluster in the Filter name box and specify ApbCluster.dll (or ApbCluster64.dll) as the ISAPI filter in the Executable box (C:\inetpub\wwwroot\ApbCluster\ApbCluster.dll in this guide). Click OK.
-
Copying the redirector configuration file (ApbCluster.cfg).
Copy the ApbCluster.cfg redirector configuration file from appeon\IISSupport\conf\ to the virtual directory (C:\inetpub\wwwroot\ApbCluster in this guide) and edit the file when necessary.
Extension_URI=/ApbCluster/ApbCluster.dll
MatchExpression=/AEM
MatchExpression=/servlet
MatchExpression=/reportfile
MatchExpression=/imagefile
MatchExpression=/dwfile
MatchExpression=/ajsdown
Log=On
Notes:
-
The Extension_URI command points to the virtual directory where ApbCluster.dll (or ApbCluster64.dll) resides, that is /virtual-directory-alias-name/ApbCluster.dll (/ApbCluster/ApbCluster.dll in this guide).
-
The MatchExpression command specifies the pages to be redirected.
-
The Log command specifies whether logging is enabled. On indicates logging is enabled; Off indicates logging is disabled.
-
The commands and parameters are case insensitive.
-
-
Setting ISAPI and CGI Restrictions.
Step 1: Open Control Panel | Administrative Tools | Internet Information Services (IIS) Manager.
Step 2: Select the local machine (the top node), and then double-click ISAPI and CGI Restrictions on the right side.
Step 3: Right-click the blank area of the ISAPI and CGI Restrictions page and click Add.
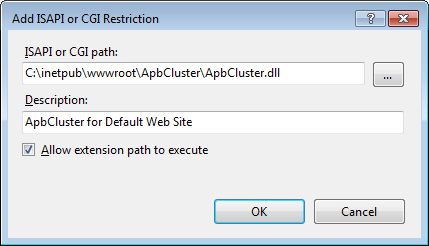
Step 4: Specify the local path of ApbCluster.dll (or ApbCluster64.dll) in the ISAPI or CGI path box and input the descriptive text in the Description box, and then select Allow extension path to execute.
Step 5: Click OK.
-
Enabling ISAPI-dll.
Step 1: Open Control Panel | Administrative Tools | Internet Information Services (IIS) Manager.
Step 2: Expand Default Web Site, select ApbCluster, and then double-click Handler Mappings on the right side.
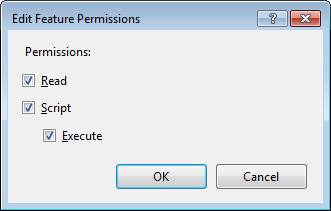
Step 3: Right-click ISAPI-dll, and select Edit Feature Permissions.
Step 4: Select Read, Script, Execute, and click OK.
-
Adding MIME type for loading the pages without extension names or pages without MIME types defined.
Step 1: Select Default Web Site and then double-click MIME Types on the right of the page.
Step 2: Right-click the blank area of the MIME Types page, and click Add.
Step 3: Specify the following settings:
-
Extension: *
-
MIME Type: application/octet-stream
Step 4: Click OK.
-
-
Restarting IIS.
Restart IIS to make the new settings effective.


