Now you create an MDI frame window for the application.
In this exercise you:
-
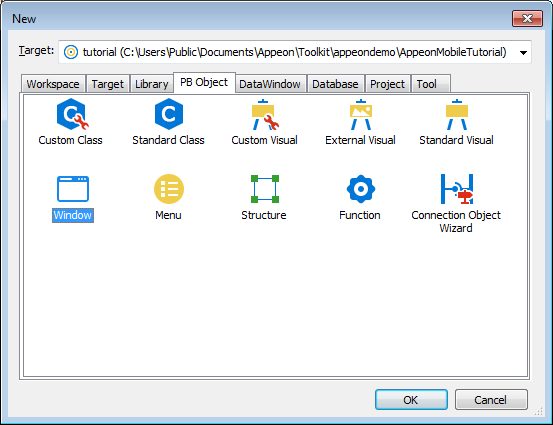
Click the New button in the PowerBar1.
The New dialog box is displayed.
-
Click the PB Object tab.
Select the Window icon and click OK.
The Window painter opens. Notice that you have four new toolbars, the StyleBar (with character style and text alignment buttons), PainterBar1 (with save, cut, copy, paste, close buttons etc.), PainterBar2 (with buttons used with the Script view) and PainterBar3 (with color and border buttons, as well as grayed out control alignment buttons).
-
Make sure that the Layout view and the Properties view are displayed in the Window painter.
You can display these views by selecting them from the View menu. If they are grayed out in the menu, the views are already displayed in the painter.
The default view layout scheme contains both views.
To retrieve the default painter layout
Select View > Layouts > Default from the workspace menu bar.
The rectangle in the Layout view represents the window you are building.
If your window does not have a pegboard look
If the window in your Layout view is displayed as a solid color, the Show Grid option has been disabled. To enable it, select Design > Options from the menu bar. Then select the Show Grid checkbox on the General page of the Options dialog box. Click Apply, then OK to save the change and close the dialog box.
-
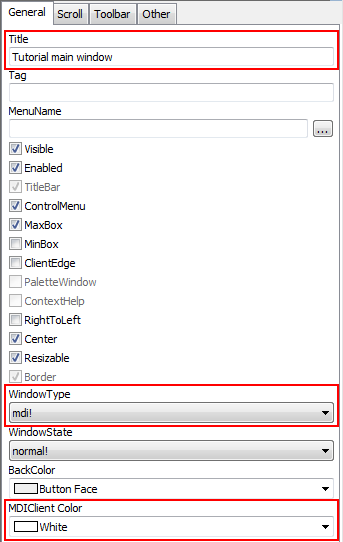
Type Tutorial main window in the Title text box on the General page of the Properties view.
Select mdi! in the WindowType list box.
Select White in the MDIClient Color list box.
When you set the window type to mdi! or mdihelp!, you must associate a menu with the frame. Menus usually provide a way to open sheets in the frame.
About MDI
MDI stands for multiple document interface. In an MDI application, the main window for the application is called the MDI frame. Using the MDI frame menu bar, you can open additional windows known as sheet windows that display inside the frame window.

Now you attach the m_main menu you have created to the MDI frame window.
-
Click the ellipsis button next to the MenuName box on the General page of the Properties view.
The Select Object dialog box appears.
-
Select m_main in the Menus list box and click OK.
This is the menu you have created. It is now listed as the menu name in the Properties view.
-
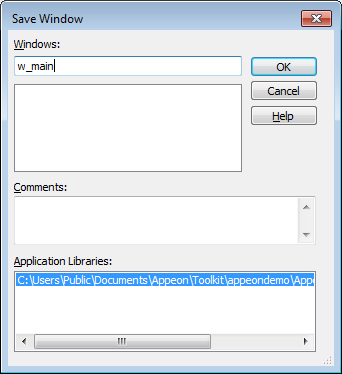
Select File > Save from the menu bar.
The Save Window dialog box is displayed. The only library in the Application Libraries text box is tutorial.pbl, and it is selected.
-
Type w_main for the window name.
The prefix w_ is standard for windows.
-
Click OK.
PowerBuilder saves the new MDI frame window. If you expand tutorial workspace, tutorial, and tutorial.pbl in the system tree, you can see w_main listed under it.
Now you change the size of the application's frame window. When you run the application, the frame window is displayed in the size that you specify.
The Window painter should still be open for the w_main window. If it is not, you can double-click the w_main window in the System Tree to open it in the Window painter.
-
Click the Other tab in the Properties view.
-
Type 4672 in the Width text box and 2950 in the Height text box.
Press the Tab key.
The size of the window rectangle in the Layout view changes. The values you type are in PowerBuilder Units (PBUs).
Other methods for entering position properties
You can use the spin controls to enter values instead of typing them. Alternatively, you can change the size of the window in the Layout view by moving the pointer to the bottom or right edge of the window. When it turns into a double-headed arrow, you can drag the arrow to change the window size.
-
Select File > Close from the PowerBuilder menu.
Click Yes when you are prompted to save your changes.
The Window painter closes.

Now you add a one-line script to open the w_main window as soon as the application starts executing.
In this exercise you:
Now you write scripts in the Application object Open event to open the w_main frame window.
-
Expand the tutorial workspace, the tutorial target, and tutorial.pbl in the system tree, double-click the tutorial Application object.
or
Right-click the tutorial Application object and select Edit from the pop-up menu.
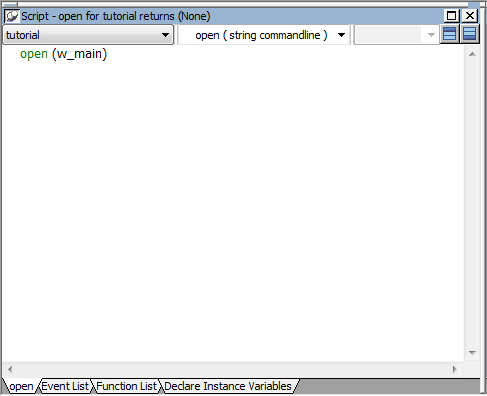
The Application painter opens and displays the Open event in the Script view.
Using the Script view
The Script view has three drop-down list boxes. The first drop-down list box displays the list of available controls for the current object plus two special entries, Functions and Declare. The contents of the second drop-down list box depend on the selection in the first drop-down list box. The third drop-down list box contains all ancestor objects of the current object, if any.
-
Type the following script in the Script view:
open(w_main)
This calls the Open function to display the w_main frame window you created.
-
Select File > Save from the menu bar.
Now you compile the script you just typed. In this exercise, you use a pop-up menu item to compile the script. PowerBuilder also compiles a script when you close the Script view or when you select a different object, event, or function for display in the Script view.
Handling errors in scripts
When there is an error in a script, an error window is displayed at the bottom of the Script view with the line number of the error and the error message.
To find an error
Click on an error message to move the cursor to the line that contains that error. After you correct the error, you can try to compile the script again.
Commenting out errors
PowerBuilder does not save scripts that have errors. If you want to save a script that has errors, select the entire script and click the Comment button to comment out the code. You can come back later, uncomment the code, and fix the problem.
-
Right-click anywhere in the Script view script area. Select Compile from the pop-up menu.
The script compiles.
-
Close the Application painter by clicking the close button in PainterBar1.
Click Yes when you are prompted to save your changes.
