Appeon provides a non-visual object, AppeonFileService object, with five functions for uploading files to and downloading files from the file server. This is a web-based solution, and it does not work in your client/server application.
You should follow the steps below to implement File Upload and Download:
Step 1: Configuring and deploying the file server
Step 2: Uploading and Downloading files
Appeon File Server is a standard non-visual Web application running on the back-end for uploading and downloading files. For PowerServer installed to the .NET IIS, the setup wizard of Appeon File Server (setup.exe) can be found under %IIS_Web_Root%\appeon\plugin\fileservice. For PowerServer installed to the Java server, the WAR package of Appeon File Server (fileservice.war) can be found under %Appeon_Server%\plugin\fileservice.
You must configure and deploy the file server first in order to use the AppeonFileService object in the Appeon Workarounds PBL. In most cases Appeon File Server is deployed to the machine where the application server is installed. It can also be deployed separately. For example, when the file size is too big, uploading or downloading it will negatively impact the performance of the application server, you can deploy the file server separately to another machine.
In the following section, you will be guided to configure and deploy Appeon File Server to IIS (.NET Framework), WebLogic, WebSphere, JBoss, JEUS, and NetWeaver. For more about the deploy instructions, refer to related documents of IIS, WebLogic, WebSphere, JBoss, JEUS, and NetWeaver.
You will need to install first and then configure the Appeon File Server. For installing the file server to IIS, Appeon provides a setup.exe file at %IIS_Web_Root%\appeon\plugin\fileservice.
Step 1: Double click the setup.exe file to start the setup.
If the "Installation Incomplete" error displays, please try the solution in the the section called “Appeon File Server Installation Incomplete” in PowerServer Troubleshooting Guide.

Step 2: Click the Next button and then the following window pops up. Select a Web site where the Appeon File Server will be installed.
Note that DO NOT change the name of Virtual directory otherwise Appeon File Server will fail to start.

Step 3: Click Next until the installation is complete.
Step 4: Go to directory where the Appeon File Server is installed, for example (C:\inetpub\wwwroot\fileservice).

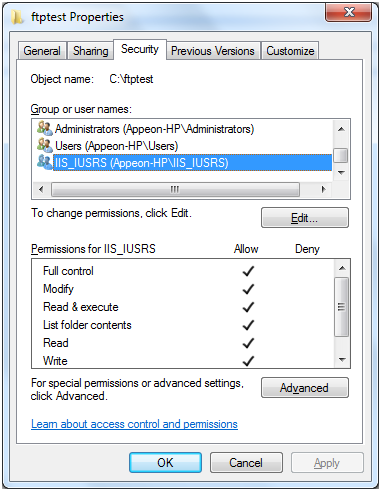
Step 5: Select Properties from the right-click menu of the fileservice folder.
Step 6: In the Security tab page of the fileservice Properties window,
For IIS 7.5 or above, grant the IIS_IUSRS user with Full Control permission to this folder.
Uninstall Appeon File Server
Step 1: Go to Start | Control Panel | Add and Remove Programs.
Step 2: Select Appeon File Server and click Remove button.
After deploying the Appeon File Server, follow steps below to configure it.
Open the appeonfileserver.xml in C:\Inetpub\wwwroot\fileservice.
<?xml version="1.0" encoding="UTF-8"?>
<webserver>
<!-- The value of attribute "value" must begin with either a single or double quote character. -->
 <file-path value="D:\appeon\upload" />
 <log-level value="3" />          <!--0 Error,1 Info,2 Func, 3 Debug-->
 <session-timeout value="3600" /> <!-- the unit is second  -->
 <allowed-file-types value="txt;doc;jpg;mpeg" ignorecase="true" />
 <max-file-size value="20" />     <!-- the unit is M -->
 <users>
  <user name="test" password="password" />
  <user name="userA" password="userA" />
  <user name="userB" password="userB" />
 </users>
</webserver>
Modify the file according to your own demands.
Table 2. Settings specification value
|
Settings |
The value of the setting specifies... |
|---|---|
|
<file-path> |
Specifies the directory to which files are saved after uploaded to the file server. Files are automatically saved in the "plugin" folder under the application directory when downloaded from the file server. |
|
<log-level> |
Specify the log level. Value: 0 - Error 1 - Information 2 - Function 3 - Debug |
|
<session-timeout> |
Specifies the time, in seconds, that passes after the last request is processed before the session times out. |
|
<allow-file-type> |
Specifies the file types that can be uploaded. Use a ";" between two file types.
|
|
<max-file-size> |
Specifies the maximum size (MB) of the file that can be uploaded. |
|
<user> |
Specifies the User Name and Password that can log on the file server. Multiple users are allowed as shown in the code example above. |
You will need to configure first and then deploy the Appeon File Server. Follow steps below to configure the Appeon File Server:
Step 1: On the machine where the Appeon File Server will be deployed, create an XML file wherever you like and name it whatever you wish. In this example, create an XML file named "appeonfileserver.xml" under D:\appeon\config directory.
Step 2: Copy the following code to the XML file.
<?xml version="1.0" encoding="UTF-8"?>
<fileserver>
 <file-path value="D:\appeon" />
 <session-timeout value="3600" />
 <allowed-file-types value="txt;doc;jpg;mpeg" ignorecase="true" />
 <max-file-size value="20" />
 <users>
  <user name="userA" password="userA" />
  <user name="userB" password="userB" />
 </users>
</fileserver>
Step 3: Modify the settings in the XML file if necessary.
Table 3. The settings specification value
|
Settings |
The value of the setting specifies... |
|---|---|
|
<file-path> |
Specifies the directory to which files are saved after uploaded to the file server. Files are automatically saved in the "plugin" folder under the application directory when downloaded from the file server. |
|
<session-timeout> |
Specifies the time, in seconds, that passes after the last request is processed before the session times out. |
|
<allow-file-type> |
Specifies the file types that can be uploaded. Use a ";" between two file types.
|
|
<max-file-size> |
Specifies the maximum size (MB) of the file that can be uploaded. |
|
<user> |
Specifies the User Name and Password that can log on the file server. Multiple users are allowed as shown in the code example above. |
Step 4: On the machine where the PowerServer is installed, unzip the fileservice.war (%powerserver%\plugin\fileservice) and find the web.xml file under the WEB-INF folder. Then open web.xml with a text editor. Replace the bold text with the name and directory of the XML file created in the previous steps.
<?xml version="1.0" encoding="UTF-8"?>
<!DOCTYPE web-app PUBLIC '-//Sun Microsystems, Inc.//DTD Web Application 2.3//EN'
'http://java.sun.com/dtd/web-app_2_3.dtd'>
<web-app>

<servlet>
 <servlet-name>fileservice</servlet-name>
 <servlet-class>com.appeon.fileserver.WebServiceDispatcher</servlet-class>
 <init-param>
  <param-name>config</param-name>
  <param-value>D:\appeon\config\appeonfileserver.xml</param-value>
 </init-param>
 <load-on-startup>1</load-on-startup>
</servlet>
<servlet>
 <servlet-name>uploadfile</servlet-name>
 <servlet-class>com.appeon.fileserver.UploadFile</servlet-class>
 <init-param>
  <param-name>config</param-name>
  <param-value>D:\appeon\config\appeonfileserver.xml</param-value>
 </init-param>
 <load-on-startup>1</load-on-startup>
</servlet>

<servlet-mapping>
 <servlet-name>fileservice</servlet-name>
 <url-pattern>/fileservice</url-pattern>
</servlet-mapping>

</web-app>
Step 5: Save the file and re-compress the fileservice folder to fileservice.war using WinZip, WinRAR or JDK. Do not use the other compression tools such as 7-zip.
Then follow the next section Deploying the Appeon File Server to deploy fileservice.war.
After configuring the Appeon File Server, follow steps below to deploy it:
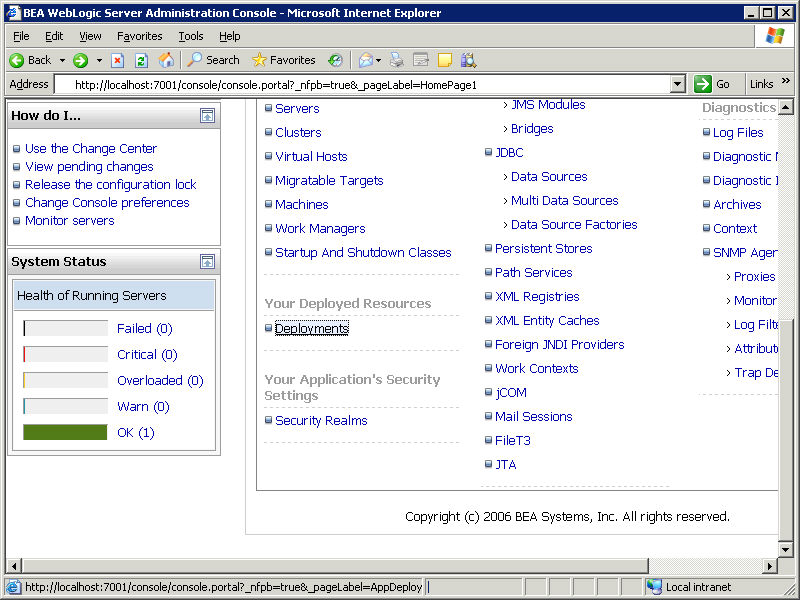
Step 1: On the machine where PowerServer is installed, access the WebLogic Server Administration Console in a Web browser.
Step 2: Click the Deployment link.
Step 3: Click the Install button and select the fileservice.war file at %powerserver%\plugin\fileservice.
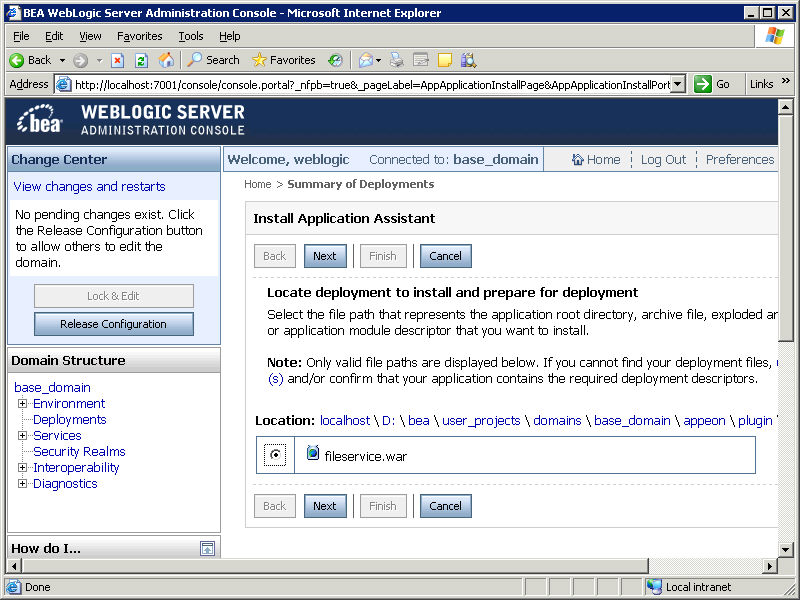
Step 4: Click the Next button to use the default settings and then click the Finish button to finish the deployment of Appeon File Server.
Configuring the Appeon File Server in the Java server such as WebLogic, WebSphere, JBoss, JEUS, NetWeaver etc. is the same. Please refer to Configuring the Appeon File Server for WebLogic.
After configuring the Appeon File Server, follow steps below to deploy it:
Step 1: On the machine where PowerServer is installed, access the WebSphere Administrative Console in a Web browser.
Step 2: Select Applications | Install New Applications from the left tree view. And then in the right page specify the path where the fileservice.war is (by default at %powerserver%\plugin\fileservice) and Context Root for the WAR file and click the Next button.

Step 3: Click Next with default settings until the file server is successfully installed on the WebSphere server.
Configuring the Appeon File Server in the Java server such as WebLogic, WebSphere, JBoss, JEUS, NetWeaver etc. is the same. Please refer to Configuring the Appeon File Server for WebLogic.
After configuring the Appeon File Server, follow steps below to deploy it. There are two methods to deploy the Appeon File Server in JBoss:
-
Automatic deploy
Copy the file fileservice.war to the directory %JBoss installation root directory%\standalone\deployments and then start JBoss.
The fileservice.war file will be deployed automatically.
-
Manual deploy
-
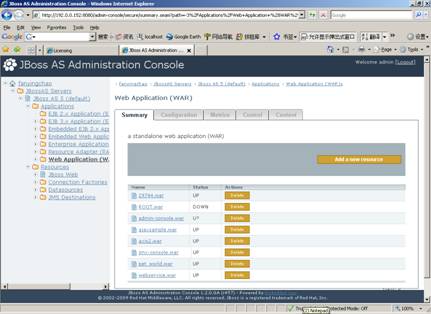
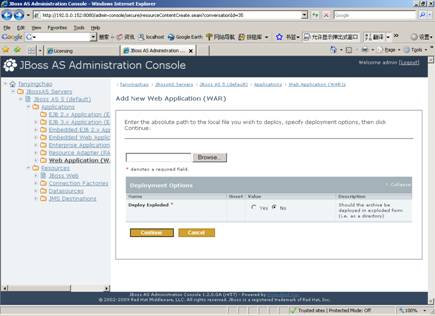
Start JBoss and log in to JBoss console.
-
Select Web Application in the left tree view and then click Add a new resource in the right page.
-
Click Browse and locate the file fileservice.war.
-
Click Continue with default settings until the file server is successfully deployed in the JBoss server.
-
Configuring the Appeon File Server in the Java server such as WebLogic, WebSphere, JBoss, JEUS, NetWeaver etc. is the same. Please refer to Configuring the Appeon File Server for WebLogic.
Configuring the Appeon File Server in the Java server such as WebLogic, WebSphere, JBoss, JEUS, NetWeaver etc. is the same. Please refer to Configuring the Appeon File Server for WebLogic.
After configuring the Appeon File Server, follow steps below to deploy it:
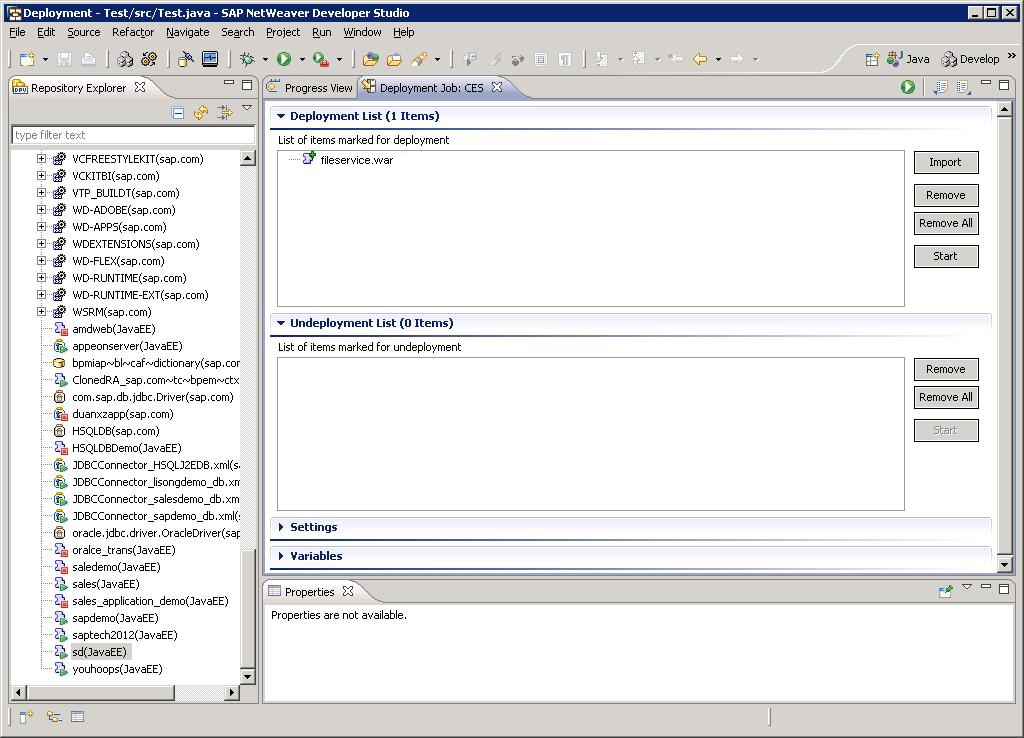
Step 1: Open the deployment perspective in the SAP NetWeaver Developer Studio by clicking the menu Window | Open Perspective | Other and then selecting deployment in the pop-up window. The deployment perspective is shown as below.
Step 2: Click the Import button to import the fileservice.war file and then click Start to deploy the Appeon File Server after the file is imported successfully.
After configuring and deploying the Appeon File Server, you can follow the steps below to upload files to or download files from the Appeon File Server.
Step 1: Add Appeon Workaround PBL to your PowerBuilder project.
Step 2: Define a variable and create an instance for the AppeonFileService object.
Step 3: Call of_logonfileserver to connect to the file server.
Step 4: Call of_appeonupload or of_appeondownload to upload or download files.
Step 5: Call of_logofffileserver to disconnect from the file server.
AppeonFileService object provides service about the file uploading and downloading.
AppeonFileService object provides the following functions to upload and download files:
-
of_logonfileserver function: Connects to the file server.
-
of_logofffileserver function: Disconnects from the file server.
-
of_appeonupload function: Uploads file to the file server. You can specify the path where the source file locates and the path where the file will be uploaded.
-
of_appeondownload function: Downloads the specified file from the file server. You can specify the path from which the file is downloaded and the path to which the file will be saved.
-
of_FileExists function: Reports whether the specified file exists on the file server.
Description
Connects to the Appeon File Server.
Syntax
appeonfileservice.of_logonfileserver (string fileserveripaddress, long port, string connectstring )
| Parameter |
Description |
|---|---|
|
appeonfileservice |
An instance of an AppeonFileService object |
|
fileserveripaddress |
Protocol and IP address or machine name of the Appeon File Server. To use the HTTPS protocol, you should add "https://" before the IP address or machine name, for example, "https://192.168.168.52", otherwise, HTTP protocol (http://) will be used by default. |
|
port |
HTTP or HTTPS port of the application where the Appeon File Server is deployed. |
|
connectstring |
User name and password for connecting to the Appeon File Server. Format: "username=username;password=password". Use a semicolon ";" to separate the user name and password. The user name and password should be consistent with those specified in the appeonfileserver.xml configuration file. |
Return value
|
Long. |
Return values are: 0 - The logon is successful. -1 - Connection to the file server fails. -2 - The provided user name or password is invalid. |
Code example
long ll_re
string info

ll_re = fileservice.of_logonfileserver ("192.168.168.52", 80, "username=userA;password=userA")

if ll_re = 0 then
 info = "Logon to file server is successful."
elseif  ll_re = 1 then
 info = "Failed to connect to the file server."
else
 info = "Failed to connect to the file server."
end if

Messagebox( "ll_re="+string(ll_re),info)Description
Disconnects from the Appeon File Server.
Syntax
appeonfileservice.of_logofffileserver()
| Parameter |
Description |
|---|---|
|
appeonfileservice |
An instance of an AppeonFileService object |
Return value
|
Long. |
Return values are: 0 - The log-off is successful. -1 - Connection to the Appeon File Server fails. -2 - The session has timed out or the user has not logged off the file server. |
Code example
long ll_re
string info

ll_re = fileservice.of_logofffileserver ( )

if ll_re = 0 then
 info = "Logoff file server is successful."
elseif  ll_re = 1 then
 info = "Failed to log off file server."
else
 info = "The session has timed out or the user has not logged off the file server."
end if

Messagebox( "ll_re="+string(ll_re),info)
Description
Uploads file to the Appeon File Server.
Syntax
appeonfileservice.of_appeonupload (string source, string destination, boolean isrename, ref long errorcode)
appeonfileservice.of_appeonupload (string destination, boolean isrename, ref long errorcode) (Web only)
appeonfileservice.of_appeonupload (boolean isrename, ref long errorcode) (Web only)
| Parameter |
Description |
|---|---|
|
appeonfileservice |
An instance of an AppeonFileService object. |
|
source |
The file name and directory of the source file. For the mobile application, this parameter is required; it must be specified with a valid directory. For the Web application, this parameter is optional. If no directory is specified here, a dialog box will be displayed prompting the user to select a file to upload. |
|
destination |
The destination directory on the file server where the file is uploaded.The directory specified here is a relative path to the file directory specified in the appeonfileserver.xml configuration file. This parameter is optional to both the Web application and the mobile application. |
|
isrename |
Whether to rename the file if another file with the same name already exists. |
|
errorcode |
The error occurred when uploading files. Values are: 0 - Succeeded. -1 - Connection to the file server fails. -2 - ID error. -3 - The format of the source file is forbidden. -4 - Destination directory is invalid or the file is too large. |
Return value
|
String. |
Returns the URL of the uploaded file if it succeeds and returns an empty string if it fails. Returns NULL if any argument is NULL. |
Usage
If you want to delete an uploaded file, you must restart the file server after deleting it. Otherwise, you will fail to upload the file with the same name.
Code example
long ll_re
string info,ls_url

ls_url = fileservice.of_appeonupload ("C:\temp\1.pdf", "pdf_files", true, ll_re)

if ll_re = 0 then
 info = "Upload is successful."
elseif  ll_re = 1 then
 info = "Failed to upload the file."
else
 info = "Other errors."
end if

Messagebox("ll_re="+string(ll_re),info+"~r~nurl="+ls_url)Description
Downloads the specified file from the Appeon File Server.
Syntax
appeonfileservice.of_appeondownload (string source)
appeonfileservice.of_appeondownload (string source, string target)
| Parameter |
Description |
|---|---|
|
appeonfileservice |
An instance of an AppeonFileService object. |
|
source |
The file name and directory of the file which will be downloaded. The directory specified here is a relative path to the file directory specified in the appeonfileserver.xml configuration file. |
|
target |
(Optional) The destination directory on the client machine where the file will be saved after downloaded from the file server. For the mobile application, this parameter is ignored, as the file will be automatically saved to the "plugin" folder under the application directory. You can determine the directory for the current application by calling the AppeonGetCacheDir function. For the Web application, this parameter is optional. If no directory is specified here, a dialog box will be displayed prompting the user to select a location to save the file. |
Return value
|
Long. |
Return values are: 0 - The file is successfully downloaded. -1 - The file download failed or exceptions occurred. -3 - File name is empty. NULL if any argument is NULL. |
Code example
The following code example is to download a PDF file named "1.pdf" from the "pdf_files" folder under the specified directory on the Appeon File Server. On the Web client, the file will be saved to "C:\" as specified by the target parameter; while on the mobile device, the file will be automatically saved to the "plugin" folder for the current application, despite that the target parameter is set to "C:\".
long ll_re
string info

ll_re = fileservice.of_appeondownload ("pdf_files\1.pdf", "C:\")

if ll_re = 0 then
 info = "Download is successful."
else
 info = "Other errors."
end if

Messagebox ("ll_re="+string(ll_re),info)
The following code example is to view the PDF file (named "1.pdf" located on the local C drive) via Internet Explorer. This is effective for the Web client only.
string ls_file

ls_file = "~"C:\Program Files\Internet Explorer\iexplore.exe~" C:\1.pdf"
Messagebox("",ls_file)
run(ls_file)Description
Reports whether the specified file exists on the Appeon File Server.
Syntax
appeonfileservice.of_FileExists (String filename)
| Parameter |
Description |
|---|---|
|
appeonfileservice |
An instance of the AppeonFileService object. |
|
filename |
A string whose value is the name of a file. |
Return value
Long.
1 - The file exists.
0 - The file does not exist on the Appeon File Server.
-1 - Failed to connect to the Appeon File Server.
Code example
long ll_re
string info

ll_re = fileservice.of_fileexists ("pdf_files\1.pdf")

if ll_re =1 then
 info = "The file exists."
elseif ll_re =0 then
 info = "The file does not exist on the file server."
else
 info = "Other errors."
end if

Messagebox( "ll_re="+string(ll_re),info)Obsolete function
of_downloadfile is an obsolete function and will be discontinued in a future release. Please replace it with of_appeondownload.
Obsolete function
of_uploadfile is an obsolete function and will be discontinued in a future release. Please replace it with of_appeonupload.
AppeonFileService object provides the following properties (private instances) to upload and download files:
-
is_FileServerName instance: Indicates the name of the file server.
-
is_LogOnParams instance: Indicates the connection string for logging into the file server.
-
il_Id instance: Long. Indicates the ID number returned from the file server when logon has succeeded.
Description
Indicates the IP address or machine name of the file server. This property is initialized after the of_LogOnFileServer function is called.
Return value
String.
Description
Indicates the connection string for logging into the file server. This property is initialized after the of_LogOnFileServer function is called.
Return value
String.
