Be aware of the following points before you run the deployment project to install an application to the server:
-
The Setup program of the generated deployment project runs on the Windows platform only. To install applications to servers running on Unix\Linux, you must run the Setup program on the Windows platform and then install the application to remote servers running on Unix\Linux.
-
The target server must have PowerServer correctly installed. If the Web server is separated from the PowerServer, then the Web server must have the PowerServer Web Component installed.
The generated deployment project runs on the Windows platform only. Therefore, you will need to copy the deployment project to a computer running Windows and then install the application to any number of PowerServer and Web servers located in the same network area. Installing an application using the deployment project is the same as deploying an application using the Appeon Deployment Wizard.
Step 1: Start the target PowerServer(s) and Web server(s) where you want to install the application.
Verify that the target servers already have PowerServer installed.
Step 2: Run the Setup.exe file in the generated deployment project.
The Appeon Application Deployment wizard is displayed. Click Next to proceed.
Step 3: Select the deployment configuration file (config.xml) to ease your configuration of the installation wizard. The installation wizard will use the settings in the config.xml file.
If you do not want to use the deployment configuration file, simply skip this option and click Next to configure the settings step by step.

Step 4: Input the Application Profile Name and the Application URL for the application and click Next.
The Application Profile Name is used as the application name to identify an application. If you want to install multiple instances of the same application on the same server, you can run the setup package repeatedly and specify different Application Profile Name here. For example, input appeon_code_examples_test as the Application Profile Name in the first installation, and input appeon_code_examples_production as the Application Profile Name in the second installation. The Application Profile Name will be used as the application name to distinguish the multiple application instances on the same server, so they can be run independently from each other.
However, there are the following circumstances that you should not use different Application Profile Name and Application URL from those specified when creating the package, otherwise the application would not run:
-
when you are installing a mobile application
-
when you are installing a Web application to a JEUS Web server

Step 5: Configure and select profiles for the PowerServer(s) and the Web server(s) where the application will be installed.
To install the application to more than one PowerServer, please make sure the PowerServer are of the same version (such as 2017) as the PowerServer selected for packaging.
To install the application to a PowerServer cluster, please create a PowerServer profile for each PowerServer in the cluster. For detailed instructions on how to create the PowerServer profile and Web server profile, refer to the section called “Managing server profiles”.

Step 6: Select whether to install AEM settings and data sources for the current application and click Next.

Step 7: Specify the destination folder for the undeployment tool and the log file and click Next.
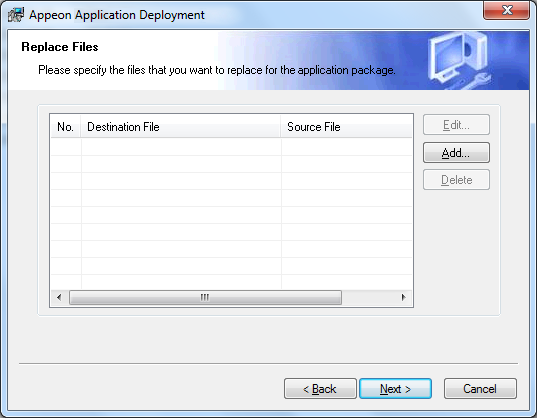
Step 8: Specify the destination file and source file that you want to replace for the Appeon application package, and click Next.
Files (also called "destination file") under the "wcode" folder of Appeon application package can be replaced by files of the same type (also called "source file"), so that the source file will be installed instead of the destination file. When you click the Add button, the File Replacement dialog box is opened. To select the destination file, click Browse to display the Open file dialog which will automatically open the "wcode" folder of Appeon application package, so you can conveniently select a file from the "wcode" folder or from its subfolder. To select the source file, click Browse to navigate to the folder where the source file is stored.
Step 9: Wait while the wizard is installing files and settings.
Step 10: Once the operation is complete, click Finish to exit the installation wizard.
To run the application immediately, select the Run Application Now option and click Finish. Or you can run the application later from the Windows Start > Programs > Appeon Web Application > ApplicationName.
To view the log information generated during the installation process, select the View Log box and then click Finish. The log file will be displayed.
Step 1: Start the PowerServer(s) and/or Web server(s) where you intend to uninstall the application.
Step 2: Select Windows Start > All Programs > Appeon Application > Undeploy ApplicationName.
The Appeon Application Undeployment Wizard is displayed. Click Next to proceed.

Step 3: Select an existing deploy-config file to automatically use the configuration previously used for the deployment wizard.
Step 4: Specify the Application URL.
Step 5: Select the PowerServer(s) and Web server(s) where application will be undeployed. Click Next to proceed.
To create the PowerServer profile and Web server profile, refer to the section called “Managing server profiles”.
Step 6: Wait while the wizard is removing files and settings.
Step 7: Once the operation is complete, click Finish to exit the undeployment wizard.
To view the log information generated during the uninstall process, select the View Log box and then click Finish. The log file will be displayed.

