Create a Web API
Last Updated: February 2021
This tutorial teaches how to create an ASP.NET Core Web API in SnapDevelop.
In this tutorial, you learn how to:
- Create a Web API Project
- Test the Sample API
- Add a Database Context
- Register the Database Context
- Add and Register a Service (.NET DataStore)
- Test the Service APIs
- Call the Service API from PowerBuilder
The following diagram shows the high-level design of a Web API.

When the client app sends a user request (an URL) to the Web API, the API controller class handles the request and calls the method in the service class to perform the business logics and data operations.
- A Controller is responsible for the initial processing of the request and returning the result of the processing. The controller does not include data access or business logic; it calls the service to perform data operations and business logics.
- A Service is responsible for retrieving and creating data models from the data source, performing application specific logic and manipulation, etc. The service is where the core business logic is. A service normally separates its interface from its implementation of that interface.
These concepts will be covered later in this tutorial.
Prerequisites
SnapDevelop 2019 R3
Sample database setup
Install SQL Server Express or SQL Server 2012 or later.
Download the database backup file (AdventureWorks_for_sqlserver.zip) from https://github.com/Appeon/.NET-Project-Example-Database.
Restore the database using the downloaded database backup file.
For how to restore the database, you can refer to the readme file: https://github.com/Appeon/.NET-Project-Example-Database/blob/master/README.md.
Create a Web API Project
Start SnapDevelop and select Create New Project from the Start page. Or, from the File menu, select New and then Project....
In the New Project dialog, select ASP.NET Core Web API from the template list, and select Basic for the Sample Code. Name the project WebAPI1 and click OK.
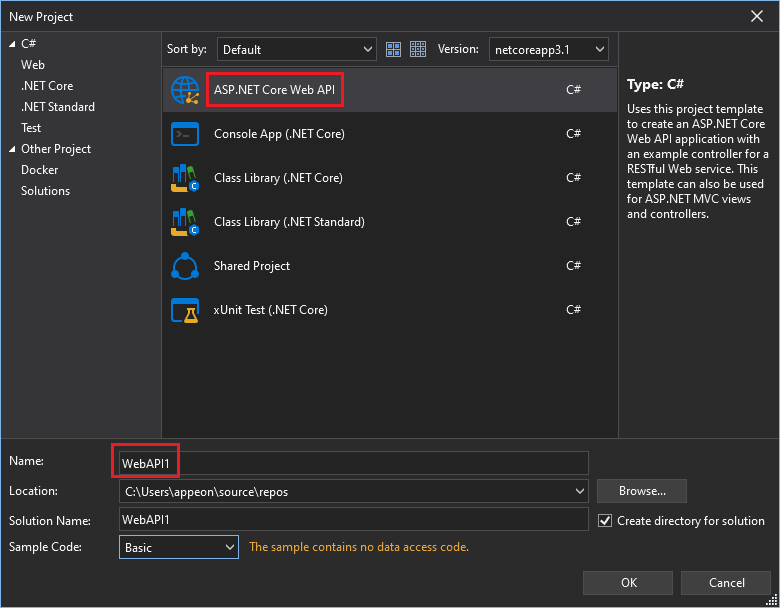
A sample API is created from the project template. The Web API project contains the following folders and files by default:

Test the Sample API
The Web API project includes a sample controller called SampleController.cs by default. The action methods in the controller class will be invoked when a user requested is submitted.
Open SampleController.cs, right-click in the Load() method, and then select Run Test(s).

In the Web API Tester, click Send.
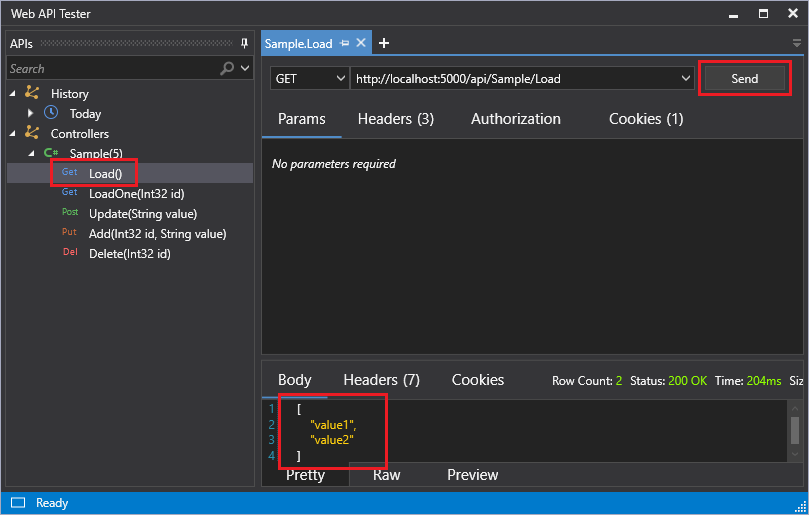
The following JSON is returned:
[
    "value1",
    "value2"
]
In the following sections, we will add a database context and a service (.NET DataStore) to this Web API project.
Add a Database Context
The database context is the class that manages database connections and transactions. This class is created by deriving from the SnapObjects.Data.DataContext class.
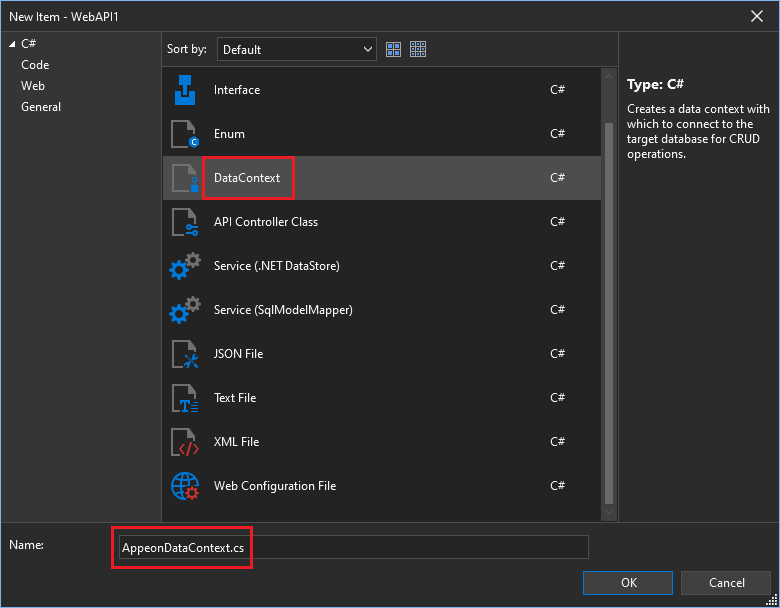
Right-click the Web API project and select Add > New Item.... Select DataContext from the item template list and name the class AppeonDataContext and click OK.
In the Database Connection dialog box, click New.
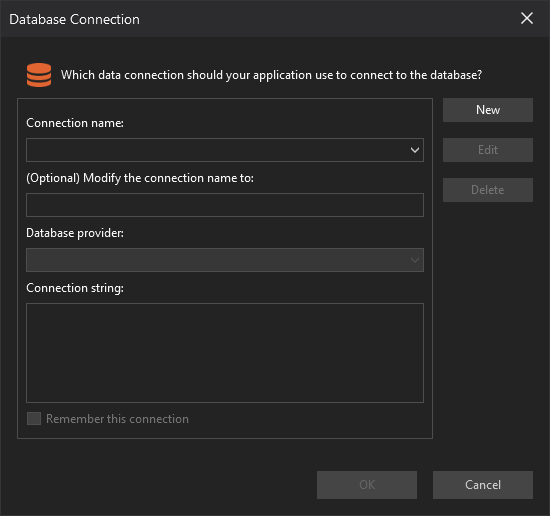
Configure the connection settings, and select the AdventureWorks2012 database. Click Test Connection to test the connection, and then click OK.
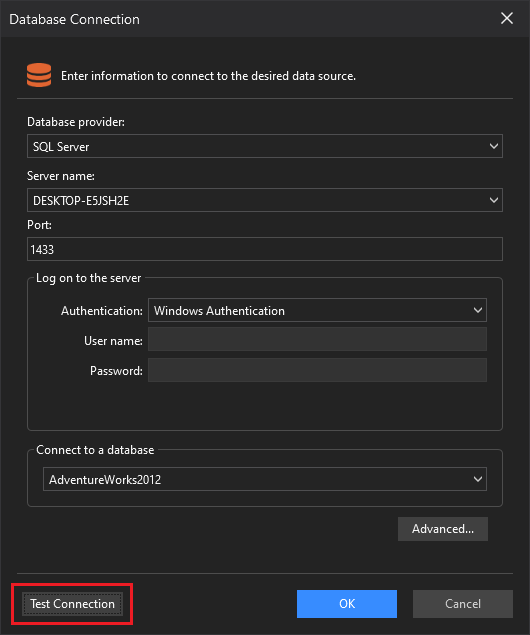
Then back to the Database Connection dialog box, a connection string is automatically generated, click OK.
The connection string is saved in appsettings.json and the AppeonDataContext class is created.
Register the Database Context
In ASP.NET Core, services such as the DataContext must be registered with the dependency injection (DI) container. The container provides the service to controllers.
In the ConfigureServices() method in Startup.cs, right-click where you want to insert the code and select Inject DataContext.
In the Inject DataContext(s) dialog box, make sure WebAPI1 and AppeonDataContext are selected and click OK.
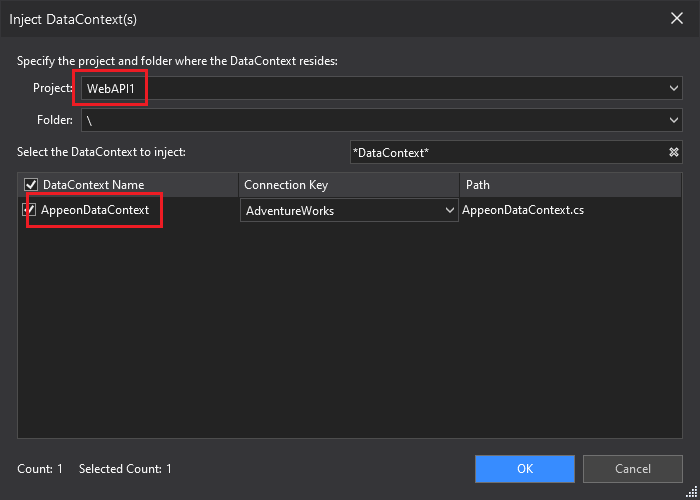
The following code is automatically added to the ConfigureServices() method:
services.AddDataContext<AppeonDataContext>(m => m.UseSqlServer(this.Configuration, "AdventureWorks2012"));
Add a Service
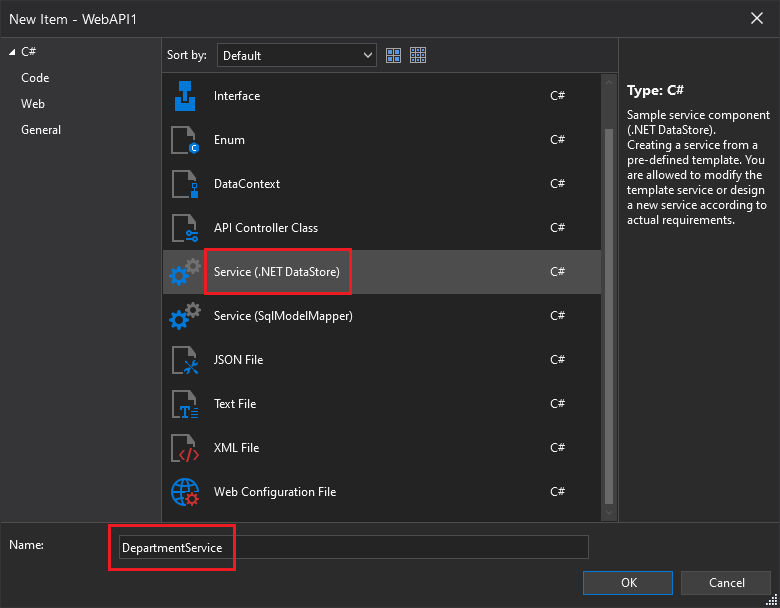
Right-click the Web API project and select Add > New Item.... Select Service (.NET DataStore) from the item template list and name the service DepartmentService and click OK.
Please note that the template Service (.NET Datastore) is created for this tutorial ONLY. By creating a service from this template, you add a data model mapping to the table HumanResources.Department in the AdventureWorks2012 database, and create the corresponding services and controllers.
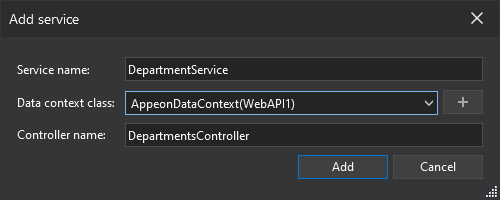
Choose the AppeonDataContext class (created in Add a database context) that will be used to connect to the database. And change the name of the controller to DepartmentsController. (It is a good practice to use plural names for your controllers if any method will return/update/delete more than one row).
Click Add.
The following folders and classes are created from the Service (.NET DataStore) template:
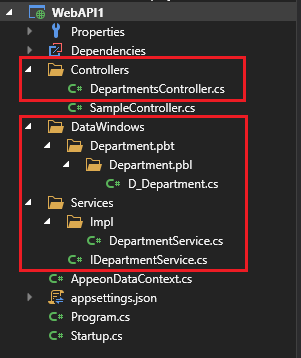
Services folder: This folder contains the service which performs the data operations on the .NET DataStore model.
\IDepartmentService.cs: This service defines the
IDepartmentServiceinterface which contains the declaration of the following methods. All of these methods are declared with parameter(s) and return type only, but with an empty body, as shown below:public interface IDepartmentService { Task<IDataStore<D_Department>> RetrieveByKeyAsync(int id, CancellationToken cancellationToken); Task<int> CreateAsync(D_Department department, CancellationToken cancellationToken); Task<int> UpdateAsync(D_Department department, CancellationToken cancellationToken); Task<int> UpdateAsync(IDataStore<D_Department> department, CancellationToken cancellationToken); Task<int> DeleteByKeyAsync(int id, CancellationToken cancellationToken); }\Impl\DepartmentService.cs: This service provides the implementation of the IDepartmentService interface. It contains the actual definition of the methods declared in the interface.
Take the
RetrieveByKeyAsyncmethod in DepartmentService.cs for example. It retrieves one data row from the database according to the specified id, and returns the retrieved data in an instance of theD_Department.NET DataStore model.public async Task<IDataStore<D_Department>> RetrieveByKeyAsync(int id, CancellationToken cancellationToken) { var dataStore = new DataStore<D_Department>(_dataContext); await dataStore.RetrieveByKeyAsync(new object[] { id }, cancellationToken); return dataStore; }
Controllers\DepartmentsControllers.cs: This controller is based on the DepartmentService service. It defines the routing format, the HTTP method, and the action methods corresponding to the service.
[Route("api/[controller]/[action]")][controller]will be automatically replaced with the name of the controller, which by convention is the controller class name minus the "Controller" suffix. For this sample, the controller class name is DepartmentsController, so the controller name is "Departments".[action]will be automatically replaced with the name of the action method in the controller. For example, appendingapi/departments/retrieveone/{id}to the base URL would cause theRetrieveOneAsyncaction method in theDepartmentsControllersclass to run.// GET api/departments/retrieveoneasync/{id} [HttpGet("{id}")] [ProducesResponseType(typeof(D_Department), StatusCodes.Status200OK)] [ProducesResponseType(StatusCodes.Status404NotFound)] public async Task<ActionResult<D_Department>> RetrieveOneAsync(int id) { var department = await _departmentservice.RetrieveByKeyAsync(id, CancellationToken.None); if (department.Count == 0) { return NotFound(); } return department.FirstOrDefault(); }The [HttpGet] attribute denotes a method that responds to an HTTP GET request.
"{id}"is a placeholder variable for the unique identifier of the department. Whenretrieveoneasyncis invoked, the value of"{id}"in the URL is provided to the method in itsidparameter.The
RetrieveOneAsyncaction method calls theRetrieveByKeyAsyncmethod in the DepartmentService service.DataWindows\Department.pbt\Department.pbl\D_Department.cs: This is the .NET DataStore model converted from a PowerBuilder DataWindow. It maps to the table
HumanResources.Departmentin the AdventureWorks2012 database.
Add the following using statement to Startup.cs:
using DWNet.Data.AspNetCore;
Add the UsePowerBuilderIntegrated method to the ConfigureServices method in Startup.cs:
 services.AddControllers(m =>
            {
                m.UseCoreIntegrated();
                m.UsePowerBuilderIntegrated();
            });
Register the DepartmentService service by right-clicking in the ConfigureServices() method in Startup.cs, selecting Inject Service, and then selecting the DepartmentService service.
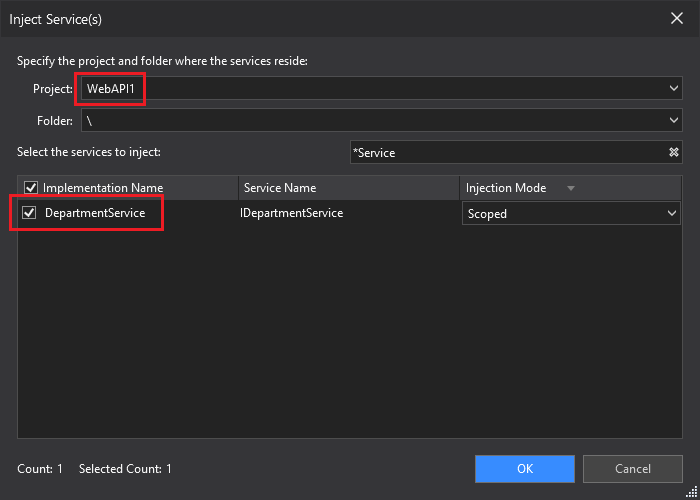
After you click OK, the following line is added automatically to the ConfigureServices() method:
services.AddScoped<IDepartmentService, DepartmentService>();
And notice that the following using statement is added to Startup.cs:
using WebAPI1.Services;
Test and Run the Web APIs
Test the Web APIs
Right-click in the RetrieveOneAsync method of DepartmentsController.cs and then select Run Test(s).
In the Web API Tester, input 1 for the value of id and click Send.
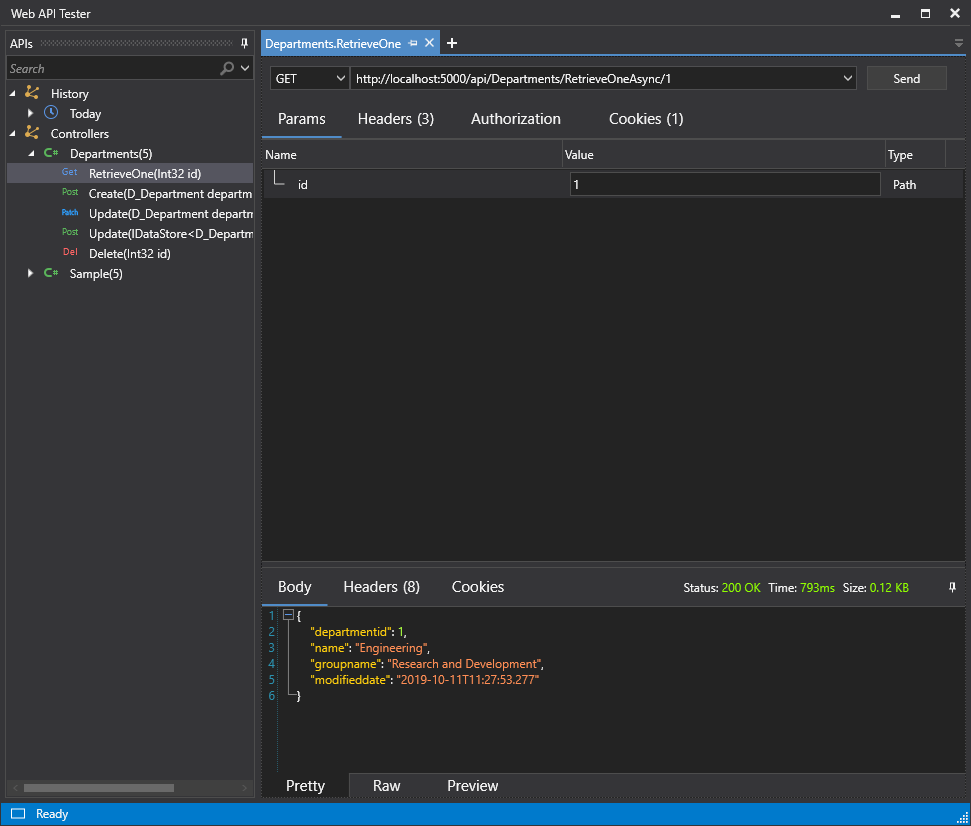
The following JSON is returned:
{
    "departmentid": 1,
    "name": "Engineering",
    "groupname": "Research and Development",
    "modifieddate": "2019-10-11T11:27:53.277"
}
For more information about Web API Tester, please go to this tutorial: https://docs.appeon.com/snapdevelop2019r3/Testing_with_Web_API_Tester/index.html.
Run the Web APIs
Run the Web APIs by pressing Ctrl+F5 in SnapDevelop IDE. SnapDevelop will build the Web API project, start the Web APIs, and access the default Web API: http://localhost:5000/api/sample/load in the Web browser.
If you enter this URL: http://localhost:5000/api/Departments/RetrieveOne/1 in the Web browser, the following JSON is returned:
{"departmentid":1,"name":"Engineering","groupname":"Research and Development","modifieddate":"2008-04-30T00:00:00"}
Call the Web APIs from PowerBuilder
In this section, we create a PowerBuilder app as the client app to access the Web APIs.
Add a JSON DataWindow
A JSON DataWindow is a traditional DataWindow that has a Web API as its data source. You use the same functionalities on the client-side, but the data manipulation is done on the Web API server-side. In this example, we create a PowerBuilder DataWindow and use it as the JSON DataWindow.
Start PowerBuilder and create a template application with no database connection. Then add a Grid DataWindow that maps to the table HumanResources.Department in the AdventureWorks2012 database. Save the DataWindow object with the name d_department.
Add a DataWindow control to a window. Set its Name to dw_department and DataObject to d_department. And add a Retrieve button for the retrieval operation.
Retrieve Data to the JSON DataWindow
The PowerBuilder RESTClient object provides the ability to access the RESTful Web APIs. It can load the JSON-formatted string returned from the RESTful Web Service APIs into the DataWindow object.
In the Declare Instance Variables of your window, add an instance variable of the RESTClient object:
RESTClient inv_RestClient
In the open event of your window, create the object variable:
// Create the RESTClient object variable
inv_RestClient	= CREATE RESTClient
In the clicked event of the Retrieve button, add the RESTClient.RetrieveOne() method to call the Web API and load the data directly into the DataWindow. If you retrieve more than one row, use RESTClient.Retrieve() instead.
// Retrieve the DW using the RESTClient
inv_RestClient.RetrieveOne(dw_department, "http://localhost:5000/api/departments/retrieveone/1")
Now you can run the PowerBuilder application, and click Retrieve to retrieve data via the Web API. (Note: Your Web API needs to be running.)
See Also
Now you have learned how to retrieve data with .NET DataStore through a Web API; you might want to learn how to perform CRUD operations with .NET DataStore through Web APIs.