Secure a Web API with a JWT Token
Last Updated: March 2020
Introduction
This tutorial teaches the basics of using JWT token to secure a web API with ASP.NET Core in SnapDevelop.
In this tutorial, you will learn how to:
- Create a Web API Project
- Test the API
- Configure Authentication and JWT
- Enable HTTPS and Authentication
- Add a Service
- Add a Controller
- Enable Authentication for the Sample Controller
- Test the Sample API
- Call the
serviceAPI from PowerBuilder
Prerequisites
- PowerBuilder 2019 R2 and SnapDevelop 2019 R2
Create a Web API Project
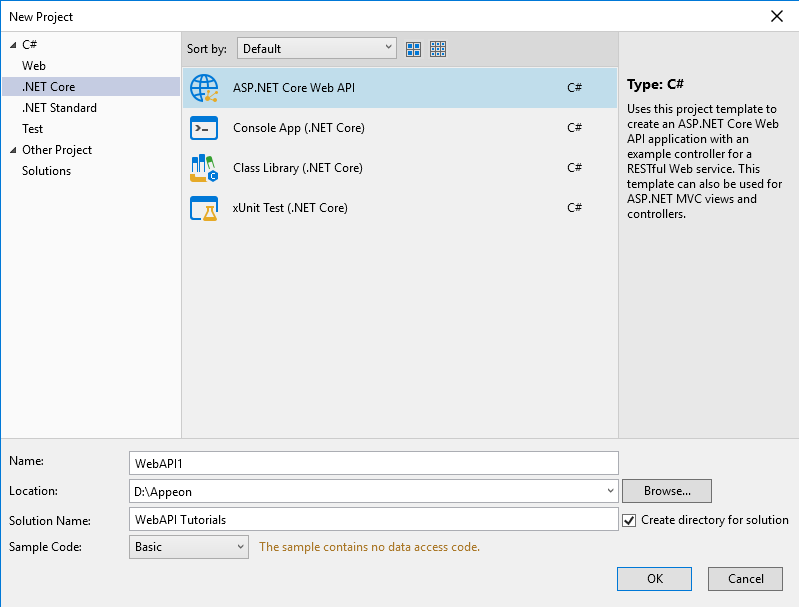
Start SnapDevelop and select Create New Project from the Start page. Or, from the File menu, select New and then Project....
In the New Project dialog box, select .NET Core, and in the list of project templates, select ASP.NET Core Web API. Name the project "WebAPI1", name the solution "WebAPI Tutorials" and click OK.
Test the API
The project template creates a sample API. Call the Load method from a browser to test the app.
Press Ctrl+F5 to run the app. SnapDevelop launches a browser and navigates to http://localhost:5000/api/sample/load.
If it's the first time the Web API runs, you may need to wait several seconds for initiating .NET runtime after the browser is launched.
The following JSON is returned:
["value1","value2"]
Configure Authentication and JWT
Update Startup.cs, add the following using statements.
using Microsoft.AspNetCore.Authentication.JwtBearer;
using Microsoft.IdentityModel.Tokens;
using System.Text;
Define Secret Key in Startup.cs
public class Startup
{
    //put secret here for simplicity, usually it should be in appsettings.json
    public const string SECRET = "THIS IS USED TO SIGN AND VERIFY JWT TOKENS, REPLACE  IT WITH YOUR OWN SECRET, IT CAN BE ANY STRING";

    //other code
    ......
Add Configuration Code
Update the ConfigureServices(IServiceCollection services) method in Startup.cs. Add the following code to the end of the method:
            var key = Encoding.ASCII.GetBytes(SECRET);

            services.AddAuthentication(x =>
            {
                x.DefaultAuthenticateScheme = JwtBearerDefaults.AuthenticationScheme;
                x.DefaultChallengeScheme = JwtBearerDefaults.AuthenticationScheme;
            })
            .AddJwtBearer(x =>
            {
                x.RequireHttpsMetadata = true;
                x.SaveToken = true;
                x.TokenValidationParameters = new TokenValidationParameters
                {
                    ValidateIssuerSigningKey = true,
                    IssuerSigningKey = new SymmetricSecurityKey(key),
                    ValidateIssuer = false,
                    ValidateAudience = false
                };
            });
Enable HTTPS and Authentication
Update Configure(IApplicationBuilder app, IHostingEnvironment env) method in Startup.cs. Uncomment the following line of code.
app.UseHttpsRedirection();
Add the following code under app.UseHttpsRedirection().
app.UseAuthentication();
The changed code is as below.
app.UseHttpsRedirection();
app.UseAuthentication();
Add a Service
Add a User Model
Right-click on the Web API project. Click Add > New Folder. Name it Models. Then right-click on the new folder and click Add > Class.
On the popup window, name it User.cs and click OK.

The User class represents the data for a user, and acts as a data model in the application. Replace the auto-generated code with the following code.
namespace WebAPI1.Models
{
    public class User
    {
        public int Id { get; set; }
        public string UserName { get; set; }
        public string Password { get; set; }
        public string Role { get; set; }
        public string Token { get; set; }
    }
}
Add Service Interface and Implementation
Right-click on the Web API project. Click Add > New Folder. Name it Services. Now add a sub-folder to it and name it Impl. Next, right-click on the Services folder and click on Add > Interface.

Select Interface on the template list and name the interface IUserService, click OK. The interface defines the user service. Replace the auto-generated code with the following code.
namespace WebAPI1.Services
{
    public interface IUserService
    {
        string Login(string userName, string password);
    }
}
Right-click on the Services/Impl folder and click on Add > Class. Name the class UserService. The UserService implements IUserService interface. Replace the auto-generated code with the following code.
using System;
using System.Collections.Generic;
using System.IdentityModel.Tokens.Jwt;
using System.Linq;
using System.Security.Claims;
using System.Text;
using Microsoft.IdentityModel.Tokens;
using WebAPI1.Models;

namespace WebAPI1.Services
{
    public class UserService : IUserService
    {
        // users hardcoded for simplicity, store in a db with hashed passwords in production applications
        private List<User> _users = new List<User>
        {
            new User { Id = 1, UserName = "user1", Password = "password1", Role = "admin"},
            new User { Id = 2, UserName = "user2", Password = "password2", Role = "guest"}
        };

        public string Login(string userName, string password)
        {
            var user = _users.SingleOrDefault(x => x.UserName == userName && x.Password == password);

            // return null if user not found
            if (user == null)
            {
                return string.Empty;
            }

            // authentication successful so generate jwt token
            var tokenHandler = new JwtSecurityTokenHandler();
            var key = Encoding.ASCII.GetBytes(Startup.SECRET);

            var tokenDescriptor = new SecurityTokenDescriptor
            {
                Subject = new ClaimsIdentity(new Claim[]
                {
                    new Claim(ClaimTypes.Name, user.UserName),
                    new Claim(ClaimTypes.Role, user.Role)
                }),

                Expires = DateTime.UtcNow.AddMinutes(5),
                SigningCredentials = new SigningCredentials(new SymmetricSecurityKey(key), SecurityAlgorithms.HmacSha256Signature)
            };

            var token = tokenHandler.CreateToken(tokenDescriptor);
            user.Token = tokenHandler.WriteToken(token);

            return user.Token;
        }
    }
}
In ASP.NET Core, services must be registered with the dependency injection (DI) container. The container provides the service to controllers.
Update Startup.cs, add the following using statement.
using WebAPI1.Services;
Update the ConfigureServices(IServiceCollection services) method in Startup.cs. Add the following code to the end of method :
services.AddScoped<IUserService, UserService>();
Add a Controller
Right-click on the Controllers folder and click on Add > New Item.... Select API Controller Class on the list of item templates and name the controller UserController, click OK. Replace the auto-generated code with the following code.
using System;
using Microsoft.AspNetCore.Mvc;
using Microsoft.AspNetCore.Authorization;
using WebAPI1.Services;
using WebAPI1.Models;

namespace WebAPI1.Controllers
{
    [Route("api/[controller]/[action]")]
    [ApiController]
    public class UserController : ControllerBase
    {
        private IUserService _userService;

        public UserController(IUserService userService)
        {
            _userService = userService;
        }

        // POST api/user/login
        [AllowAnonymous]
        [HttpPost]
        public IActionResult Login([FromBody]User user)
        {
            var token = _userService.Login(user.UserName, user.Password);

            if (token == null || token == String.Empty)
                return BadRequest(new { message = "User name or password is incorrect" });

            return Ok(token);
        }
    }
}
Enable Authentication for the Sample Controller
Back to SampleController class. Add the following using statement.
using Microsoft.AspNetCore.Authorization;
Add an Authorize attribute with roles ""admin,manager"" property on Load() action. Only authorized user with role admin or manager can access this API.
        // GET api/sample/load
        [HttpGet]
        [Authorize(Roles = "admin,manager")]
        public ActionResult<IEnumerable<string>> Load()
        {
            return new string[] { "value1", "value2" };
        }
Add an Authorize attribute without roles property on LoadOne(int id) action. Any authorized user can access this API.
        // GET api/sample/loadone/{id}
        [HttpGet("{id}")]
        [Authorize]
        public ActionResult<string> LoadOne(int id)
        {
            return "value";
        }
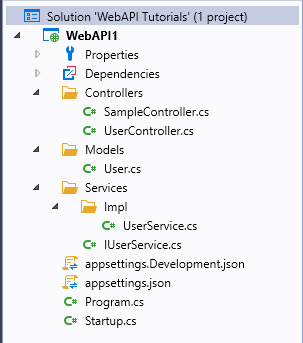
View of the Solution Tree:
Test the Sample API
Press Ctrl+F5 to run the app. SnapDevelop launches a browser and navigates to https://localhost:5001/api/sample/load. Please pay attention here, it's https://....
You will get HTTP ERROR 401 as expected.
Changes and navigates to https://localhost:5001/api/sample/loadone/1.
You will get HTTP ERROR 401 as expected too.
Call the service API from PowerBuilder
Get the JWT token
The RESTClient object provides the ability to access the RESTful Web APIs. It can get the JWT token using the POST method.
To get the JWT token, you need to instantiate the RESTClient object first. Add an instance variable of the RESTClient object.
RESTClient inv_RestClient
On the Open event of your window, create the object variable and set the Request Header.
// Create the RESTClient object variable
inv_RestClient	= CREATE RESTClient

// Set the Request Headers to tell the Web API you will send JSON data
inv_RESTClient.SetRequestHeader ("Content-Type", "application/json;charset=UTF-8")
On the source code window of your Send Request button, add the RESTClient.GetJWTToken() function to call the Web API to get a token. Add the RESTClient.SetJWTToken() function to set the JWT token string to the HTTP request header.
String ls_url_token = "https://localhost:5001/api/user/login"
String ls_user = '{"UserName":"user1", "Password":"password1"}'
String ls_token

// Get a JWT token.
If inv_RestClient.GetJWTToken(ls_url_token, ls_user, ls_token) = 1 Then

    // Set the JWT token string to the HTTP request header.
    inv_RestClient.SetJWTToken(ls_token)
Else
    // Get JWT token failed.
    Return
End If
Call the service API with the JWT token
On the source code window of the Send Request button, continue adding the RESTClient.SendGetRequest() function to call your Web API to get data (with the JWT token in HTTP request header).
String ls_url = "https://localhost:5001/api/sample/load"
String ls_response
String ls_msg

// Request api/sample
inv_RestClient.SendGetRequest(ls_url, ls_response)

// Show response info.
ls_msg = "Status Code: " + String(inv_RestClient.GetResponseStatusCode()) + '~r~n' + &
            "Status Text: " + String(inv_RestClient.GetResponseStatusText()) + '~r~n' + &
            "Response Body: " + ls_response

Messagebox("Response Info", ls_msg)
Press Ctrl+R to run the app. Click on the Send Request button and check the response. (Note: Your Web API needs to be running.)
Status Code: 200
Status Text: OK
Response Body: ["value1","value2"]
Call Web APIs with different role authorization
There are two users created at server side (see Add Service Interface and Implementation). 'user1' has admin role, and 'user2' has guest role.
In the Sample Controller class at server side (see Enable Authentication for the Sample Controller), it only authorized the user with admin or manager role to access the API "GET api/sample/load". The API "GET api/sample/loadone/{id}" is allowed to access by user with any role.
Call the Web API with a user that has an admin role
Based on the response of previous application run, user1 that has an admin role is allowed to request the API "GET api/sample/load".
On the source code window of your
Send Requestbutton, change the URL of the request to: "GET api/sample/loadone/{id}".
String ls_url = "https://localhost:5001/api/sample/loadone/1"
Press Ctrl+R to run the app. Click on the Send Request button and check the response. (Note: Your Web API needs to be running.)
Status Code: 200
Status Text: OK
Response Body: value
Notice that user1 is authorized to access both "GET api/sample/load" and "GET api/sample/loadone/{id}" APIs.
Call the Web API with a user that has a guest role
Close your application. On the source code window of your Send Request button, change the user from user1 (admin) to user2 (guest).
String ls_user = '{"UserName":"user2", "Password":"password2"}'
On the source code window of your Send Request button, change URL to request both APIs and check the response.
- First request is "GET api/sample/load":
String ls_url = "https://localhost:5001/api/sample/load"
Press Ctrl+R to run the app. Click on the Send Request button and check the response. (Note: Your Web API needs to be running.)
Status Code: 403
Status Text: Forbidden
Response Body:
Notice that user2 is forbidden to access the API "GET api/sample/load". Because only admin and manager user role can access this API.
- Second request is "GET api/sample/loadone/{id}":
String ls_url = "https://localhost:5001/api/sample/loadone/1"
Press Ctrl+R to run the app. Click on the Send Request button and check the response. (Note: Your Web API needs to be running.)
Status Code: 200
Status Text: OK
Response Body: value
User2 can access the API "GET api/sample/loadone/{id}", because user is authorized to access this API with any role.