Publish and Host Apps Developed in SnapDevelop
Overview
From within SnapDevelop, applications can be published using the following two options:
- File system
- Web Deploy
File system
Publishing to the file system means to simply copy your application's files to a specific folder on your own computer. This is most often used for testing purposes, or to publish the application for use by a limited number of people if the computer is also running a server. If the target folder is shared on a network, then publishing to the file system can make the web application files available to others who might then publish it to specific servers.
When to choose file system publication:
You need only a local test publication.
You want to examine and potentially modify the application files independently before sending them onto another publication target.
You want to host the app on a server such as Linux.
For example, you can use SnapDevelop to publish an ASP.NET Core application to the File System, and then host the application on the Linux CentOS 7 operating system with Apache. See more details in Publishing and Hosting an ASP.NET Core Application on Linux.
Web Deploy
A custom target allows you to publish your application to a target other than the local file system. It can deploy to a file system or any other server (Internet or Intranet) to which you have access. It can work with Web Deploy.
When you select Web Deploy, SnapDevelop prompts you for a profile name, and then collects additional Connection information including the target server or location, a site name, and credentials. You can control the following behaviors on the Settings tab:
The configuration you want to deploy.
Whether to remove existing files from the destination.
Whether to pre-compile during publication.
You can create any number of custom deployment profiles in SnapDevelop, making it possible to manage profiles with different settings.
When to choose IIS publication:
- You want to publish using credentials other than the ones that you use within SnapDevelop.
- You want to remove files from the target each time you publish.
Publishing a Project to a Local Folder with File System
You can use the Publish tool to publish a .NET Core application to a local folder from SnapDevelop.
Prerequisites:
SnapDevelop 2019 installed with the appropriate workloads:
Universal C Runtime (CRT)
Universal CRT is installed by default on Windows 10. On the other supported Windows platforms, you can follow the on-screen instructions to download and install the package when you install SnapDevelop (PB Edition). See Downloading and Installing UCRT.
Microsoft .NET Framework 4.6.1 SDK
Microsoft .NET Core SDK 2.1.6
TypeScript SDK 3.1
These three prerequisites will be automatically installed if the installer detects that they are not installed on the current machine. If your current machine runs on Windows 7, make sure that Service Pack 1 (KB976932) has already been installed; if your current machine runs on Windows 8.1, make sure that KB 2919355 has already been installed.
A .NET Core project
If you don’t already have a project, follow the steps below to create a .NET Core project:
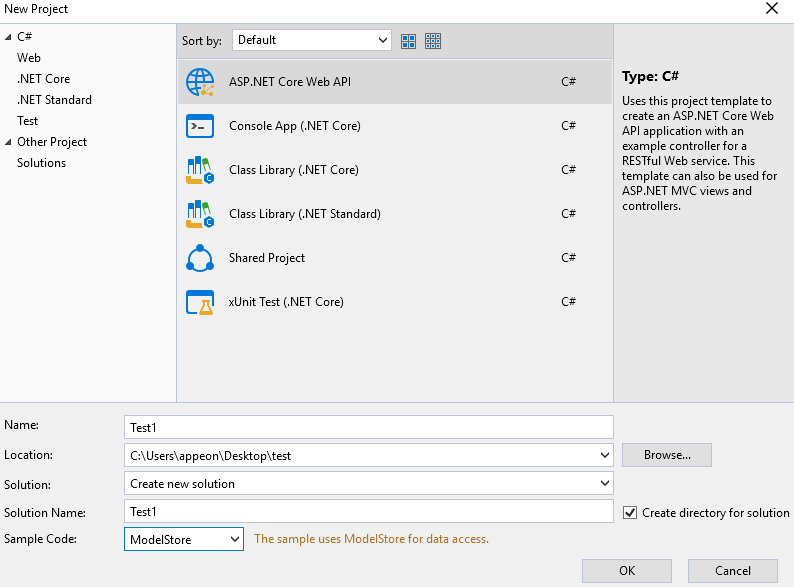
Select File from the menu bar and then choose New > Project. In the dialog box, select C# > .NET Core and then select ASP.NET Core Web API. Then, fill in the project information and create a .NET Core project by clicking OK.
Publishing to a local folder
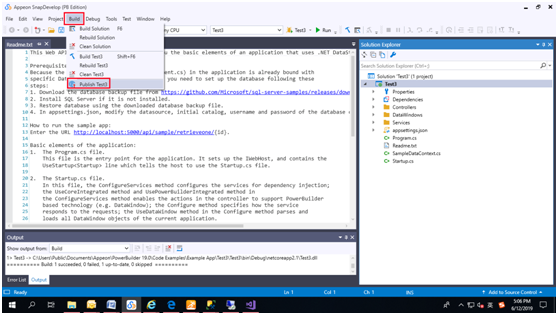
In Solution Explorer, right-click the project and choose Publish (or use the Build > Publish menu item).
On the popup window, select File System, specify the target location of publication and click Save to continue.

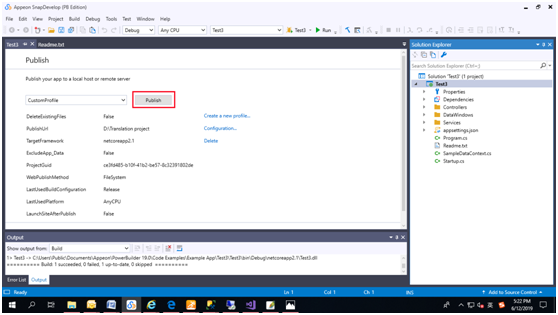
Click Publish.
Check the publication status in the Output window.
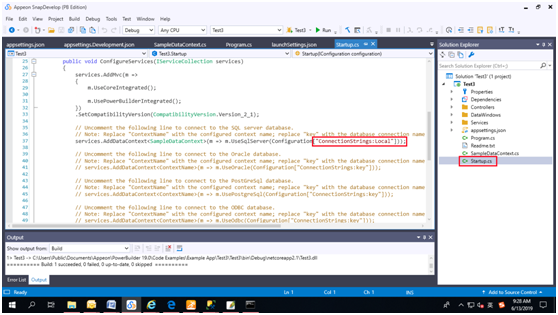
Double-click the Startup.cs and change ConnectionStrings:key to ConnectionStrings:local.
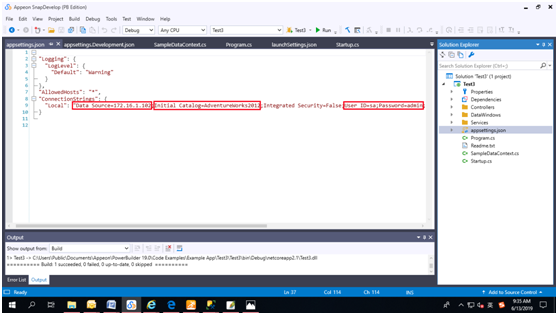
Double-click the appsettings.json and enter the data source, initial catalog, user ID and password.
Click Run on the toolbar or press Ctrl + F5 to run the application.
Publishing a Project to IIS with Web Deploy
Prerequisites
Before you use Web Deploy to publish an application, some requirements need to be satisfied on the server side and client side respectively.
Requirements for server side
Windows Server 2012 or 2016
Windows Server 2012 or 2016 is recommended. If your operating system is Windows 10, for example, you can use File System, rather than Web Deploy, to publish your project to your local folder.
Make sure that your Windows installation is up-to-date and includes KB2999226, which can be installed through Windows Update. If you don't have this update installed, you'll see an error like the following when you launch a .NET Core application: The program can't start because api-ms-win-crt-runtime-1-1-0.dll is missing from your computer. Try reinstalling the program to fix this problem.
Web Deploy 3.6 or higher
Download link for Web Deploy: https://www.iis.net/downloads/microsoft/web-deploy (32-bit and 64-bit versions of Web Deploy are available; install according to the version of your operating system)
Runtime & Hosting Bundle
Download link for Runtime & Hosting Bundle: https://dotnet.microsoft.com/download/dotnet-core/2.1 (Runtime 2.1.* | Windows | ASP.NET Core/.NET Core: Runtime & Hosting Bundle)
.NET Core Installer
Download link for .NET Core Installer: https://dotnet.microsoft.com/download/dotnet-core/2.1 (SDK 2.1.* | Windows | .NET Core Installer: x64 | x86; install according to the version of your operating system). Note that .NET SDK 2.1.* needs to be installed when SnapDevelop is not installed on the server side.
Requirements for client side
Windows 7/8.1/10
Make sure that your Windows installation is up-to-date and includes KB2999226, which can be installed through Windows Update. If you don't have this update installed, you'll see an error like the following when you launch a .NET Core application: The program can't start because api-ms-win-crt-runtime-1-1-0.dll is missing from your computer. Try reinstalling the program to fix this problem.
Web Deploy 3.6 or higher
Download link for Web Deploy: https://www.iis.net/downloads/microsoft/web-deploy (32-bit and 64-bit versions of Web Deploy are available; install according to the version of your operating system). Note that versions of Web Deploy must be the same on the server and client sides.
Configuring server side
To configure the server side, you need to perform the following actions.
Configuring IIS
To configure IIS, you should:
Launch Server Manager.
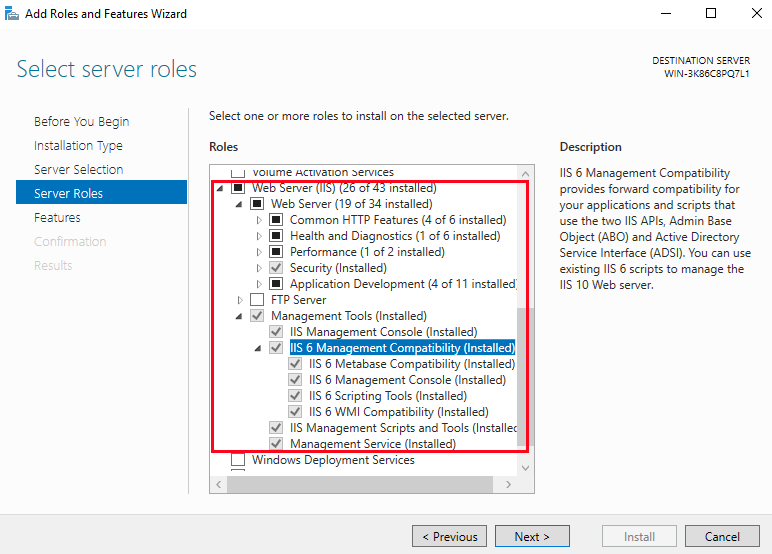
Use the Add Roles and Features wizard from the Manage menu or the link in Server Manager. On the Server Roles step, check the boxes for Web Server (IIS) and Management Tools.
On the Features step, check the boxes for .NET Framework 3.5 Features and .NET Framework 4.6 Features.

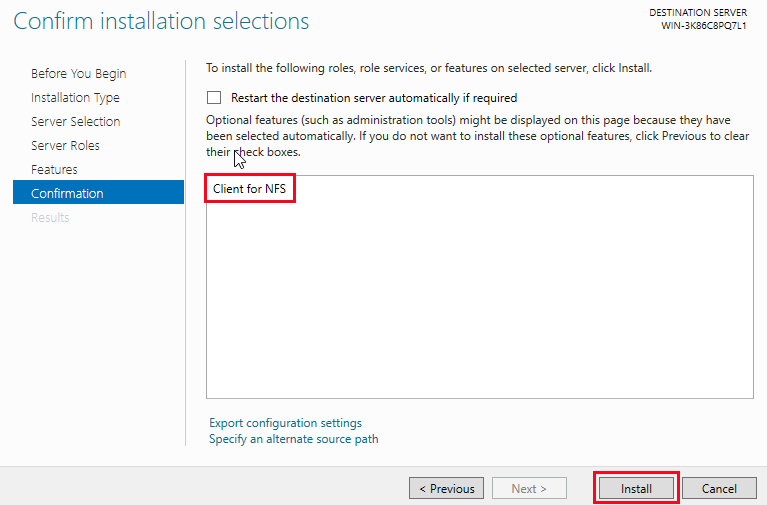
Confirm the roles and features you select and then click Install to continue.
View the results of the installations. Click Close if the installations are successful.
Installing and configuring Web Deploy
Click the download link (https://www.iis.net/downloads/microsoft/web-deploy) to install Web Deploy. Enable the Web Management Service and Web Deployment Agent Service after Web Deploy is properly installed. To do so, you should:
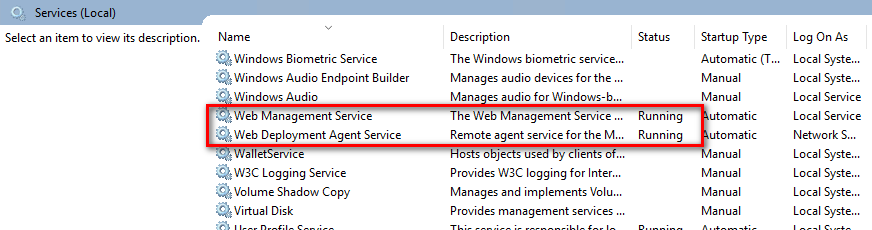
Launch the desktop application Services.
Locate Web Management Service and Web Deployment Agent Service and, if necessary, right-click any one of them and then select Start.
Enabling remote connections
To enable remote connections, you should:
Launch IIS Manager, select the name of your computer in the left column, and then double-click Management Service in the right column.

Launch the Management Service. Click Stop first, select Enable remote connections and then click Apply.

Configuring IIS users
There are two ways of user configuration, which are configuration of IIS Manager users and configuration of Windows users. Windows users are granted more permissions for publishing an application.
Configuring IIS Manager users
To configure IIS Manager users, you should:
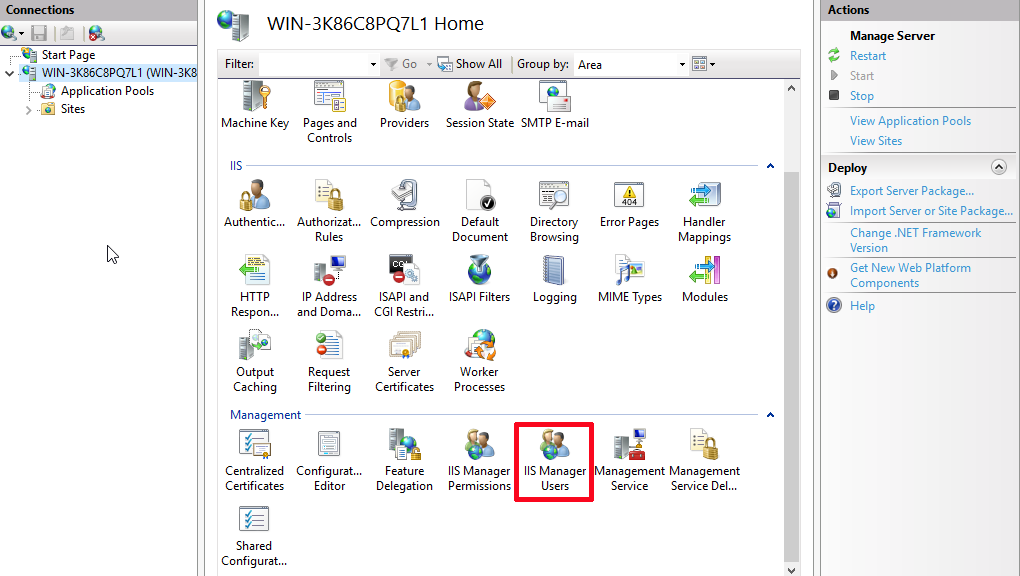
Double-click IIS Manager Users so that you can go to the IIS Manager Users page.
Add a user and then enter the user name and password.

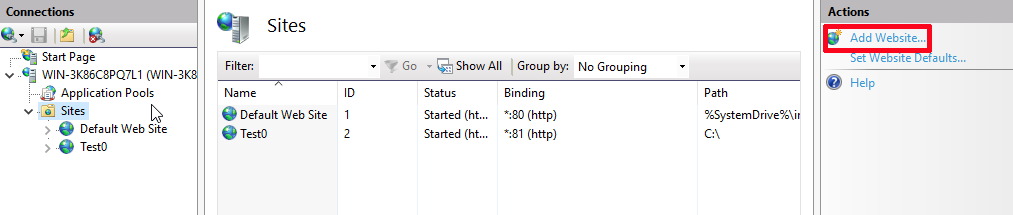
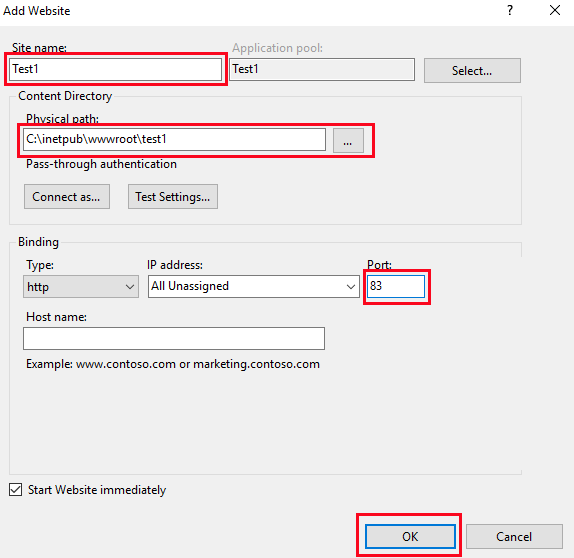
In IIS Manager, open the server's node in the Connections panel. Right-click the Sites folder. Select Add Website from the contextual menu.
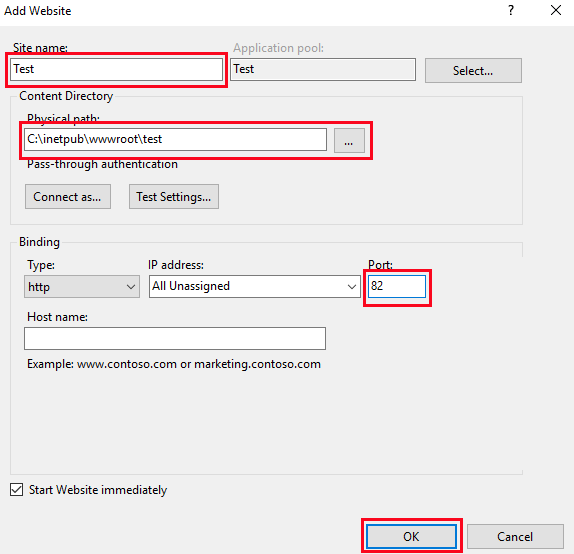
Provide a Site name and change the Physical path. Provide the Binding configuration and create the website by clicking OK.
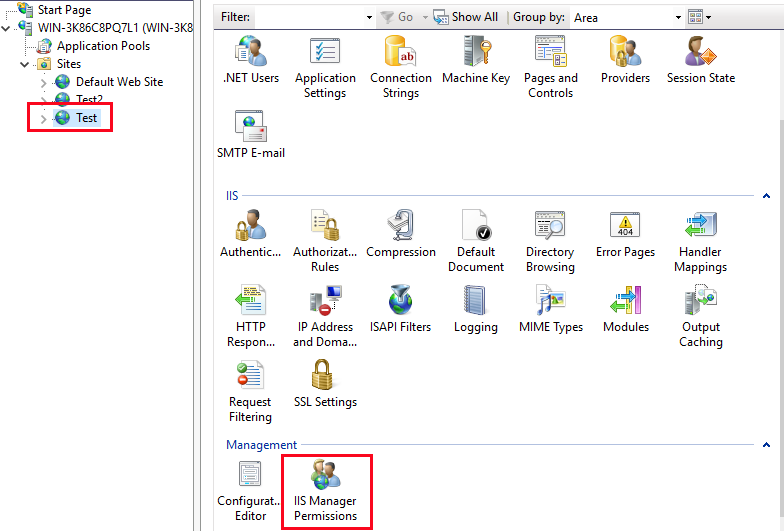
Expand the Sites folder. Select the newly created website and then double-click IIS Manager Permissions.
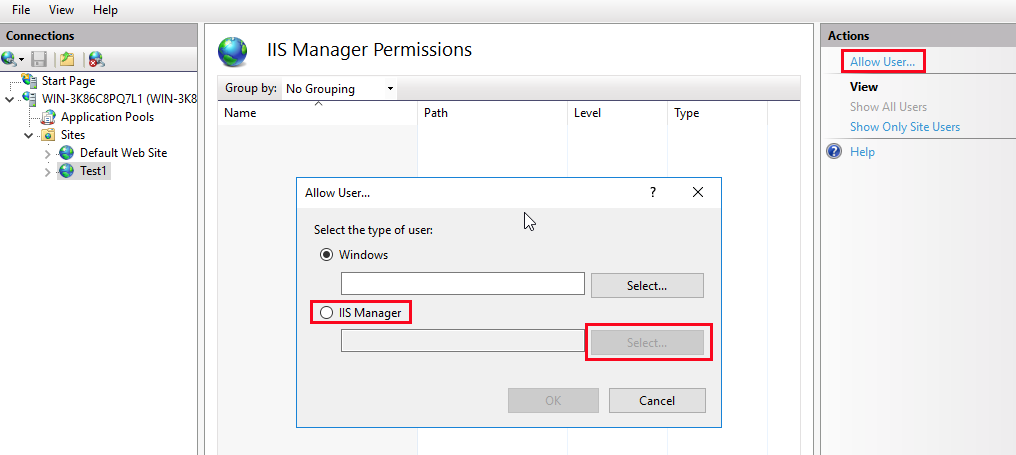
In the IIS Manager Permissions dialog box, click Allow User so that a popup window appears. Choose IIS Manager and then click Select to select a desired user you added previously.
Configuring Windows users
To configure Windows users, you should:
Right-click the Sites folder in the Connections panel. Select Add Website from the contextual menu.

Provide the Site name and change the Physical path. Provide the Binding configuration and create the website by clicking OK.
Expand the Sites folder. Select the newly created website and double-click IIS Manager Permissions.

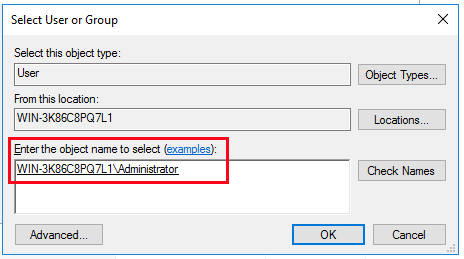
On the IIS Manager Permissions page, click Allow User so that a popup window appears. Choose Windows and then click Select to continue.

Specify the object type and location and enter the object name to select. Check the object name after you enter it.
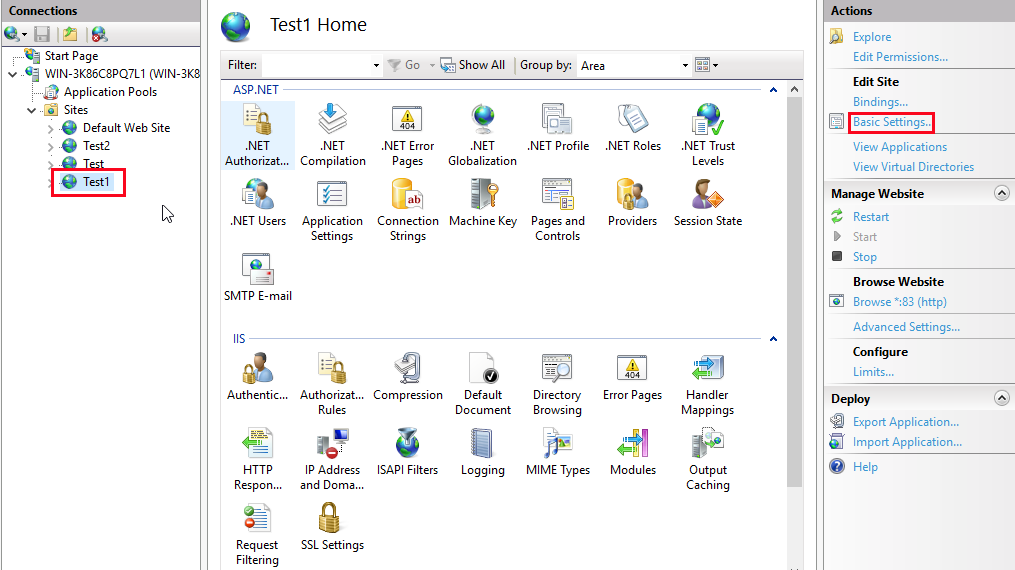
Select Basic Settings.
Choose Connect as > Specific user > Set and then enter the user name and password.
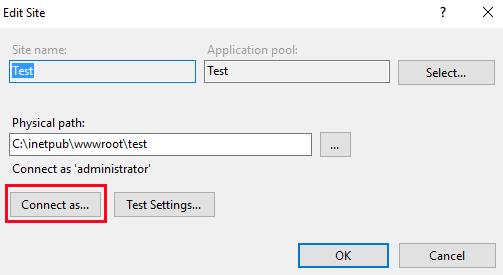
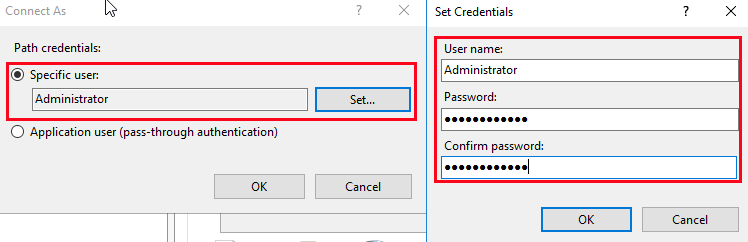
View the result of connection test by clicking Test Settings in step 7.
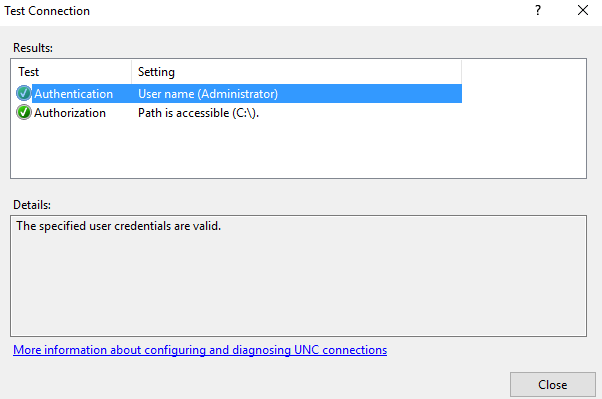
Click OK to continue if the specified user credentials are valid.
Publishing a project
To publish a C# project, you should perform the following actions.
Creating a new C# project
To create a new C# project, you should:
Launch SnapDevelop.
Select File > New > Project.
Set the new project.
Publishing an application
To deploy an application, you should:
Right-click the project you create and then select Publish to launch the publish wizard.
Select Web Deploy and enter the corresponding information (including server IP address, site name, user name and password). Note that the user name can be either the IIS Web Deploy user name or the Windows user name.
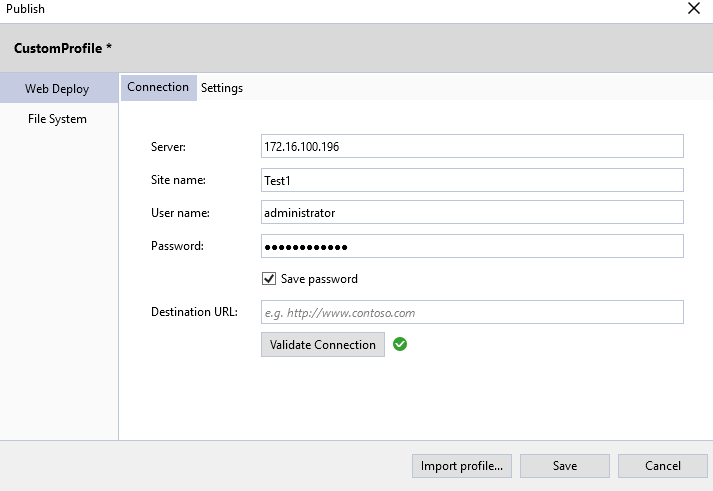
Click Validate Connection after the information is entered. Note that a green tick will appear if IIS and Web Deploy users are configured correctly.
Click Save to continue.
Check the configuration information and modify if necessary.
Click Publish to publish your application to a local host or a remote server.
Check the output message to see if the publication succeeds.
Troubleshooting
There are some common errors that may appear during server configuration. These errors are listed in the following paragraphs and corresponding solutions are offered.
1. "the site does not exist" error
When the plug-in Web Deploy required for publication is to be installed, the Complete setup type must be installed so that SnapDevelop can successfully publish the application. Otherwise, the "the site does not exist" error will be reported since Web deployment agent service is not enabled in the other setup types of Web Deploy.
Solution:
Uninstall the current version of Web Deploy and then reinstall the Complete version.

2. "The Web server is configured to not list the contents of this directory" error
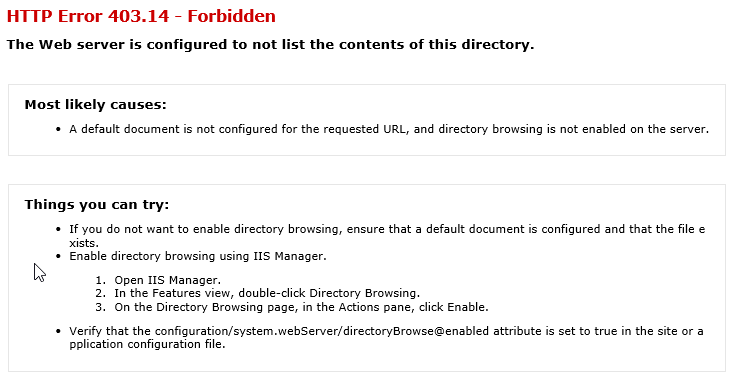
Solution:
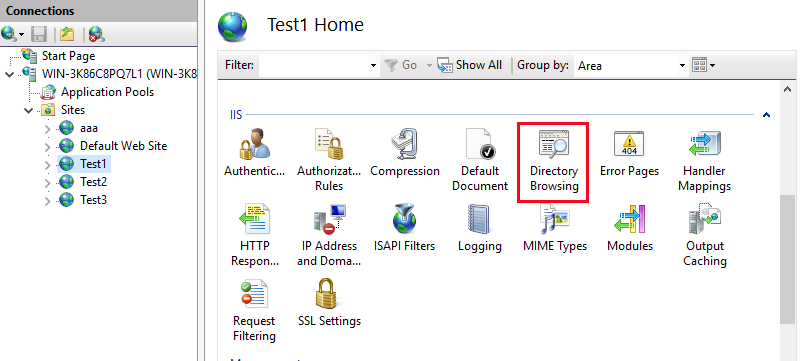
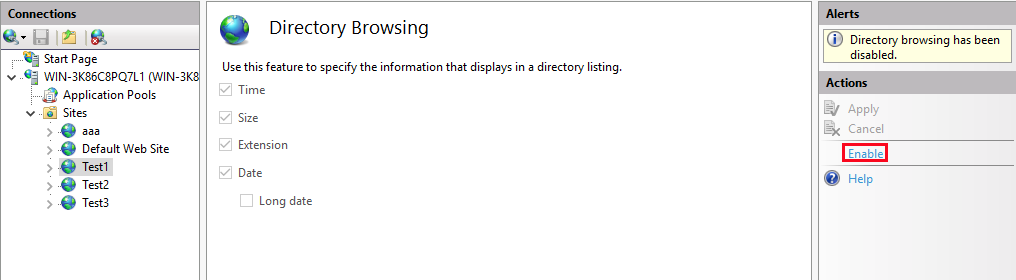
Launch IIS -> select your website -> click Directory Browsing -> click Enable on the top right corner of the page.
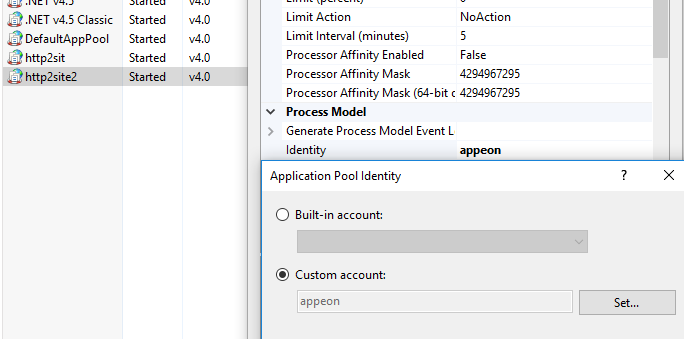
3. Issues concerning IIS application pool permission
There is sometimes the situation where data cannot be available after the publication of an application and the error code 500 is returned. This is due to the fact that the IIS application pool does not have permission to log in to the database.
Solution 1:
Change the application pool identifier and select a user who has permission.
Solution 2:
Change stdoutLogEnabled="false" to stdoutLogEnabled="true" in the web.config file that appears after the publication.

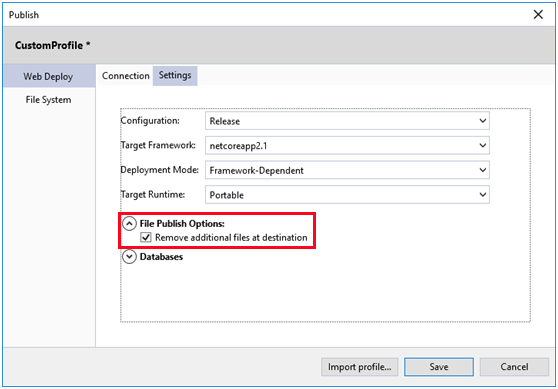
4. Error indicating that files are locked when an application is published to a remote site where an application has previously been published
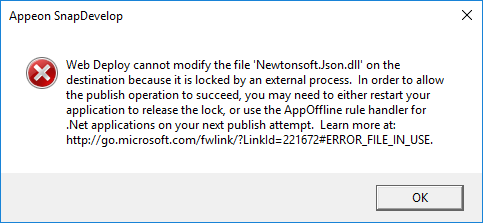
Solution 1:
Close down the site and then launch the site after publication.
Solution 2:
Check the box for Remove additional files at destination when publishing.
5. Runtime error 500.30 with .NET Core 2.2d application published to IIS
Solution:
Change the method: Change InProcess to OutOfProcess in PropertyGroup in the application configuration file and then add ModelName.

Error 502.5 may occur after the change of method. To resolve Error 502.5, you can change the .NET path of Web API as an absolute path and restart your computer.
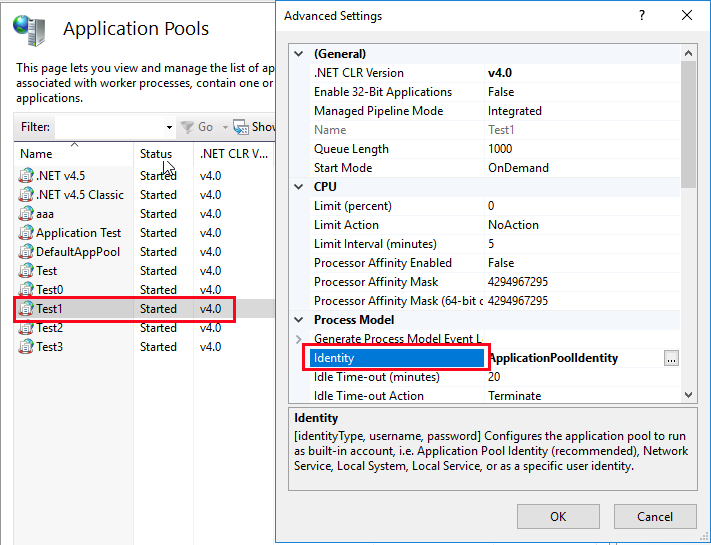
If Error 502.5 still remains, you can check the event log. If the log indicates that the startup process fails, this error can be caused by the lack of permissions. Change the permissions under the IIS application pool, right-click the website and click Advanced Settings. Choose Identity in Process Model and then check the radio button for the Custom account to enter the local administrator's user name and password.
Publishing and Hosting an ASP.NET Core Application on Linux
In this section, we create a Web API application, publish it using the File System method, and then host the app on Linux CentOS7 operating system following these steps:
In SnapDevelop, publish the Web API application with middleware configured to support reverse proxy
Copy over the Web API application from the local published folder to CentOS server
In CentOS, host Web API application on CentOS with reverse proxy (Apache) configured
For more information on how to set up Apache as a reverse proxy on CentOS 7, you can further read the Microsoft article: Host ASP.NET Core on Linux with Apache.
Prerequisites
- SnapDevelop 2019
- Server running CentOS 7 with a standard sudo user account
- .NET Core Runtime is installed on CentOS 7 with the following instructions
Install .NET Core Runtime on CentOS 7
Before installing .NET Runtime, you need to register the Microsoft key, register the product repository, and install required dependencies. These only need to be done once per machine. Open a terminal and run the following commands:
# Install repository configuration
curl https://packages.microsoft.com/config/rhel/7/prod.repo > ./microsoft-prod.repo
sudo cp ./microsoft-prod.repo /etc/yum.repos.d/

# Install Microsoft's GPG public key
curl https://packages.microsoft.com/keys/microsoft.asc > ./microsoft.asc
sudo rpm --import ./microsoft.asc
Install the latest available updates for the product, then install the .NET Runtime.
In your terminal, run the following commands:
# Install the latest available updates for the product
sudo yum update

# Install the ASP.NET Core 2.1 runtime
sudo yum install aspnetcore-runtime-2.1
The previous command will install the .NET Core Runtime Bundle, which includes the .NET Core runtime and the ASP.NET Core 2.1 runtime. To install just the .NET Core runtime, use the dotnet-runtime-2.1 package.
Publish an ASP.NET Core application to server
Preparation for the application
In SnapDevelop, select File from the menu bar and then choose New > Project. In the dialog box, select C# > .NET Core and then select ASP.NET Core Web API. Then, fill in the project information to create a .NET Core project named WebAPI1 by clicking OK.
Some configurations for reverse proxy and Kestrel server need to be made before publishing.
Configuration for Forwarded Headers Middleware
Because requests are forwarded by reverse proxy, use the Forwarded Headers Middleware from the Microsoft.AspNetCore.HttpOverrides package. The middleware updates the Request.Scheme, using the X-Forwarded-Proto header, so that redirect URIs and other security policies work correctly.
Any component that depends on the scheme, such as authentication, link generation, redirects, and geolocation, must be placed after invoking the Forwarded Headers Middleware. As a general rule, Forwarded Headers Middleware should run before other middleware except for diagnostics and error handling middleware. This running order ensures that the middleware relying on forwarded headers information can consume the header values for processing.
Invoke the UseForwardedHeaders method in Startup.Configure before calling UseAuthentication or similar authentication scheme middleware. Configure the middleware to forward the X-Forwarded-For and X-Forwarded-Proto headers:
app.UseForwardedHeaders(new ForwardedHeadersOptions
{
    ForwardedHeaders = ForwardedHeaders.XForwardedFor | ForwardedHeaders.XForwardedProto
});

app.UseAuthentication();
If no ForwardedHeadersOptions are specified to the middleware, the default forwarded headers are None.
Proxies running on loopback addresses (127.0.0.0/8, [::1]), including the standard localhost address (127.0.0.1), are trusted by default. For other trusted proxies or networks within the organization handling requests between the Internet and the web server, add them to the list of KnownProxies or KnownNetworks as options in ForwardedHeadersOptions. The following example adds a trusted proxy server at IP address 10.0.0.100 to the KnownProxies of Forwarded Headers Middleware in Startup.ConfigureServices:
services.Configure<ForwardedHeadersOptions>(options =>
{
    options.KnownProxies.Add(IPAddress.Parse("10.0.0.100"));
});
For more information, see Configure ASP.NET Core to work with proxy servers and load balancers.
Configuration for secure (HTTPS) local connections
It is important for the application to make secure connections (HTTPS), configure the application to use a certificate for your development using one of the following approaches:
- Replace the default certificate from configuration (Recommended)
- KestrelServerOptions.ConfigureHttpsDefaults
The configuration for the application to listen to the URLs is in applicationUrl property in the Properties/launchSettings.json file, for example, https://localhost:5001;http://localhost:5000.
The app runs locally, so it is optional to configure the web server (Kestrel) with secure (HTTPS) local connections. You can remove https://localhost:5001 (if present) from the configuration.
Publish the application to a local folder
In Solution Explorer, right-click the project and choose Publish
On the popup window, select File System
Specify the target location of publication
Go to Settings tab, change Target Runtime to linux-64
Note that the application is configured for a framework-dependent deployment by default.

Click Save to continue.
Click Publish, then check the publication status in the Output window.
Copy the application to the server
Once the Web API application is published, copy the application from the published folder to the CentOS server using a tool that integrates into the organization's workflow (for example, SCP, SFTP). It's common to locate web applications under the var directory (for example, var/www/WebAPI1).
Host ASP.NET Core on CentOS with Apache
Configure a proxy server
A reverse proxy is a common setup for serving dynamic web applications. The reverse proxy terminates the HTTP request and forwards it to the Web API application. In this example, Apache is configured as a reverse proxy, and Kestrel serves the Web API application. Apache forwards client requests to the Web API application running on Kestrel instead of fulfilling requests itself.
Install Apache
Update CentOS packages to the latest stable versions:
sudo yum update -y
Install the Apache web server on CentOS with a single yum command:
sudo yum -y install httpd mod_ssl
To verify where Apache is installed, run whereis httpd from a command prompt.
Configure Apache
Open the /etc/httpd/conf/httpd.conf file and set the ServerName directive globally:
sudo nano /etc/httpd/conf/httpd.conf

# Set ServerName in this configuration file
ServerName www.example.com:80
The configuration files for Apache are located in the /etc/httpd/conf.d/ directory. Any file with the .conf extension is processed in alphabetical order in addition to the module configuration files in /etc/httpd/conf.modules.d/, which contains all the necessary configuration files to load modules.
Create a configuration file:
sudo nano /etc/httpd/conf.d/WebAPI1.conf
An example of configuration files for the application:
<VirtualHost *:*>
    RequestHeader set "X-Forwarded-Proto" expr=$scheme
</VirtualHost>

<VirtualHost *:80>
    ProxyPreserveHost On
    ProxyPass / http://127.0.0.1:5000/
    ProxyPassReverse / http://127.0.0.1:5000/
    ServerName www.example.com
    ServerAlias *.example.com
    ErrorLog /var/log/httpd/WebAPI1-error.log
    CustomLog /var/log/httpd/WebAPI1-access.log common
</VirtualHost>
The VirtualHost block can appear multiple times in one or more files on a server. In the preceding configuration file, Apache accepts public traffic on port 80. The domain www.example.com is being served, and the *.example.com alias resolves to the same domain. See Name-based virtual host support for more information. Requests are proxied at the root to port 5000 of the server at 127.0.0.1. For bi-directional communication, ProxyPass and ProxyPassReverse are required. To change Kestrel's IP/port, see Kestrel: Endpoint configuration.
Warning: Failure to specify a proper ServerName directive in the VirtualHost block exposes your application to security vulnerabilities. Subdomain wildcard binding (for example, *.example.com) doesn't pose this security risk if you control the entire parent domain (as opposed to .com, which is vulnerable). See rfc7230 section-5.4 for more information.
Logging can be configured per VirtualHost using ErrorLog and CustomLog directives. ErrorLog is the location where the server logs errors, and CustomLog sets the filename and format of log file. In this case, this is where request information is logged. There's one line for each request.
Save the file and test the configuration. If everything passes, the response should be Syntax [OK].
sudo service httpd configtest
Restart Apache:
sudo systemctl restart httpd
sudo systemctl enable httpd
Monitor the application
Apache is now setup to forward requests made to http://localhost:80 to the Web API application running on Kestrel at http://127.0.0.1:5000. However, Apache isn't set up to manage the Kestrel process. Use systemd and create a service file to start and monitor the underlying web application. systemd is an init system that provides many powerful features for starting, stopping, and managing processes.
Create the service file
Create the service definition file:
sudo nano /etc/systemd/system/kestrel-webapi1.service
An example of service files for the application:
[Unit]
Description=Example .NET Web API application running on CentOS 7

[Service]
WorkingDirectory=/var/www/WebAPI1
ExecStart=/usr/share/dotnet /var/www/WebAPI1/WebAPI1.dll
Restart=always
# Restart service after 10 seconds if the dotnet service crashes:
RestartSec=10
KillSignal=SIGINT
SyslogIdentifier=dotnet-example
User=apache
Environment=ASPNETCORE_ENVIRONMENT=Production

[Install]
WantedBy=multi-user.target
If the user apache isn't used by the configuration, the user must be created first and given proper ownership of the files.
Use TimeoutStopSec to configure the duration of time to wait for the application to shut down after it receives the initial interrupt signal. If the application doesn't shut down in this period, SIGKILL is issued to terminate the application. Provide the value as unitless seconds (for example, 150), a time span value (for example, 2min 30s), or infinity to disable the timeout. TimeoutStopSec defaults to the value of DefaultTimeoutStopSec in the manager configuration file (systemd-system.conf, system.conf.d, systemd-user.conf, user.conf.d). The default timeout for most distributions is 90 seconds.
# The default value is 90 seconds for most distributions.
TimeoutStopSec=90
Save the file and enable the service:
sudo systemctl enable kestrel-webapi1.service
Start the service and verify that it's running:
# Start the service
sudo systemctl start kestrel-webapi1.service

# Verify the service
sudo systemctl status kestrel-webapi1.service

● kestrel-webapi1.service - Example .NET Web API application running on CentOS 7
   Loaded: loaded (/etc/systemd/system/kestrel-webapi1.service; enabled; vendor preset: disabled)
   Active: active (running) since Tue 2019-08-06 13:46:27 CST; 5s ago
 Main PID: 46668 (dotnet)
    Tasks: 16
   CGroup: /system.slice/kestrel-webapi1.service
           └─46668 /usr/share/dotnet/dotnet /var/www/WebAPI1/WebAPI1.dll
With the reverse proxy configured and Kestrel managed through systemd, the web application is fully configured and can be accessed from a browser on a local machine at http://localhost/api/sample/load. Inspecting the response headers, the Server header indicates that the Web API application is served by Kestrel:
HTTP/1.1 200 OK
Date: Tue, 06 Aug 2019 05:52:17 GMT
Server: Kestrel
Keep-Alive: timeout=5, max=100
Connection: Keep-Alive
Transfer-Encoding: chunked
View logs
Since the web application using Kestrel is managed using systemd, events and processes are logged to a centralized journal. However, this journal includes all of the entries for services and processes managed by systemd. View the specific items of kestrel-webapi1.service with the following command:
sudo journalctl -fu kestrel-webapi1.service
For time filtering, specify time options with the command. For example, use --since today to filter for the current day or --until 1 hour ago to see the previous hour's entries. For more information, see man page for journalctl.
sudo journalctl -fu kestrel-webapi1.service --since "2019-08-06" --until "2019-08-06 23:00"
Configure the reverse proxy for secure (HTTPS) client connections
To configure Apache for HTTPS, the mod_ssl module is used. When the httpd module was installed, the mod_ssl module was also installed. If it wasn't installed, use yum to add it to the configuration.
sudo yum install mod_ssl
To enforce HTTPS, install the mod_rewrite module to enable URL rewriting:
sudo yum install mod_rewrite
Modify the /etc/httpd/conf.d/WebAPI1.conf file to enable URL rewriting and secure communication on port 443:
<VirtualHost *:*>
    RequestHeader set "X-Forwarded-Proto" expr=$scheme
</VirtualHost>

<VirtualHost *:80>
    RewriteEngine On
    RewriteCond %{HTTPS} !=on
    RewriteRule ^/?(.*) https://%{SERVER_NAME}/$1 [R,L]
</VirtualHost>

<VirtualHost *:443>
    ProxyPreserveHost On
    ProxyPass / http://127.0.0.1:5000/
    ProxyPassReverse / http://127.0.0.1:5000/
    ErrorLog /var/log/httpd/WebAPI1-error.log
    CustomLog /var/log/httpd/WebAPI1-access.log common
    SSLEngine on
    SSLProtocol all -SSLv2
    SSLCipherSuite ALL:!ADH:!EXPORT:!SSLv2:!RC4+RSA:+HIGH:+MEDIUM:!LOW:!RC4
    SSLCertificateFile /etc/pki/tls/certs/localhost.crt
    SSLCertificateKeyFile /etc/pki/tls/private/localhost.key
</VirtualHost>
This example is using a locally-generated certificate. SSLCertificateFile should be the primary certificate file for the domain name. SSLCertificateKeyFile should be the key file generated when CSR is created. SSLCertificateChainFile should be the intermediate certificate file (if present) that was supplied by the certificate authority.
Save the file and test the configuration:
sudo service httpd configtest
Restart Apache:
sudo systemctl restart httpd
After HTTPS is fully configured, the web application can be accessed from a browser on a local machine at https://localhost/api/sample/load. Please pay attention here, it's https://....
Attribution
The content of this section incorporates some materials from “Host ASP.NET Core on Linux with Apache“ by Shayne Boyer licensed under CC BY 2.0.