CRUD Operations with .NET DataStore
This tutorial demonstrates the basics of creating, in SnapDevelop, a Web API with ASP.NET Core that will use .NET DataStore as its data manipulation component.
In this tutorial, you will learn to:
- Create a Web API Project
- Test the API
- Add a Database Context
- Register the Database Context
- Add a .NET DataStore Model
- Add a Service
- Perform CRUD Operations Using the Web API
- Call the Web API from PowerBuilder
Prerequisites
- SnapDevelop 2019
- Sample database setup
- Download the database backup file from https://github.com/Microsoft/sql-server-samples/releases/download/adventureworks/AdventureWorks2012.bak. (This specific version of the DB is required for this tutorial)
- Install SQL Server Express or SQL Server if it is not installed.
- Restore database using the downloaded database backup file.
Create a Web API Project
Start SnapDevelop and select Create New Project from the Start page. Or, from the File menu, select New and then Project....
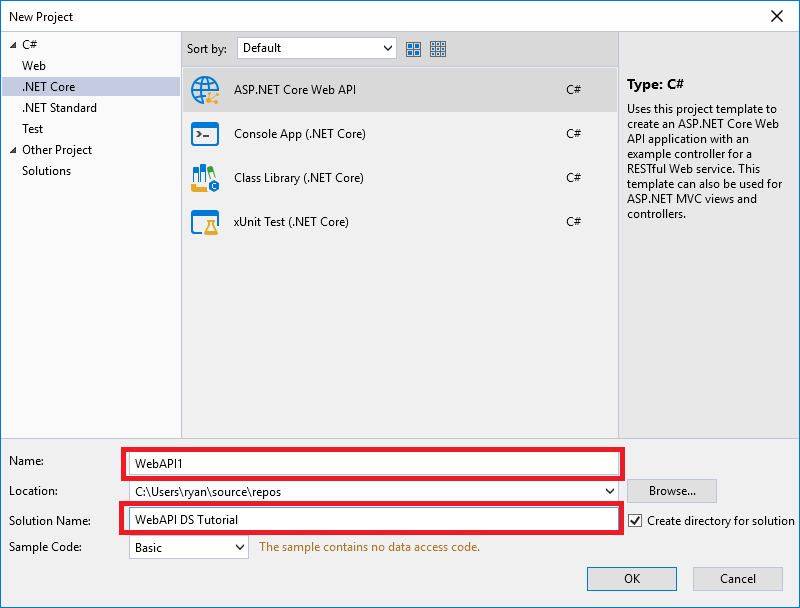
In the New Project dialog, select .NET Core, and in the list of project templates, select ASP.NET Core Web API. Name the project "WebAPI1", name the solution "WebAPI DS Tutorial" and click Ok.
Test the Web API
The project template creates a Sample Web API. Call the GET HTTP verb from a browser to test the app.
Press Ctrl+F5 to run the app. SnapDevelop launches a browser and navigates to http://localhost:5000/api/Sample/Load.
If it's the first time the Web API runs, then you may need to wait several seconds for it to initiate the .NET runtime after the browser has launched.
The following JSON is returned:
["value1","value2"]
Add a Database Context
The database context is the class that manages database connections and transactions. This class is created by deriving from the SnapObjects.Data.DataContext class.
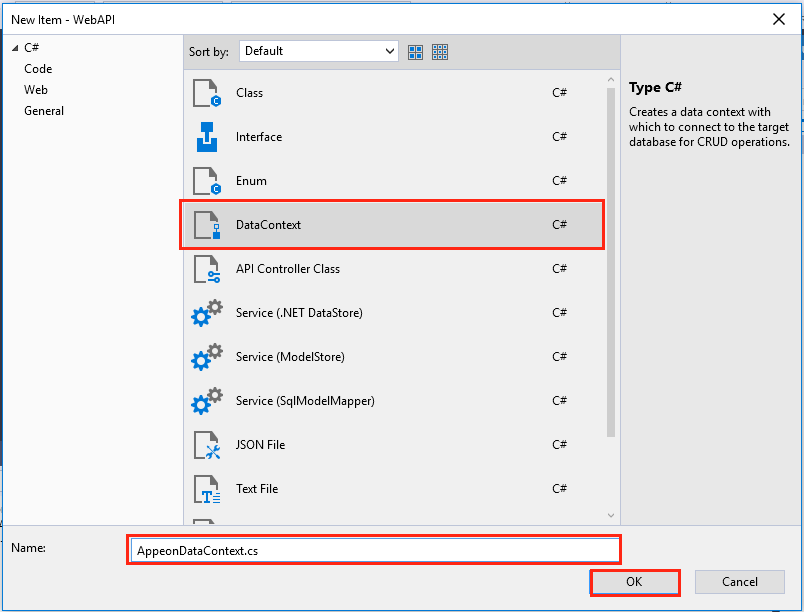
Right-click the WebAPI1 project and select Add > New Item.... In the item template list select DataContext and Name the class AppeonDataContext.cs and click OK.
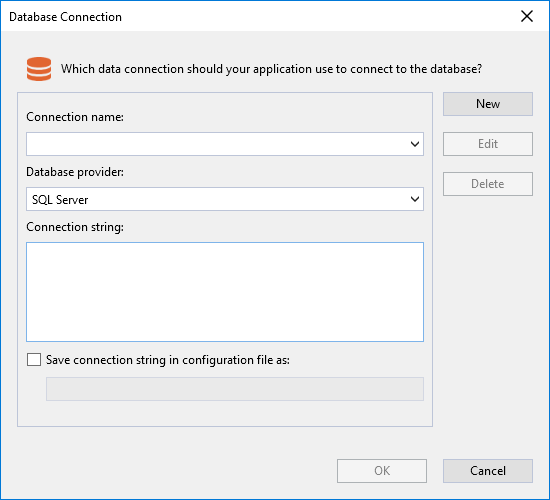
In the Database Connection dialog, click New.
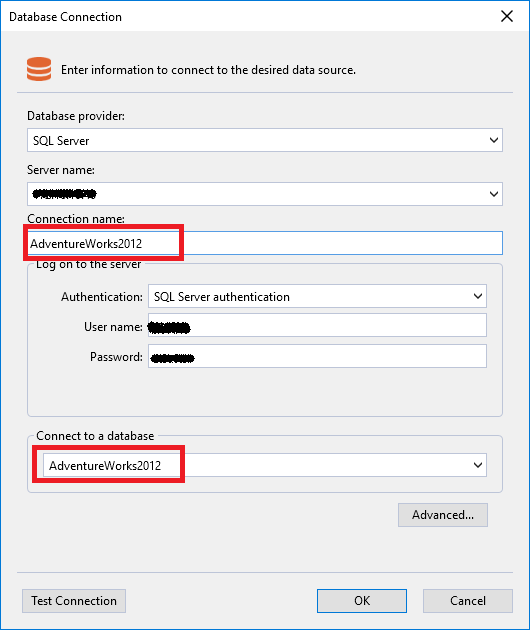
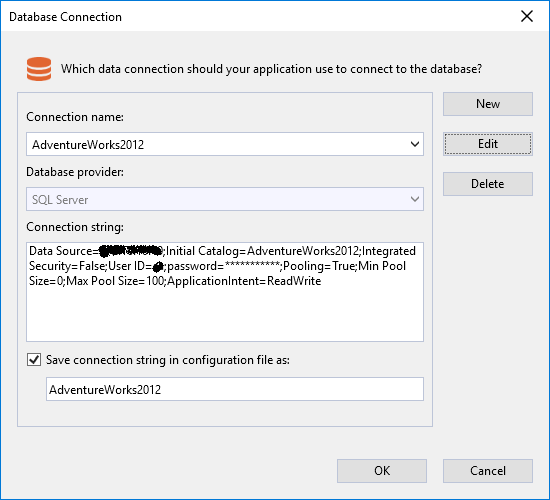
In the connection properties dialog box, fill in the database connection information and click OK.
Then back to the Database Connection dialog box, a Connection String is generated by the connection properties dialog box, click OK.
The Connection String is saved in appsettings.json and the AppeonDataContext class is created.
Register the Database Context
In ASP.NET Core, services such as the DataContext must be registered with the dependency injection (DI) container. The container provides the service to the controllers.
Update Startup.cs according to the following comments:
// Add the following using statements
using SnapObjects.Data;
using SnapObjects.Data.SqlServer;
and modify the ConfigureServices() method in Startup.cs according to the comments:
// Uncomment the following line to connect to the SQL server database.
// Note: Replace "ContextName" with the configured context name; replace "key" with the database connection name that exists in appsettings.json. The sample code is as follows:
services.AddDataContext<AppeonDataContext>(m => m.UseSqlServer(Configuration["ConnectionStrings:AdventureWorks2012"]));
Add a .NET DataStore Model
.NET DataStore is a .NET version of the native PowerBuilder DataStore. It provides almost the same set of APIs as the native PowerBuilder DataStore. A native PowerBuilder DataStore is created using PowerBuilder's DataWindow Designer.
Create a DataObject in the PowerBuilder IDE
Start PowerBuilder and create a template application with no database connection. Then add a new Grid DataWindow, using the DataWindow Designer, that maps to the table: HumanResources.Department. Save the DataObject with the name d_department.
Generate C# Models
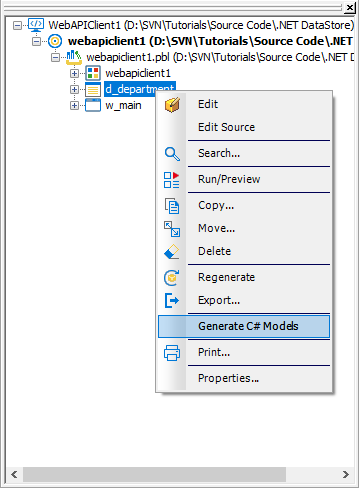
Right-click on the new DataObject from PowerBuilder's System Tree. Click on Generate C# Models.
SnapDevelop will open theC# Model Generator window. On the Database Connection popup window click on Ok.
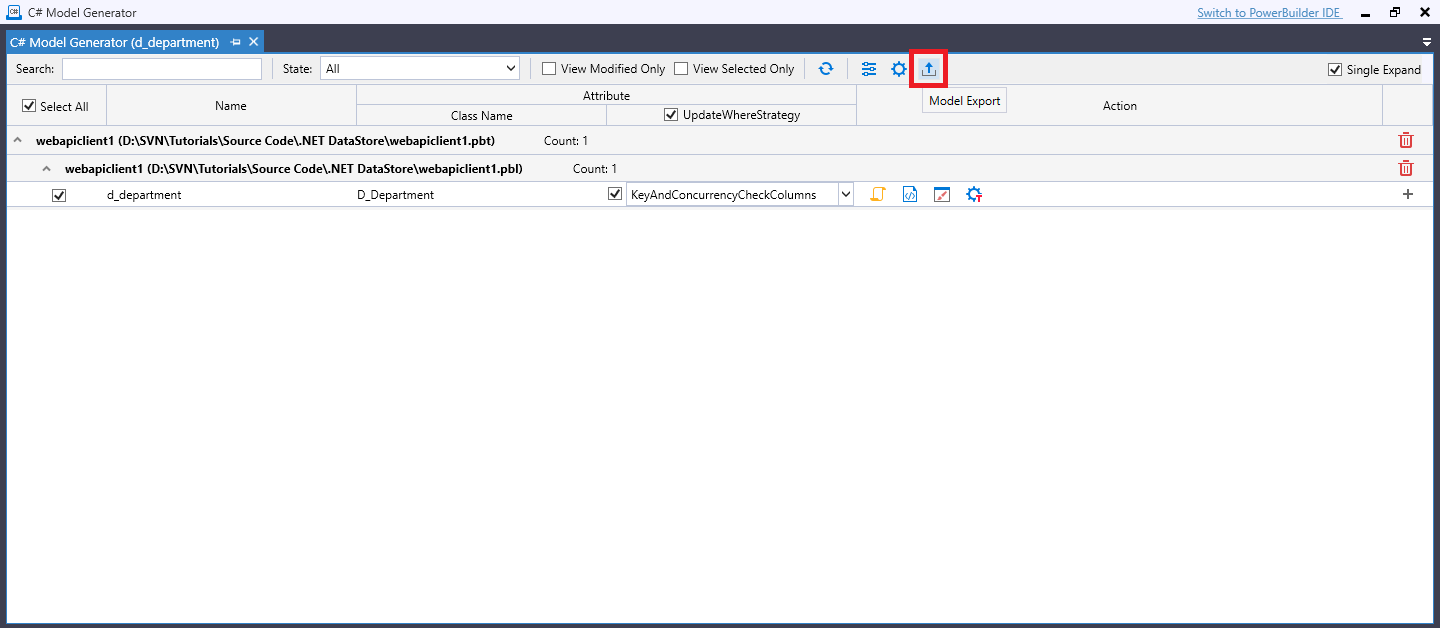
In the C# Model Generator window click on Model Export.
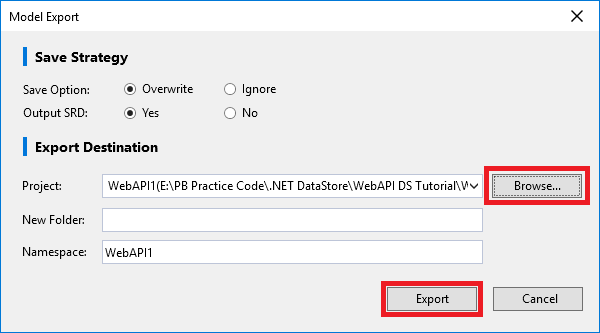
On the Model Export popup window select the project by clicking in Browse and select the project then click on Export.
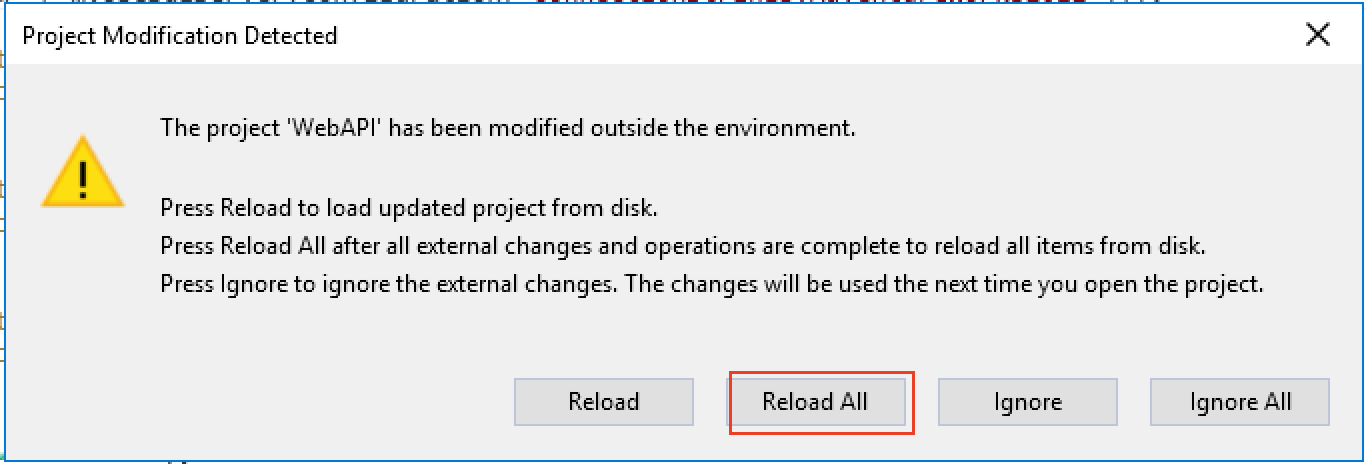
Back on SnapDevelop, click on Reload All to refresh the files and folders.
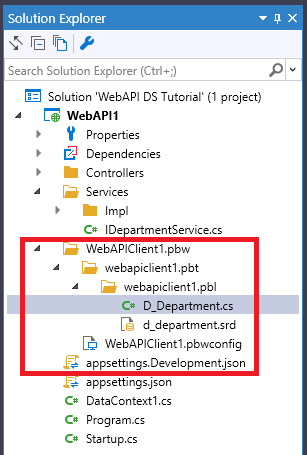
Your .NET DataStore model and DataObject have been added in a new folder.
Add a Service
A service is a component that is intended for common consumption in an app and commonly implements an interface. This is where you develop the business logic of your Web API.
The interface contains only the declaration of the methods, properties and events, but not the implementation.
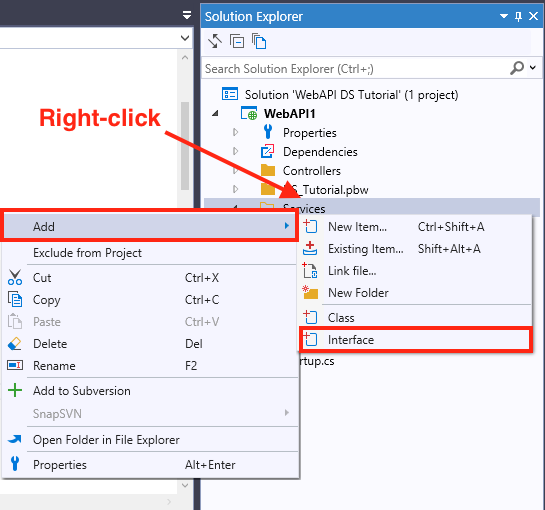
Right-click on the Web API Project. Then click Add > New Folder. Name it Services. Now add a sub-folder to it and name it Impl. Next, Right-click on the Services folder and click on Add > Interface.
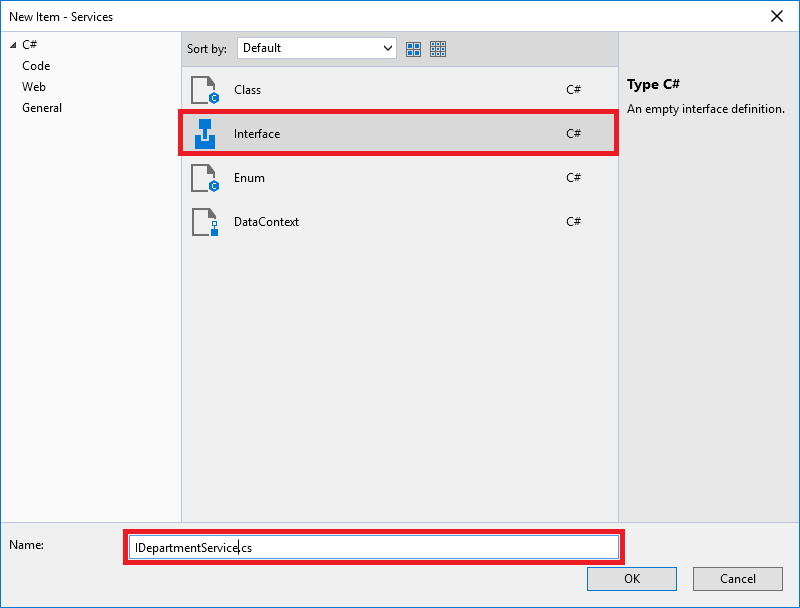
Name it as IDepartmentService.cs and click Ok.
Add the declaration of the methods we will implement on the service.
// IDepartmentService.cs
using PowerBuilder.Data;

namespace WebAPI1.Services
{
    public interface IDepartmentService
    {
        IDataStore Retrieve();

        int Create(D_Department department);

        int Update(IDataStore departments);

        int Delete(IDataStore department);
    }
}
To add the Service right-click on the Service > Impl sub-folder and click on Add > Class. Name it DepartmentService.cs and click Ok. (Notice the difference between the name of the interface "IDepartmentService.cs" and the name of the service "DepartmentService.cs")
Update DepartmentService.cs to implement the IDepartmentService interface, and add a constructor to receive the data context:
using System;
using System.Collections.Generic;
using System.Linq;
using System.Threading.Tasks;
using SnapObjects.Data;
using PowerBuilder.Data;

namespace WebAPI1.Services.Impl
{
    /// <summary>
    /// The service needs to be injected into the ConfigureServices method of the Startup
    /// class. Sample code as follows:
    /// services.AddScoped<ISampleService, SampleService>();
    /// </summary>
    public class DepartmentService : IDepartmentService
    {
        private readonly AppeonDataContext _context;

        public DepartmentService(AppeonDataContext Context)
        {
            _context = Context;
        }

        public int Create(D_Department department)
        {
            throw new NotImplementedException();
        }

        public int Delete(IDataStore department)
        {
            throw new NotImplementedException();
        }

        public IDataStore Retrieve()
        {
            throw new NotImplementedException();
        }

        public int Update(IDataStore departments)
        {
            throw new NotImplementedException();
        }
    }
}
In ASP.NET Core, services such as the DepartmentService must be registered with the dependency injection (DI) container. The container provides the service to the controllers.
Update Startup.cs. Add the following using statements:
// Add the following using statements
using WebAPI1.Services;
using WebAPI1.Services.Impl;
and modify the ConfigureServices() method in Startup.cs according to the comments:
 // The service needs to be registered in the ConfigureServices method of the Startup class.
services.AddScoped<IDepartmentService, DepartmentService>();
Perform CRUD Operations Using the Web API
Since the .NET DataStore and PowerBuilder's DataStore are very similar, you perform CRUD operations in a similar way as you do in the Web API.
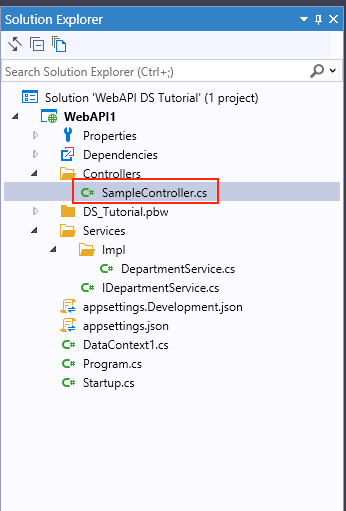
The Web API requires one more component called Controller. A default Controller was created when you created the Web API project; but you can also create a new one by right-clicking on the Controllers folder, then click on Add -> New Item -> API Controller Class.
A controller determines what response to send back to a user when a client makes an HTTP request.
Retrieve the .NET DataStore
To retrieve data from the .NET DataStore we will use the Retrieve() method declared in the Interface.
Retrieve() method in the Service
Create an instance of .NET DataStore using specified DataObject and DataContext, then call the .NET DataStore's Retrieve method to retrieve data.
// Replace your RetrieveOne method in the DepartmentService.cs class with this code
public IDataStore Retrieve()
{
    var ds_Department = new DataStore("d_department", _context);

    ds_Department.Retrieve();

    return ds_Department;
}
Retrieve() method in the Controller
The Retrieve() method is called by the client using the HTTP verb GET. It produces a response type 404 if no row was retrieved. If there was an internal server error it returns a response type 500 with the exception message. IF rows were retrieved it produces a response type 200 and returns the retrieved rows in JSON format.
Add the following using statements to your controller:
SampleController.cs
using System;
using System.Collections.Generic;
using Microsoft.AspNetCore.Http;
using Microsoft.AspNetCore.Mvc;
using PowerBuilder.Data;
using WebAPI1.Services;
using System.Linq;

namespace WebAPI1.Controllers
{
	[Route("api/[controller]/[action]")]
  [ApiController]
  public class SampleController : ControllerBase
  {
  	private readonly IDepartmentService _service;

    public SampleController(IDepartmentService Service)
    {
    	_service = Service;
    }

		// GET api/Sample/Retrieve
    [HttpGet]
    [ProducesResponseType(StatusCodes.Status200OK)]
    [ProducesResponseType(StatusCodes.Status404NotFound)]
    [ProducesResponseType(StatusCodes.Status500InternalServerError)]
    public ActionResult<IDataStore> Retrieve()
    {
    	IDataStore ds_Department = new DataStore("d_department");

      try
      {
      	ds_Department = _service.Retrieve();
      }
      catch (Exception ex)
      {
      	return StatusCode(StatusCodes.Status500InternalServerError, ex.Message);
      }

			if (ds_Department.RowCount <= 0)
      {
      	return NotFound("No rows retrieved.");
			}
      else
      {
      	return Ok(ds_Department);
      }
		}

    // GET api/sample/load
    [HttpGet]
    public ActionResult<IEnumerable<string>> Load()
    {
			return new string[] { "value1", "value2" };
    }
	}
}
The project template creates a Sample Web API and we have added a Retrieve method. Press Ctrl+F5 to run the app. SnapDevelop launches a browser and navigates to http://localhost:5000/api/Sample/Load.
Change the URL to: http://localhost:5000/api/Sample/Retrieve and Refresh the browser.
The following JSON is returned:
[{"Departmentid":1,"Name":"Engineering","Groupname":"Research and Development","Modifieddate":"2019-02-26T15:38:26.677"},{"Departmentid":2,"Name":"Tool Design","Groupname":"Research and Development","Modifieddate":"2008-04-30T00:00:00"},{"Departmentid":3,"Name":"Sales","Groupname":"Sales and Marketing","Modifieddate":"2008-04-30T00:00:00"},{"Departmentid":4,"Name":"Marketing","Groupname":"Sales and Marketing","Modifieddate":"2008-04-30T00:00:00"},{"Departmentid":5,"Name":"Purchasing","Groupname":"Inventory Management","Modifieddate":"2008-04-30T00:00:00"},{"Departmentid":6,"Name":"Research and Development","Groupname":"Research and Development","Modifieddate":"2008-04-30T00:00:00"},{"Departmentid":7,"Name":"Production","Groupname":"Manufacturing","Modifieddate":"2008-04-30T00:00:00"},{"Departmentid":8,"Name":"Production Control","Groupname":"Manufacturing","Modifieddate":"2008-04-30T00:00:00"},{"Departmentid":9,"Name":"Human Resources","Groupname":"Executive General and Administration","Modifieddate":"2008-04-30T00:00:00"},{"Departmentid":10,"Name":"Finance","Groupname":"Executive General and Administration","Modifieddate":"2008-04-30T00:00:00"},{"Departmentid":11,"Name":"Information Services","Groupname":"Executive General and Administration","Modifieddate":"2008-04-30T00:00:00"},{"Departmentid":12,"Name":"Document Control","Groupname":"Quality Assurance","Modifieddate":"2008-04-30T00:00:00"},{"Departmentid":13,"Name":"Quality Assurance","Groupname":"Quality Assurance","Modifieddate":"2008-04-30T00:00:00"},{"Departmentid":14,"Name":"Facilities and Maintenance","Groupname":"Executive General and Administration","Modifieddate":"2008-04-30T00:00:00"},{"Departmentid":15,"Name":"Shipping and Receiving","Groupname":"Inventory Management","Modifieddate":"2008-04-30T00:00:00"},{"Departmentid":16,"Name":"Executive","Groupname":"Executive General and Administration","Modifieddate":"2008-04-30T00:00:00"},{"Departmentid":19,"Name":"TestName2","Groupname":"TestGroup","Modifieddate":"2019-02-28T17:56:49.457"}]
Create/Insert a new row into the .NET DataStore
To insert data into the .NET DataStore we will use the Create() method declared in the Interface.
Create() method in the Service
Create an instance of .NET DataStore using specified DataObject and DataContext, then call the .NET DataStore's AddRow() method, passing the .NET DataStore to it, and call the Update() method to insert the data into the Database. Return the number of rows affected if it succeeds.
// Replace your Create method in the DepartmentService.cs class with this code:
public int Create(D_Department department)
{
    var ds_Department = new DataStore("d_department", _context);

    ds_Department.AddRow(department);

    return ds_Department.Update();
}
Create() method in the Controller
The Create() method is called by the client using the HTTP verb POST. It accepts a .NET DataStore that corresponds to the actual department table to update, and produces a response type 200 with the number of inserted rows. If an internal server error occurred, it produces a response type 500 or a response type 409 if a conflict occurred.
/***Add this method to your controller***/
// POST api/Sample/Create
[HttpPost]
[ProducesResponseType(StatusCodes.Status200OK)]
[ProducesResponseType(StatusCodes.Status409Conflict)]
[ProducesResponseType(StatusCodes.Status500InternalServerError)]
public ActionResult<int> Create([FromBody]IList<D_Department> department)
{
	int insertedRow;

  try
  {
  	insertedRow = _service.Create(department.FirstOrDefault());
	}
  catch (Exception ex)
  {
  	return StatusCode(StatusCodes.Status500InternalServerError, ex.Message);
	}

  if (insertedRow <= 0)
  {
  	return Conflict();
	}
  else
  {
  	return Ok(insertedRow);
	}
}
The project template creates a Sample Web API and we have added a Create method. Press Ctrl+F5 to run the app. SnapDevelop launches a browser and navigates to http://localhost:5000/api/Sample/Load.
To consume this method of the Web API, call the URL http://localhost:5000/api/Sample/Create with your client application passing, into the body of the request, the JSON containing the row you want to Create/Insert. (To learn how to call this method from PowerBuilder, refer to the following section: Call the Web API from PowerBuilder)
Update changes into the .NET DataStore
To update data from the .NET DataStore we will use the Update() method declared in the Interface.
Update() method in the Service
Initialize the received instance of the .NET DataStore using the specified DataContext, then call the .NET DataStore's Update() method to update the data from the database. Return the number of rows affected if it succeeds.
// Replace your Update method in the DepartmentService.cs class with this code:
public int Update(IDataStore departments)
{
    departments.SetDataContext(_context);

    return departments.Update();
}
Update() method in the Controller
The Update() method is called by the client using the HTTP verb POST. It accepts a .NET DataStore that corresponds to the actual department table to update, and produces a response type 200 if the update was successful. It produces a response type 404 if the ID was not found or was invalid. If an internal server error occurred, it produces a response type 500.
/***Add this method to your controller***/
// POST api/Sample/Update
[HttpPost]
[ProducesResponseType(StatusCodes.Status200OK)]
[ProducesResponseType(StatusCodes.Status404NotFound)]
[ProducesResponseType(StatusCodes.Status500InternalServerError)]
public ActionResult<int> Update([FromBody] IDataStore department)
{
	int modifiedRows;

  try
  {
  	modifiedRows = _service.Update(department);
	}
  catch (Exception ex)
  {
  	return StatusCode(StatusCodes.Status500InternalServerError, ex.Message);
	}

  if (modifiedRows <= 0)
  {
  	return NotFound("No rows updated.");
	}
  else
  {
  	return Ok(modifiedRows);
	}
}
The project template creates a Sample Web API and we have added an Update method. Press Ctrl+F5 to run the app. SnapDevelop launches a browser and navigates to http://localhost:5000/api/Sample/Load.
To consume this method of the Web API, call the URL http://localhost:5000/api/Sample/Update with your client application and pass in the JSON containing the rows you want to Update. (To learn how to call this method from PowerBuilder, refer to the following section: Call the Web API from PowerBuilder)
Delete data from the .NET DataStore
To delete data from the .NET DataStore we will use the Delete() method declared in the Interface.
Delete() method in the Service
Create an instance of .NET DataStore by using the specified DataContext, then call the .NET DataStore's Update() method to update the data from the database. since the .NET DataStore already has the row status of each row, using the Update() method will also delete the row(s). Return the number of rows affected if it succeeds.
// Replace your Delete method in the DepartmentService.cs class with this code:
public int Delete(IDataStore department)
{
	department.SetDataContext(_context);

  return department.Update();
}
Delete() method in the Controller
The Delete() method is called by the client using the HTTP verb DELETE. It accepts a .NET DataStore with the actual row(s) to delete, and produces a response type 200 if the delete was successful. It produces a response type 404 if the ID was invalid or was not found. If an internal server error occurred, it produces a response type 500.
/***Add this method to your controller***/
// DELETE api/Sample/Delete
[HttpDelete]
[ProducesResponseType(StatusCodes.Status200OK)]
[ProducesResponseType(StatusCodes.Status404NotFound)]
[ProducesResponseType(StatusCodes.Status500InternalServerError)]
public ActionResult<int> Delete([FromBody]IDataStore department)
{
	int deletedRows;

  try
  {
  	deletedRows = _service.Delete(department);
	}
  catch (Exception ex)
  {
  	return StatusCode(StatusCodes.Status500InternalServerError, ex.Message);
	}

  if (deletedRows <= 0)
  {
  	return NotFound("No rows deleted.");
	}
  else
  {
  	return Ok(deletedRows);
	}
}
The project template creates a Sample Web API and we have added a Delete method. Press Ctrl+F5 to run the app. SnapDevelop launches a browser and navigates to http://localhost:5000/api/Sample/Load.
To consume this method of the Web API, change the URL: http://localhost:5000/api/Sample/Delete and call it with your client application passing in the department DataStore with the rows you want to delete. (To learn how to call this method from PowerBuilder, refer to the following section: Call the Web API from PowerBuilder)
Call the Web API from PowerBuilder
Add the JSON DataWindow
A JSON DataWindow is a traditional DataWindow that has a Web API as its data source. You use the same functionalities on the client-side, but the data manipulation is done on the Web API server-side.
Start PowerBuilder and using the template application created at “Create a DataObject in PowerBuilder IDE”. Put a DataWindow control on a sheet window. Set the DataObject to “d_department”. And add a button for each CRUD operation as well as its basic source code to Insert/Update/Delete some data.
Retrieve the JSON DataWindow
The RESTClient object provides the ability to access the RESTful Web APIs. It can load the JSON-formatted string returned from the RESTful Web Service APIs into the DataWindow object.
To retrieve a JSON DataWindow you first need to instantiate the RESTClient object. Add an instance variable of the RESTClient object.
RESTClient inv_RestClient
On the Open event of your window, create the object variable and Set the Request Headers.
// Create the RESTClient object variable
inv_RestClient	= CREATE RESTClient

// Set the Request Headers to tell the Web API you will send JSON data
inv_RESTClient.SetRequestHeader ("Content-Type", "application/json;charset=UTF-8")

// Set the Request Headers to accept GZIP compression
inv_RestClient.SetRequestHeader("Accept-Encoding", "gzip")
On the source code window of your Retrieve button, add the RESTClient.Retrieve() function to call your Web API and load it directly into your DataWindow.
// Retrieve the DW using the RESTClient
inv_RestClient.Retrieve(dw_department, "http://localhost:5000/api/Sample/Retrieve")
Run your application. Press Ctrl+R. Click on the Retrieve button. (Note: Your Web API needs to be running)
Insert/Update and Delete data using the Web API
On the source code window of your Insert button, add DataWindow.ExportJson() function to export the new data as plain-format JSON string, and add the RESTClient.SendPostRequest() function to call your Web API using the HTTP verb POST to send the data to the Web API.
On the source code window of your Update button, add the RESTClient.Submit() function to call the Web API using the HTTP verb POST. It automatically exports the DataWindow JSON, as well as all of it's Buffers, and sends the all rows to the Web API.
On the source code window of your Delete button, add the RESTClient.SendDeleteRequest() function to call the Web API using the HTTP verb DELETE. You can also send your JSON data in the body of the request or you can send individual arguments on the URL.
Insert
// Variable Declaration
Long	ll_row
Long	ll_rtn
String	ls_json
String	ls_response

// Insert a new row into the DW
ll_row	= dw_department.InsertRow(0)

// Add data to the new row
dw_department.object.departmentid[ll_row]	= 0
dw_department.object.name[ll_row]			= "Research"
dw_department.object.groupname[ll_row]		= "Research and Development"
dw_department.object.modifieddate[ll_row]	= Today()

// Accept the text of the DW
dw_department.AcceptText()

// Export the DW JSON
// The exported JSON string will be a plain-format string.
ls_json	= dw_department.ExportJson(TRUE, FALSE)

// Call the Create method of the Web API by passing the JSON and catching the response
ll_rtn	= inv_RESTClient.SendPostRequest("http://localhost:5000/api/Sample/Create", ls_json, ls_response)

// Add your business logic to validate if the Creation of the department was successful
// ...
Alternatively, you can also insert data from the JSON DataWindow using the RESTClient.Submit() function if the Web API can receive an IDataStore argument type.
inv_RestClient.Submit("http://localhost:5000/api/Sample/Update", ls_response, dw_department)
Update
// Variable Declaration
Long	ll_rtn
String	ls_response
String	ls_json

// Retrieve the DW from the Web API
inv_RestClient.Retrieve(dw_department, "http://localhost:5000/api/Sample/Retrieve")

// Changes a value from the DW
dw_department.SetItem(1, "name", "Training")

// Call the Web API to submit the changes
ll_rtn = inv_RestClient.Submit("http://localhost:5000/api/Sample/Update", ls_response, dw_department)

// Add your business logic to validate if the Creation of the department was successful
// ...
Delete
// Variable Declaration
Int	li_rtn
Int li_dep_id
String	ls_response
String	ls_json

// Note: for the Delete method to actually delete a row, delete a newly inserted row
// since the existing rows have dependent data on other tables.
dw_department.DeleteRow(dw_department.GetRow())

// Accept the text of the DW
dw_department.AcceptText()

// Export the DW JSON
// The exported JSON string will be a DWJSON-format string.
ls_json	= dw_department.ExportJson(TRUE, TRUE)

// Delete data from the JSON DataWindow with the RESTClient
li_rtn = inv_RestClient.SendDeleteRequest("http://localhost:5000/api/Sample/Delete", ls_json, ls_response)

// Check if the delete was successful by looking into the Return code of the RESTClient
IF li_rtn <> 1 THEN
	  // Rest of your code....
End If
Alternatively, you can also delete data from the JSON DataWindow with the RESTClient.Submit() function if Web API can receive a IDataStore type argument.
inv_RestClient.Submit("http://localhost:5000/api/Sample/Update", ls_response, dw_department)
Run your application. Press Ctrl+R. Click on each button. (Note: Your Web API needs to be running)