You can add a PowerBuilder workspace to the SVN source control system from the PowerBuilder IDE. Make sure all of your source code for the workspace is located under the same directory as the workspace (*.pbw) file or under its sub-directory.
To add a PowerBuilder workspace to the SVN source control system:
-
Right-click the workspace in the System Tree and select Add to Source Control from the pop-up menu.
-
In the Add to Source Control dialog box, select Subversion (SVN) as the source control provider for the current workspace and click OK.
-
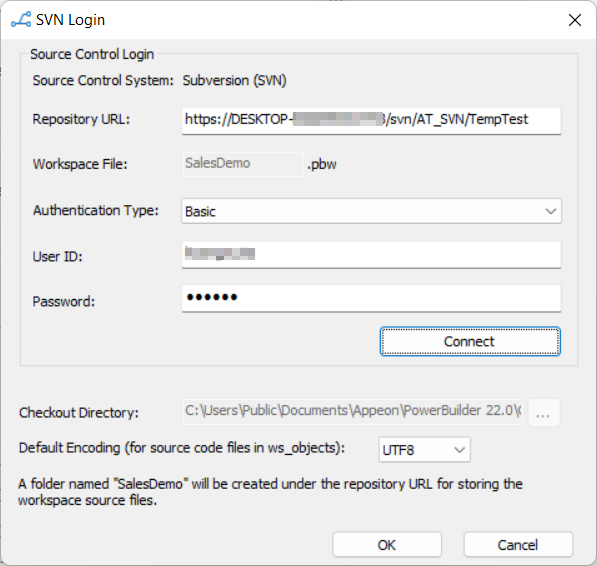
In the SVN Login dialog box, input the information required by the source control system. If the login information has been input before, they will be filled in automatically.
In the Repository URL box, input the URL of the SVN source control repository. The name of the current workspace is automatically displayed and a folder will be created with this name for storing this workspace on the server. Notice that the URL for the workspace will be the server repository URL + the workspace folder name. Use this complete URL when downloading the workspace. Connecting to a local repository of SVN using the file:// protocol (such as file:///C:/SVNRepository) is unsupported.
Select an authentication type. Token is not supported for SVN currently.
Type in your user name and password for the SVN source control system.
Click Connect to make sure connection is successful and then click OK.
Specify the encoding format for the source code files in "ws_objects". You can select from: ANSI/DBCS, HEXASCII, and UTF8.
After connecting with the source control system successfully, the Add to Source Control dialog box displays listing all the files for the workspace that are not currently under source control. You cannot add files that are already under source control.
You may notice that a "ws_objects" folder is automatically created under the workspace. This folder is for managing the source code file of the PowerBuilder objects including .srw (for window), .srm (for menu), .sru (for user object), .srd (for DataWindow), etc. It must be added to source code, in order to manage the source code at object level.
All of the source code for the workspace must be located under the same directory as the workspace (*.pbw) file or under its sub-directory.
-
In the Add to Source Control dialog box, select the files and folders (especially "ws_objects") and click OK.
PowerBuilder starts uploading the selected files and folders to the source control system. After the file or folder is added to source control, the object in the PowerBuilder System Tree will be marked with a green dot (
 ) in front of it, indicating that its source
code file on the local computer is in sync with the file on the
server.
) in front of it, indicating that its source
code file on the local computer is in sync with the file on the
server.
Note
If using the proxy server, configure the proxy server IP address and port number in the PB.ini file. See Using proxy server for more information.


When PowerBuilder IDE opens without loading any workspace, you can get a PowerBuilder workspace from the source control system and open the workspace in the PowerBuilder IDE directly.
To get a PowerBuilder workspace from the SVN source control system:
-
Right-click "No Workspace" in the System Tree and select Connect to Workspace from the pop-up menu
or
Select Connect to Workspace from the File menu.
The Connect to Workspace dialog box displays. If the login information has been input before, they will be filled in automatically.
-
Select Subversion (SVN) from the Source Control System list.
In the Repository URL box, input the repository URL of the workspace. Notice that the complete URL should be the server repository URL + the workspace folder name. Connecting to a local repository of SVN using the file:// protocol (such as file:///C:/SVNRepository) is unsupported.
In the Workspace File box, type in the name of the workspace file to be downloaded from the repository. Note that the workspace file name is case-sensitive.
Select an authentication type. Token is not supported for SVN currently.
Type in your user name and password for the SVN source control system.
In the Checkout Directory box, type or select a path for the local root directory. All the files that you add to or get from source control must reside in this path or in a subdirectory of this path.
Select the Regenerate all PBLs with the source code after download option to regenerate all PBLs after downloading the source code from workspace if you are unsure whether the PBLs are updated with the latest source code.
-
Click Connect, and click OK when connection is successful.
PowerBuilder starts downloading the workspace from the SVN source control system, and after the workspace is successfully downloaded, it will be loaded in the PowerBuilder IDE automatically.
Note
After you get a workspace which was added to SVN using a third-party tool such as TortoiseSVN (not by PowerBuilder IDE), the objects will be marked with this icon
 which means the objects are not yet under
source control in PowerBuilder IDE, so you should commit the
entire workspace from the PowerBuilder IDE to SVN to add it
under source control.
which means the objects are not yet under
source control in PowerBuilder IDE, so you should commit the
entire workspace from the PowerBuilder IDE to SVN to add it
under source control.

After you create a new object or change an existing object on your local workspace, you can commit the object to the SVN source control system so that other developers can reach it.
To commit an object to the SVN source control system:
-
Right-click the object (or the library that contains the object) in the System Tree and select SVN Commit from the pop-up menu.
-
In the commit dialog box that displays, input a comment and click OK to confirm committing the object.
PowerBuilder starts uploading the object to the SVN source control system. After the object is uploaded successfully, the icon in front of the object will change from a plus sign (
) to a green dot (), indicating that the object on the local
computer is in sync with the object on the server.
If conflicts are detected, you will be prompted in the output view and will have to resolve the conflict manually. See the section called “Resolve conflicts” for details.
If you remove an object from your local workspace, you use the same instructions as above to commit the change and remove the object from the SVN source control server.
Note
If you are prompted for conflicts when committing a removed object, you should first restore the object using the Revert feature of an SVN client (such as TortoiseSVN), and then remove the local object and execute SVN Commit again.
The output (including error and warning) of a variety of operations (SVN Commit, SVN Update, SVN Revert, Refresh etc.) displays in the Output window. Currently, lines in the Output window provide no links to open the object when you double-click on that line, and although the pop-up menu provides the options Edit and Edit Source, they will not open an object in a painter or the Source editor.
For objects that are changed or added by other developers to the SVN source control server but not yet synchronized to your local workspace, you can get these objects from the SVN source control system.
To get objects from the SVN source control system:
-
Right-click the library (or the workspace or the target that contains the object to be downloaded) in the System Tree and select SVN Update from the pop-up menu.
PowerBuilder starts downloading the new objects or changed objects from the SVN source control system to the local workspace. After the object is downloaded successfully, the object will be marked with a green dot (
) in front of it, indicating that the object
on the local computer is in sync with the object on the
server.
If conflicts are detected, you will be prompted in the output view and will have to resolve the conflict using an SVN client. See the section called “Resolve conflicts” for details.
When "Compile failure" error occurs
When "Compile failure" error occurs during the download process, clicking OK will still download and import the object with the error (and you will need to fix the error later), or clicking Cancel will terminate the download process of all objects and revert back to the object on the local computer.
When to do a full build
When the following problems happen, a full build may help to fix them:
-
If both the parent object and the child object have been changed on the source control server, the parent object or the child object may not display correctly after downloaded from the server to the local computer.
-
After the object is downloaded from the server to the local computer, PowerBuilder IDE crashed when trying to open the object.
-
After the object is downloaded from the server to the local computer, the application crashed when running from the PowerBuilder IDE.
-
When the following error occurs: "Open of User Object xxx failed. It has been migrated to current version format, but must also be successfully regenerated.", performing a full build can resolve the error.
-
If more than one developer are making changes to the same object
and committing the object at the same time, conflicts will occur when
synchronizing the object. When conflicts are detected, the object in
the library tree will be marked by a "!" sign ( ) and you will be prompted in the output view
and will have to resolve the conflict manually.
) and you will be prompted in the output view
and will have to resolve the conflict manually.
Note
If the workspace has already been added to the SVN source code system in PowerBuilder 2017 R2, please remove its binary property first before resolving conflicts in PowerBuilder 2017 R3 and later. See Remove the binary property from a R3 source-controlled workspace for details.
The following steps walk you through how to resolve the conflicts and merge the changes (Suppose developer A and B make changes to the same PowerBuilder object at the same time):
Step 1: Developer A commits the object to the source control server successfully.
Step 2: When developer B tries to commit the object, he receives
a message requiring him to update the object first, so developer B
performs SVN Update, then the object in the library tree will be
marked by a "!" sign () which means there is a conflict, and the
changes made by Developer B, the original code, and the changes made
by Developer A will be listed together in the object's source
code.
Step 3: Developer B right-clicks the object and selects Edit Conflicts; the object's source code will be displayed in TortoiseSVN. Developer B looks into the source code and decides which changes to keep (the changes made by Developer B, the original code, or the changes made by Developer A). He manually removes the unwanted changes from the object's source code.
In order for the "Edit Conflicts" option to work, developers will need to specify the executable program of TortoiseSVN in the Properties of Workspace dialog box first. See Tools for Show Log\Edit Conflicts for details.
Note
After you merge the changes, make sure to refresh and then compile the object in PowerBuilder, otherwise, the object may be missing or fail to open in the PowerBuilder IDE, or may cause the PowerBuilder IDE to crash.
Step 4: Developer B performs SVN Resolve for the object to refresh the object status (clears the conflict sign) and commit the object to the server.
A workspace that has already been added to the SVN source code system from PowerBuilder 2017 R2 must have its (as well as all files') binary property removed, in order to correctly resolve conflicts and merge changes in PowerBuilder 2017 R3 and later.
To remove the binary property of the files for a workspace:
-
In PowerBuilder IDE, get the workspace from the SVN source control system.
-
Download the SccAuxiliaryTool.exe tool from the Appeon website.
-
Execute the following command to remove the binary property of the files for this workspace:
SccAuxiliaryTool.exe /command:svn_prop_del /path:C:\check_out\svn\workspace_1
The /path parameter should point to the directory where the workspace is located.
-
Commit the changed files to the source control system.
For objects that are changed locally but not yet synchronized to the SVN source control system, you can give up the local changes and restore to the version in the source control system.
To revert objects from the SVN source control system:
-
Right-click the workspace, target, library, or object in the System Tree and select SVN Revert from the pop-up menu.
-
Select the objects you want to revert and then click OK.
PowerBuilder downloads the object from the SVN source control system and replaces the copy in the local workspace.
After the object is loaded into the PowerBuilder IDE, it might be changed outside of the PowerBuilder IDE, for example, the developer merges the changes from the other version using an SVN client, and such changes will not be detected by the PowerBuilder IDE, you will need to right click the object and select Refresh from the pop-up menu to reload the object in the PowerBuilder IDE.
The "Refresh" menu is also used when the PBL file on the source control server is not the latest when you first download the entire workspace from the source control server. In such case, after you download the PBL file, you will need to select the Refresh menu to refresh the objects and reload the latest objects in the PowerBuilder IDE.
Starting from version 2022, the PBL files no longer need to be uploaded to the source control server, because they will be automatically generated using the source code downloaded from the source control server (when executing the "Connect to Workspace" and "SVN Update" operations).
The "Upload PBL" menu is preserved for projects that have been managed and upgraded from the earlier versions.
When you lock the local object, the object on the source control server will be locked correspondingly. Locking the object can prevent the other users committing changes to them.
You can lock PBW, PBT, and source files of PBLs; but cannot lock PBD, or PBX files.
To lock objects in the SVN source control system:
-
Right-click the workspace, target, library, or object in the System Tree and select SVN Get Lock from the pop-up menu.
-
Select the files or objects you want to lock and then click OK.
If newer version of the file/object exists on the source code server, you will be prompted to update the file/object first before locking it. You can select to update the selected files/objects to the latest version and then lock the file, or cancel the update and lock procedure.
When PowerBuilder locks the file or object in the SVN source control system successfully, it adds the "SVN Release Lock" option to the pop-up menu.
Note
When the PBL file is made read-only by setting the "svn:needs-lock" property via a third-party tool, the PBL file will be available for selection in the SVN Get Lock dialog; and when you select to lock the PBL file, the local copy of the PBL file is made editable; and when you release the lock for the PBL file, the local copy of the PBL file is made read-only again. The server copy of the PBL file will remain intact during Get/Release Lock, because the PBL file should never be manipulated in the source control server except for scenarios in Upload PBL.
To unlock objects in the SVN source control system:
-
Right-click the workspace, target, library, or object in the System Tree and select SVN Release Lock from the pop-up menu.
-
Select the files or objects you want to unlock and then click OK.
PowerBuilder unlocks the file or object in the SVN source control system so that other users can commit changes to them.
The file or object will be automatically unlocked when you commit the file or object to the server by performing SVN Commit, unless you select the "Keep locks" option in the SVN Commit dialog box.
svn:needs-lock property
To make it easier to manage locks, there is a new property called "svn:needs-lock". PowerBuilder IDE provides no direct option for setting this property; you can set this property using an SVN client (such as TortoiseSVN). After that, you can manipulate (such as lock, commit etc.) the object which has the svn:needs-lock property using the SVN options provided in the PowerBuilder IDE.
If you set "svn:needs-lock" to an object, you should also set "svn:needs-lock" to the PBL file that contains this object, otherwise changes made to the object may not be properly saved and synchronized between the object source and the PBL file. For example, if you set "svn:needs-lock" to the object only but not to the PBL file, and then if you edit the object without locking the object first, the changes you made to the object will not be saved to the object source (which is expected), but will be saved in the object painter (which is not expected); in such case, you should refresh the object (using the SVN Refresh option) to discard the changes from the object painter.
Note
After you set the "svn:needs-lock" property to an object, you should commit the object (using the Commit option in the SVN client, or using the SVN Commit option in PowerBuilder) to make the property effective; so after that any user who wants to edit the object will need to lock the object first.
However, it is a different case for the PBL file. After you set the "svn:needs-lock" property to the PBL file, you should commit the PBL file (using the Commit option in the SVN client) or upload the PBL file (using the Upload PBL option in PowerBuilder) to make the property effective; and after that when the user tries to "lock" or "unlock" the PBL file, only the local copy is locked or unlocked (the local copy is changed from read-only to editable when locked; and changed from editable to read-only when unlocked), the server copy of the PBL file has no change (it cannot be locked or unlocked); therefore, unlike the object which can be locked by one user at a time, the PBL file can be "locked" by multiple users at the same time.
PowerBuilder IDE provides no utilities to view logs or edit conflicts, but it allows you to specify the executable file of TortoiseSVN and use it to view logs and edit conflicts.
To specify the executable file of TortoiseSVN:
-
Right-click the workspace in the System Tree and select Properties from the pop-up menu.
-
In the Properties of Workspace dialog box, select the Source Control tab, and then click the Advanced button.
-
In the Source Control Advanced Settings dialog box, select Show Log/Edit Conflicts in the left panel, and then specify the executable program of TortoiseSVN.
-
Click OK.

To show the revision log:
-
Right-click the workspace, target, library, or object in the System Tree and select SVN Show Log from the pop-up menu.
The TortoiseSVN tool displays the revision logs directly.
To edit conflicts:
-
Right-click the object with the conflict sign (
) in the System Tree and select SVN Edit
Conflicts from the pop-up menu.
The TortoiseSVN tool displays the source control with the conflicts. For more details, see Resolve conflicts.
You can compare an object in your local directory with the version of the object that was last synchronized with the source control server. If the object you want to compare has not been added to the source control server, or the local object is not changed since last sync, the SVN Diff menu item is not available.
PowerBuilder IDE provides no difference utility, but it allows you to select one that you have already installed. Please make sure the utility itself is compatible with SVN client 1.9.7 or later. The recommended utilities and versions are:
-
TortoiseSVN 1.9.7
-
Araxis Merge 2018.4988
-
Beyond Compare 4.2.4
-
DiffMerge 4.2.0
-
ExamDiff Pro 9.0.1.8
-
KDiff3 0.9.98
-
SemanticMerge 2.0.120.0
-
UltraCompare 18.00.0.47
-
WinMerge 2.14.0.0
To select a utility for object comparison:
-
Right-click the workspace in the System Tree and select Properties from the pop-up menu.
-
In the Properties of Workspace dialog box, select the Source Control tab, and then click the Advanced button.
-
In the Source Control Advanced Settings dialog box, select Diff Viewer in the left panel, then select the tool name from the list, specify the executable program of the tool, and change the arguments if necessary.
-
Click OK.

Method 1: To compare the local object with the version last sync with source control:
-
Right-click the object in the System Tree and select SVN Diff from the pop-up menu.
The difference utility displays the objects and highlights the differences directly.
Method 2: To compare the local object with the version last sync with source control:
-
Right-click the object in the System Tree and select SVN Commit (Release Lock, Revert, or Resolve) from the pop-up menu.
-
In the SVN Commit (Release Lock, Revert, or Resolve) dialog, double click an item from the object list to view the differences.
You can view the differences of the item which is added, modified, locked, conflicted, or deleted.
The difference utility displays the objects and highlights the differences directly.
You can also compare the workspace file (.pbw) or the target file (.pbt), but you cannot compare the binary file such as the library file (.pbl).
After you add the workspace to SVN using the Add to Source Control menu or get the workspace from SVN using the Connect to Workspace menu, you can view and edit the SVN connection settings in the Properties of Workspace dialog box; you can also remove and restore the connection between the workspace and the source control server.
To view/edit the connection settings of the SVN source control system:
-
Right-click the workspace in the System Tree and select Properties from the pop-up menu.
-
Select the Source Control tab in the Properties of Workspace dialog box.
-
Select Subversion (SVN) from the Source Control System list.
Subversion (SVN) is available from the list when the current workspace is under the SVN source control, for example, after the workspace is uploaded to SVN using the Add to Source Control menu (see the section called “Add a workspace to SVN”), or after the workspace is downloaded from SVN using the Connect to Workspace menu (see the section called “Get a workspace from SVN”), or when PowerBuilder IDE detects that an .svn sub-folder exists.
-
View or edit the connection settings for the selected source control system. Note that User ID and Password are used by all workspaces, but the other settings are not.
User ID and Password: User credentials for logging into the source control system. These settings can be changed here. Token is not supported for SVN currently.
Repository URL: A URL that points to the repository on the source control server. This setting is read-only and cannot be changed here.
Local Root Directory: A local path where all the files that you add to or get from source control must reside. This setting is read-only and cannot be changed here.
-
Click OK.

To remove/restore the connection settings from the SVN source control system:
-
If you select None from the Source Control System list and click OK, PowerBuilder will remove the connection between the workspace and the source control server.
-
If you move the workspace to a new location and then select SVN from the Source Control System list and click OK, PowerBuilder will restore connections between the workspace and the source control server.
Besides that, if a workspace is under source control using a third-party tool such as TortoiseSVN, you can open the workspace (make sure the .svn sub-folder exists) and then select SVN from the Source Control System list to establish connections between the workspace and the source control server in the PowerBuilder IDE. Notice that the objects are marked with this icon
which means the objects are not yet under
source control in PowerBuilder IDE, so you should commit the
entire workspace to add it under source control, and so the
"ws_objects" folder is successfully created and uploaded to SVN.
The "ws_objects" folder is essential for correctly identifying the
status of the PowerBuilder objects during the source control
management process.
After a workspace is successfully added to the SVN source control, icons in the PowerBuilder System Tree display the source control status of all objects in the workspace.
The icons and their meanings are described in the following tables.
|
Icon |
SVN source control status of object displaying icon |
|---|---|
|
|
The object resides only locally and is not under source control. |
|
|
The object is under source control. The object on the local computer is in sync with the object on the server. |
|
|
The object is under source control. The object on the local computer is changed, and is not committed to the server. |
|
|
The object is under source control. The object on the local computer conflicts with the object on the server. |
|
|
The object is under source control, and the object is locked. |


