Unit Testing with xUnit Test in PowerBuilder 2019 C# IDE
This tutorial uses a sample solution to walk you through the steps of performing unit testing on PowerBuilder 2019 C# IDE with xUnit Test.
xUnit Test is a framework that facilitates the unit testing tasks of a project. PowerBuilder 2019 C# IDE integrates its own xUnit Test so that your unit testing tasks can be easier. This tutorial focuses on unit testing in Test Driven Development (TDD): Coding your test cases (requirements), then developing your app to pass those tests. This approach features very short repetitive cycles, and encourages simple designs and inspires confidence*. Taking this approach, you, the developer, can have better confidence that your apps are coded to work properly from the very beginning.
In this tutorial, you will learn to:
- Add a new xUnit test project to an existing solution
- Write your unit test methods using the
FactandTheoryattributes - Run the tests
- Debug your tests
- Additional notes
Prerequisites
- PowerBuilder 2019 C# IDE and a sample project
- Basic C# knowledge
- Basic xUnit Test knowledge
- Basic debugging knowledge
Add a new xUnit test project to an existing solution
Open an existing project for testing
Open the PowerBuilder 2019 C# IDE and load the starting project of the tutorial that you downloaded from here. Now, open the Calculator.cs file, we need to add the actual business logic to it. This is how the Calculator class should be:
using System;
using System.Collections.Generic;
using System.Linq;
using System.Threading.Tasks;

namespace Calculator
{
    public class Calculator
    {
        public static double Addition(double num1, double num2)
        {
            return num1 + num2;
        }

        public static double Subtraction(double num1, double num2)
        {
            return num1 - num2;
        }

        public static double Multiplication(double num1, double num2)
        {
            return num1 * num2;
        }

        public static double Division(double num1, double num2)
        {
            return num1 / num2;
        }
    }
}
As you can see, it is a very simple class. It only performs some very simple operations and returns the result of each operation. But this is enough to start using the xUnit Test projects.
Also notice the use of the static keyword. We will use this to avoid having to instantiate it later on.
Create an xUnit Test (.NET Core) project
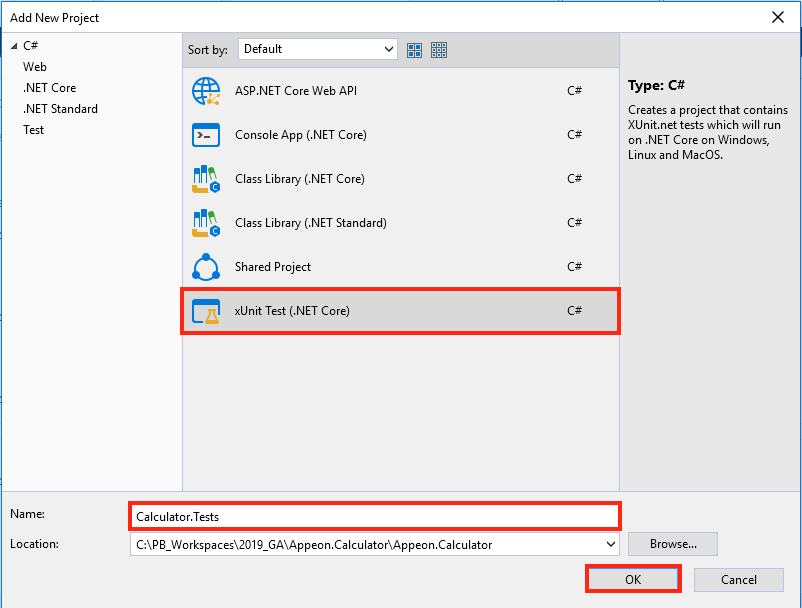
Let's add a new xUnit Test project to our solution. Right-click on the solution. Then click on Add > New Project.

Name the project Calculator.Tests and click OK.
This will create a simple project with one class for the basic starting point of your tests.
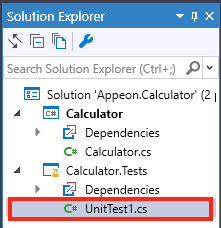
Since we will create our own class to test our code, we can proceed to delete this object. So, right-click on the UnitTest1.cs object and then select Delete.
Perform unit test using the Fact attribute
Add a test class
Then create your own class by right-clicking on the Calculator.Tests project and selecting Add > Class. Name it CalculatorTests.cs and click OK.

The following code will be generated for CalculatorTests class. Delete the Test1() method and the [Fact] attribute.
using System;
using Xunit;
using System.Collections.Generic;
using System.Linq;
using System.Threading.Tasks;

namespace Calculator.Tests
{
    public class CalculatorTests
    {
      	// ***Delete these lines of code*** //
        [Fact]
        public void Test1()
        {

        }
      	// ******************************* //
    }
}
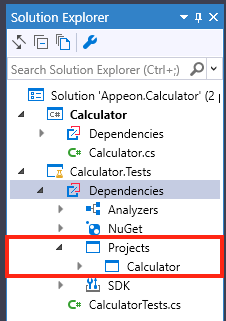
Now that we have our testing class, we will create a reference to our actual development project. In order to do that, expand the Dependencies item of the Calculator.Tests project. Then right-click on it and select Add Reference….

Then mark the checkbox for the project Calculator and click OK.

This will add a reference to our project and make it available to our testing project.
Our class is ready for us to start coding our tests.
using System;
using Xunit;
using System.Collections.Generic;
using System.Linq;
using System.Threading.Tasks;

namespace Calculator.Tests
{
    public class CalculatorTests
    {

    }
}
Develop the test method
Here is where we start developing our first method that will test the Addition method from our Calculator class. The coding of our tests will be done on the CalculatorTests class, and any required changes to the actual app will be done to the methods of the Calculator class.
One very useful thing to keep in mind is to applying a naming convention for our test methods. One of these conventions states that you need to use the word Should in the name of your test method in order to make it clear that the method should perform certain testing task. But for this tutorial we will use our own naming convention that will start with the name of the method to test, then a simple and short explanation of what it should do. So we will name it:
public void Addition_ShouldCalculateSimpleValues()
{

}
Notice that it returns void. That is because testing methods usually don't need to return any value. So this method will test the Addition method.
The testing methods usually have three main sections inside of its lines of code: Instantiation, Action and Assertion.
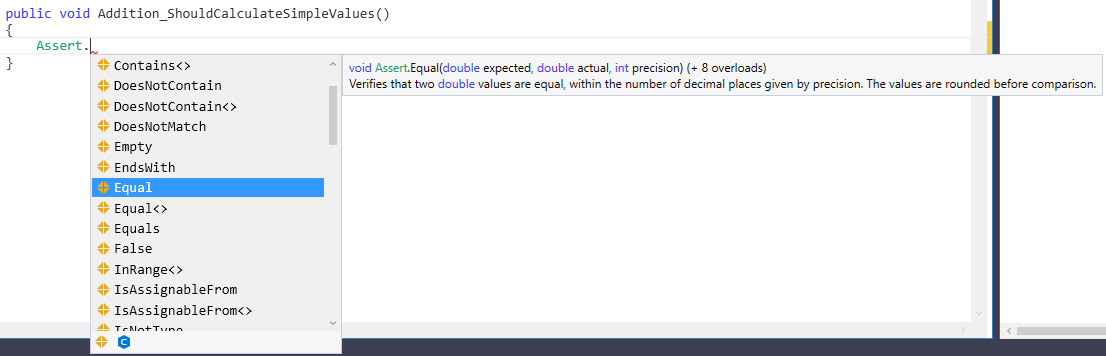
The Instantiation section is where we set up what's needed for the test to run. The Action section is where we define the method that we want to test, and any other operations needed for it to run. Then, the Assertion section is where we actually assert that the method should do what we expect it to do. For that, we will use the Assert object.
The Assert object has many APIs that help you determine if the test passed or failed. You can find all of the APIs of Assert using the Intelligent Code Completion feature of PowerBuilder 2019 C# IDE.
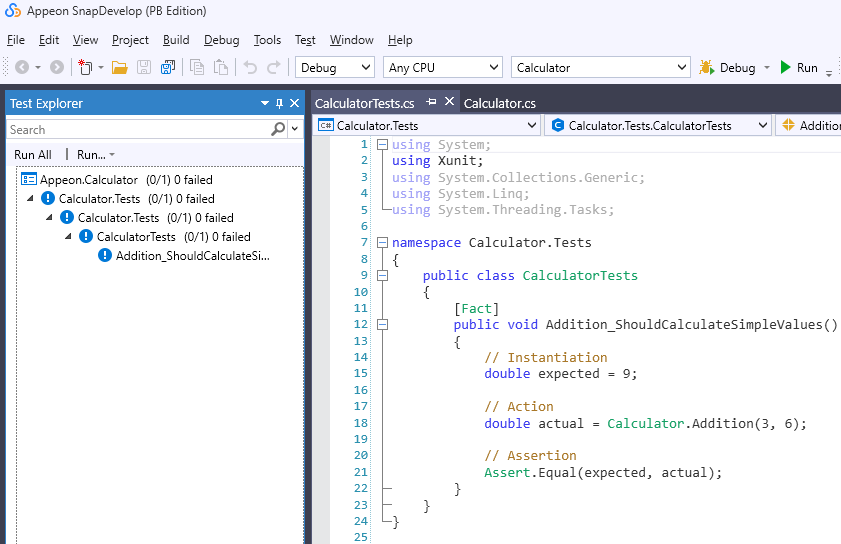
So let's add the code to our test method for the actual Test:
[Fact]
public void Addition_ShouldCalculateSimpleValues()
{
    // Instantiation
    double expected = 9;

    // Action
    double actual = Calculator.Addition(3, 6);

    // Assertion
    Assert.Equal(expected, actual);
}
Notice how we decorated our test method with the attribute [Fact]. That is because there are mainly two different types of test methods:
- Facts are tests which are always true. They test invariant conditions.
- Theories are tests which are only true for a particular set of data.
We will start by testing a Fact because we know, for sure, that 3 plus 6 equals 9. We'll test a Theory after that in this tutorial.
So now, click on the Test > Test Explorer menu option to open the Test Explorer window.

You will notice that our test already appears there:
Run your test!
It's time to run your test! Click on Run All in the Test Explorer window. Wait a couple seconds for the projects to build and the test to run. Then you will notice that the test has actually passed!

This was an actual test that asserts that if you pass a 3 and a 6 to the Addition method, it should return 9.
Perform unit test using the Theory attribute
Even though this was very simple, it illustrates the basics of how Facts are developed and tested against our code. But we will now perform a more close to the real-world test, where we want to test Theories that challenge our code against several different set of values, thus actually testing different scenarios that our methods could, would, or should stumble upon. So, we'll change our Fact to a Theory.
Develop the test method
Theories usually test different scenarios, or values, of data. We need to pass these values to our test method. In order to do that, we use the [InlineData] attribute. This attribute will set the different scenarios that will test the different values of our data. We will now add some of these scenarios to our method:
[Theory]
[InlineData(3, 6, 9)]
[InlineData(4, 3, 7)]
[InlineData(-10, 10, 0)]
[InlineData(34, 5.33, 39.33)]
[InlineData(-10, -10, -20)]
public void Addition_ShouldCalculateSimpleValues(double num1, double num2, double expected)
{
    // Action
    double actual = Calculator.Addition(num1, num2);

    // Assertion
    Assert.Equal(expected, actual);
}
Notice the changes we made to our method. We have added three new parameters in order to receive the values from our Theory. Plus, calling our actual method, it passes the parameters making it more real-worldish.
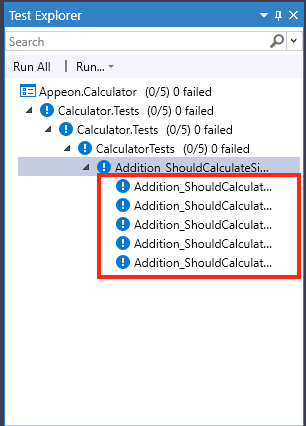
If we do a build to our solution (Press F6), you will notice that now, each one of, the InlineData attributes we added have become tests in our Test Explorer window.
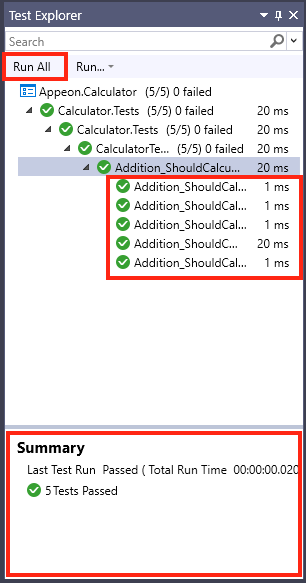
Run your test!
We can now click on Run All again to run all our tests. They should all pass!
Fix a failed test
So far we have tested theories that all pass. But what if one of them didn't? Well, that's the whole purpose of this approach. How to tackle a test that doesn't pass? What to do next? Well… let's see another test method example:
[Theory]
[InlineData(8, 4, 2)]
[InlineData(-9, 3, -3)]
[InlineData(15, 0, 0)]
public void Division_ShouldCalculateSimpleValues(double num1, double num2, double expected)
{
    // Action
    double actual = Calculator.Division(num1, num2);

    // Assertion
    Assert.Equal(expected, actual);
}
This testing method example, tests three theories of the Division method.
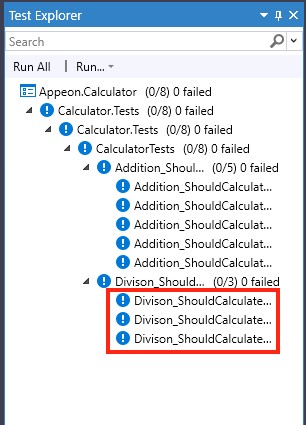
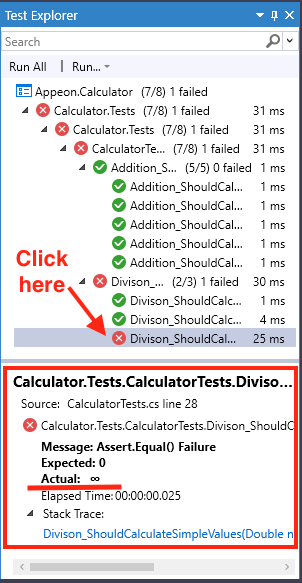
If we run these tests, you'll notice that one of them fails.
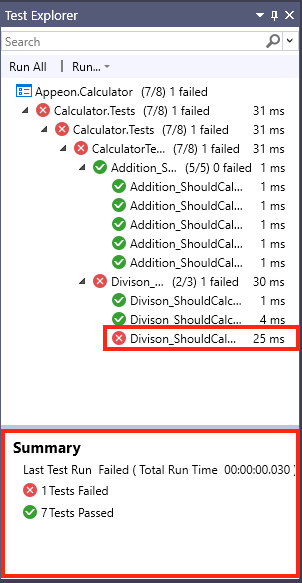
But this is actually useful information, because it is telling us that our method is not prepared to divide by zero and return a zero. It is actually returning undetermined or infinite.
This means that we need to refactor our code so that it can pass this particular test too. And this is where we actually make changes to our Calculator class in order to comply with all the requirements, or tests, that our method should.
Calculator.cs
public static double Division(double num1, double num2)
{
    if (num2 == 0)
    {
        // Refactored logic for Division by zero
        return 0;
    }
    else
    {
        return num1 / num2;
    }
}
And, since we now know for a Fact that all divisions by zero should return zero, then we can make that test a Fact:
CalculatorTests.cs
[Theory]
[InlineData(8, 4, 2)]
[InlineData(-9, 3, -3)]
public void Division_ShouldCalculateSimpleValues(double num1, double num2, double expected)
{
    // Action
    double actual = Calculator.Division(num1, num2);

    // Assertion
    Assert.Equal(expected, actual);
}

[Fact]
public void Division_ShouldDivideByZero()
{
    // Instantiation
    double expected = 0;

    // Action
    double actual = Calculator.Division(15, 0);

    // Assertion
    Assert.Equal(expected, actual);
}
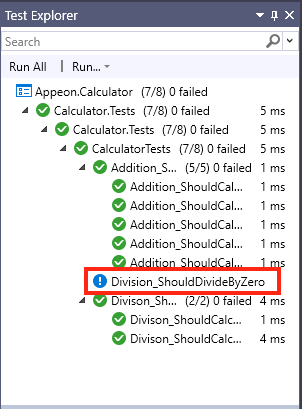
If we build the solution (press F6), the tests in the Test Explorer window will update.
At this point, if we Run All the tests again, then all our tests should pass!
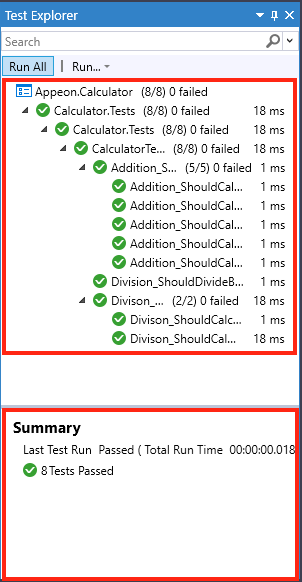
This is exactly what we are aiming for!
Debug your tests
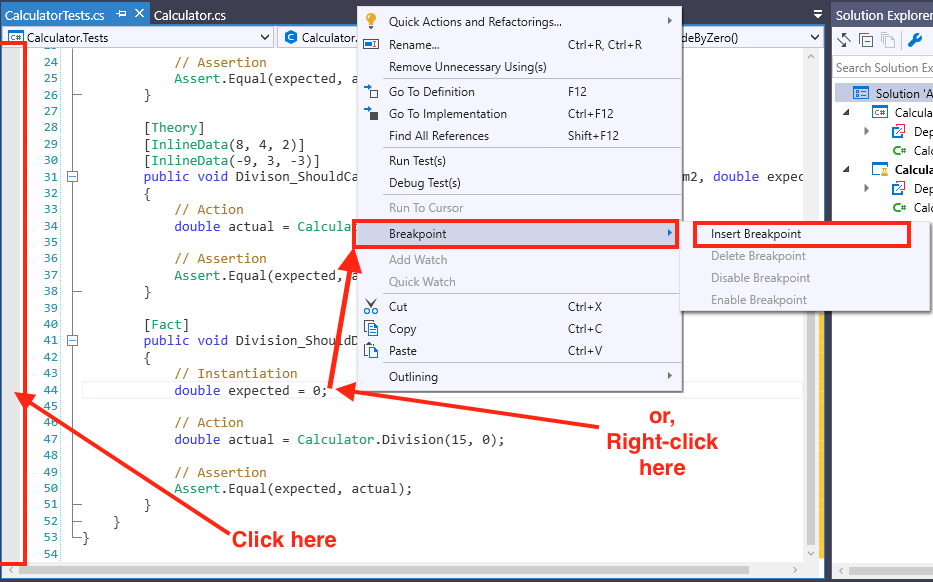
Now that we have several tests, there may be the need to debug a test to make sure that it is actually doing what it is expected to do. This is actually quite simple: First you need to add a breakpoint to your code. You can do that by clicking on the grey sidebar on the Code Editor window in the line you want to add the breakpoint to, or by right-clicking on the line of code where you want to insert the breakpoint, and then selecting Add > Insert breakpoint.
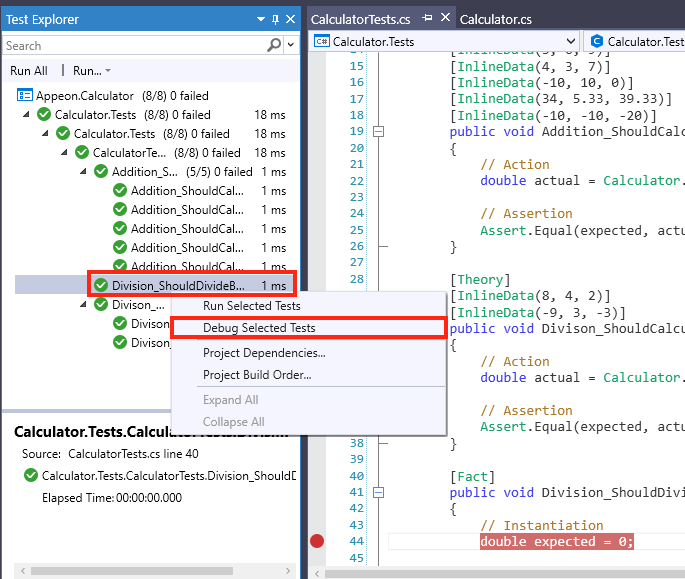
Then Right-click on the test you want to debug, and select Debug Selected Tests.
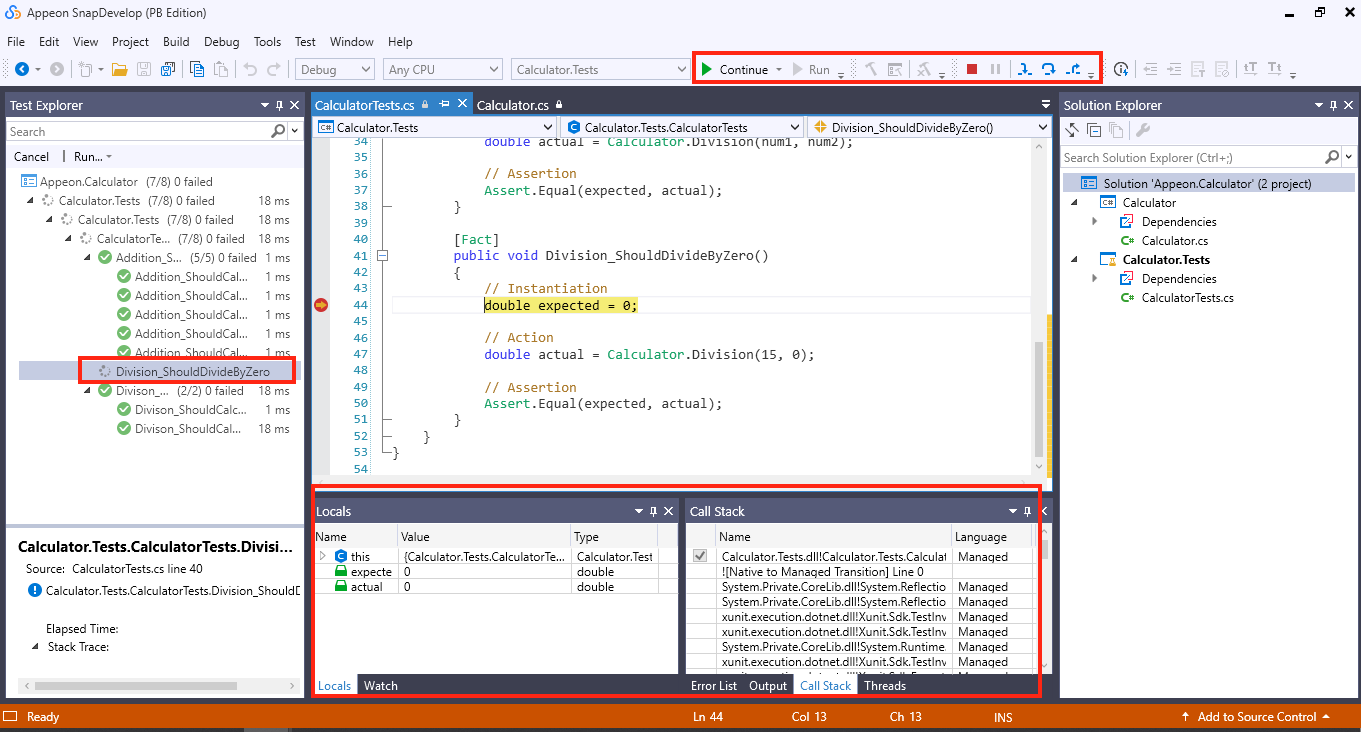
Now you can continue debugging your code as you would normally do.
Final notes
Keep in mind that:
- You should develop your code to pass your tests, not develop your tests so that your code can pass your tests.
- You want to create tests for as many possible scenarios (Facts and Theories) as you can. This provides confidence that you will deploy better working code to production.
- Your testing project (Calculator.Tests in this tutorial) is not necessarily needed in a production environment. In fact, in most cases, it can be a big No, no!
- xUnit Test projects are actually projects that will assist you to develop better working code from the very beginning.
We encourage you to continue creating tests for this Calculator class to better grasp the concepts mentioned in this tutorial.