If you are packaging the stand-alone mobile projects (for iOS and Android), you only need to go through the part-1 preparation (Preparing for the mobile package (part 1)).
If you are customizing and packaging the Appeon Workspace, you need to go through both part-1 (Preparing for the mobile package (part 1)) and part-2 preparations (Preparing for the mobile package (part 2)).
Before you package the iOS application, make the following preparations accordingly:
-
(Required) Register for an Apple ID.
You can follow the onscreen instructions on My Apple ID to create an Apple ID if you do not have one.
-
(Required) Prepare a Mac machine with the latest Xcode installed.
The Package Wizard will generate an Xcode project which you will need to compile into the IPA file using Xcode. More instructions are provided in the section called “Task 1.2: Prepare the Mac machine” in PowerServer Mobile Tutorials.
Note that if you have used the Payment APIs in the application, make sure you compile the application using Xcode 5.1 or above, otherwise Payment APIs will not work.
-
(Required) Enroll in an iOS Developer program.
The iOS Developer program determines how you can distribute the app. More instructions are provided in the section called “Task 1.3: Enroll in an iOS Developer Program” in PowerServer Mobile Tutorials.
-
(Required) Create an App ID.
It is strongly recommended that you consistently use the same App ID in every place that requires you to input an App ID. This is mainly for the following two reasons: 1) Using the same App ID when packaging the iOS applications can help PowerServer determine whether the apps are running on the same device, so PowerServer can correctly manage the device sessions in the license file. 2) Using the same App ID when working with Xcode can eliminate the likelihood of conflicts between the certificate and the provisioning profile.
Instructions for creating an App ID are provided in the section called “Task 1.4: Create an App ID” in PowerServer Mobile Tutorials.
-
(Required) Create & install a distribution certificate & a distribution provisioning profile.
More instructions are provided in the section called “Task 1.5: Create & install a distribution certificate” in PowerServer Mobile Tutorials and the section called “Task 1.6: Create & install a distribution provisioning profile” in PowerServer Mobile Tutorials.
-
(Optional) Prepare the icons/images for your application.
You can provide you own app icons, settings icons, spotlight icons, and launch images for your iOS application. If you do not provide the icons and images, the Package Wizard will use the default ones.
-
App icons, spotlight icons, and settings icons: Refer to App Icon for the size requirement for different iOS devices.
-
Launch images: Refer to Launch Image for the size requirement for different iOS devices.
It is optional to reduce the iOS status bar (20 pixels for standard display and 40 pixels for retina display) for the launch image, for example, 1004 x 768 pixels as the launch image for standard display in landscape on iPad.
-
Before you package the Android application, make the following preparations accordingly:
The Android operating system requires that all installed applications be digitally signed with a certificate whose private key is held by the application's developer and uses the certificate as a means of identifying the author of an application and establishing trust relationships between applications. You can either use the default keystore file generated by Appeon or use the Keytool utility included in the Java Development Kits (JDK) to generate your private key. For details, refer to http://developer.android.com/tools/publishing/app-signing.html.
If you choose to use the keystore file provided by Appeon, you can bypass this section and go ahead to create the Android package, the Appeon keystore file will be automatically used by default.
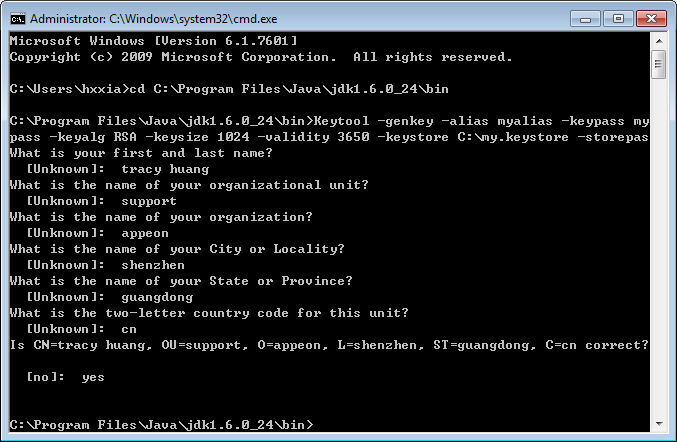
Here is an example of a Keytool command that generates a private key (you can execute the command in any folder if the JAVA_HOME environment variable correctly points to the JDK directory, otherwise, you should first change to the JDK bin directory (using the "cd" command as shown below), and then execute the Keytool command there):
cd C:\Program Files\Java\jdk1.6.0_24\bin
Keytool -genkey -alias myalias -keypass mypass -keyalg RSA -keysize 1024 -validity 3650 -keystore C:\my.keystore -storepass mypass
The Keytool command prompts you to provide the owner information.
After the keystore file is generated, remember the file name and location (C:\my.keystore in the above example) and the password, as you will need to include the keystore file when packaging the application later. To include the file, specify the relevant information in the App Signing section in the PowerServer Application Package Wizard.
If you plan to provide the Google Maps functionality in the application, you would need to register for a Google Maps API key first and then include the key when packaging the application in the PowerServer Application Package Wizard. The key is free and you can use it with any of your applications that call the Map APIs (for how to call Map APIs, see the section called “Map” in Workarounds & APIs Guide), and it supports an unlimited number of users.
Below are instructions for generating the Google Map API key in the Google Developers Console.
-
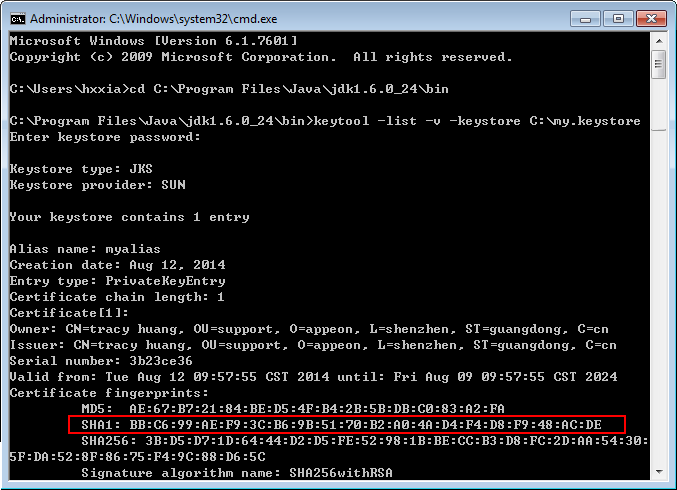
Obtain the SHA1 fingerprint of the keystore file that will be used to sign the application.
The keystore file should have already been generated, if not, follow instructions in the previous section Obtain a private key to generate a keystore file. Make sure you have installed JDK so the Keytool utility included in it is available to use.
Here is an example of a Keytool command that retrieves the SHA1 fingerprint of the keystore file (you can execute the command in any folder if the JAVA_HOME environment variable correctly points to the JDK directory, otherwise, you should first change to the JDK bin directory (using the "cd" command as shown below), and then execute the Keytool command there):
cd C:\Program Files\Java\jdk1.6.0_24\bin
keytool -list -v -keystore C:\my.keystore
-
Turn on the Google Maps APIs.
You should register for a Google developer account first if you do not have one, as you will need to log into the Google Developers Console (https://code.google.com/apis/console) to turn on the Google Maps API and create the key.
-
Log into the Google Developers Console.
-
Click Create Project to create a new project for Google Maps API, or use an existing project.
-
Click APIs under APIs & AUTH on the left navigation pane, and then click the switch indicator on the right to turn on Google Maps Android API v2 and Google Maps Coordinate API on the right side.
-
-
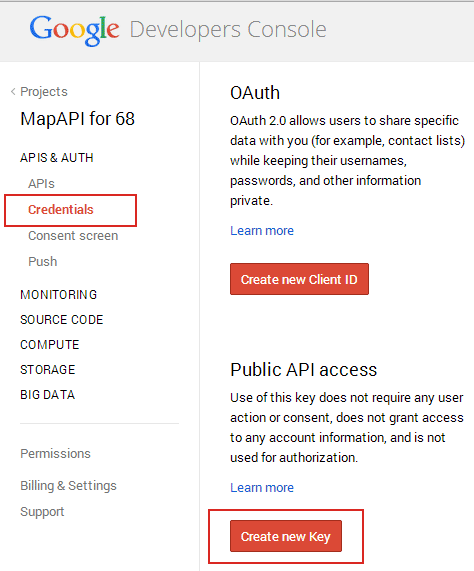
Create the API key that binds with the specified application(s).
-
In the Google Developers Console, click Credentials under APIs & AUTH on the left navigation pane, and then click Create new key under Public API access on the right.
-
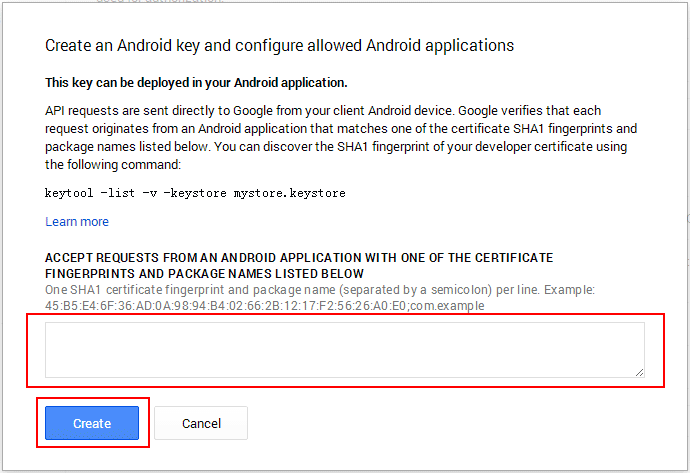
In the popup Create a new key dialog, click Android key.
-
Input the SHA1 fingerprint and the application name (separated by a semicolon) per line in the text box, and then click Create.
Notes:
-
The same application name must be specified as the App Identifier in the PowerServer Application Package Wizard later.
-
The generated API key should be included in the application. To do this, specify the key in the Map API Key field in PowerServer Application Package Wizard later.
-
-


You can provide you own app icons and splash/launch images for your Android application. If you do not provide the icons and images, the Package Wizard will use the default ones.
Android powers a variety of devices with different screen sizes and densities, in order to get a proper UI look on those different screens, you may need to provide different app icons and splash/launch images for your app.
-
App Icons: Refer to App Icon for the size requirement for different Android screens.
-
Splash/Launch Images: Refer to Splash Image for the size requirement for different Android screens.
