The deployment process of an application contains three major deployment tasks. Different deployment modes perform different tasks. The following table describes the tasks performed during each deployment mode.
Table 30. Different tasks performed during each deployment mode
|
Deployment Task |
Full Deployment |
Incremental Deployment |
Deploy Already Generated Application |
|---|---|---|---|
|
Task 1: Application Source Code Export Exports the source code of the original PowerBuilder application. |
Y |
Y |
N |
|
Task 2: Application File Generation Analyzes unsupported features and generates Web or mobile application files. |
Y |
Y (Partial) |
N |
|
Task 3: Web or Mobile Deployment Deploys the generated Web or mobile application files to Appeon Server. |
Y |
Y (Partial) |
Y |

As shown in the above figure, the application to be deployed is the sales_application_demo, and the deployment mode is Full Application Deployment.
The following are the complete steps in the deployment process:
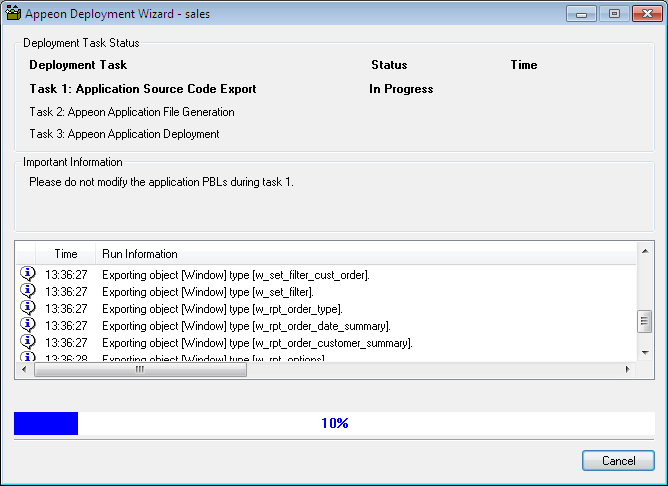
Step 1: Click Next. The Appeon Deployment Wizard begins Task 1, Application Source Code Export, as shown in the following figure.
After Task 1 is completed, Task 2, Application File Generation, will automatically start (as shown in the following figure) if the Unattended Deployment option is selected, otherwise, you must click Next at the bottom of the Appeon Deployment Wizard to begin Task 2.

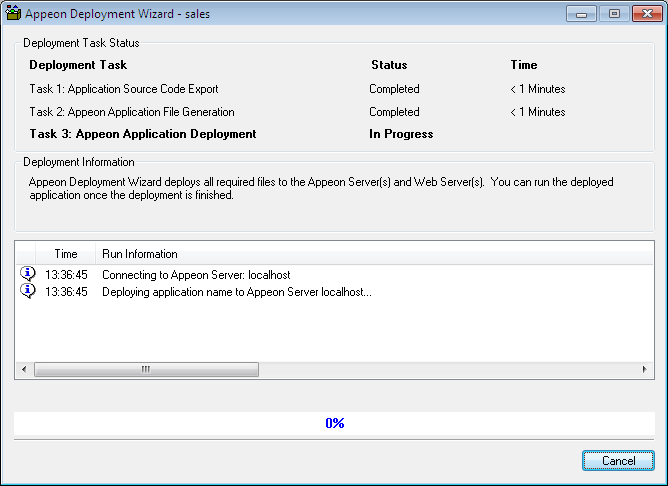
After Task 2 is completed, Task 3, Web or Mobile Deployment, will automatically start (as shown in the following figure), or click Next at the bottom of the Appeon Deployment Wizard to begin Task 3 if the Unattended Deployment option is not selected.
Confirm that the Web Server and Appeon Server have been started and correctly configured in Appeon Developer Configuration; otherwise, deployment will fail. If deployment fails, a Retry button appears so you can retry Task 3 without running through a full deployment again.
Click the Cancel button or press the Esc key to terminate Task 3. If you cancel Task 3 during a Full Deployment, only some of the application files will have been uploaded to the server and the application will not run correctly. To correct this, select Incremental Deployment or Deploy Already Generated Application as the deployment mode the next time you attempt to deploy the application.
Step 2: After Task 3 has been completed, click the Next button at the bottom of the Appeon Deployment Wizard to display the deployment report page, as shown in the following figure.

Table 31. Deployment report page
|
Element |
Description |
|---|---|
|
Deployment Information |
Displays the name of the application deployed, the deployment mode used, and the deployment profile used. |
|
Deployment Task Summary |
Displays the status and time of each of the three deployment tasks, as well as the total time for the entire PowerBuilder-to-Web or PowerBuilder-to-mobile conversion process. |
|
Log Information |
Displays the number of errors and warnings that occurred during the deployment process. Click the View Log button to view the errors and warnings generated during the deployment process. The log file can be managed in the Information Manager. For detailed instructions, refer to Using Information Manager. |
|
Available Reports |
Displays the reports (Analysis Report) generated during the deployment process (mainly Task 2). Analysis Report button: This report is available if the Generate Unsupported Feature Analysis Report option on the Appeon Deployment Wizard is selected before deployment. After you click this button, the UFA Report Window will be displayed. For detailed instructions, refer to the section called “Working with UFA Report”. |
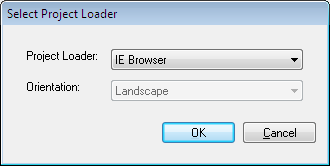
Step 3: Click the Finish button to close the Appeon Deployment Wizard, or click Finish and Debug to close the Appeon Deployment Wizard and open Appeon Debugger to debug the application, or click the Finish and Run button to close the Appeon Deployment Wizard, and then select a project loader from the dialog box that appears to automatically launch the newly deployed application.
Note: When you click Finish and Debug or Finish and Run to run the application, please make sure the database connection from Appeon Server to the database server has been properly configured. For detailed instructions, refer to the Database Connection Setup in Appeon Server Configuration Guide for .NET or in Appeon Server Configuration Guide for J2EE.